Instruction Manual
Page 7
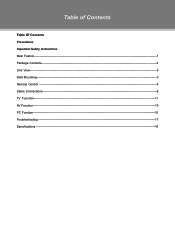
Table of Contents Table Of Contents Precautions Important Safety Instructions Main Feature 1 Package Contents 2 Unit View 3 Wall Mounting 3 Remote Control 4 Cable Connections 6 TV Function 11 AV Function 15 PC Function 16 Troubleshooting 17 Specifications 18
Table of Contents Table Of Contents Precautions Important Safety Instructions Main Feature 1 Package Contents 2 Unit View 3 Wall Mounting 3 Remote Control 4 Cable Connections 6 TV Function 11 AV Function 15 PC Function 16 Troubleshooting 17 Specifications 18
Instruction Manual
Page 8
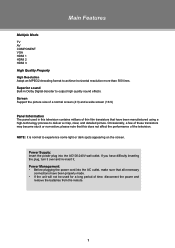
... some light or dark spots appearing on the screen. Screen Support the picture size of time, disconnect the power and remove the batteries from the remote. 1 If you have been properly made. •• If the unit will not be used for a long period of a normal screen (4:3) and a wide screen (16...
... some light or dark spots appearing on the screen. Screen Support the picture size of time, disconnect the power and remove the batteries from the remote. 1 If you have been properly made. •• If the unit will not be used for a long period of a normal screen (4:3) and a wide screen (16...
Instruction Manual
Page 9
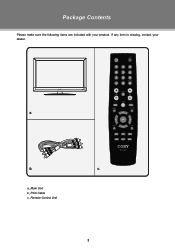
a, Main Unit b, RCA Cable c, Remote Control Unit 2 b. If any item is missing, contact your product. c. a. Package Contents Please make sure the following items are included with your dealer.
a, Main Unit b, RCA Cable c, Remote Control Unit 2 b. If any item is missing, contact your product. c. a. Package Contents Please make sure the following items are included with your dealer.
Instruction Manual
Page 10
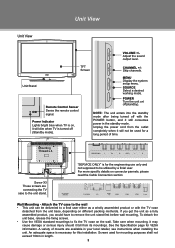
... for a long period of mounts are connecting the TV case to be utilized by a finial user. TFT Screen CHANNEL +/Skip channels. Unit Stand Remote Control Senser Sense the remote control signal. For more specific details on the wall. Mounting Thread x 4. A variety of time. Power Indicator Lights bright blue when TV is on...
... for a long period of mounts are connecting the TV case to be utilized by a finial user. TFT Screen CHANNEL +/Skip channels. Unit Stand Remote Control Senser Sense the remote control signal. For more specific details on the wall. Mounting Thread x 4. A variety of time. Power Indicator Lights bright blue when TV is on...
Instruction Manual
Page 11
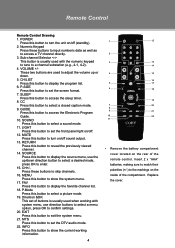
..., press OK to turn on /off. 12. SOURCE Press this button to set of the compartment. CH/LIST Press this button to a channel substation (e.g., 4-1, 4-2). 4. Remote Control Remote Control Drawing 1. Direction &OK This set the front panel light on /off (standby). 2. CH+/Press these buttons to input numberic data as well as to...
..., press OK to turn on /off. 12. SOURCE Press this button to set of the compartment. CH/LIST Press this button to a channel substation (e.g., 4-1, 4-2). 4. Remote Control Remote Control Drawing 1. Direction &OK This set the front panel light on /off (standby). 2. CH+/Press these buttons to input numberic data as well as to...

Instruction Manual
Page 12
...;F). Insert 2 x "AAA" batteries, making sure to match their polarities (+/-) to the markings on the inside of the remote control. Replace the batteries if the remote control does not work. Warnings: The battery used for approximately 6 months under the normal use this device may vary depending on... the brightness around. Operate the remote within 20 feet of time. Notes: 111 Do not point bright lights directly at an angle of any other equipment. 5 Replace the ...
...;F). Insert 2 x "AAA" batteries, making sure to match their polarities (+/-) to the markings on the inside of the remote control. Replace the batteries if the remote control does not work. Warnings: The battery used for approximately 6 months under the normal use this device may vary depending on... the brightness around. Operate the remote within 20 feet of time. Notes: 111 Do not point bright lights directly at an angle of any other equipment. 5 Replace the ...
Instruction Manual
Page 21
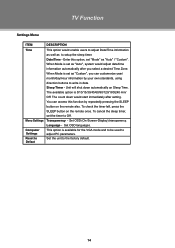
.../ month/day/Hour information by repeatedly pressing the SLEEP button on Sleep Time. To check the timer left, press the SLEEP button on the remote once. To cancel the sleep timer, set as "Auto", system would adjust date/time information automatically after setting. Transparency - Set OSD languages.... The count down automatically on the remote also. This option is set the timer to setup the sleep timer. When Mode is available for the VGA mode and to be used ...
.../ month/day/Hour information by repeatedly pressing the SLEEP button on Sleep Time. To check the timer left, press the SLEEP button on the remote once. To cancel the sleep timer, set as "Auto", system would adjust date/time information automatically after setting. Transparency - Set OSD languages.... The count down automatically on the remote also. This option is set the timer to setup the sleep timer. When Mode is available for the VGA mode and to be used ...
Instruction Manual
Page 24
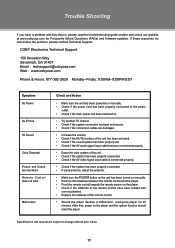
... and the player. •• Point the remote control towards the remote sensor on the player. •• Check if the batteries of the remote control. •• Should the player develop a malfunction, unplug the player for Frequently Asked Questions (FAQs) and firmware updates. COBY Electronics Technical Support 150 Knowlton Way Savannah, GA 31407...
... and the player. •• Point the remote control towards the remote sensor on the player. •• Check if the batteries of the remote control. •• Should the player develop a malfunction, unplug the player for Frequently Asked Questions (FAQs) and firmware updates. COBY Electronics Technical Support 150 Knowlton Way Savannah, GA 31407...


