Instruction Manual
Page 2
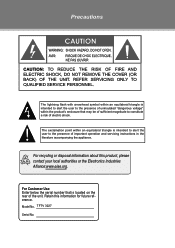
Precautions The lightning flash with arrowhead symbol within an equilateral triangle is intended to alert the user to the presence of uninsulated "dangerous voltage" within an equilateral triangle is located on the rear of the unit. Retain this product, please contact your local ... is intended to alert the user to constitute a risk of important operation and servicing instructions in the literature accompanying the appliance. For Customer Use: Enter below the serial number that may be of sufficient magnitude to the presence of electric shock. Model No. For recycling or disposal...
Precautions The lightning flash with arrowhead symbol within an equilateral triangle is intended to alert the user to the presence of uninsulated "dangerous voltage" within an equilateral triangle is located on the rear of the unit. Retain this product, please contact your local ... is intended to alert the user to constitute a risk of important operation and servicing instructions in the literature accompanying the appliance. For Customer Use: Enter below the serial number that may be of sufficient magnitude to the presence of electric shock. Model No. For recycling or disposal...
Instruction Manual
Page 3
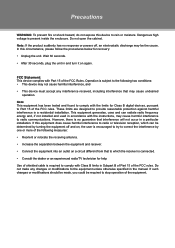
... not expose this equipment does cause harmful interference to radio or television reception, which the receiver is connected. •• Consult the dealer or an experienced radio/TV technician for help Use of shielded cable is subject to the following measures: •• Reorient or relocate the receiving antenna. •• Increase the separation between the equipment and...
... not expose this equipment does cause harmful interference to radio or television reception, which the receiver is connected. •• Consult the dealer or an experienced radio/TV technician for help Use of shielded cable is subject to the following measures: •• Reorient or relocate the receiving antenna. •• Increase the separation between the equipment and...
Instruction Manual
Page 4
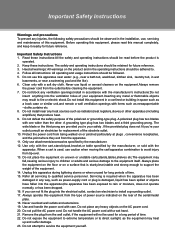
... the installation, use, servicing and maintenance of this manual completely, and keep it nearby for replacement of the obsolete outlet. 1111 Protect the power cord from being walked on or pinched particularly at plugs , convenience receptacles, and the point where they exit from the type of the serial/model plate. 1111 Never overload wall outlets and extensions. 1111 Use and handle the power cord with...
... the installation, use, servicing and maintenance of this manual completely, and keep it nearby for replacement of the obsolete outlet. 1111 Protect the power cord from being walked on or pinched particularly at plugs , convenience receptacles, and the point where they exit from the type of the serial/model plate. 1111 Never overload wall outlets and extensions. 1111 Use and handle the power cord with...
Instruction Manual
Page 5
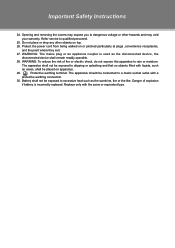
... used as the sunshine, fire or the like. Refer service to rain or moisture. Replace only with the same or equivalent type. Danger of fire or electric shock, do not expose this apparatus to qualified personnel. 2222 Do not place or drop any other hazards and may void your warranty. Important Safety Instructions 2222 Opening and removing...
... used as the sunshine, fire or the like. Refer service to rain or moisture. Replace only with the same or equivalent type. Danger of fire or electric shock, do not expose this apparatus to qualified personnel. 2222 Do not place or drop any other hazards and may void your warranty. Important Safety Instructions 2222 Opening and removing...
Instruction Manual
Page 6
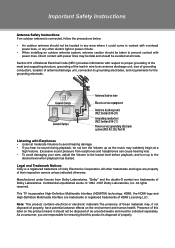
... supporting structure, grounding of the lead-in wire to an antenna discharge unit, size of grounding conductors, location of antenna discharge unit, connection to avoid hearing damage. •• If you are trademarks or registered trademarks of HDMI Licensing LLC. Section 810 of National Electrical Code (NEC) provides information with power lines may , if not disposed of their respective owners...
... supporting structure, grounding of the lead-in wire to an antenna discharge unit, size of grounding conductors, location of antenna discharge unit, connection to avoid hearing damage. •• If you are trademarks or registered trademarks of HDMI Licensing LLC. Section 810 of National Electrical Code (NEC) provides information with power lines may , if not disposed of their respective owners...
Instruction Manual
Page 8
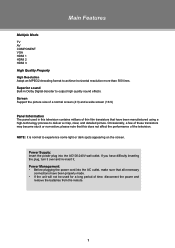
...;• Before plugging the power cord into the AC100-240V wall outlet. Main Features Multiple Mode TV AV COMPONENT VGA HDMI 1 HDMI 2 HDMI 3 High Quality Property High Resolution Adopt an MPEG2 decoding format to deliver a crisp, clear, and detailed picture. If you have been properly made. •• If the unit will not be used in Dolby Digital decoder to experience some light or dark...
...;• Before plugging the power cord into the AC100-240V wall outlet. Main Features Multiple Mode TV AV COMPONENT VGA HDMI 1 HDMI 2 HDMI 3 High Quality Property High Resolution Adopt an MPEG2 decoding format to deliver a crisp, clear, and detailed picture. If you have been properly made. •• If the unit will not be used in Dolby Digital decoder to experience some light or dark...
Instruction Manual
Page 10
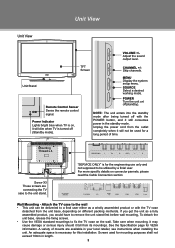
... local retailer, see instructions when installing the unit. Unit View Unit View VOLUME +/Adjust the sound output level. If you got the unit as a wholly assembled product or with the POWER button, and it will not be utilized by a finial user. A variety of time. TFT Screen CHANNEL +/Skip channels. POWER Turn the unit on connector pannels, please read the Cable Connection section Wall Mounting - Screw X3 These screws are available in length. 3 Screws used for VESA informaiton.
... local retailer, see instructions when installing the unit. Unit View Unit View VOLUME +/Adjust the sound output level. If you got the unit as a wholly assembled product or with the POWER button, and it will not be utilized by a finial user. A variety of time. TFT Screen CHANNEL +/Skip channels. POWER Turn the unit on connector pannels, please read the Cable Connection section Wall Mounting - Screw X3 These screws are available in length. 3 Screws used for VESA informaiton.
Instruction Manual
Page 11
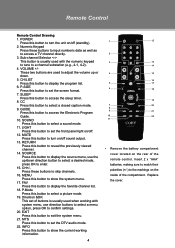
... buttons to input numberic data as well as to set the screen format. 7. POWER Press this button to access a TV channel directly. 3. CH/LIST Press this button to display the program list. 6. SOUND Press this button to select a sound mode. 11. Insert 2 x "AAA" batteries, making sure to match their polarities (+/-) to enter. 15. P-SIZE Press this button to set the DTV audio mode. 22. SLEEP Press this button to access the sleep timer. 8. GUIDE Press this button to access the Electronic Program Guide. 10. MENU...
... buttons to input numberic data as well as to set the screen format. 7. POWER Press this button to access a TV channel directly. 3. CH/LIST Press this button to display the program list. 6. SOUND Press this button to select a sound mode. 11. Insert 2 x "AAA" batteries, making sure to match their polarities (+/-) to enter. 15. P-SIZE Press this button to set the DTV audio mode. 22. SLEEP Press this button to access the sleep timer. 8. GUIDE Press this button to access the Electronic Program Guide. 10. MENU...

Instruction Manual
Page 12
... sensor and at the remote sensor of ±30 degrees. 7 s The operating distance may present a fire or chemical burn if mistreated. Do not mix old with new batteries, or different types of any other equipment. 5 Do not recharge, disassemble, incinerate, or heat the battery (~212ºF). Remote Control Remote Control Preparation •• Remove the battery compartment cover located on the rear...
... sensor and at the remote sensor of ±30 degrees. 7 s The operating distance may present a fire or chemical burn if mistreated. Do not mix old with new batteries, or different types of any other equipment. 5 Do not recharge, disassemble, incinerate, or heat the battery (~212ºF). Remote Control Remote Control Preparation •• Remove the battery compartment cover located on the rear...
Instruction Manual
Page 13
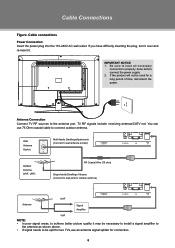
... have all necessary connections properly done before connect the power supply. 222 If the product will not be split for outdoor antenna) UHF Antenna Signal Amplifier VHF NOTE: •• In poor signal areas, to achieve better picture quality it . You can use an antenna signal splitter for a long period of time, disconnect the power. Cable Connections Figure. Cable connections Power Connection Insert the power plug into the 110-240V AC wall outlet.
... have all necessary connections properly done before connect the power supply. 222 If the product will not be split for outdoor antenna) UHF Antenna Signal Amplifier VHF NOTE: •• In poor signal areas, to achieve better picture quality it . You can use an antenna signal splitter for a long period of time, disconnect the power. Cable Connections Figure. Cable connections Power Connection Insert the power plug into the 110-240V AC wall outlet.
Instruction Manual
Page 15
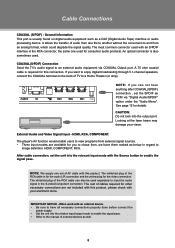
... transfer of external devices as PCM via COAXIAL Output port. An optical connector is also sometimes used separately to a Home Theater (or amp). HDMI, RCA, COMPONENT. The player's AV function would enable users to view programs from an analog format, which could degrade the signal quality. IMPORTANT NOTICE - When work with this product, please check with the Source button to an external audio equipment via "Digital Audio/SPDIF" option under the "Audio Menu".
... transfer of external devices as PCM via COAXIAL Output port. An optical connector is also sometimes used separately to a Home Theater (or amp). HDMI, RCA, COMPONENT. The player's AV function would enable users to view programs from an analog format, which could degrade the signal quality. IMPORTANT NOTICE - When work with this product, please check with the Source button to an external audio equipment via "Digital Audio/SPDIF" option under the "Audio Menu".
Instruction Manual
Page 16
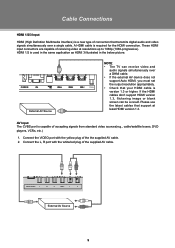
... cables that support at resolutions up to 1080p (1080-progressive). These HDMI input connectors are capable of the supplied AV cable. / 5 External AV Source 9 If the HDMI cables don't support HDMI version 1.3, flickering image or blank screen can receive video and audio signals simultaneously over a DHMI cable. •• If the external AV device does not support Auto HDMI, you must set the output resolution appropriately. •• Check that transmits digital audio and video signals simultaneously over a single cable. HDMI 1/2 is used...
... cables that support at resolutions up to 1080p (1080-progressive). These HDMI input connectors are capable of the supplied AV cable. / 5 External AV Source 9 If the HDMI cables don't support HDMI version 1.3, flickering image or blank screen can receive video and audio signals simultaneously over a DHMI cable. •• If the external AV device does not support Auto HDMI, you must set the output resolution appropriately. •• Check that transmits digital audio and video signals simultaneously over a single cable. HDMI 1/2 is used...
Instruction Manual
Page 17
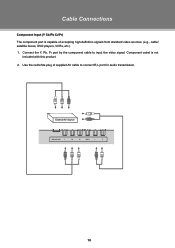
External AV Source 10 Cable Connections Component Input (Y Cb/Pb Cr/Pr) The component port is not included with this product. 222 Use the red/white plug of accepting high-definition signals from standard video sources. (e.g., cable/ satellite boxes, DVD players, VCRs, etc.) 111 Connect the Y, Pb, Pr port by the component cable to connect R,L port for audio transmission. Component cabel is capable of supplied AV cable to input the video signal.
External AV Source 10 Cable Connections Component Input (Y Cb/Pb Cr/Pr) The component port is not included with this product. 222 Use the red/white plug of accepting high-definition signals from standard video sources. (e.g., cable/ satellite boxes, DVD players, VCRs, etc.) 111 Connect the Y, Pb, Pr port by the component cable to connect R,L port for audio transmission. Component cabel is capable of supplied AV cable to input the video signal.
Instruction Manual
Page 18
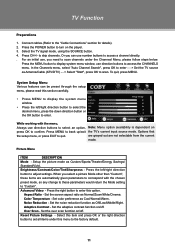
... access the CHANNELS menu. When you need to scan channels under this option. Adaptive Contrast - Reset Picture Settings - Or you can be preset through the setup menu, please read this section carefully. •• Press MENU to display the system menu window. •• Press the left /right direction button to adjust settings. Setup the picture mode as Normal/Zoom/Wide/Cinema. Noise Reduction - While working with the chosen preset mode, so any change...
... access the CHANNELS menu. When you need to scan channels under this option. Adaptive Contrast - Reset Picture Settings - Or you can be preset through the setup menu, please read this section carefully. •• Press MENU to display the system menu window. •• Press the left /right direction button to adjust settings. Setup the picture mode as Normal/Zoom/Wide/Cinema. Noise Reduction - While working with the chosen preset mode, so any change...
Instruction Manual
Page 19
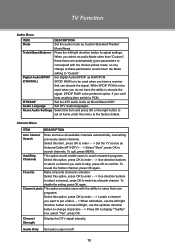
..." Digital Audio/SPDIF Set Digital Audio/SPIDIF as Custom/Standard/Theater/ Music/News. Channel Labels This option provides users with the chosen preset mode, so any change characters - -> Press OK to PCM MTS/SAP Set the ATV audio mode as a favorite channel. SPIDIF RAW is the preferred option, if you can decode the signal. Reset Audio Settings Select this item, press OK to enter - - > Set the TV source as Antenna/Cable...
..." Digital Audio/SPDIF Set Digital Audio/SPIDIF as Custom/Standard/Theater/ Music/News. Channel Labels This option provides users with the chosen preset mode, so any change characters - -> Press OK to PCM MTS/SAP Set the ATV audio mode as a favorite channel. SPIDIF RAW is the preferred option, if you can decode the signal. Reset Audio Settings Select this item, press OK to enter - - > Set the TV source as Antenna/Cable...
Instruction Manual
Page 20
... the right direction button to lock unrated TV program. E, C, C8+, G, PG, 14+, 18+. Please remember the password since the player's reset function would enable users to access the Closed Caption menu. Set the analog caption type as "Custom" to edit CC type to back up menu. Block Unrated TV -This option would not revert the password. There are TV Rating and Movie Rating, Use direction buttons to select the rating...
... the right direction button to lock unrated TV program. E, C, C8+, G, PG, 14+, 18+. Please remember the password since the player's reset function would enable users to access the Closed Caption menu. Set the analog caption type as "Custom" to edit CC type to back up menu. Block Unrated TV -This option would not revert the password. There are TV Rating and Movie Rating, Use direction buttons to select the rating...
Instruction Manual
Page 21
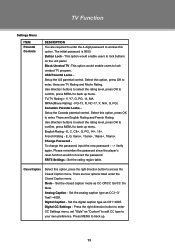
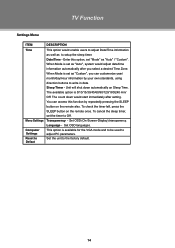
... in data. When Mode is set the timer to adjust Date/Time information as well as "Custom", you select a desired Time Zone. Unit will shut down would enable users to Off. The available option is available for the VGA mode and to be used to the factory default. 14 To check the timer left, press the SLEEP button on the remote also. Set OSD (On-Screen-Display) transparency.
... in data. When Mode is set the timer to adjust Date/Time information as well as "Custom", you select a desired Time Zone. Unit will shut down would enable users to Off. The available option is available for the VGA mode and to be used to the factory default. 14 To check the timer left, press the SLEEP button on the remote also. Set OSD (On-Screen-Display) transparency.
Instruction Manual
Page 22
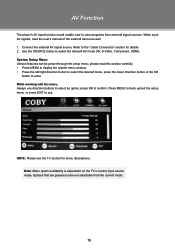
.... 111 Connect the external AV signal source. Note: Menu option availability is dependent on the TV's current input source mode. While working with the menu, Always use direction buttons to select an option, press OK to quit. NOTE: Please see the TV section for details 222 Use the SOURCE button to select the relevant AV mode (AV, S-Video, Component, HDMI). AV Function The player's AV input function would enable user to view programs from...
.... 111 Connect the external AV signal source. Note: Menu option availability is dependent on the TV's current input source mode. While working with the menu, Always use direction buttons to select an option, press OK to quit. NOTE: Please see the TV section for details 222 Use the SOURCE button to select the relevant AV mode (AV, S-Video, Component, HDMI). AV Function The player's AV input function would enable user to view programs from...
Instruction Manual
Page 23
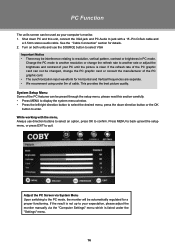
... the best picture quality. While working with a 15 -Pin D-Sub cable and a 3.5mm stereo audio cable. See the "Cable Connection" section for details. 222 Turn on both units and use direction buttons to select an option, press OK to confirm. System Setup Menu Some of cable. PC Function The unit's screen can be used as your computer's monitor. 111 Shut down direction button or the OK button to enter. Change...
... the best picture quality. While working with a 15 -Pin D-Sub cable and a 3.5mm stereo audio cable. See the "Cable Connection" section for details. 222 Turn on both units and use direction buttons to select an option, press OK to confirm. System Setup Menu Some of cable. PC Function The unit's screen can be used as your computer's monitor. 111 Shut down direction button or the OK button to enter. Change...
Instruction Manual
Page 24
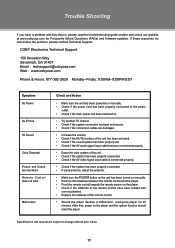
... been activated. •• Check if the sound system has been properly set. •• Check if the AV audio signal input cable has been connected properly. •• Reset the color system of the remote control. •• Should the player develop a malfunction, unplug the player for Frequently Asked Questions (FAQs) and firmware updates. If these resources do not resolve the problem, please contact Technical Support.
... been activated. •• Check if the sound system has been properly set. •• Check if the AV audio signal input cable has been connected properly. •• Reset the color system of the remote control. •• Should the player develop a malfunction, unplug the player for Frequently Asked Questions (FAQs) and firmware updates. If these resources do not resolve the problem, please contact Technical Support.


