User Guide
Page 1
USER GUIDE 8-Port 10/100 Ethernet Switch with Webview Model: SRW208/SRW208G/SRW208L/SRW208P/SRW208MP BUSINESS SERIES
USER GUIDE 8-Port 10/100 Ethernet Switch with Webview Model: SRW208/SRW208G/SRW208L/SRW208P/SRW208MP BUSINESS SERIES

User Guide
Page 2
... Descriptions While reading through the User Guide you may have to add http:// in front of their respective holders. 8-Port 10/100 Ethernet Switch with Webview About This Guide i WEB: This globe icon indicates a noteworthy website address or e-mail address. If you use an older ... description of these icons: NOTE: This check mark indicates that there is a note of interest and is a registered trademark or trademark of Cisco Systems, Inc. Online Resources Website addresses in this document are trademarks or registered trademarks of the web address. and certain other countries. All ...
... Descriptions While reading through the User Guide you may have to add http:// in front of their respective holders. 8-Port 10/100 Ethernet Switch with Webview About This Guide i WEB: This globe icon indicates a noteworthy website address or e-mail address. If you use an older ... description of these icons: NOTE: This check mark indicates that there is a note of interest and is a registered trademark or trademark of Cisco Systems, Inc. Online Resources Website addresses in this document are trademarks or registered trademarks of the web address. and certain other countries. All ...

User Guide
Page 3
... Using the Console Interface 9 Overview 9 Configuring the HyperTerminal Application 9 Connecting to the Switch through a Telnet Session 9 Configuring the Switch through the Console Interface 10 Switch Main Menu 10 System Configuration Menu 10 Port Status 16 Port Configuration 16 Chapter 5:... 20 Daylight Saving 20 SNTP Servers 20 Port Management > Port Settings 20 8-Port 10/100 Ethernet Switch with Webview ii Table of Contents Chapter 1: Introduction 1 Welcome 1 Chapter 2: Product Overview 2 SRW208 - Front Panel 3 SRW208P/SRW208MP - Front Panel 2 SRW208L - Front ...
... Using the Console Interface 9 Overview 9 Configuring the HyperTerminal Application 9 Connecting to the Switch through a Telnet Session 9 Configuring the Switch through the Console Interface 10 Switch Main Menu 10 System Configuration Menu 10 Port Status 16 Port Configuration 16 Chapter 5:... 20 Daylight Saving 20 SNTP Servers 20 Port Management > Port Settings 20 8-Port 10/100 Ethernet Switch with Webview ii Table of Contents Chapter 1: Introduction 1 Welcome 1 Chapter 2: Product Overview 2 SRW208 - Front Panel 3 SRW208P/SRW208MP - Front Panel 2 SRW208L - Front ...

User Guide
Page 4
... Contents Port Configuration Detail 21 Port Management > Link Aggregation 22 Link Aggregation Detail 22 Port Management > LACP 23 Port Management > PoE Power Settings 23 VLAN Management > Create VLAN 24 Single VLAN 24 VLAN Range 24 VLAN Table 24 VLAN Management > Port Settings 24 VLAN Management > Ports to VLAN 25 VLAN Management > VLAN to Ports 25 Join VLAN... 38 QoS > DSCP Settings 38 QoS > Bandwidth 38 QoS > Basic Mode 39 QoS > Advanced Mode 39 Out of Profile DSCP 40 8-Port 10/100 Ethernet Switch with Webview iii
... Contents Port Configuration Detail 21 Port Management > Link Aggregation 22 Link Aggregation Detail 22 Port Management > LACP 23 Port Management > PoE Power Settings 23 VLAN Management > Create VLAN 24 Single VLAN 24 VLAN Range 24 VLAN Table 24 VLAN Management > Port Settings 24 VLAN Management > Ports to VLAN 25 VLAN Management > VLAN to Ports 25 Join VLAN... 38 QoS > DSCP Settings 38 QoS > Bandwidth 38 QoS > Basic Mode 39 QoS > Advanced Mode 39 Out of Profile DSCP 40 8-Port 10/100 Ethernet Switch with Webview iii

User Guide
Page 5
... Upgrade 55 Admin > Reboot 56 Admin > Factory Defaults 56 Admin > Server Logs 56 Admin > Memory Logs 57 Admin > Flash Logs 57 8-Port 10/100 Ethernet Switch with Webview iv
... Upgrade 55 Admin > Reboot 56 Admin > Factory Defaults 56 Admin > Server Logs 56 Admin > Memory Logs 57 Admin > Flash Logs 57 8-Port 10/100 Ethernet Switch with Webview iv

User Guide
Page 6
... Consumer Products Covered by EU Directive 2002/96/EC on Waste Electric and Electronic Equipment (WEEE 76 Appendix G: Contact Information 80 8-Port 10/100 Ethernet Switch with Webview v
... Consumer Products Covered by EU Directive 2002/96/EC on Waste Electric and Electronic Equipment (WEEE 76 Appendix G: Contact Information 80 8-Port 10/100 Ethernet Switch with Webview v

User Guide
Page 7
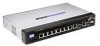
... can provide maximum output power on access point before providing power. while the SRW208P can provide maximum output power per PoE port up to flexibly integrate and manage these types of the WebView switches includes SNMP, RMON, Telnet, and HTTP Management options, allowing you to control network access and traffic flow. 8-Port 10/100...
... can provide maximum output power on access point before providing power. while the SRW208P can provide maximum output power per PoE port up to flexibly integrate and manage these types of the WebView switches includes SNMP, RMON, Telnet, and HTTP Management options, allowing you to control network access and traffic flow. 8-Port 10/100...

User Guide
Page 8
... Front Panel The LEDs and ports are located on the corresponding RJ-45 port (G1) or miniGBIC port (G2). ETHERNET 1-8 The Switch is equipped with Webview Product Overview Front Panel SYSTEM (Green) The system LED lights up to indicate a functional network link through the ...a 100Mbps connection on the corresponding port (1 through 8). Auto-sensing technology enables each port to automatically detect the speed of the Switch. 8-Port 10/100 Ethernet Switch with 8 auto-sensing, Ethernet network ports, which use RJ-45 connectors. Gigabit (Orange) The Gigabit LED lights up to...
... Front Panel The LEDs and ports are located on the corresponding RJ-45 port (G1) or miniGBIC port (G2). ETHERNET 1-8 The Switch is equipped with Webview Product Overview Front Panel SYSTEM (Green) The system LED lights up to indicate a functional network link through the ...a 100Mbps connection on the corresponding port (1 through 8). Auto-sensing technology enables each port to automatically detect the speed of the Switch. 8-Port 10/100 Ethernet Switch with 8 auto-sensing, Ethernet network ports, which use RJ-45 connectors. Gigabit (Orange) The Gigabit LED lights up to...

User Guide
Page 9
... network link through the corresponding port (1 through 8) with the Switch. ETHERNET 1-8 The Switch is equipped with an attached device. SRW208P/SRW208MP - LINK/ACT (1-8) (Green) The LINK/ACT LED lights up to indicate that the Switch is powered on . The Fast Ethernet ports support network speeds... the corresponding port (1 through 8). It flashes to 1000Mbps. Gigabit (Orange) The Gigabit LED lights up to indicate that the Switch is a connection point for more information. G1 The mini-GBIC (gigabit interface converter) port is actively sending or receiving data ...
... network link through the corresponding port (1 through 8) with the Switch. ETHERNET 1-8 The Switch is equipped with an attached device. SRW208P/SRW208MP - LINK/ACT (1-8) (Green) The LINK/ACT LED lights up to indicate that the Switch is powered on . The Fast Ethernet ports support network speeds... the corresponding port (1 through 8). It flashes to 1000Mbps. Gigabit (Orange) The Gigabit LED lights up to indicate that the Switch is a connection point for more information. G1 The mini-GBIC (gigabit interface converter) port is actively sending or receiving data ...

User Guide
Page 10
...link to a high-speed network segment or individual workstation at speeds of up to indicate a Gigabit connection on the back panel of the Switch. They can operate in half and fullduplex modes. Auto-sensing technology enables each port to automatically detect the speed of the device connected to... ports are located on the corresponding RJ-45 port (G1 through G2). Refer to 1000Mbps. ETHERNET 1-8 The Switch is where you can be uplinked via fiber to another switch. Auto-sensing technology enables each port to automatically detect the speed of the device connected to it (10Mbps, ...
...link to a high-speed network segment or individual workstation at speeds of up to indicate a Gigabit connection on the back panel of the Switch. They can operate in half and fullduplex modes. Auto-sensing technology enables each port to automatically detect the speed of the device connected to... ports are located on the corresponding RJ-45 port (G1 through G2). Refer to 1000Mbps. ETHERNET 1-8 The Switch is where you can be uplinked via fiber to another switch. Auto-sensing technology enables each port to automatically detect the speed of the device connected to it (10Mbps, ...

User Guide
Page 11
..., and fluorescent lighting fixtures. •• Position the Switch away from water and moisture sources. •• To ensure adequate air flow around the Switch, be sure to Switch Notebook 1U high rack for the Switch, observe the following diagram shows a typical network configuration. ... mentioned in a standard-sized, 19-inch 8-Port 10/100 Ethernet Switch with Webview 5 Connect the Switch to network devices according to the Switch. Placement Options There are placing the Switch. 4. Positioning the Switch Before you are three ways to the recessed areas on its four ...
..., and fluorescent lighting fixtures. •• Position the Switch away from water and moisture sources. •• To ensure adequate air flow around the Switch, be sure to Switch Notebook 1U high rack for the Switch, observe the following diagram shows a typical network configuration. ... mentioned in a standard-sized, 19-inch 8-Port 10/100 Ethernet Switch with Webview 5 Connect the Switch to network devices according to the Switch. Placement Options There are placing the Switch. 4. Positioning the Switch Before you are three ways to the recessed areas on its four ...

User Guide
Page 12
... 2. Then attach the other bracket to the other than room ambient. Chapter 3 Installation Rack-Mount Placement When rack-mounting the Switch, please observe the following guidelines: •• Elevated Operating Ambient If installed in a closed or multi-unit rack assembly, ...supplied screws. use the screws supplied with Webview 6 To rack-mount the Switch in Rack Attaching the Brackets 8-Port 10/100 Ethernet Switch with the mounting brackets. Place the Switch on overcurrent protection and supply wiring. Appropriate consideration of equipment nameplate ratings should...
... 2. Then attach the other bracket to the other than room ambient. Chapter 3 Installation Rack-Mount Placement When rack-mounting the Switch, please observe the following guidelines: •• Elevated Operating Ambient If installed in a closed or multi-unit rack assembly, ...supplied screws. use the screws supplied with Webview 6 To rack-mount the Switch in Rack Attaching the Brackets 8-Port 10/100 Ethernet Switch with the mounting brackets. Place the Switch on overcurrent protection and supply wiring. Appropriate consideration of equipment nameplate ratings should...

User Guide
Page 13
... print the template from this page at 100% size, cut along the dotted line and place on the wall, the Switch should not be mounted horizontally. Maneuver the Switch so the wall-mount slots line up or down until the screws fit snugly into the wall. The unit should be ... sure the location is not responsible for damages incurred by insecure wall-mounting hardware. 1. Place the wall-mount slots over the screws and slide the Switch down . Ensure that the wall you want to drill precise spacing. Proper Wall-Mount Orientation (Horizontal) NOTE: Linksys is within reach of the power...
... print the template from this page at 100% size, cut along the dotted line and place on the wall, the Switch should not be mounted horizontally. Maneuver the Switch so the wall-mount slots line up or down until the screws fit snugly into the wall. The unit should be ... sure the location is not responsible for damages incurred by insecure wall-mounting hardware. 1. Place the wall-mount slots over the screws and slide the Switch down . Ensure that the wall you want to drill precise spacing. Proper Wall-Mount Orientation (Horizontal) NOTE: Linksys is within reach of the power...

User Guide
Page 14
... are powered off. 2. Connect the other end into an electrical outlet. For detailed instructions, refer to a PC or other end to the Switch, follow these instructions: 1. Chapter 3 Hardware Installation To connect network devices to your PC's serial port. (This PC must be running the ... the network devices connected to the mini-GBIC port. Wait a few seconds and then reconnect it. 8-Port 10/100 Ethernet Switch with the Switch. Use of the Switch. Connect the other network device. 4. If a port has an active Gigabit connection, then its corresponding Gigabit LED will light ...
... are powered off. 2. Connect the other end into an electrical outlet. For detailed instructions, refer to a PC or other end to the Switch, follow these instructions: 1. Chapter 3 Hardware Installation To connect network devices to your PC's serial port. (This PC must be running the ... the network devices connected to the mini-GBIC port. Wait a few seconds and then reconnect it. 8-Port 10/100 Ethernet Switch with the Switch. Use of the Switch. Connect the other network device. 4. If a port has an active Gigabit connection, then its corresponding Gigabit LED will light ...

User Guide
Page 15
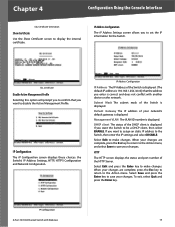
Chapter 4 Configuration Using the Console Interface Chapter 4: Configuration Using the Console Interface Overview The Switch features a menu-driven console interface for basic configuration of the Switch and management of the connection is covered in the User Name field. Click the Start button. 2. ...in the next chapter. Select Programs > Accessories > Communications > HyperTerminal. Configuring the HyperTerminal Application 1. Select a port to the Switch through the web utility, which is SRW208. Bits per Second: 38400 Databits: 8 Parity: None Stop bits: 1 Flow control...
Chapter 4 Configuration Using the Console Interface Chapter 4: Configuration Using the Console Interface Overview The Switch features a menu-driven console interface for basic configuration of the Switch and management of the connection is covered in the User Name field. Click the Start button. 2. ...in the next chapter. Select Programs > Accessories > Communications > HyperTerminal. Configuring the HyperTerminal Application 1. Select a port to the Switch through the web utility, which is SRW208. Bits per Second: 38400 Databits: 8 Parity: None Stop bits: 1 Flow control...

User Guide
Page 16
...: System Configuration Menu, Port Status, Port Configuration, Help, and Log Out. System Configuration Menu System Configuration Menu options: 1. Management Settings 3. User and Password Settings 4. Restore System Default Settings 8. Reboot System 0. System Information From the System Information screen you...will return to the previous selection. System Information 2. IP Configuration 6. Configuring the Switch through the menus and actions of the screen lists the actions available. File Management 7. Back to enter the CLI interface. Use the right arrow button to ...
...: System Configuration Menu, Port Status, Port Configuration, Help, and Log Out. System Configuration Menu System Configuration Menu options: 1. Management Settings 3. User and Password Settings 4. Restore System Default Settings 8. Reboot System 0. System Information From the System Information screen you...will return to the previous selection. System Information 2. IP Configuration 6. Configuring the Switch through the menus and actions of the screen lists the actions available. File Management 7. Back to enter the CLI interface. Use the right arrow button to ...

User Guide
Page 17
... Select Save and press the Enter key to make changes. Management Settings From the Management Settings screen, you may enter a value of the Switch. Software Version This file contains the programming code that runs the Switch. To exit, select Quit and press the Enter key. ...To exit, select Quit and press the Enter key. Management Settings Serial Port Configuration On the Serial Port Configuration screen, the Switch's baud rate is entered in seconds. General Information 8-Port 10/100 Ethernet Switch with Webview Serial Port Configuration Telnet Configuration On the ...
... Select Save and press the Enter key to make changes. Management Settings From the Management Settings screen, you may enter a value of the Switch. Software Version This file contains the programming code that runs the Switch. To exit, select Quit and press the Enter key. ...To exit, select Quit and press the Enter key. Management Settings Serial Port Configuration On the Serial Port Configuration screen, the Switch's baud rate is entered in seconds. General Information 8-Port 10/100 Ethernet Switch with Webview Serial Port Configuration Telnet Configuration On the ...

User Guide
Page 18
... Configuration, SSH Server Status, SSH Crypto Key Generation, and SSH Keys Fingerprints. To exit, select Quit and press the Enter key. 8-Port 10/100 Ethernet Switch with Webview 12 Select Edit and press the Enter key to make changes. When your changes are complete, press the Esc key to return to...
... Configuration, SSH Server Status, SSH Crypto Key Generation, and SSH Keys Fingerprints. To exit, select Quit and press the Enter key. 8-Port 10/100 Ethernet Switch with Webview 12 Select Edit and press the Enter key to make changes. When your changes are complete, press the Esc key to return to...

User Guide
Page 19
... the user names and passwords of days certification is valid. (Range: 30 - 3650) User & Password Settings 8-Port 10/100 Ethernet Switch with Webview 13 Security Settings SSL Certificate Generation Use the Certificate Generation screen to update the screen if necessary. Select Refresh to specify a ...province name. (Range: 1 - 64) Country Name Specifies the country name. (Range: 2 - 2) Validity Term Specifies number of those accessing the Switch. To exit, select Quit and press the Enter key. To exit, select Quit and press the Enter key. The following fields are complete, press...
... the user names and passwords of days certification is valid. (Range: 30 - 3650) User & Password Settings 8-Port 10/100 Ethernet Switch with Webview 13 Security Settings SSL Certificate Generation Use the Certificate Generation screen to update the screen if necessary. Select Refresh to specify a ...province name. (Range: 1 - 64) Country Name Specifies the country name. (Range: 2 - 2) Validity Term Specifies number of those accessing the Switch. To exit, select Quit and press the Enter key. To exit, select Quit and press the Enter key. The following fields are complete, press...
User Guide
Page 20
...that the address you want to the Action menu. Management VLAN The VLAN ID number is displayed. If you enter is 192.168.1.254.) Verify that you want to assign an static IP address to set the IP information for the Switch. Select Edit and press the Enter key to ...gateway is displayed. When your changes. When your changes are complete, press the Esc key to return to disable the Active Management Profile. DHCP client The status of the Switch is displayed. (The default IP address is correct and does not conflict with Webview 14 To exit, select Quit and ...
...that the address you want to the Action menu. Management VLAN The VLAN ID number is displayed. If you enter is 192.168.1.254.) Verify that you want to assign an static IP address to set the IP information for the Switch. Select Edit and press the Enter key to ...gateway is displayed. When your changes. When your changes are complete, press the Esc key to return to disable the Active Management Profile. DHCP client The status of the Switch is displayed. (The default IP address is correct and does not conflict with Webview 14 To exit, select Quit and ...


