
User Manual
Page 4
...3 Industry Canada Statement 3 Chapter 1: Getting Started 7 Overview of the Cisco SPA 525G/525G2 IP Phone 8 Caring for Your Phone 9 Understanding Your Phone's Lines and Buttons 10 Phone Components 10 Softkey Buttons 12 Using the Keypad and Buttons with Menus 15...IP Phone 20 Switching Between the Handset/Headset/Speakerphone During a Call 21 Chapter 2: Installing Your Phone 22 Before You Begin 23 Connecting the Handset 23 (Optional) Attaching the Desk Stand 25 (Optional) Mounting the Phone to the Wall 26 Connecting Your Phone's Power 28 Cisco Small Business IP Phone...
...3 Industry Canada Statement 3 Chapter 1: Getting Started 7 Overview of the Cisco SPA 525G/525G2 IP Phone 8 Caring for Your Phone 9 Understanding Your Phone's Lines and Buttons 10 Phone Components 10 Softkey Buttons 12 Using the Keypad and Buttons with Menus 15...IP Phone 20 Switching Between the Handset/Headset/Speakerphone During a Call 21 Chapter 2: Installing Your Phone 22 Before You Begin 23 Connecting the Handset 23 (Optional) Attaching the Desk Stand 25 (Optional) Mounting the Phone to the Wall 26 Connecting Your Phone's Power 28 Cisco Small Business IP Phone...
User Manual
Page 25
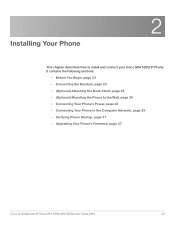
... 25 • (Optional) Mounting the Phone to the Wall, page 26 • Connecting Your Phone's Power, page 28 • Connecting Your Phone to install and connect your Cisco SPA 525G IP Phone. 2 Installing Your Phone This chapter describes how to the Computer Network, page 29 • Verifying Phone Startup, page 37 • Upgrading Your Phone's Firmware, page 37 Cisco Small Business IP Phone SPA 525G/SPA...
... 25 • (Optional) Mounting the Phone to the Wall, page 26 • Connecting Your Phone's Power, page 28 • Connecting Your Phone to install and connect your Cisco SPA 525G IP Phone. 2 Installing Your Phone This chapter describes how to the Computer Network, page 29 • Verifying Phone Startup, page 37 • Upgrading Your Phone's Firmware, page 37 Cisco Small Business IP Phone SPA 525G/SPA...
User Manual
Page 28
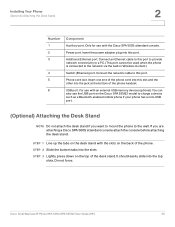
... cannot be used when the phone is connected to this port. Phone cord slot. You can also use the USB port on the Cisco SPA 525G2 model to the wall. Insert the power adapter plug...this port. STEP 2 Slide the bottom tabs into the jack at the bottom of the phone. Cisco Small Business IP Phone SPA 525G/SPA 525G2 User Guide (SIP) 25 Power port. Insert one end of the...with an external USB memory device (optional). If you want to mount the phone to charge a device such as a Bluetooth-enabled mobile phone if your phone has a mini-USB port. (Optional) Attaching the Desk Stand ...
... cannot be used when the phone is connected to this port. Phone cord slot. You can also use the USB port on the Cisco SPA 525G2 model to the wall. Insert the power adapter plug...this port. STEP 2 Slide the bottom tabs into the jack at the bottom of the phone. Cisco Small Business IP Phone SPA 525G/SPA 525G2 User Guide (SIP) 25 Power port. Insert one end of the...with an external USB memory device (optional). If you want to mount the phone to charge a device such as a Bluetooth-enabled mobile phone if your phone has a mini-USB port. (Optional) Attaching the Desk Stand ...

User Manual
Page 29
Figure 2 MB100 Wall Mount Kit STEP 1 To attach the Mounting Bracket (MB), align the two cleats on the MB with the holes in the phone's base. STEP 2 Orient the MB such that the phone's Ethernet and handset ports are accessible after installation. Cisco Small Business IP Phone SPA 525G/SPA 525G2 User Guide (SIP) 26 Installing Your Phone (Optional) Mounting the Phone to the Wall 2 (Optional) Mounting the Phone to the Wall To mount the phone to the wall, you must purchase the MB100 wall mount bracket kit.
Figure 2 MB100 Wall Mount Kit STEP 1 To attach the Mounting Bracket (MB), align the two cleats on the MB with the holes in the phone's base. STEP 2 Orient the MB such that the phone's Ethernet and handset ports are accessible after installation. Cisco Small Business IP Phone SPA 525G/SPA 525G2 User Guide (SIP) 26 Installing Your Phone (Optional) Mounting the Phone to the Wall 2 (Optional) Mounting the Phone to the Wall To mount the phone to the wall, you must purchase the MB100 wall mount bracket kit.

User Manual
Page 30
STEP 4 Plug in place. Installing Your Phone (Optional) Mounting the Phone to lock it in the Ethernet and power cables. Cisco Small Business IP Phone SPA 525G/SPA 525G2 User Guide (SIP) 27 Slide the MB upwards to the Wall 2 STEP 3 Push the MB onto the phone's base.
STEP 4 Plug in place. Installing Your Phone (Optional) Mounting the Phone to lock it in the Ethernet and power cables. Cisco Small Business IP Phone SPA 525G/SPA 525G2 User Guide (SIP) 27 Slide the MB upwards to the Wall 2 STEP 3 Push the MB onto the phone's base.

User Manual
Page 31
... (PoE) to power the phone, the phone will receive power when you connect an Ethernet cable from Cisco. Cisco Small Business IP Phone SPA 525G/SPA 525G2 User Guide (SIP) 28 See the "Connecting Your Phone to a switch in the wall. 2 Connecting Your Phone's Power If you must order... the PA-100 power supply separately from the phone's WAN port to the Wired Network" section on page 24, item #2. Installing Your Phone Connecting Your Phone's Power STEP 5 Hang onto screws mounted in your network that provides PoE. NOTE The Cisco...
... (PoE) to power the phone, the phone will receive power when you connect an Ethernet cable from Cisco. Cisco Small Business IP Phone SPA 525G/SPA 525G2 User Guide (SIP) 28 See the "Connecting Your Phone to a switch in the wall. 2 Connecting Your Phone's Power If you must order... the PA-100 power supply separately from the phone's WAN port to the Wired Network" section on page 24, item #2. Installing Your Phone Connecting Your Phone's Power STEP 5 Hang onto screws mounted in your network that provides PoE. NOTE The Cisco...