User Guide
Page 19
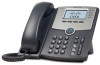
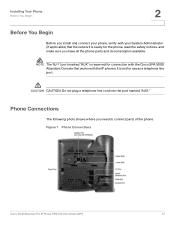
... cord into the port marked "AUX." Figure 1 Phone Connections Cisco Small Business Pro IP Phone SPA 50X User Guide (SIP) 12 Installing Your Phone Before You Begin 2 Before You Begin Before you install and connect your phone, verify with your System Administrator (if applicable) that works with the Cisco... SPA 500S Attendant Console that the network is ready for the phone, read the safety notices, and make sure you need to connect parts of the phone. Phone Connections The following photo shows where you have all the phone parts and documentation available...
... cord into the port marked "AUX." Figure 1 Phone Connections Cisco Small Business Pro IP Phone SPA 50X User Guide (SIP) 12 Installing Your Phone Before You Begin 2 Before You Begin Before you install and connect your phone, verify with your System Administrator (if applicable) that works with the Cisco... SPA 500S Attendant Console that the network is ready for the phone, read the safety notices, and make sure you need to connect parts of the phone. Phone Connections The following photo shows where you have all the phone parts and documentation available...
User Guide
Page 20
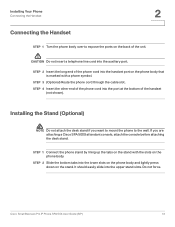
...Handset 2 Connecting the Handset STEP 1 Turn the phone body over to the wall. CAUTION Do not insert a telephone line cord into the upper stand slots. Installing the Stand (Optional) NOTE Do not attach the desk stand if you are attaching a Cisco SPA 500S attendant console, attach the console before ... into the auxiliary port. Cisco Small Business Pro IP Phone SPA 50X User Guide (SIP) 13 STEP 1 Connect the phone stand by lining up the tabs on the stand with a phone symbol. STEP 4 Insert the other end of the phone cord into the lower slots on the phone body and lightly press down...
...Handset 2 Connecting the Handset STEP 1 Turn the phone body over to the wall. CAUTION Do not insert a telephone line cord into the upper stand slots. Installing the Stand (Optional) NOTE Do not attach the desk stand if you are attaching a Cisco SPA 500S attendant console, attach the console before ... into the auxiliary port. Cisco Small Business Pro IP Phone SPA 50X User Guide (SIP) 13 STEP 1 Connect the phone stand by lining up the tabs on the stand with a phone symbol. STEP 4 Insert the other end of the phone cord into the lower slots on the phone body and lightly press down...
User Guide
Page 26
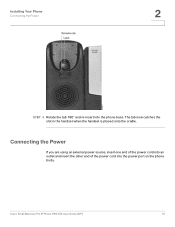
Connecting the Power If you are using an external power source, insert one end of the power cord into an outlet and insert the other end of the power cord into the phone base. Cisco Small Business Pro IP Phone SPA 50X User Guide (SIP) 19 Installing Your Phone Connecting the Power 2 STEP 3 Rotate the tab 180° and re-insert into the power port on the phone body. The tab now catches the slot in the handset when the handset is placed onto the cradle.
Connecting the Power If you are using an external power source, insert one end of the power cord into an outlet and insert the other end of the power cord into the phone base. Cisco Small Business Pro IP Phone SPA 50X User Guide (SIP) 19 Installing Your Phone Connecting the Power 2 STEP 3 Rotate the tab 180° and re-insert into the power port on the phone body. The tab now catches the slot in the handset when the handset is placed onto the cradle.
User Guide
Page 28
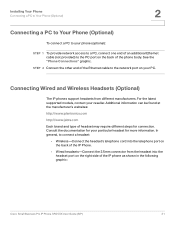
... of an additional Ethernet cable (not provided) to the PC port on the right side of the IP phone as shown in the following graphic: Cisco Small Business Pro IP Phone SPA 50X User Guide (SIP) 21 For the latest supported models, contact your particular headset for connection. In... general, to connect a headset: • Wireless-Connect the headset's telephone cord into the headset port on the back of the IP Phone. • ...
... of an additional Ethernet cable (not provided) to the PC port on the right side of the IP phone as shown in the following graphic: Cisco Small Business Pro IP Phone SPA 50X User Guide (SIP) 21 For the latest supported models, contact your particular headset for connection. In... general, to connect a headset: • Wireless-Connect the headset's telephone cord into the headset port on the back of the IP Phone. • ...

User Guide
Page 88
...auxiliary cable to the Cisco SPA 500S. ! no additional power source is powered by the auxiliary cable with the Cisco SPA 500S. Use only the auxiliary cable provided with the IP phone; CAUTION Do not plug a telephone line cord into the AUX port. Using the Cisco SPA 500S Attendant ...Console Connecting the Cisco SPA 500S Attendant Console to the IP Phone 6 STEP 7 Using an attachment arm screw, secure the attachment arm ...
...auxiliary cable to the Cisco SPA 500S. ! no additional power source is powered by the auxiliary cable with the Cisco SPA 500S. Use only the auxiliary cable provided with the IP phone; CAUTION Do not plug a telephone line cord into the AUX port. Using the Cisco SPA 500S Attendant ...Console Connecting the Cisco SPA 500S Attendant Console to the IP Phone 6 STEP 7 Using an attachment arm screw, secure the attachment arm ...

User Guide
Page 91
CAUTION Do not plug a telephone line cord into the AUX port. Connect the other end of the first Cisco SPA 500S. Using the Cisco SPA 500S Attendant Console Connecting the Cisco SPA 500S Attendant Console to each unit. STEP 7 Locate the AUX OUT port on the back of the auxiliary cable ... cable inside the cable slot. STEP 10 Attach the appropriate desktop stands to the IP Phone 6 ! Connect one end of the second Cisco SPA 500S. The Cisco SPA 500S is required. Cisco Small Business Pro IP Phone SPA 50X User Guide (SIP) 84 Use only the auxiliary cable provided with the IP...
CAUTION Do not plug a telephone line cord into the AUX port. Connect the other end of the first Cisco SPA 500S. Using the Cisco SPA 500S Attendant Console Connecting the Cisco SPA 500S Attendant Console to each unit. STEP 7 Locate the AUX OUT port on the back of the auxiliary cable ... cable inside the cable slot. STEP 10 Attach the appropriate desktop stands to the IP Phone 6 ! Connect one end of the second Cisco SPA 500S. The Cisco SPA 500S is required. Cisco Small Business Pro IP Phone SPA 50X User Guide (SIP) 84 Use only the auxiliary cable provided with the IP...


