
Administration Guide
Page 2
... the Cables 7 4 Using the Console 9 Connecting to Your Switch with HyperTerminal 9 Connecting to the Switch with Telnet 12 Logging On to the Console 12 Selecting Menu Options and Actions 12 Using the Switch Main Menu 13 System Configuration 13 System Information 14 Management Settings 16 Username & Password Settings 21 Security Settings 22 VLAN Management 25 IP Configuration 26 File Management 40 Restore System Default Settings 43 Reset to Factory Settings 43 Reboot System 43 Stack Configuration 44 Port Status 44 SGE2010/SGE2010P Administration Guide i
... the Cables 7 4 Using the Console 9 Connecting to Your Switch with HyperTerminal 9 Connecting to the Switch with Telnet 12 Logging On to the Console 12 Selecting Menu Options and Actions 12 Using the Switch Main Menu 13 System Configuration 13 System Information 14 Management Settings 16 Username & Password Settings 21 Security Settings 22 VLAN Management 25 IP Configuration 26 File Management 40 Restore System Default Settings 43 Reset to Factory Settings 43 Reboot System 43 Stack Configuration 44 Port Status 44 SGE2010/SGE2010P Administration Guide i

Administration Guide
Page 4
... configuration of the Switch. This user guide covers the steps for setting up and using the Switch. • Chapter 2, "Getting to Know the SGE2010/SGE2010P" This chapter describes the ports, LEDs, and other Linksys switches or devices. These instructions should be all you connect the switch, set it up your workstations or connect to your Linksys system. The Switch features monitoring and configuration via your web browser, making it to quickly...
... configuration of the Switch. This user guide covers the steps for setting up and using the Switch. • Chapter 2, "Getting to Know the SGE2010/SGE2010P" This chapter describes the ports, LEDs, and other Linksys switches or devices. These instructions should be all you connect the switch, set it up your workstations or connect to your Linksys system. The Switch features monitoring and configuration via your web browser, making it to quickly...

Administration Guide
Page 5
... the Switch is stacked and the corresponding number indicates its default settings. The Act (Activity) LEDs flash to various Linksys products over that PoE is connected and operating properly. On the SGE2010P, a green PoE LED indicates that port. SGE2010/P Front Panel Feature Reset LEDs PWR FAN RPS MST Stack ID Act/Link Speed PoE Description The Switch can be used to supply power to indicate that this Switch is actively sending or receiving data over Ethernet cable. A green PWR LED lights up...
... the Switch is stacked and the corresponding number indicates its default settings. The Act (Activity) LEDs flash to various Linksys products over that PoE is connected and operating properly. On the SGE2010P, a green PoE LED indicates that port. SGE2010/P Front Panel Feature Reset LEDs PWR FAN RPS MST Stack ID Act/Link Speed PoE Description The Switch can be used to supply power to indicate that this Switch is actively sending or receiving data over Ethernet cable. A green PWR LED lights up...

Administration Guide
Page 6
...-GBIC ports. Refer to it, and adjust its speed and duplex accordingly. Each mini-GBIC port provides a link to a high-speed network segment or individual workstation at speeds of the device connected to Chapter 4: Using the Console Interface for Configuration for configuration using your PC's HyperTerminal program. Use the Linksys MGBT1, MGBSX1, or MGBLH1 mini-GBIC modules with an RJ-45 connector. The Fast Ethernet ports support network speeds of 15.4W to all PoE ports...
...-GBIC ports. Refer to it, and adjust its speed and duplex accordingly. Each mini-GBIC port provides a link to a high-speed network segment or individual workstation at speeds of the device connected to Chapter 4: Using the Console Interface for Configuration for configuration using your PC's HyperTerminal program. Use the Linksys MGBT1, MGBSX1, or MGBLH1 mini-GBIC modules with an RJ-45 connector. The Fast Ethernet ports support network speeds of 15.4W to all PoE ports...

Administration Guide
Page 11
... an electrical outlet. Connect the supplied power cord to "Web Utility Configuration" section on the back of a different power cord could damage the Ethernet switch. 7. If you use the power cord that is supplied with the Ethernet switch. Each active port's corresponding Act/Link LED will also light up on page 33 for directions. • If you use the console interface to configure the Ethernet switch, then connect the supplied serial cable to the Ethernet switch. The bottom mini...
... an electrical outlet. Connect the supplied power cord to "Web Utility Configuration" section on the back of a different power cord could damage the Ethernet switch. 7. If you use the power cord that is supplied with the Ethernet switch. Each active port's corresponding Act/Link LED will also light up on page 33 for directions. • If you use the console interface to configure the Ethernet switch, then connect the supplied serial cable to the Ethernet switch. The bottom mini...

Administration Guide
Page 12
... the Enter key. You can save the settings to use each time you connect to the switch IP address 192.168.1.254. Telnet to your switch. SGE2010/SGE2010P Administration Guide 9 Configuration can also be configured through the web utility, which allows you to your switch. NOTE: The switch also can use the HyperTerminal to connect to perform basic configuration of the switch. 4 Using the Console Connecting to Your Switch with HyperTerminal Using the Console This chapter describes...
... the Enter key. You can save the settings to use each time you connect to the switch IP address 192.168.1.254. Telnet to your switch. SGE2010/SGE2010P Administration Guide 9 Configuration can also be configured through the web utility, which allows you to your switch. NOTE: The switch also can use the HyperTerminal to connect to perform basic configuration of the switch. 4 Using the Console Connecting to Your Switch with HyperTerminal Using the Console This chapter describes...

Administration Guide
Page 15
... Edit and enter admin in numeric order. Then, press the Enter key. 2. Press the menu number and then press Enter key to the switch with Telnet You can also be used to login, enter the default login and password: admin The Switch Main Menu appears. Select Enter to enter the CLI interface. Selecting Menu Options and Actions Within the Console Interface, menus list options in the User Name field.
... Edit and enter admin in numeric order. Then, press the Enter key. 2. Press the menu number and then press Enter key to the switch with Telnet You can also be used to login, enter the default login and password: admin The Switch Main Menu appears. Select Enter to enter the CLI interface. Selecting Menu Options and Actions Within the Console Interface, menus list options in the User Name field.

Administration Guide
Page 16
... management settings, set up user accounts, and manage security settings. Using the Console Using the Switch Main Menu Using the Switch Main Menu The Switch Main Menu provides access to screens that you can use this menu if you need to restore default settings, reset the switch to the factory default configuration, or reboot the system. 1. It also provides access to screens where you can manage VLAN IDs, IPv4 and IPv6 settings, and download upgrade files. Management Settings (see page 16) SGE2010/SGE2010P Administration Guide...
... management settings, set up user accounts, and manage security settings. Using the Console Using the Switch Main Menu Using the Switch Main Menu The Switch Main Menu provides access to screens that you can use this menu if you need to restore default settings, reset the switch to the factory default configuration, or reboot the system. 1. It also provides access to screens where you can manage VLAN IDs, IPv4 and IPv6 settings, and download upgrade files. Management Settings (see page 16) SGE2010/SGE2010P Administration Guide...

Administration Guide
Page 17
... 21) 4. Username & Password Settings (see page 15) 0.Back (Select to return to Factory Settings (see page 40) 8. Reset to the previous menu.) To open this screen, select 0. From the Switch Main Menu, select 1. System Configuration. 2. Back. File Management (see page 43) 10. When you can view firmware version information and general system information. 1. VLAN Management (see page 43) 11. Reboot System (see page 25) 6. Versions (see page...
... 21) 4. Username & Password Settings (see page 15) 0.Back (Select to return to Factory Settings (see page 40) 8. Reset to the previous menu.) To open this screen, select 0. From the Switch Main Menu, select 1. System Configuration. 2. Back. File Management (see page 43) 10. When you can view firmware version information and general system information. 1. VLAN Management (see page 43) 11. Reboot System (see page 25) 6. Versions (see page...
Administration Guide
Page 25
... be 20 characters in the Password field and the Password Again field. 2. Using the Console System Configuration NOTE: The default user is "admin" with no password. System Configuration. 2. To change User & Password settings: 1. NOTE: The username and password can generate SSL certificates and view the SSL certificate listings. Show Certificate (see page 23) 2. From the Switch Main Menu, select 1. SGE2010/SGE2010P Administration Guide 22 From the Switch Main Menu, select 1. You must...
... be 20 characters in the Password field and the Password Again field. 2. Using the Console System Configuration NOTE: The default user is "admin" with no password. System Configuration. 2. To change User & Password settings: 1. NOTE: The username and password can generate SSL certificates and view the SSL certificate listings. Show Certificate (see page 23) 2. From the Switch Main Menu, select 1. SGE2010/SGE2010P Administration Guide 22 From the Switch Main Menu, select 1. You must...

Administration Guide
Page 30
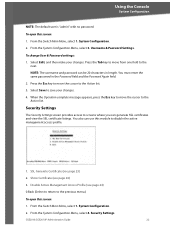
... open this screen to the IPv4 address settings and DHCP renew. 1. To open this screen: 1. System Configuration. 2. IPv4 Address Configuration. IP Configuration. 3. SGE2010/SGE2010P Administration Guide 27 From the Switch Main Menu, select 1. From the Switch Main Menu, select 1. From the IP Configuration menu, select 1. Using the Console System Configuration IPv4 Address Configuration The IPv4 Configuration menu provides access to view or editing the IPv4 address settings. IPv4 Address Configuration. DHCP Renew (see page 27) 2.
... open this screen to the IPv4 address settings and DHCP renew. 1. To open this screen: 1. System Configuration. 2. IPv4 Address Configuration. IP Configuration. 3. SGE2010/SGE2010P Administration Guide 27 From the Switch Main Menu, select 1. From the Switch Main Menu, select 1. From the IP Configuration menu, select 1. Using the Console System Configuration IPv4 Address Configuration The IPv4 Configuration menu provides access to view or editing the IPv4 address settings. IPv4 Address Configuration. DHCP Renew (see page 27) 2.
Administration Guide
Page 31
... Action list. 3. From the System Configuration Menu, select 6. IPv4 Address Configuration. 4. IPv4 Address Settings. NOTE: To enable or disable the DHCP client, move the cursor to renew DHCP. NOTE: This option is available only if the interface is configured as a DHCP interface, through IPv4 Address Settings. IP Configuration. 3. DHCP Renew. SGE2010/SGE2010P Administration Guide 28 To edit the IPv4 address settings: 1. DHCP Renew You can manage the settings for IPv6 and ISATAP. Press the Esc key...
... Action list. 3. From the System Configuration Menu, select 6. IPv4 Address Configuration. 4. IPv4 Address Settings. NOTE: To enable or disable the DHCP client, move the cursor to renew DHCP. NOTE: This option is available only if the interface is configured as a DHCP interface, through IPv4 Address Settings. IP Configuration. 3. DHCP Renew. SGE2010/SGE2010P Administration Guide 28 To edit the IPv4 address settings: 1. DHCP Renew You can manage the settings for IPv6 and ISATAP. Press the Esc key...

Administration Guide
Page 32
... Space Bar to the Action list. SGE2010/SGE2010P Administration Guide 29 IPv6 Address Settings (see page 31) 5. IPv6 Address Table (see page 33) To open this screen: 1. From the System Configuration Menu, select 6. IP Configuration. 3. From the IP Configuration menu, select 2. On the Switch Main Menu, select 6. IPv6 Address Configuration. 3. When you select ENABLE, a warning appears. Press the Esc key to move the cursor to...
... Space Bar to the Action list. SGE2010/SGE2010P Administration Guide 29 IPv6 Address Settings (see page 31) 5. IPv6 Address Table (see page 33) To open this screen: 1. From the System Configuration Menu, select 6. IP Configuration. 3. From the IP Configuration menu, select 2. On the Switch Main Menu, select 6. IPv6 Address Configuration. 3. When you select ENABLE, a warning appears. Press the Esc key to move the cursor to...

Administration Guide
Page 35
... from one field to the Action list. 3. From the Switch Main Menu, select 1. ISATAP Interface Show. IPv6 ISATAP Interface Show You can use the ISATAP Interface Show screen to save your settings 4. Using the Console System Configuration To edit the ISATAP tunnel settings 1. IP Configuration. 3. To open this screen: 1. Press the Tab key to move the cursor to the next. Select Save to view the interface type and address.
... from one field to the Action list. 3. From the Switch Main Menu, select 1. ISATAP Interface Show. IPv6 ISATAP Interface Show You can use the ISATAP Interface Show screen to save your settings 4. Using the Console System Configuration To edit the ISATAP tunnel settings 1. IP Configuration. 3. To open this screen: 1. Press the Tab key to move the cursor to the next. Select Save to view the interface type and address.

Administration Guide
Page 36
.../SGE2010P Administration Guide 33 NOTE: To change the state of the gateway, move the cursor from one field to toggle between ENABLE and DISABLE. 2. Press the Esc key to move the cursor to the Action list. 3. Select Execute to view or edit information about the IPv6 Default Gateway. Using the Console System Configuration IPv6 Default Gateway You can use the IPv6 Default Gateway screen to save your settings 4. From the Switch Main...
.../SGE2010P Administration Guide 33 NOTE: To change the state of the gateway, move the cursor from one field to toggle between ENABLE and DISABLE. 2. Press the Esc key to move the cursor to the Action list. 3. Select Execute to view or edit information about the IPv6 Default Gateway. Using the Console System Configuration IPv6 Default Gateway You can use the IPv6 Default Gateway screen to save your settings 4. From the Switch Main...

Administration Guide
Page 46
...reset stacking configuration, use the hardware reset button on the front of the Ethernet switch. Using the Console System Configuration Restore System Default Settings You can restart the Ethernet switch. System Configuration. 2. To restore factory default settings 1. Reboot System You can restore the switch to the system default settings. SGE2010/SGE2010P Administration Guide 43 Restore Factory Settings. 3. NOTE: Restoring factory settings from the console or web resets all values except stacking configuration (stacking mode, stacking ports, and auto-numbering settings...
...reset stacking configuration, use the hardware reset button on the front of the Ethernet switch. Using the Console System Configuration Restore System Default Settings You can restart the Ethernet switch. System Configuration. 2. To restore factory default settings 1. Reboot System You can restore the switch to the system default settings. SGE2010/SGE2010P Administration Guide 43 Restore Factory Settings. 3. NOTE: Restoring factory settings from the console or web resets all values except stacking configuration (stacking mode, stacking ports, and auto-numbering settings...

Administration Guide
Page 48
...: To configure PoE, use the Port Configuration screen. Port Status. 2. From the Switch Main Menu, press 2. From the Switch Main Menu, press 2. Port Status. To open this screen: 1. From the Port Status Menu, press 2. From the Port Status Menu, press 1. SGE2010/SGE2010P Administration Guide 45 Using the Console Port Status Port Status You can use the PoE Status screen to view the PoE status of the ports. Port Status. 2. See "Port Settings," on the switch. To open this screen: 1. PoE Status You can use the Port Status screen to view the port connection status...
...: To configure PoE, use the Port Configuration screen. Port Status. 2. From the Switch Main Menu, press 2. From the Switch Main Menu, press 2. Port Status. To open this screen: 1. From the Port Status Menu, press 2. From the Port Status Menu, press 1. SGE2010/SGE2010P Administration Guide 45 Using the Console Port Status Port Status You can use the PoE Status screen to view the PoE status of the ports. Port Status. 2. See "Port Settings," on the switch. To open this screen: 1. PoE Status You can use the Port Status screen to view the port connection status...

Administration Guide
Page 54
.../SGE2010P Administration Guide 51 This utility is accessed through your web browser. Using Menus in the web-based utility. 5 Web Utility Configuration Connecting to the Switch with the Web-Based Utility You can connect to the switch using a standard web browser on a computer that is 192.168.1.254. The default IP address is connected to choose options in the Web-Based Utility Use the left navigation panel to the same network...
.../SGE2010P Administration Guide 51 This utility is accessed through your web browser. Using Menus in the web-based utility. 5 Web Utility Configuration Connecting to the Switch with the Web-Based Utility You can connect to the switch using a standard web browser on a computer that is 192.168.1.254. The default IP address is connected to choose options in the Web-Based Utility Use the left navigation panel to the same network...

Administration Guide
Page 62
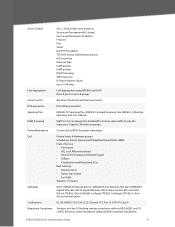
... packets) Power, Fan, Link/Act, PoE, Speed, RPS, Master, Stack ID 1 - 8 • Up to 192 ports in a stack • Hot Insertion and removal • Ring and Chain stacking options • Master and Backup master for resilient stack control • Auto-numbering or manual configuration of units in stack Reset Button 8K 256 active VLANs (4096 range) Port-based and 802.1Q Tag-based VLANs Protocol-based VLAN Management VLAN Multicast TV VLAN Private VLAN Edge (PVE) GVRP Head of layer 3 traffic SGE2010/SGE2010P...
... packets) Power, Fan, Link/Act, PoE, Speed, RPS, Master, Stack ID 1 - 8 • Up to 192 ports in a stack • Hot Insertion and removal • Ring and Chain stacking options • Master and Backup master for resilient stack control • Auto-numbering or manual configuration of units in stack Reset Button 8K 256 active VLANs (4096 range) Port-based and 802.1Q Tag-based VLANs Protocol-based VLAN Management VLAN Multicast TV VLAN Private VLAN Edge (PVE) GVRP Head of layer 3 traffic SGE2010/SGE2010P...
Administration Guide
Page 64
... Ethernet Type ICMP packets IGMP packets DHCP Snooping ARP Inspection IP Source Address Guard Up to 1018 rules Link Aggregation Link Aggregation using IEEE 802.3ad LACP Up to 8 ports in up to 8 groups Storm Control Broadcast, Multicast and Unknown Unicast DOS prevention DOS Attack prevention Spanning Tree IEEE 802.1D Spanning Tree, IEEE 802.1w Rapid Spanning Tree, IEEE 802.1s Multiple Spanning Tree, Fast Linkover IGMP Snooping IGMP (v1/v2) snooping limits bandwidth-intensive video traffic to RPSU for power redundancy QoS Priority levels: 4 Hardware...
... Ethernet Type ICMP packets IGMP packets DHCP Snooping ARP Inspection IP Source Address Guard Up to 1018 rules Link Aggregation Link Aggregation using IEEE 802.3ad LACP Up to 8 ports in up to 8 groups Storm Control Broadcast, Multicast and Unknown Unicast DOS prevention DOS Attack prevention Spanning Tree IEEE 802.1D Spanning Tree, IEEE 802.1w Rapid Spanning Tree, IEEE 802.1s Multiple Spanning Tree, Fast Linkover IGMP Snooping IGMP (v1/v2) snooping limits bandwidth-intensive video traffic to RPSU for power redundancy QoS Priority levels: 4 Hardware...


