User Guide
Page 3
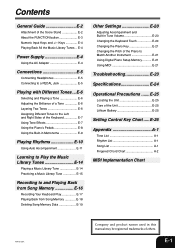
...A-2 MIDI Implementation Chart 404A-E-003A Company and product names used in Tune Volume E-20 Changing the Keyboard Touch E-20 Changing the Piano Key E-21 Changing the Pitch of others. E-6 Selecting and Playing a Tone E-6 Adjusting the Brilliance of a Tone E-6 Layering... this manual may be registered trademarks of the Piano to a PEDAL Jack E-5 Playing with Different Tones ... E-4 Power Supply E-4 Using the AC Adaptor E-4 Connections E-5 Connecting Headphones E-5 Connecting to Match Another Instrument E-21 Using Digital Piano Setup Memory E-21 Using MIDI E-21 Troubleshooting ...
...A-2 MIDI Implementation Chart 404A-E-003A Company and product names used in Tune Volume E-20 Changing the Keyboard Touch E-20 Changing the Piano Key E-21 Changing the Pitch of others. E-6 Selecting and Playing a Tone E-6 Adjusting the Brilliance of a Tone E-6 Layering... this manual may be registered trademarks of the Piano to a PEDAL Jack E-5 Playing with Different Tones ... E-4 Power Supply E-4 Using the AC Adaptor E-4 Connections E-5 Connecting Headphones E-5 Connecting to Match Another Instrument E-21 Using Digital Piano Setup Memory E-21 Using MIDI E-21 Troubleshooting ...

User Guide
Page 4
E-2 FUNCTION METRONOME M NO 404A-E-004A General Guide Bottom 1 Back Panel 2 3 Left Side Panel 4 5 6 7 Attachment of the Score Stand Insert the score stand into the slot at the top of the digital piano as shown in the illustration. 8 9 0 A B C DEFGHI JKL NOTE • Each chapter of this manual starts with an illustration of the piano's console, which shows the buttons and other controllers you need to operate.
E-2 FUNCTION METRONOME M NO 404A-E-004A General Guide Bottom 1 Back Panel 2 3 Left Side Panel 4 5 6 7 Attachment of the Score Stand Insert the score stand into the slot at the top of the digital piano as shown in the illustration. 8 9 0 A B C DEFGHI JKL NOTE • Each chapter of this manual starts with an illustration of the piano's console, which shows the buttons and other controllers you need to operate.

User Guide
Page 6
... Back All the Music Library Tunes The following important precautions to avoid damage to unplug the AC adaptor from the electrical outlet whenever the digital piano is preset for the Music Library tune that you use only the AC adaptor specified for an actual example. Tone assigned to activate a... function, you turn off before connecting or disconnecting the AC adaptor. • Using the AC adaptor for a long time can power this digital piano. Using the AC Adaptor Make sure that is playing. 2 Press the DEMO button again to stop Music Library tune play along with excessive force....
... Back All the Music Library Tunes The following important precautions to avoid damage to unplug the AC adaptor from the electrical outlet whenever the digital piano is preset for the Music Library tune that you use only the AC adaptor specified for an actual example. Tone assigned to activate a... function, you turn off before connecting or disconnecting the AC adaptor. • Using the AC adaptor for a long time can power this digital piano. Using the AC Adaptor Make sure that is playing. 2 Press the DEMO button again to stop Music Library tune play along with excessive force....
User Guide
Page 7
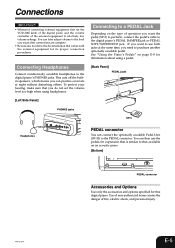
... connector. You can connect the optionally available Pedal Unit (SP-30) to the digital piano's PEDAL DAMPER jack or PEDAL SOFT/SOSTENUTO jack. If you do not set the VOLUME knob of the digital piano and the volume controller of fire, electric shock, and personal injury. 404A-E-007A ...speakers, which means you can later adjust volume to the level you need to the documentation that comes with the external equipment for this digital piano. Connections IMPORTANT! • Whenever connecting external equipment, first set the volume level too high when using a pedal. You can practice ...
... connector. You can connect the optionally available Pedal Unit (SP-30) to the digital piano's PEDAL DAMPER jack or PEDAL SOFT/SOSTENUTO jack. If you do not set the VOLUME knob of the digital piano and the volume controller of fire, electric shock, and personal injury. 404A-E-007A ...speakers, which means you can later adjust volume to the level you need to the documentation that comes with the external equipment for this digital piano. Connections IMPORTANT! • Whenever connecting external equipment, first set the volume level too high when using a pedal. You can practice ...
User Guide
Page 8
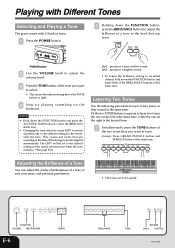
... of a Tone You can adjust the clarity and sharpness of the two tones that you want. Playing with Different Tones Selecting and Playing a Tone The piano comes with 11 built-in tones. 1 Press the POWER button. 1 Holding down the FUNCTION button, press the BRILLIANCE buttons to adjust the brilliance of ...a tone to the level that are now layered. Of the two TONE buttons you want to layer. Example: Press GRAND PIANO 2 button and STRINGS button at the same time. FUNCTION VOLUME METRONOME E-6 TEMPO BRILLIANCE TONE REVERB SPLIT CHORUS 404A-E-008B GRAND...
... of a Tone You can adjust the clarity and sharpness of the two tones that you want. Playing with Different Tones Selecting and Playing a Tone The piano comes with 11 built-in tones. 1 Press the POWER button. 1 Holding down the FUNCTION button, press the BRILLIANCE buttons to adjust the brilliance of ...a tone to the level that are now layered. Of the two TONE buttons you want to layer. Example: Press GRAND PIANO 2 button and STRINGS button at the same time. FUNCTION VOLUME METRONOME E-6 TEMPO BRILLIANCE TONE REVERB SPLIT CHORUS 404A-E-008B GRAND...
User Guide
Page 9
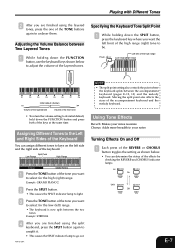
... SPLIT indicator lamp to its initial default, hold down the FUNCTION button and press both of the accompaniment keyboard and the melody keyboard. Example: GRAND PIANO 2 2 Press the SPLIT button. • This causes the SPLIT indicator lamp to adjust the volume of the layered tones. ̇ Specifying the ...; The keyboard is now split between the accompaniment keyboard (pages E-12, 13) and the melody keyboard. Split Point Low Range High Range STRINGS GRAND PIANO 2 1 Press the TONE button of the keyboard. Moving the split point also affects the sizes of the keys at the same time. Lit On...
... SPLIT indicator lamp to its initial default, hold down the FUNCTION button and press both of the accompaniment keyboard and the melody keyboard. Example: GRAND PIANO 2 2 Press the SPLIT button. • This causes the SPLIT indicator lamp to adjust the volume of the layered tones. ̇ Specifying the ...; The keyboard is now split between the accompaniment keyboard (pages E-12, 13) and the melody keyboard. Split Point Low Range High Range STRINGS GRAND PIANO 2 1 Press the TONE button of the keyboard. Moving the split point also affects the sizes of the keys at the same time. Lit On...
User Guide
Page 10
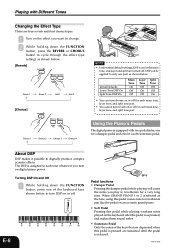
... and Off 1 While holding down the FUNCTION button, press one of the keys that are depressed when this pedal while playing weakens notes played on digital piano power. The DSP is released. 404A-E-010B DSP can turn reverb on or off . Chorus 1 Chorus 2 Chorus 3 Chorus 4 Using the... Piano's Pedals The digital piano is on for the main tone, and layer and split are four reverb and four chorus types. 1 Turn on the effect you play to change. 2 ...
... and Off 1 While holding down the FUNCTION button, press one of the keys that are depressed when this pedal while playing weakens notes played on digital piano power. The DSP is released. 404A-E-010B DSP can turn reverb on or off . Chorus 1 Chorus 2 Chorus 3 Chorus 4 Using the... Piano's Pedals The digital piano is on for the main tone, and layer and split are four reverb and four chorus types. 1 Turn on the effect you play to change. 2 ...
User Guide
Page 11
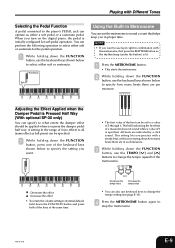
... be applied when you press the damper pedal half way. When you practice with Different Tones Selecting the Pedal Function A pedal connected to the piano's PEDAL jack can operate as full press) can also use the keyboard keys shown below to 42 (same effect as either soft or sostenuto....(indicating the first beat of a measure) does not sound while a value of the keys at the same time. This setting lets you turn on the digital piano, the pedal is specified. Playing with a steady beat, without worrying about how many beats there are per measure. L • The first value of ...
... be applied when you press the damper pedal half way. When you practice with Different Tones Selecting the Pedal Function A pedal connected to the piano's PEDAL jack can operate as full press) can also use the keyboard keys shown below to 42 (same effect as either soft or sostenuto....(indicating the first beat of a measure) does not sound while a value of the keys at the same time. This setting lets you turn on the digital piano, the pedal is specified. Playing with a steady beat, without worrying about how many beats there are per measure. L • The first value of ...

User Guide
Page 13
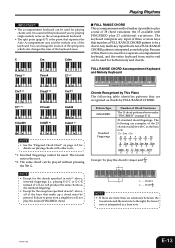
...selected rhythm before you play the first chord within the accompaniment keyboard range. 3 Press the INTRO/ENDING button. • This configures the piano so accompaniment starts with auto accompaniment PREPARATION • Select the rhythm you want to use and adjust the tempo. 1 Select one of ...how to play with an intro pattern. Auto accompaniment makes it feel like you all the time. With such rhythms, make sure that CASIO CHORD, FINGERED, or FULL RANGE CHORD is selected as the accompaniment mode. Using Auto Accompaniment With auto accompaniment, the keyboard automatically plays...
...selected rhythm before you play the first chord within the accompaniment keyboard range. 3 Press the INTRO/ENDING button. • This configures the piano so accompaniment starts with auto accompaniment PREPARATION • Select the rhythm you want to use and adjust the tempo. 1 Select one of ...how to play with an intro pattern. Auto accompaniment makes it feel like you all the time. With such rhythms, make sure that CASIO CHORD, FINGERED, or FULL RANGE CHORD is selected as the accompaniment mode. Using Auto Accompaniment With auto accompaniment, the keyboard automatically plays...
User Guide
Page 14
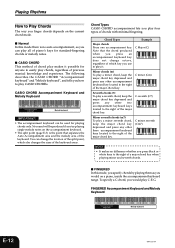
...to play chords, regardless of the major chord key. Playing Rhythms How to Play Chords The way you finger chords depends on a piano, inside the accompaniment keyboard range. No sound will be used for playing chords only. I FINGERED In this mode there is the ... press any other three accompaniment keyboard keys located to the right of the split point, which key you use to easily play CASIO CHORDs. I CASIO CHORD This method of chords with minimal fingering. FINGERED Accompaniment Keyboard and Melody Keyboard Accompaniment keyboard Melody keyboard E-12 404A-E-014A C...
...to play chords, regardless of the major chord key. Playing Rhythms How to Play Chords The way you finger chords depends on a piano, inside the accompaniment keyboard range. No sound will be used for playing chords only. I FINGERED In this mode there is the ... press any other three accompaniment keyboard keys located to the right of the split point, which key you use to easily play CASIO CHORDs. I CASIO CHORD This method of chords with minimal fingering. FINGERED Accompaniment Keyboard and Melody Keyboard Accompaniment keyboard Melody keyboard E-12 404A-E-014A C...
User Guide
Page 15
... a separate accompaniment keyboard, and the entire keyboard from end-to play the chord C major and C E . 1 EG C E GC 2 1 ..... Accompaniment keyboard/Melody keyboard Chords Recognized by This Piano The following are examples of three or more than six semitones between the lowest note and the next note to the right, the lowest note...
... a separate accompaniment keyboard, and the entire keyboard from end-to play the chord C major and C E . 1 EG C E GC 2 1 ..... Accompaniment keyboard/Melody keyboard Chords Recognized by This Piano The following are examples of three or more than six semitones between the lowest note and the next note to the right, the lowest note...
User Guide
Page 16
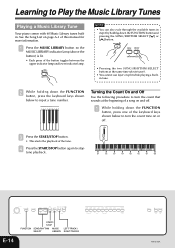
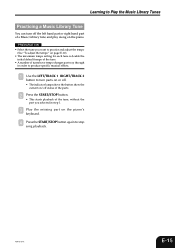
... Off Use the following procedure to turn the count tone on or off. Learning to Play the Music Library Tunes Playing a Music Library Tune Your piano comes with 60 Music Library tunes built in step 2 by holding down the FUNCTION button and pressing the SONG/RHYTHM SELECT [ ] or [ ] button. • Pressing...
... Off Use the following procedure to turn the count tone on or off. Learning to Play the Music Library Tunes Playing a Music Library Tune Your piano comes with 60 Music Library tunes built in step 2 by holding down the FUNCTION button and pressing the SONG/RHYTHM SELECT [ ] or [ ] button. • Pressing...
User Guide
Page 17
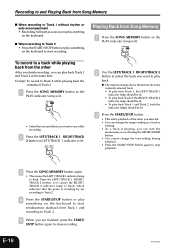
.... 2 Press the START/STOP button. • This starts playback of the tune, without the part you selected in step 1. 3 Play the missing part on the piano's keyboard. 4 Press the START/STOP button again to turn parts on or off. • The indicator lamps above the button show the current on the...
.... 2 Press the START/STOP button. • This starts playback of the tune, without the part you selected in step 1. 3 Play the missing part on the piano's keyboard. 4 Press the START/STOP button again to turn parts on or off. • The indicator lamps above the button show the current on the...
User Guide
Page 18
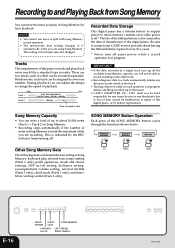
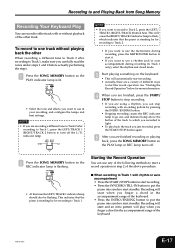
... off .* The life of the lithium battery is five years after the date of manufacture of notes in track Recorded Data Storage This digital piano has a lithium battery to supply power to retain memory contents even while power is off power while a record operation is included when ... play in /ending control (Track 1 only). Be sure to contact your CASIO service provider about 10,000 notes (Track 1 + Track 2) in Song Memory. • Recording stops automatically if the number of the digital piano. Playback Standby Record Standby Normal Other Song Memory Data The following data is in...
... off .* The life of the lithium battery is five years after the date of manufacture of notes in track Recorded Data Storage This digital piano has a lithium battery to supply power to retain memory contents even while power is off power while a record operation is included when ... play in /ending control (Track 1 only). Be sure to contact your CASIO service provider about 10,000 notes (Track 1 + Track 2) in Song Memory. • Recording stops automatically if the number of the digital piano. Playback Standby Record Standby Normal Other Song Memory Data The following data is in...
User Guide
Page 19
...with rhythm or auto accompaniment • Press the START/STOP button to start recording. • Press the SYNCHRO/FILL-IN button to put the piano into synchro start standby. See "Starting the Record Operation" below for recording to Track 2, press the LEFT/ TRACK 1 RIGHT/TRACK 2 button here... indicator lamp. Recording will start and an intro pattern will cause the RIGHT/TRACK 2 indicator lamp to flash, which indicates that the piano is standing by pressing the INTRO/ENDING button. • Stopping recording causes the REC indicator lamp to start standby. This will play back...
...with rhythm or auto accompaniment • Press the START/STOP button to start recording. • Press the SYNCHRO/FILL-IN button to put the piano into synchro start standby. See "Starting the Record Operation" below for recording to Track 2, press the LEFT/ TRACK 1 RIGHT/TRACK 2 button here... indicator lamp. Recording will start and an intro pattern will cause the RIGHT/TRACK 2 indicator lamp to flash, which indicates that the piano is standing by pressing the INTRO/ENDING button. • Stopping recording causes the REC indicator lamp to start standby. This will play back...
User Guide
Page 20
... 1 indicator lamp to flash. Press the LEFT/TRACK 1 RIGHT/ TRACK 2 button, so it causes the RIGHT/ TRACK 2 indicator lamp to flash, which indicates that the piano is standing by for recording to Track 2. 4 Press the START/STOP button or play something on the keyboard to Track 1 without rhythm or auto accompaniment...
... 1 indicator lamp to flash. Press the LEFT/TRACK 1 RIGHT/ TRACK 2 button, so it causes the RIGHT/ TRACK 2 indicator lamp to flash, which indicates that the piano is standing by for recording to Track 2. 4 Press the START/STOP button or play something on the keyboard to Track 1 without rhythm or auto accompaniment...
User Guide
Page 23
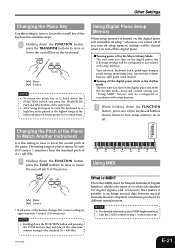
...settings will remember its setup* whenever you turn it possible to turn off the digital piano. NOTE • For detailed information about MIDI Implementation, visit the CASIO website at: http://world.casio.com/. 404A-E-023B E-21 The setting range is the name of the keyboard... Tune selection, keyboard touch, pedal type, damper pedal setting, metronome beat, layered tone volume balance, split point, send channel Turning off the digital piano while in semitone steps. 1 Holding down the FUNCTION button, press the TRANSPOSE buttons to raise or lower the overall key of the keyboard. [...
...settings will remember its setup* whenever you turn it possible to turn off the digital piano. NOTE • For detailed information about MIDI Implementation, visit the CASIO website at: http://world.casio.com/. 404A-E-023B E-21 The setting range is the name of the keyboard... Tune selection, keyboard touch, pedal type, damper pedal setting, metronome beat, layered tone volume balance, split point, send channel Turning off the digital piano while in semitone steps. 1 Holding down the FUNCTION button, press the TRANSPOSE buttons to raise or lower the overall key of the keyboard. [...
User Guide
Page 24
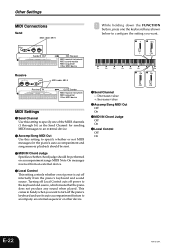
...the setting you want to turn off power to the keyboard and source, which means that the piano does not produce any sound when played. Turning off Local Control cuts off the piano's keyboard and use its auto accompaniment feature to specify whether or not MIDI messages for sending MIDI... MIDI cabel: MK-5 1 While holding down the FUNCTION button, press one of the MIDI channels (1 through 16) as the Send Channel for the piano's auto accompaniment and song memory playback should be sent. 3 MIDI IN Chord Judge Specifies whether chord judge should be performed on accompaniment range MIDI Note...
...the setting you want to turn off power to the keyboard and source, which means that the piano does not produce any sound when played. Turning off Local Control cuts off the piano's keyboard and use its auto accompaniment feature to specify whether or not MIDI messages for sending MIDI... MIDI cabel: MK-5 1 While holding down the FUNCTION button, press one of the MIDI channels (1 through 16) as the Send Channel for the piano's auto accompaniment and song memory playback should be sent. 3 MIDI IN Chord Judge Specifies whether chord judge should be performed on accompaniment range MIDI Note...
User Guide
Page 25
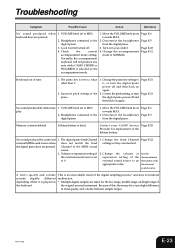
... the current accompaniment mode setting. Turn on the keyboard. Incorrect pitch setting of the lithium battery. Correct the pitch setting, or turn the digital piano power off . 4. Contact your CASIO Service Page E-25 Provider for the low range, middle range, and high range of the original musical instrument. Volume or expression setting of...
... the current accompaniment mode setting. Turn on the keyboard. Incorrect pitch setting of the lithium battery. Correct the pitch setting, or turn the digital piano power off . 4. Contact your CASIO Service Page E-25 Provider for the low range, middle range, and high range of the original musical instrument. Volume or expression setting of...
User Guide
Page 26
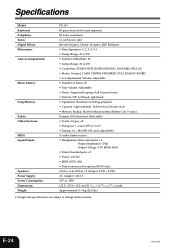
... Model: Keyboard: Polyphony: Tones: Digital Effects: Metronome: Auto Accompaniment: Music Library: Song Memory: Pedals: Other Functions: MIDI: Input/Output: Speakers: Power Supply: Power Consumption: Dimensions: Weight: PX-110 88 piano keys (with layer, split Reverb ...(4 types), Chorus (4 types), DSP, Brilliance • Time Signatures: 0, 2, 3, 4, 5, 6 • Tempo Range: 30 to 255 • Number of Rhythms: 20 • Tempo Range: 30 to 255 • Controllers: START/STOP, INTRO/ENDING, SYNCHRO/FILL-IN • Modes: Normal, CASIO...
... Model: Keyboard: Polyphony: Tones: Digital Effects: Metronome: Auto Accompaniment: Music Library: Song Memory: Pedals: Other Functions: MIDI: Input/Output: Speakers: Power Supply: Power Consumption: Dimensions: Weight: PX-110 88 piano keys (with layer, split Reverb ...(4 types), Chorus (4 types), DSP, Brilliance • Time Signatures: 0, 2, 3, 4, 5, 6 • Tempo Range: 30 to 255 • Number of Rhythms: 20 • Tempo Range: 30 to 255 • Controllers: START/STOP, INTRO/ENDING, SYNCHRO/FILL-IN • Modes: Normal, CASIO...


