MIDI Implementation
Page 5
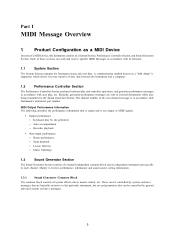
...number of the sent channel message is supported, which allows two-way transfer of system effects, mixer master control, etc. Keyboard play , etc. Demo performance - Mainly it receives performance information and sound source setting information. 1.3.1 Sound Generator Common Block... block consists of user data between the Instrument and a computer. 1.2 Performance Controller Section The Performance Controller Section performs keyboard play and controller operations, and generates performance messages in accordance with Instrument's instrument part number. These can be controlled by...
...number of the sent channel message is supported, which allows two-way transfer of system effects, mixer master control, etc. Keyboard play , etc. Demo performance - Mainly it receives performance information and sound source setting information. 1.3.1 Sound Generator Common Block... block consists of user data between the Instrument and a computer. 1.2 Performance Controller Section The Performance Controller Section performs keyboard play and controller operations, and generates performance messages in accordance with Instrument's instrument part number. These can be controlled by...
MIDI Implementation
Page 6
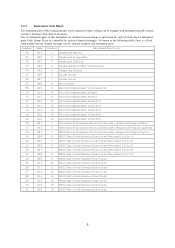
...B can be controlled by external channel messages. Number Name Channel Assigned Function 00 A01 1 Keyboard (Main) 01 A02 2 Keyboard (Layered) 02 A03 3 Keyboard (Split) 03 A04 4 Keyboard/Recorder (Harmonize) 04 A05 5 Sampling Phrase 05 A06 6 Guide Sound 06 A07 7 Guide... (Chord 5) 16 B01 1 MIDI/Auto Performance Functions/Recorder (Keyboard Playback Main) 17 B02 2 MIDI/Auto Performance Functions/Recorder (Keyboard Playback Layered) 18 B03 3 MIDI/Auto Performance Functions/Recorder (Keyboard Playback Split) 19 B04 4 MIDI/Auto Performance Functions/Recorder (Solo...
...B can be controlled by external channel messages. Number Name Channel Assigned Function 00 A01 1 Keyboard (Main) 01 A02 2 Keyboard (Layered) 02 A03 3 Keyboard (Split) 03 A04 4 Keyboard/Recorder (Harmonize) 04 A05 5 Sampling Phrase 05 A06 6 Guide Sound 06 A07 7 Guide... (Chord 5) 16 B01 1 MIDI/Auto Performance Functions/Recorder (Keyboard Playback Main) 17 B02 2 MIDI/Auto Performance Functions/Recorder (Keyboard Playback Layered) 18 B03 3 MIDI/Auto Performance Functions/Recorder (Keyboard Playback Split) 19 B04 4 MIDI/Auto Performance Functions/Recorder (Solo...
MIDI Implementation
Page 8
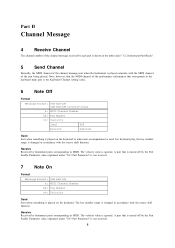
...00H (receive only) n: MIDI Channel Number kk: Key Number vv: Velocity Send 40H Receive Ignored Send Sent when something is played on the keyboard or when auto accompaniment is used. The key number range is changed in accordance with the octave shift function. A part that is turned off... Note On Format Message Format: 9nH kkH vvH n: MIDI Channel Number kk: Key Number vv: Velocity Send Sent when something is played on the keyboard. Part II Channel Message 4 Receive Channel The channel number of the channel message received by each part is shown in the table under "1.3.2 Instrument ...
...00H (receive only) n: MIDI Channel Number kk: Key Number vv: Velocity Send 40H Receive Ignored Send Sent when something is played on the keyboard or when auto accompaniment is used. The key number range is changed in accordance with the octave shift function. A part that is turned off... Note On Format Message Format: 9nH kkH vvH n: MIDI Channel Number kk: Key Number vv: Velocity Send Sent when something is played on the keyboard. Part II Channel Message 4 Receive Channel The channel number of the channel message received by each part is shown in the table under "1.3.2 Instrument ...

MIDI Implementation
Page 16
... the currently sounding voice (same as when All Notes Off is never sent. Receive Receipt of this message performs the same operation as releasing the keyboard key). 10.2 Omni Off (7CH) Format Message Format: BnH 7CH 00H n: MIDI Channel Number Send This message is stopped, etc.
... the currently sounding voice (same as when All Notes Off is never sent. Receive Receipt of this message performs the same operation as releasing the keyboard key). 10.2 Omni Off (7CH) Format Message Format: BnH 7CH 00H n: MIDI Channel Number Send This message is stopped, etc.
User Guide
Page 4
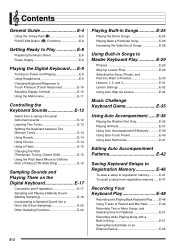
...Recorded Data on an External Device E-52 E-2 E-48 Using Tracks to Play E-8 Preparing the Music Stand E-8 Power Supply E-8 Playing the Digital Keyboard ..... Contents General Guide E-4 Using the 10-key Pad (br E-6 FUNCTION Button (cs) Functions E-6 Getting Ready to Record and Mix Parts... Parts E-37 Using Auto Accompaniment Effectively E-39 Using One-Touch Preset E-40 Using Auto Harmonize E-41 Editing Auto Accompaniment Patterns E-42 Saving Keyboard Setups to Registration Memory E-46 To save a setup to Practice E-30 Lessons 1, 2, and 3 E-31 Lesson Settings E-32 Using Auto...
...Recorded Data on an External Device E-52 E-2 E-48 Using Tracks to Play E-8 Preparing the Music Stand E-8 Power Supply E-8 Playing the Digital Keyboard ..... Contents General Guide E-4 Using the 10-key Pad (br E-6 FUNCTION Button (cs) Functions E-6 Getting Ready to Record and Mix Parts... Parts E-37 Using Auto Accompaniment Effectively E-39 Using One-Touch Preset E-40 Using Auto Harmonize E-41 Editing Auto Accompaniment Patterns E-42 Saving Keyboard Setups to Registration Memory E-46 To save a setup to Practice E-30 Lessons 1, 2, and 3 E-31 Lesson Settings E-32 Using Auto...
User Guide
Page 5
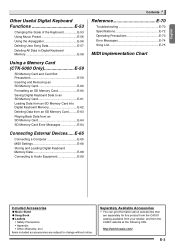
...an SD Memory Card E-60 Saving Digital Keyboard Data to an SD Memory Card E-61 Loading Data from an SD Memory Card into Digital Keyboard Memory E-62 Deleting Data from an SD Memory Card..........E-63 Playing Back Data from the CASIO website at the following URL. E-65 Connecting... a Computer E-65 MIDI Settings E-66 Storing and Loading Digital Keyboard Memory Data E-68 Connecting to Audio Equipment E-69 Contents Reference E-70 Troubleshooting E-70 ...
...an SD Memory Card E-60 Saving Digital Keyboard Data to an SD Memory Card E-61 Loading Data from an SD Memory Card into Digital Keyboard Memory E-62 Deleting Data from an SD Memory Card..........E-63 Playing Back Data from the CASIO website at the following URL. E-65 Connecting... a Computer E-65 MIDI Settings E-66 Storing and Loading Digital Keyboard Memory Data E-68 Connecting to Audio Equipment E-69 Contents Reference E-70 Troubleshooting E-70 ...
User Guide
Page 6
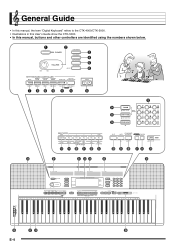
General Guide • In this manual, the term "Digital Keyboard" refers to the CTK-4000/CTK-5000. • Illustrations in this User's Guide show the CTK-5000. • In this manual, buttons and other controllers are identified using the numbers shown below. 1 2 3 4 5 6 7 8 9 bk bl bm bn br bo bp bq bs bt ck cl cm cn co cp cq cr cs ct dk dl dm dn do dp dk dq dr ds dt E-4
General Guide • In this manual, the term "Digital Keyboard" refers to the CTK-4000/CTK-5000. • Illustrations in this User's Guide show the CTK-5000. • In this manual, buttons and other controllers are identified using the numbers shown below. 1 2 3 4 5 6 7 8 9 bk bl bm bn br bo bp bq bs bt ck cl cm cn co cp cq cr cs ct dk dl dm dn do dp dk dq dr ds dt E-4

User Guide
Page 8
...-key) [9] (EXIT) key. 3. E-6 Then use the FUNCTION button (cs) to adjust the reverb effect, to delete data, and to perform a wide range of other Digital Keyboard operations. Use [-] (decrease) and [+] (increase) instead. [-] and [+] Buttons You can exit a submenu by pressing cs. • After selecting functions 8 through 12, press the br (10...
...-key) [9] (EXIT) key. 3. E-6 Then use the FUNCTION button (cs) to adjust the reverb effect, to delete data, and to perform a wide range of other Digital Keyboard operations. Use [-] (decrease) and [+] (increase) instead. [-] and [+] Buttons You can exit a submenu by pressing cs. • After selecting functions 8 through 12, press the br (10...
User Guide
Page 9
... Guide Performance Evaluation Phrase Length 10 Other Settings Arpeggiator Hold Pedal Effect Pitch Bend Range (CTK-5000 only) Accompaniment Scale LCD Contrast 11 MIDI Settings Keyboard Channel Navigate Channels Local Control Accomp Out 12 Delete Sampled Sound Delete User Rhythm Delete User Song Delete All Data Delete Display Trans.
... Guide Performance Evaluation Phrase Length 10 Other Settings Arpeggiator Hold Pedal Effect Pitch Bend Range (CTK-5000 only) Accompaniment Scale LCD Contrast 11 MIDI Settings Keyboard Channel Navigate Channels Local Control Accomp Out 12 Delete Sampled Sound Delete User Rhythm Delete User Song Delete All Data Delete Display Trans.

User Guide
Page 10
... batteries are facing as shown in the illustration. 3. Low battery indicator (flashes) E-8 Open the battery cover on the side of the Digital Keyboard. 2. ends of AC adaptor power is recommended. • The AC adaptor does not come with new ones. See page E-3 for information about...of the battery compartment, and close the cover. Purchase it separately from a household electrical outlet. Replace the batteries with this Digital Keyboard. Getting Ready to Play Preparing the Music Stand Using Batteries Music stand Power Supply Either an AC adaptor or batteries can be used...
... batteries are facing as shown in the illustration. 3. Low battery indicator (flashes) E-8 Open the battery cover on the side of the Digital Keyboard. 2. ends of AC adaptor power is recommended. • The AC adaptor does not come with new ones. See page E-3 for information about...of the battery compartment, and close the cover. Purchase it separately from a household electrical outlet. Replace the batteries with this Digital Keyboard. Getting Ready to Play Preparing the Music Stand Using Batteries Music stand Power Supply Either an AC adaptor or batteries can be used...
User Guide
Page 11
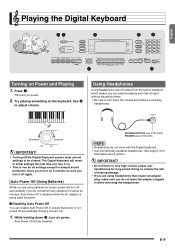
...Auto Power Off You can practice playing even late at night without disturbing others. • Be sure to turn off the Digital Keyboard causes most current settings to adjust volume. While holding down the volume level before connecting headphones. E-9 Auto Power Off (Using Batteries...) While you do not come with the Digital Keyboard. • Use commercially available headphones. Decrease Increase • Turning off automatically if you are using batteries for power, power will ...
...Auto Power Off You can practice playing even late at night without disturbing others. • Be sure to turn off the Digital Keyboard causes most current settings to adjust volume. While holding down the volume level before connecting headphones. E-9 Auto Power Off (Using Batteries...) While you do not come with the Digital Keyboard. • Use commercially available headphones. Decrease Increase • Turning off automatically if you are using batteries for power, power will ...
User Guide
Page 12
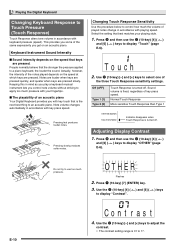
... 3. Actually, however, the intensity of an acoustic piano Your Digital Keyboard provides you with playing speed. Note volume changes automatically in accordance with keyboard pressure (speed). Playing the Digital Keyboard Changing Keyboard Response to Touch Pressure (Touch Response) Touch Response alters tone volume ... Do not try to apply too much pressure with your playing style. 1. Use the br (10-key) [4] ( ) and [6] ( to a piano keyboard, the louder the sound. Pressing slowly produces softer notes. Use br (10-key) [-] and [+] keys to display "Touch" (page E-6). Off (oFF) ...
... 3. Actually, however, the intensity of an acoustic piano Your Digital Keyboard provides you with playing speed. Note volume changes automatically in accordance with keyboard pressure (speed). Playing the Digital Keyboard Changing Keyboard Response to Touch Pressure (Touch Response) Touch Response alters tone volume ... Do not try to apply too much pressure with your playing style. 1. Use the br (10-key) [4] ( ) and [6] ( to a piano keyboard, the louder the sound. Pressing slowly produces softer notes. Use br (10-key) [-] and [+] keys to display "Touch" (page E-6). Off (oFF) ...

User Guide
Page 13
... any operation for this case, all beats are playing. • You can configure the metronome to use a bell sound for a short while. Playing the Digital Keyboard Changing the Metronome Tempo Use the following procedure to change the tempo setting. E-11 Use y (slower) and t (faster) to change the tempo of each beat...
... any operation for this case, all beats are playing. • You can configure the metronome to use a bell sound for a short while. Playing the Digital Keyboard Changing the Metronome Tempo Use the following procedure to change the tempo setting. E-11 Use y (slower) and t (faster) to change the tempo of each beat...
User Guide
Page 14
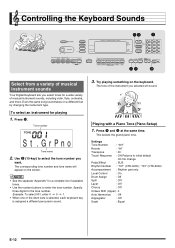
... bpbo br co cp cs Select from a variety of musical instrument sounds Your Digital Keyboard lets you select tones for a wide variety of the drum sets is selected, each keyboard key is assigned a different percussion sound. 3. Example: To select 001, enter 0 3 0 3 1. • When one of musical instrument sounds, including ...the tone number. This selects the grand piano tone. Press bo and bp at the same time. Even the same song sound takes on the keyboard. Use br (10-key) to select the tone number you selected will appear on the screen. • See the separate "Appendix" for a...
... bpbo br co cp cs Select from a variety of musical instrument sounds Your Digital Keyboard lets you select tones for a wide variety of the drum sets is selected, each keyboard key is assigned a different percussion sound. 3. Example: To select 001, enter 0 3 0 3 1. • When one of musical instrument sounds, including ...the tone number. This selects the grand piano tone. Press bo and bp at the same time. Even the same song sound takes on the keyboard. Use br (10-key) to select the tone number you selected will appear on the screen. • See the separate "Appendix" for a...
User Guide
Page 15
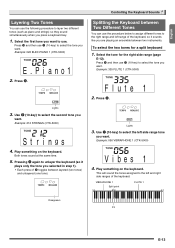
... Different Tones You can use the following procedure to layer two different tones (such as piano and strings) so they sound simultaneously when you press a keyboard key. 1. Use br (10-key) to select the second tone you want. VIBRAPHONE 1 Split point FLUTE 1 Disappears F3 E-13 Press cp. Lights 3. Play something ... can use the procedure below to assign different tones to the right range and left range of the keyboard, so it plays only the tone you selected in step 1). • Each press of the keyboard. Press bo and then use br (10-key) to select the tone you want . Example: 026...
... Different Tones You can use the following procedure to layer two different tones (such as piano and strings) so they sound simultaneously when you press a keyboard key. 1. Use br (10-key) to select the second tone you want. VIBRAPHONE 1 Split point FLUTE 1 Disappears F3 E-13 Press cp. Lights 3. Play something ... can use the procedure below to assign different tones to the right range and left range of the keyboard, so it plays only the tone you selected in step 1). • Each press of the keyboard. Press bo and then use br (10-key) to select the tone you want . Example: 026...
User Guide
Page 16
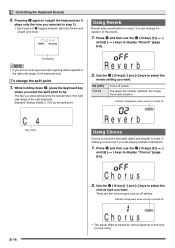
... the split point 1. There are playing multiple instruments. 1. Use the br (10-key) [-] and [+] keys to the right side range of the split keyboard. The larger the number selected, the longer the reverb duration. E-14 Cho r us • The actual effect produced by chorus depends on both layer and... split, layering will become the lowest note of the right side range of the keyboard only. Off (oFF) 1 to notes. Indicator disappears when reverb is a function that adds depth and breadth to 10 Turns off setting. Press cs...
... the split point 1. There are playing multiple instruments. 1. Use the br (10-key) [-] and [+] keys to the right side range of the split keyboard. The larger the number selected, the longer the reverb duration. E-14 Cho r us • The actual effect produced by chorus depends on both layer and... split, layering will become the lowest note of the right side range of the keyboard only. Off (oFF) 1 to notes. Indicator disappears when reverb is a function that adds depth and breadth to 10 Turns off setting. Press cs...

User Guide
Page 17
...) [4] ( ) and [6] ( ) keys to match that are playing when the pedal is depressed before the keyboard keys are sustained even if the pedal is not pressed. Controlling the Keyboard Sounds Changing the Pitch (Transpose, Tuning, Octave Shift) Changing the Pitch in Semitone Steps (Transpose) The transpose feature... (Tuning) Use the tuning feature when you instantly change the pitch, in various ways while playing. • A pedal unit does not come with the Digital Keyboard. Press cs. Use the br (10-key) [4] ( ) and [6] ( to adjust the tuning. Sustains notes that of a singer. • The ...
...) [4] ( ) and [6] ( ) keys to match that are playing when the pedal is depressed before the keyboard keys are sustained even if the pedal is not pressed. Controlling the Keyboard Sounds Changing the Pitch (Transpose, Tuning, Octave Shift) Changing the Pitch in Semitone Steps (Transpose) The transpose feature... (Tuning) Use the tuning feature when you instantly change the pitch, in various ways while playing. • A pedal unit does not come with the Digital Keyboard. Press cs. Use the br (10-key) [4] ( ) and [6] ( to adjust the tuning. Sustains notes that of a singer. • The ...

User Guide
Page 18
... shift the octave for a few seconds after this screen appears, the display will return to display "OTHER" (page E-6). You can individually set the left side keyboard range. • Split Off : The screen shown below will appear. Use the br (10-key) [-] and [+] keys to display "Bend Rng". )... (10-key) [4] ( ) and [6] ( to change the range. Press cp. • Split On : The screen shown below will appear. Controlling the Keyboard Sounds Octave Shift Octave Shift lets you raise or lower the pitch of notes smoothly upwards and downwards. This technique makes it possible to produce...
... shift the octave for a few seconds after this screen appears, the display will return to display "OTHER" (page E-6). You can individually set the left side keyboard range. • Split Off : The screen shown below will appear. Use the br (10-key) [-] and [+] keys to display "Bend Rng". )... (10-key) [4] ( ) and [6] ( to change the range. Press cp. • Split On : The screen shown below will appear. Controlling the Keyboard Sounds Octave Shift Octave Shift lets you raise or lower the pitch of notes smoothly upwards and downwards. This technique makes it possible to produce...

User Guide
Page 19
...Turn down the volume levels of your dog and then use the sound in monaural. • Turn off the external device and the Digital Keyboard before connecting them. 1. Connect an external device to create new sounds that matches the configuration of the external device on the other device, ...and then play the sound with keyboard keys. E-17 You also can use the Digital Keyboard to sample a sound from a CD. Connection and Preparation 2. Stereo mini plug CD player, Cassette player, etc. ...
...Turn down the volume levels of your dog and then use the sound in monaural. • Turn off the external device and the Digital Keyboard before connecting them. 1. Connect an external device to create new sounds that matches the configuration of the external device on the other device, ...and then play the sound with keyboard keys. E-17 You also can use the Digital Keyboard to sample a sound from a CD. Connection and Preparation 2. Stereo mini plug CD player, Cassette player, etc. ...

User Guide
Page 20
... finished, press cr. Sampled sound 1 To sample a sound 1. No Da t a No sampled sound stored Lights • In place of sampling if Digital Keyboard memory is started. Press cr. The allowable sampling time (in seconds) will appear on the display momentarily and then the display will stop automatically 10... stop when you release cr. • Even if you do not accidentally delete important data, be stored in Digital Keyboard memory as the melody part on the Digital Keyboard. • Up to sample for more sound being input from the external device. After the sound you should be ...
... finished, press cr. Sampled sound 1 To sample a sound 1. No Da t a No sampled sound stored Lights • In place of sampling if Digital Keyboard memory is started. Press cr. The allowable sampling time (in seconds) will appear on the display momentarily and then the display will stop automatically 10... stop when you release cr. • Even if you do not accidentally delete important data, be stored in Digital Keyboard memory as the melody part on the Digital Keyboard. • Up to sample for more sound being input from the external device. After the sound you should be ...


