MIDI Implementation
Page 12
... pedal operation. 9.10 Reverb Send (5BH) Format Message Format: BnH 5BH vvH n: MIDI Channel Number vv: Value 12 Timbre Type Specific Operation This operation differs in accordance with the Timbre Type (see "11.1 About the Timbre Type") setting. • Timbre Type: Melody Sustain off/on control is performed in accordance with the value of the received message. • Timbre Type: Drum The received message does not affect sound source operation. 9.8 Sostenuto (42H) Format...
... pedal operation. 9.10 Reverb Send (5BH) Format Message Format: BnH 5BH vvH n: MIDI Channel Number vv: Value 12 Timbre Type Specific Operation This operation differs in accordance with the Timbre Type (see "11.1 About the Timbre Type") setting. • Timbre Type: Melody Sustain off/on control is performed in accordance with the value of the received message. • Timbre Type: Drum The received message does not affect sound source operation. 9.8 Sostenuto (42H) Format...
MIDI Implementation
Page 22
... Format: F0H 7EH 7FH 09H 03H F7H Send This message is changed. Send This message is sent when the System Chorus Type setting is never sent. Receive Receipt changes the System Chorus Type parameter. Receive Receipt puts the sound source into a GM sound source mode. Receive Receipt changes the sound source setting to the Instrument presetting. Receive Though the Instrument does not support...
... Format: F0H 7EH 7FH 09H 03H F7H Send This message is changed. Send This message is sent when the System Chorus Type setting is never sent. Receive Receipt changes the System Chorus Type parameter. Receive Receipt puts the sound source into a GM sound source mode. Receive Receipt changes the sound source setting to the Instrument presetting. Receive Though the Instrument does not support...
User Guide
Page 4
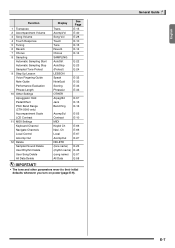
...the Rhythm Part Only E-36 Playing All Parts E-37 Using Auto Accompaniment Effectively E-39 Using One-Touch Preset E-40 Using Auto Harmonize E-41 Editing Auto Accompaniment Patterns E-42 Saving Keyboard Setups to Registration Memory E-46 To save a setup to Play E-8 Preparing the Music Stand E-8 Power Supply E-8 Playing the Digital Keyboard ..... E-47 To recall a setup from a variety of Songs E-28 Using Built-in Song E-51 Saving Recorded Data on Power and Playing E-9 Using Headphones E-9 Changing Keyboard Response to Touch Pressure (Touch Response E-10 Adjusting Display...
...the Rhythm Part Only E-36 Playing All Parts E-37 Using Auto Accompaniment Effectively E-39 Using One-Touch Preset E-40 Using Auto Harmonize E-41 Editing Auto Accompaniment Patterns E-42 Saving Keyboard Setups to Registration Memory E-46 To save a setup to Play E-8 Preparing the Music Stand E-8 Power Supply E-8 Playing the Digital Keyboard ..... E-47 To recall a setup from a variety of Songs E-28 Using Built-in Song E-51 Saving Recorded Data on Power and Playing E-9 Using Headphones E-9 Changing Keyboard Response to Touch Pressure (Touch Response E-10 Adjusting Display...
User Guide
Page 9
...Function 1 Transpose 2 Accompaniment Volume 3 Song Volume 4 Touch Response 5 Tuning 6 Reverb 7 Chorus 8 Sampling Automatic Sampling Start Automatic Sampling Stop Sampled Tone Protect 9 Step Up Lesson Voice Fingering Guide Note Guide Performance Evaluation Phrase Length 10 Other Settings Arpeggiator Hold Pedal Effect Pitch Bend Range (CTK-5000 only) Accompaniment Scale LCD Contrast 11 MIDI Settings Keyboard Channel Navigate Channels Local Control Accomp Out 12 Delete Sampled Sound Delete User Rhythm Delete User Song Delete All Data Delete Display Trans. General Guide E-7 Ch E-66 Local...
...Function 1 Transpose 2 Accompaniment Volume 3 Song Volume 4 Touch Response 5 Tuning 6 Reverb 7 Chorus 8 Sampling Automatic Sampling Start Automatic Sampling Stop Sampled Tone Protect 9 Step Up Lesson Voice Fingering Guide Note Guide Performance Evaluation Phrase Length 10 Other Settings Arpeggiator Hold Pedal Effect Pitch Bend Range (CTK-5000 only) Accompaniment Scale LCD Contrast 11 MIDI Settings Keyboard Channel Navigate Channels Local Control Accomp Out 12 Delete Sampled Sound Delete User Rhythm Delete User Song Delete All Data Delete Display Trans. General Guide E-7 Ch E-66 Local...
User Guide
Page 16
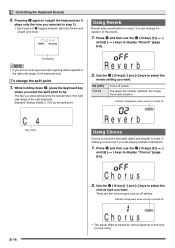
... br (10-key) [-] and [+] keys to select the chorus type you want . There are using. You can change the split point 1. To change the duration of co toggles between split (two tones) and unsplit (one tone). It makes you are playing multiple instruments. 1. C 4 Key name Reve r b Using Chorus Chorus is turned off setting. Using Reverb Reverb adds reverberation to display "Chorus" (page E-6). Example: Setting middle C (C4) as if you sound as the split point. Indicator disappears...
... br (10-key) [-] and [+] keys to select the chorus type you want . There are using. You can change the split point 1. To change the duration of co toggles between split (two tones) and unsplit (one tone). It makes you are playing multiple instruments. 1. C 4 Key name Reve r b Using Chorus Chorus is turned off setting. Using Reverb Reverb adds reverberation to display "Chorus" (page E-6). Example: Setting middle C (C4) as if you sound as the split point. Indicator disappears...

User Guide
Page 17
... pedal effects. Controlling the Keyboard Sounds Changing the Pitch (Transpose, Tuning, Octave Shift) Changing the Pitch in Semitone Steps (Transpose) The transpose feature lets you want . Use the br (10-key) [-] and [+] keys to select the pedal effect you change the pitch, in various ways while playing. • A pedal unit does not come with slightly altered tuning. Pressing the pedal starts and stops Auto Accompaniment or song playback. Trans . 2. Use the br (10-key) [-] and [+] keys to display "Jack". ) keys J a c k 4. Also, some artists perform their music...
... pedal effects. Controlling the Keyboard Sounds Changing the Pitch (Transpose, Tuning, Octave Shift) Changing the Pitch in Semitone Steps (Transpose) The transpose feature lets you want . Use the br (10-key) [-] and [+] keys to select the pedal effect you change the pitch, in various ways while playing. • A pedal unit does not come with slightly altered tuning. Pressing the pedal starts and stops Auto Accompaniment or song playback. Trans . 2. Use the br (10-key) [-] and [+] keys to display "Jack". ) keys J a c k 4. Also, some artists perform their music...

User Guide
Page 18
...-key) [4] ( ) and [6] ( ) keys to display "Bend Rng". ) keys Bend Rng 4. To play with the pitch bend wheel 1. The amount the note bends depends on how much the pitch of the note changes whenever the pitch bend wheel is -2 to +2 octaves. • When using Split (page E-13), you can individually set the left and right keyboard ranges to sounds produced when bending notes on a saxophone or electric guitar. Press cp again. Use the br (10-key) [-] and [+] keys to step...
...-key) [4] ( ) and [6] ( ) keys to display "Bend Rng". ) keys Bend Rng 4. To play with the pitch bend wheel 1. The amount the note bends depends on how much the pitch of the note changes whenever the pitch bend wheel is -2 to +2 octaves. • When using Split (page E-13), you can individually set the left and right keyboard ranges to sounds produced when bending notes on a saxophone or electric guitar. Press cp again. Use the br (10-key) [-] and [+] keys to step...

User Guide
Page 33
... display shows the key you play the correct note. • Keyboard key goes from flashing to lit. • Note guide sounds the correct note to be played. • Voice Fingering Guide tells you should use . 4 Pressing the correct keyboard key causes song playback to press the correct keyboard keys and play at your time and play the notes. Lesson 2: Watch how the song is time to play the wrong note. Song playback will wait for you to start the lessons. Flashes...
... display shows the key you play the correct note. • Keyboard key goes from flashing to lit. • Note guide sounds the correct note to be played. • Voice Fingering Guide tells you should use . 4 Pressing the correct keyboard key causes song playback to press the correct keyboard keys and play at your time and play the notes. Lesson 2: Watch how the song is time to play the wrong note. Song playback will wait for you to start the lessons. Flashes...

User Guide
Page 35
... is turned off note guide, which evaluates your performance and displays a score in Songs to Master Keyboard Play Changing the Phrase Length You can use the br (10-key) [4] ( ) and [6] ( ) keys to turn off . E-33 No t eGu i d 4. Using Built-in Lesson 2 and Lesson 3. 1. Press cs and then use the br (10-key) [4] ( ) and [6] ( ) keys to display "LESSON" (page E-6). 2. Use the br (10-key) [4] ( ) and [6] ( ) keys to select the OFF setting. Use the...
... is turned off note guide, which evaluates your performance and displays a score in Songs to Master Keyboard Play Changing the Phrase Length You can use the br (10-key) [4] ( ) and [6] ( ) keys to turn off . E-33 No t eGu i d 4. Using Built-in Lesson 2 and Lesson 3. 1. Press cs and then use the br (10-key) [4] ( ) and [6] ( ) keys to display "LESSON" (page E-6). 2. Use the br (10-key) [4] ( ) and [6] ( ) keys to select the OFF setting. Use the...

User Guide
Page 43
... to turn on Auto Harmonize. Adds harmony that is controlled using the Auto Harmonize. Do not select them when using the same button cq as the chord input mode. Adds 3-note open harmony, for strings. Use the br (10-key) [-] and [+] keys to select the Auto Harmonize type you want to use Auto Harmonize. 2. Adds the fifth degree note. Press bm to enable Auto Accompaniment with chords (ACCOMP indicator lit) (page E-37). • Auto Harmonize cannot be used while...
... to turn on Auto Harmonize. Adds harmony that is controlled using the Auto Harmonize. Do not select them when using the same button cq as the chord input mode. Adds 3-note open harmony, for strings. Use the br (10-key) [-] and [+] keys to select the Auto Harmonize type you want to use Auto Harmonize. 2. Adds the fifth degree note. Press bm to enable Auto Accompaniment with chords (ACCOMP indicator lit) (page E-37). • Auto Harmonize cannot be used while...
User Guide
Page 44
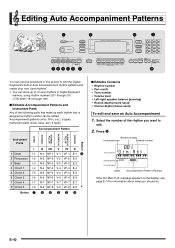
... your own "user rhythms". • You can be edited. Rhythm number Instrument part Editable content Drm:Rhy . Lights Accompaniment Pattern (Flashes) If the "Err Mem Full" message appears on /off • Tone number • Volume level • Left-right speaker balance (panning) • Reverb depth (reverb send) • Chorus depth (chorus send) To edit and save an Auto Accompaniment 1. E-42 Accompaniment patterns (intro, fill-in Digital Keyboard memory, using rhythm numbers 201 through...
... your own "user rhythms". • You can be edited. Rhythm number Instrument part Editable content Drm:Rhy . Lights Accompaniment Pattern (Flashes) If the "Err Mem Full" message appears on /off • Tone number • Volume level • Left-right speaker balance (panning) • Reverb depth (reverb send) • Chorus depth (chorus send) To edit and save an Auto Accompaniment 1. E-42 Accompaniment patterns (intro, fill-in Digital Keyboard memory, using rhythm numbers 201 through...

User Guide
Page 45
.... Setting Type 1 Part on the display. This will appear on /off 2 Tone number* 3 Volume level 4 Left-right speaker balance (panning) 5 Reverb depth (reverb send) 6 Chorus depth (chorus send) Display Part Tone Vol. English 3. Press bm to select the instrument part you want for example, 003 also will cycle through ending). 10. Parts that contain data. Part 6 (Chord 3) 5. This will change the rhythm number in step 6, the editable contents (1 through 7 as many times as...
.... Setting Type 1 Part on the display. This will appear on /off 2 Tone number* 3 Volume level 4 Left-right speaker balance (panning) 5 Reverb depth (reverb send) 6 Chorus depth (chorus send) Display Part Tone Vol. English 3. Press bm to select the instrument part you want for example, 003 also will cycle through ending). 10. Parts that contain data. Part 6 (Chord 3) 5. This will change the rhythm number in step 6, the editable contents (1 through 7 as many times as...

User Guide
Page 48
... Digital Keyboard setups (tone, rhythm, etc.) for recording. Bank 8 Setup 8-1 Setup 8-2 Setup 8-3 Setup 8-4 • Each press of bank select button bs cycles through the bank numbers, from 1 to 8. • Pressing a button from bt to a registration memory setup. • Tone numbers (main, layer, split) • Rhythm number • Tempo • Auto Harmonize • Transpose • Split point • Touch Response • Octave shift • Chord fingerings • Accompaniment volume • Arpeggiator setting (on, off, type) • Synchro start • Reverb (on, off, type...
... Digital Keyboard setups (tone, rhythm, etc.) for recording. Bank 8 Setup 8-1 Setup 8-2 Setup 8-3 Setup 8-4 • Each press of bank select button bs cycles through the bank numbers, from 1 to 8. • Pressing a button from bt to a registration memory setup. • Tone numbers (main, layer, split) • Rhythm number • Tempo • Auto Harmonize • Transpose • Split point • Touch Response • Octave shift • Chord fingerings • Accompaniment volume • Arpeggiator setting (on, off, type) • Synchro start • Reverb (on, off, type...

User Guide
Page 53
... the display. Press [+] (YES) to delete the song, or [-] (NO) to the recording. Tone number, song number, pedal operation, tempo, reverb, chorus, layer/split settings, pitch bend wheel operation (CTK-5000 only) • There can be only one of the Digital Keyboard's built-in songs. ● The following operations and settings also are recorded along with a Built-in recorder memory. This will enter record standby. To stop recording or playback, press bl. 4. Press bq. 2. Lights 3. Use br (10-key...
... the display. Press [+] (YES) to delete the song, or [-] (NO) to the recording. Tone number, song number, pedal operation, tempo, reverb, chorus, layer/split settings, pitch bend wheel operation (CTK-5000 only) • There can be only one of the Digital Keyboard's built-in songs. ● The following operations and settings also are recorded along with a Built-in recorder memory. This will enter record standby. To stop recording or playback, press bl. 4. Press bq. 2. Lights 3. Use br (10-key...

User Guide
Page 59
... again to turn on Other Useful Digital Keyboard Functions Deleting User Song Data You can use the following procedure when you want to display "DELETE" (page E-6). Remaining memory capacity 2. Ar pegH l d 3. Press cq to turn off Arpeggiator. Playing a chord on the keyboard will appear followed by the screen in step 2 of the above procedure. • To cancel the delete operation, press [-] (NO) or [9] (EXIT) in place of the pressed keys 3. Press...
... again to turn on Other Useful Digital Keyboard Functions Deleting User Song Data You can use the following procedure when you want to display "DELETE" (page E-6). Remaining memory capacity 2. Ar pegH l d 3. Press cq to turn off Arpeggiator. Playing a chord on the keyboard will appear followed by the screen in step 2 of the above procedure. • To cancel the delete operation, press [-] (NO) or [9] (EXIT) in place of the pressed keys 3. Press...
User Guide
Page 61
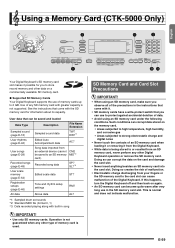
..., make sure you observe all of the precautions in the instructions that can be saved and loaded Data Type Description File Name Extension Sampled sound (page E-18) Sampled sound data TW7 DW7*1 User rhythms (page E-42) Edited Auto Accompaniment data AC7 User songs (page E-28) Song data imported from an external device (cannot be saved to the card slot can corrupt data stored on a commercially available SD memory card. ● Supported SD Memory Cards Your Digital Keyboard supports...
..., make sure you observe all of the precautions in the instructions that can be saved and loaded Data Type Description File Name Extension Sampled sound (page E-18) Sampled sound data TW7 DW7*1 User rhythms (page E-42) Edited Auto Accompaniment data AC7 User songs (page E-28) Song data imported from an external device (cannot be saved to the card slot can corrupt data stored on a commercially available SD memory card. ● Supported SD Memory Cards Your Digital Keyboard supports...
User Guide
Page 64
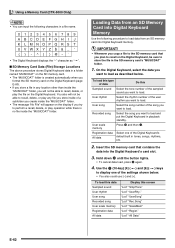
... automatically when you format the SD memory card on the Digital Keyboard (page E-60). • If you store a file in the SD memory card's "MUSICDAT" folder. 1. On the Digital Keyboard, select the data you want to perform a recall, delete, or play operation while there is no file inside the "MUSICDAT" folder. To load this data Sampled sound User rhythm User song Recorded song User scale memory Registration data All data Display this Sampled sound Select the tone number of a subfolder you...
... automatically when you format the SD memory card on the Digital Keyboard (page E-60). • If you store a file in the SD memory card's "MUSICDAT" folder. 1. On the Digital Keyboard, select the data you want to perform a recall, delete, or play operation while there is no file inside the "MUSICDAT" folder. To load this data Sampled sound User rhythm User song Recorded song User scale memory Registration data All data Display this Sampled sound Select the tone number of a subfolder you...
User Guide
Page 70
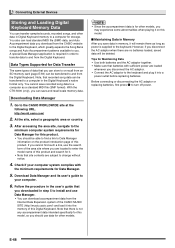
.... 6. Connecting External Devices Storing and Loading Digital Keyboard Memory Data You can transfer sampled sounds, recorded songs, and other models, you may experience some abnormalities when playing it into the memory of data that recorded song data can be transferred to and from the CASIO website to the Digital Keyboard, which greatly expands the Song Bank songs and Auto Accompaniment patterns available to a computer for Data Transfer The same types of this product. You also can load standard MIDI file (SMF) data, and Auto Accompaniment data you download from...
.... 6. Connecting External Devices Storing and Loading Digital Keyboard Memory Data You can transfer sampled sounds, recorded songs, and other models, you may experience some abnormalities when playing it into the memory of data that recorded song data can be transferred to and from the CASIO website to the Digital Keyboard, which greatly expands the Song Bank songs and Auto Accompaniment patterns available to a computer for Data Transfer The same types of this product. You also can load standard MIDI file (SMF) data, and Auto Accompaniment data you download from...

User Guide
Page 73
... Connection I can save setups to system limitations. Notes keep sounding, without stopping. • Turn power off and then back on to initialize all Digital Keyboard settings (page E-9). This does not indicate malfunction. Tone, rhythm, and other instruments. • Check and adjust the transpose (page E-15) and tuning settings (page E-15). • Turn power off and then back on to initialize all Digital Keyboard settings (page E-9). • Replace the batteries with new ones or switch over...
... Connection I can save setups to system limitations. Notes keep sounding, without stopping. • Turn power off and then back on to initialize all Digital Keyboard settings (page E-9). This does not indicate malfunction. Tone, rhythm, and other instruments. • Check and adjust the transpose (page E-15) and tuning settings (page E-15). • Turn power off and then back on to initialize all Digital Keyboard settings (page E-9). • Replace the batteries with new ones or switch over...
User Guide
Page 74
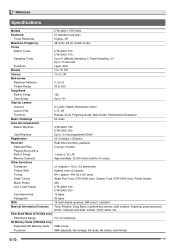
... Music Challenge 20 notes Auto Accompaniment Built-in Rhythms CTK-4000: 180 CTK-5000: 200 User Rhythms Up to 10 (Accompaniment Edit)* Registration 32 (4 setups × 8 banks) Recorder Real-time recording, playback Keyboard Play 5 songs, 6 tracks Playing Along with a Built-in Songs 1 song (L, R, LR) Memory Capacity Approximately 12,000 notes (total for 6 songs) Other Functions Transpose ±1 octaves (-12 to 12 semitones SD Memory Cards (CTK-5000 only) Supported SD Memory Cards 2GB or less Functions SMF playback, file storage, file recall, file delete, card format...
... Music Challenge 20 notes Auto Accompaniment Built-in Rhythms CTK-4000: 180 CTK-5000: 200 User Rhythms Up to 10 (Accompaniment Edit)* Registration 32 (4 setups × 8 banks) Recorder Real-time recording, playback Keyboard Play 5 songs, 6 tracks Playing Along with a Built-in Songs 1 song (L, R, LR) Memory Capacity Approximately 12,000 notes (total for 6 songs) Other Functions Transpose ±1 octaves (-12 to 12 semitones SD Memory Cards (CTK-5000 only) Supported SD Memory Cards 2GB or less Functions SMF playback, file storage, file recall, file delete, card format...


