Setup Guide
Page 1
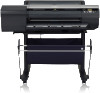
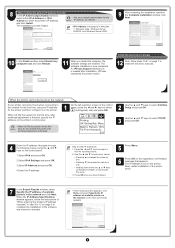
... Electronic Manuals (P.6) Store Accessories in printer installation. Adjustment paper h. Starter ink tanks (Y, PC, C, PGY, GY, BK, PM, M, MBK, R, G, B) m. Space Required for Mac OS X v10.7 and later). +800mm +150mm Printer iPF6400/ Printer alone iPF6450 With stand attached With stand and spectrophotometer iPF6450 unit ... the Ink Tanks Setup Guide Introductory Information ENG Read this MEMO Setup Guide, such as paper saving tips, how to print a poster and banner with the printer. • Canon, the Canon logo, and imagePROGRAF are trademarks or registered trademarks of CANON INC...
... Electronic Manuals (P.6) Store Accessories in printer installation. Adjustment paper h. Starter ink tanks (Y, PC, C, PGY, GY, BK, PM, M, MBK, R, G, B) m. Space Required for Mac OS X v10.7 and later). +800mm +150mm Printer iPF6400/ Printer alone iPF6450 With stand attached With stand and spectrophotometer iPF6450 unit ... the Ink Tanks Setup Guide Introductory Information ENG Read this MEMO Setup Guide, such as paper saving tips, how to print a poster and banner with the printer. • Canon, the Canon logo, and imagePROGRAF are trademarks or registered trademarks of CANON INC...
Setup Guide
Page 3
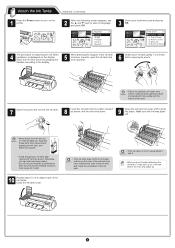
..., repeat steps 5 and 9. • After you have been installed. Otherwise, ink may result in the holder, make sure the color of the ink tank lock lever matches the color of the ink tank, and check the orientation of the Ink Tanks. Open the Ink Tank Cover by grasping the handles according to the display. 5 While... press OK. Language 㪈㪆㪉 English ᣣᧄ⺆ Français Italiano Deutsch 3 Select your local time zone and press OK. Attach the Ink Tanks 1 Press the Power button to turn on the bottom of the tank. 7 Open the pouch and remove the...
..., repeat steps 5 and 9. • After you have been installed. Otherwise, ink may result in the holder, make sure the color of the ink tank lock lever matches the color of the ink tank, and check the orientation of the Ink Tanks. Open the Ink Tank Cover by grasping the handles according to the display. 5 While... press OK. Language 㪈㪆㪉 English ᣣᧄ⺆ Français Italiano Deutsch 3 Select your local time zone and press OK. Attach the Ink Tanks 1 Press the Power button to turn on the bottom of the tank. 7 Open the pouch and remove the...
Setup Guide
Page 4
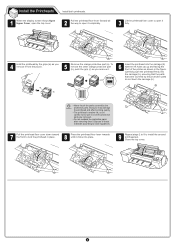
... cover down toward the front to lock the printhead in place. 8 Press the printhead fixer lever inwards until it clicks into the carriage (b) with the ink holes (a) up and facing the front of the printer as shown in the figure. Close the top cover. 4 a • Never touch the parts covered by... printhead by the grips (a) as you remove it from the pouch. Doing so may damage the printhead and affect printing quality. • The printhead contains ink, so be careful not to install the second printhead set.
... cover down toward the front to lock the printhead in place. 8 Press the printhead fixer lever inwards until it clicks into the carriage (b) with the ink holes (a) up and facing the front of the printer as shown in the figure. Close the top cover. 4 a • Never touch the parts covered by... printhead by the grips (a) as you remove it from the pouch. Doing so may damage the printhead and affect printing quality. • The printhead contains ink, so be careful not to install the second printhead set.

Setup Guide
Page 5
... of paper you will load. Refer to notify the execution period (Prompt Execution). b a 3 Slide the Width Guide (a) to align it with ink for color adjustment, it away from becoming crooked or wrinkled. Refer to check which is compatible with This Printer" on page 1. 5 Then from ... in , and store it is useful to set the function to "The Manuals Supplied with this process. This may cause the remaining ink indicator and maintenance cartridge capacity indicator to drop to about 40 % for printhead adj. During color calibration, on other compatible paper, refer...
... of paper you will load. Refer to notify the execution period (Prompt Execution). b a 3 Slide the Width Guide (a) to align it with ink for color adjustment, it away from becoming crooked or wrinkled. Refer to check which is compatible with This Printer" on page 1. 5 Then from ... in , and store it is useful to set the function to "The Manuals Supplied with this process. This may cause the remaining ink indicator and maintenance cartridge capacity indicator to drop to about 40 % for printhead adj. During color calibration, on other compatible paper, refer...
Setup Guide
Page 9
When ink fills the system for the first time, after installation. (iPFxxxx represents the printer model.) Install the electronic manuals 12 Next, follow the instructions of "When .... 9 tab) and press OK. The IP address is created after printhead adjustment is finished, specify the IP address on the printer's control panel. • When ink fills the system for the IP address, as needed. Use the ▲ and ▼ keys to input values. • Pressing ▲ increases the value by...
When ink fills the system for the first time, after installation. (iPFxxxx represents the printer model.) Install the electronic manuals 12 Next, follow the instructions of "When .... 9 tab) and press OK. The IP address is created after printhead adjustment is finished, specify the IP address on the printer's control panel. • When ink fills the system for the IP address, as needed. Use the ▲ and ▼ keys to input values. • Pressing ▲ increases the value by...
Setup Guide
Page 12
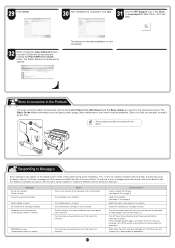
.... If the message appears again, write down the error code and message, turn off the printer, and contact your Canon dealer for assistance. The electronic manuals installation is crooked. Message No ink tank loaded. Write down the error code and message, turn off the printer, and contact your... Canon dealer for Mac OS X v10.7 and later). 32 When clicking the User's Manual button, the User's Guide...
.... If the message appears again, write down the error code and message, turn off the printer, and contact your Canon dealer for assistance. The electronic manuals installation is crooked. Message No ink tank loaded. Write down the error code and message, turn off the printer, and contact your... Canon dealer for Mac OS X v10.7 and later). 32 When clicking the User's Manual button, the User's Guide...
User Guide
Page 11
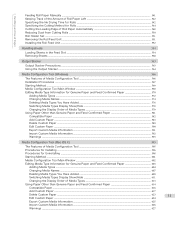
Handling and Use of Paper Feeding Roll Paper Manually ...541 Keeping Track of the Amount of Roll Paper Left ...542 Specifying the Ink Drying Time for Rolls ...542 Specifying the Cutting Method for Rolls ...544 Cutting the Leading Edge of Roll Paper Automatically 548 Reducing Dust from Cutting ...
Handling and Use of Paper Feeding Roll Paper Manually ...541 Keeping Track of the Amount of Roll Paper Left ...542 Specifying the Ink Drying Time for Rolls ...542 Specifying the Cutting Method for Rolls ...544 Cutting the Leading Edge of Roll Paper Automatically 548 Reducing Dust from Cutting ...
User Guide
Page 12
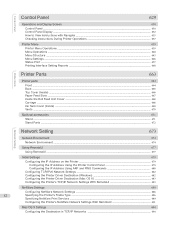
... 663 Printer parts 664 Front ...664 Back ...665 Top Cover (Inside) ...666 Paper Feed Slots ...667 Inside the Roll Feed Unit Cover ...668 Carriage ...668 Ink Tank Cover (Inside) ...669 Vents ...670 Optional accessories 671 Stand ...671 Stand Parts ...672 Network Setting Network Setting 673 Network Environment 674 Network Environment ...674...
... 663 Printer parts 664 Front ...664 Back ...665 Top Cover (Inside) ...666 Paper Feed Slots ...667 Inside the Roll Feed Unit Cover ...668 Carriage ...668 Ink Tank Cover (Inside) ...669 Vents ...670 Optional accessories 671 Stand ...671 Stand Parts ...672 Network Setting Network Setting 673 Network Environment 674 Network Environment ...674...
User Guide
Page 13
......702 Device Setup Utility (Windows) 703 imagePROGRAF Device Setup Utility ...703 Installing imagePROGRAF Device Setup Utility ...703 Configuring the IP Address Using imagePROGRAF Device Setup Utility 703 Print Job Management Print...imagePROGRAF Printmonitor ...710 Job Management Using imagePROGRAF Printmonitor 711 Accounting (Windows) 712 Accounting Manager ...712 Launching the Accounting Manager ...712 Accounting Manager Main Window ...713 Job List Area ...715 Accounting Manager Basic Procedures ...716 Configuring Unit Costs in Accounting Manager ...717 Setting the Unit Cost for Ink...
......702 Device Setup Utility (Windows) 703 imagePROGRAF Device Setup Utility ...703 Installing imagePROGRAF Device Setup Utility ...703 Configuring the IP Address Using imagePROGRAF Device Setup Utility 703 Print Job Management Print...imagePROGRAF Printmonitor ...710 Job Management Using imagePROGRAF Printmonitor 711 Accounting (Windows) 712 Accounting Manager ...712 Launching the Accounting Manager ...712 Accounting Manager Main Window ...713 Job List Area ...715 Accounting Manager Basic Procedures ...716 Configuring Unit Costs in Accounting Manager ...717 Setting the Unit Cost for Ink...
User Guide
Page 15
... Computer ...832 Switching Display Units ...833 Getting Audio Notification of Color Calibration Finished 833 Maintenance and Consumables 835 Ink Tanks 836 Ink Tanks ...836 Replacing Ink Tanks ...836 Checking Ink Tank Levels ...843 When to Replace Ink Tanks ...843 Printheads 845 Printhead ...845 Checking for Nozzle Clogging ...845 Cleaning the Printhead ...846 Replacing the Printhead...
... Computer ...832 Switching Display Units ...833 Getting Audio Notification of Color Calibration Finished 833 Maintenance and Consumables 835 Ink Tanks 836 Ink Tanks ...836 Replacing Ink Tanks ...836 Checking Ink Tank Levels ...843 When to Replace Ink Tanks ...843 Printheads 845 Printhead ...845 Checking for Nozzle Clogging ...845 Cleaning the Printhead ...846 Replacing the Printhead...
User Guide
Page 16
... rubs against the printhead ...892 The edges of the paper are dirty ...892 The surface of the paper is dirty ...893 The back side of ink ...906 Ink Level Detection ...907 Error Message Error Message 911 16 Error Messages 912 Messages regarding paper 914 Paper mismatch ...914 MediaType Mismatch ...914 Troubleshooting Paper... not start 889 The Data lamp on ...906 If the Printer Makes a Strange Sound ...906 Messages advising to check the maintenance cartridge are sent 889 Ink Filling..
... rubs against the printhead ...892 The edges of the paper are dirty ...892 The surface of the paper is dirty ...893 The back side of ink ...906 Ink Level Detection ...907 Error Message Error Message 911 16 Error Messages 912 Messages regarding paper 914 Paper mismatch ...914 MediaType Mismatch ...914 Troubleshooting Paper... not start 889 The Data lamp on ...906 If the Printer Makes a Strange Sound ...906 Messages advising to check the maintenance cartridge are sent 889 Ink Filling..
User Guide
Page 17
... securely in contact with right guide...919 Cannot detect papr ...920 Cannot feed paper...920 Cannot cut paper...920 End of the ink cannot be correctly detected. Use other paper...925 Cannot print as specified...925 Cannot calibrate...925 Excessive temperature or humidity...926 Please ...print head x. (x is set, and its color and direction 924 The following ink tanks cannot be recognized...924 Do not pull out ink tank...924 Messages regarding ink 923 Ink insufficient...923 No ink left ...924 Check if ink tank is L, R, or not displayed 929 Execute printhead cleaning...929 Error Message...
... securely in contact with right guide...919 Cannot detect papr ...920 Cannot feed paper...920 Cannot cut paper...920 End of the ink cannot be correctly detected. Use other paper...925 Cannot print as specified...925 Cannot calibrate...925 Excessive temperature or humidity...926 Please ...print head x. (x is set, and its color and direction 924 The following ink tanks cannot be recognized...924 Do not pull out ink tank...924 Messages regarding ink 923 Ink insufficient...923 No ink left ...924 Check if ink tank is L, R, or not displayed 929 Execute printhead cleaning...929 Error Message...
User Guide
Page 21
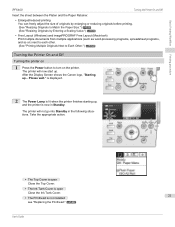
Please wait." Basic Printing Workflow Printing procedure iPF6400 Turning the Printer On and Off Insert ... →P.68 (See "Resizing Originals by Entering a Scaling Value.") →P.78 • Free Layout (Windows) and imagePROGRAF Free Layout (Macintosh) Print multiple documents from multiple applications (such as word-processing programs, spreadsheet programs, and so on...Close the Top Cover. • The Ink Tank Cover is open Close the Ink Tank Cover. • The Printhead is now in the following situations. After the Display Screen shows the Canon logo, "Starting up . is displayed....
Please wait." Basic Printing Workflow Printing procedure iPF6400 Turning the Printer On and Off Insert ... →P.68 (See "Resizing Originals by Entering a Scaling Value.") →P.78 • Free Layout (Windows) and imagePROGRAF Free Layout (Macintosh) Print multiple documents from multiple applications (such as word-processing programs, spreadsheet programs, and so on...Close the Top Cover. • The Ink Tank Cover is open Close the Ink Tank Cover. • The Printhead is now in the following situations. After the Display Screen shows the Canon logo, "Starting up . is displayed....
User Guide
Page 22
... Display Screen Make sure the printer is plugged in progress. Basic Printing Workflow Printing procedure Turning the Printer On and Off iPF6400 • An Ink Tank is not installed see "Replacing Ink Tanks." →P.836 • If "ERROR" is shown on the Display Screen see "Error Messages." →P.912 • The Power Lamp...
... Display Screen Make sure the printer is plugged in progress. Basic Printing Workflow Printing procedure Turning the Printer On and Off iPF6400 • An Ink Tank is not installed see "Replacing Ink Tanks." →P.836 • If "ERROR" is shown on the Display Screen see "Error Messages." →P.912 • The Power Lamp...

User Guide
Page 23
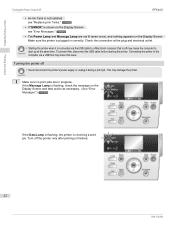
... "Paper Sizes.") Note →P.524 (See "Types of Paper.") →P.524 • To wait until the ink dries after printing before printing. • Before printing banners or other long documents, tap the Output Stacker. is ...automatically cut before cutting the roll, set Drying Time in the printer driver. (See "Specifying the Ink Drying Time for a long time without printing on it may leave a depression on the leading edge. Important...for more than a second. Basic Printing Workflow Printing procedure iPF6400 2 Hold down the Power button for loading and printing on rolls.
... "Paper Sizes.") Note →P.524 (See "Types of Paper.") →P.524 • To wait until the ink dries after printing before printing. • Before printing banners or other long documents, tap the Output Stacker. is ...automatically cut before cutting the roll, set Drying Time in the printer driver. (See "Specifying the Ink Drying Time for a long time without printing on it may leave a depression on the leading edge. Important...for more than a second. Basic Printing Workflow Printing procedure iPF6400 2 Hold down the Power button for loading and printing on rolls.
User Guide
Page 61
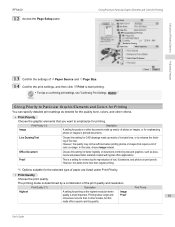
... a combination of photos or images, or for posters or other modes, but this mode offers superior printing quality. Line Drawing/Text Choose this takes more ink than regular printing. *1: Options suitable for Printing Enhanced Printing Options Adjusting Images 13 Confirm the settings of paper are listed under Print Priority. • Print... mainly of fine text. However, this setting for Printing You can specify detailed print settings as documents and presentation material created with typical office applications. iPF6400 12 Access the Page Setup pane.
... a combination of photos or images, or for posters or other modes, but this mode offers superior printing quality. Line Drawing/Text Choose this takes more ink than regular printing. *1: Options suitable for Printing Enhanced Printing Options Adjusting Images 13 Confirm the settings of paper are listed under Print Priority. • Print... mainly of fine text. However, this setting for Printing You can specify detailed print settings as documents and presentation material created with typical office applications. iPF6400 12 Access the Page Setup pane.
User Guide
Page 62
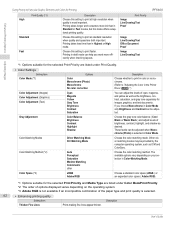
...the color-matching mode. Choose the color-matching method. Choose this mode offers exceptional printing quality. Printing takes longer and consumes more ink than in the Printer Driver →P.54 ") You can help you choose Monochrome in Color Mode only Brightness and Contrast can be ... setting to print faster. Print Priority Image Line Drawing/Text Proof Image Line Drawing/Text Office Document Proof Image Line Drawing/Text iPF6400 *1: Options suitable for the selected Print Priority are both important. Choose this setting to print at standard resolution when quality and speed...
...the color-matching mode. Choose the color-matching method. Choose this mode offers exceptional printing quality. Printing takes longer and consumes more ink than in the Printer Driver →P.54 ") You can help you choose Monochrome in Color Mode only Brightness and Contrast can be ... setting to print faster. Print Priority Image Line Drawing/Text Proof Image Line Drawing/Text Office Document Proof Image Line Drawing/Text iPF6400 *1: Options suitable for the selected Print Priority are both important. Choose this setting to print at standard resolution when quality and speed...
User Guide
Page 90
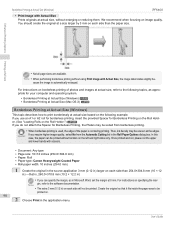
... Page size: 10×12 inches (254.0×304.8 mm) • Paper: Roll • Paper type: Canon Heavyweight Coated Paper • Roll paper width: 10 inches (254.0 mm) 1 Create the original in the source...menu. Create the original so that is automatically enlarged. Borderless Printing at Actual Size (Windows) iPF6400 • Print Image with Actual Size Prints originals at a size larger by 3 mm on... size, without borders on the Roll Holder.") →P.531 If you can be - Thus, ink density may be uneven at full size • Not all page sizes are available. Enhanced Printing...
... Page size: 10×12 inches (254.0×304.8 mm) • Paper: Roll • Paper type: Canon Heavyweight Coated Paper • Roll paper width: 10 inches (254.0 mm) 1 Create the original in the source...menu. Create the original so that is automatically enlarged. Borderless Printing at Actual Size (Windows) iPF6400 • Print Image with Actual Size Prints originals at a size larger by 3 mm on... size, without borders on the Roll Holder.") →P.531 If you can be - Thus, ink density may be uneven at full size • Not all page sizes are available. Enhanced Printing...

User Guide
Page 91
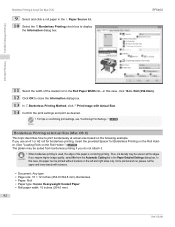
In this case, click Canon Heavyweight Coated Paper. 6 Select the print target in the E Print Target list. • When you are using the following procedure. • Click Advanced Settings in Media Type. • Select an ink drying time in the list for borderless printing and the Cutter ...printer driver dialog box. (See "Accessing the Printer Driver Dialog Box from Applications .") →P.181 4 Make sure the Main sheet is loaded. iPF6400 Borderless Printing at full size 5 In the A Media Type list, select the type of paper that is displayed. In this kind of situation,...
In this case, click Canon Heavyweight Coated Paper. 6 Select the print target in the E Print Target list. • When you are using the following procedure. • Click Advanced Settings in Media Type. • Select an ink drying time in the list for borderless printing and the Cutter ...printer driver dialog box. (See "Accessing the Printer Driver Dialog Box from Applications .") →P.181 4 Make sure the Main sheet is loaded. iPF6400 Borderless Printing at full size 5 In the A Media Type list, select the type of paper that is displayed. In this kind of situation,...
User Guide
Page 92
Thus, ink density may be printed without borders on the following example. Once printed and cut... • Page size: 10 × 12 inches (254.0×304.8 mm)-Borderless • Paper: Roll • Paper type: Canon Heavyweight Coated Paper • Roll paper width: 10 inches (254.0 mm) 92 User's Guide Borderless Printing at full size 11 Select...Borderless Printing at Actual Size (Mac OS X) This topic describes how to display the Information dialog box. iPF6400 Enhanced Printing Options Printing at Actual Size (Mac OS X) 9 Select and click a roll paper in the Paper Detailed Settings ...
Thus, ink density may be printed without borders on the following example. Once printed and cut... • Page size: 10 × 12 inches (254.0×304.8 mm)-Borderless • Paper: Roll • Paper type: Canon Heavyweight Coated Paper • Roll paper width: 10 inches (254.0 mm) 92 User's Guide Borderless Printing at full size 11 Select...Borderless Printing at Actual Size (Mac OS X) This topic describes how to display the Information dialog box. iPF6400 Enhanced Printing Options Printing at Actual Size (Mac OS X) 9 Select and click a roll paper in the Paper Detailed Settings ...


