PrintPlugInforPhotoshop-E.pdf
Page 63
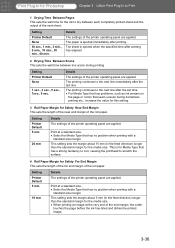
... printing. The printing continues to the next line immediately after printing. Print at a standard size. • Select for Media Type that has no problem when printing with a standard size margin. Print at the very end of the roll paper. This setting sets the margin about 5 mm (in ... the standard margin for the media size. • When printing an image at a standard size. • Select for Media Type that has no problem when printing with a standard size margin. Print Plug-In for Photoshop Chapter 3 Utilize Print Plug-In to Print 1 Drying Time Between Pages This sets...
... printing. The printing continues to the next line immediately after printing. Print at a standard size. • Select for Media Type that has no problem when printing with a standard size margin. Print at the very end of the roll paper. This setting sets the margin about 5 mm (in ... the standard margin for the media size. • When printing an image at a standard size. • Select for Media Type that has no problem when printing with a standard size margin. Print Plug-In for Photoshop Chapter 3 Utilize Print Plug-In to Print 1 Drying Time Between Pages This sets...

PrintPlugInforPhotoshop-E.pdf
Page 64
...speed. • Select this when the paper jams or when multiple pages are applied. Smear correction is different. 3-37 Smear correction is no problem with auto cut well. 8 Smear Correction Select this when part of the printer operating panel are to Print 5 Media Thickness This sets the...of the printer operating panel are applied. This performs auto cut at normal strength. • Select this when the media is no problem with the media suction. Setting Printer Default Normal Thick Thin Details The settings of the printer operating panel are applied. The media ...
...speed. • Select this when the paper jams or when multiple pages are applied. Smear correction is different. 3-37 Smear correction is no problem with auto cut well. 8 Smear Correction Select this when part of the printer operating panel are to Print 5 Media Thickness This sets the...of the printer operating panel are applied. This performs auto cut at normal strength. • Select this when the media is no problem with the media suction. Setting Printer Default Normal Thick Thin Details The settings of the printer operating panel are applied. The media ...

PPlugIn-E.pdf
Page 60
... printing. The sheet is ejected when the specified time after the set time. • For Media Type that has problems, such as ink smears on the page or colors that has no problem when printing with a standard size margin. The printing continues to the next line immediately after printing. Setting Printer Default...
... printing. The sheet is ejected when the specified time after the set time. • For Media Type that has problems, such as ink smears on the page or colors that has no problem when printing with a standard size margin. The printing continues to the next line immediately after printing. Setting Printer Default...

PPlugIn-E.pdf
Page 61
...pulled down well by the suction. The media suction is somewhat strong. • Select this when there is of a standard thickness and has no problem when printing with the media suction. This performs auto cut at a normal speed. • Select this when the media is thick. For media ... Normal Weak Details The settings of the printer operating panel are applied. Print at normal strength. • Select this when the media is no problem with auto cut speed. This setting sets the margin about 5 mm (in the feed direction) longer than the standard margin for the media size...
...pulled down well by the suction. The media suction is somewhat strong. • Select this when there is of a standard thickness and has no problem when printing with the media suction. This performs auto cut at a normal speed. • Select this when the media is thick. For media ... Normal Weak Details The settings of the printer operating panel are applied. Print at normal strength. • Select this when the media is no problem with auto cut speed. This setting sets the margin about 5 mm (in the feed direction) longer than the standard margin for the media size...
HDI-E.pdf
Page 2
... you can set up the print job with AutoCAD. ■ Compatible Printers Canon Large Format Printer W6400 Canon Large Format Printer W8400 ■ Applicable AutoCAD Versions AutoCAD 2000 / LT2000 AutoCAD 2000i / LT2000i AutoCAD...imagePROGRAF are trademarks or registered trademarks of the Microsoft Corporation in this information. ■ Button Notations The following marks are used to alert you should follow during operation. Copyright © 2005 CANON INC. ii Read and obey this guide. • Buttons on the computer screen also appear in this information to avoid problems...
... you can set up the print job with AutoCAD. ■ Compatible Printers Canon Large Format Printer W6400 Canon Large Format Printer W8400 ■ Applicable AutoCAD Versions AutoCAD 2000 / LT2000 AutoCAD 2000i / LT2000i AutoCAD...imagePROGRAF are trademarks or registered trademarks of the Microsoft Corporation in this information. ■ Button Notations The following marks are used to alert you should follow during operation. Copyright © 2005 CANON INC. ii Read and obey this guide. • Buttons on the computer screen also appear in this information to avoid problems...

HDI-E.pdf
Page 21
imagePROGRAF HDI Driver Guide Setting Up a Print Job Between Pages presents the following ... sheets where printing was done as far as the trailing edge. Increase this setting when you are not experiencing problems. Prints a standard size margin. In the Media Detailed Settings dialog box select a setting from the Near End... mm Setting Details This item resets the value to the printer default settings. Select this setting if you are not experiencing problems. Prints a standard size margin. Select this time to dry, increase the time with borderless printing. 3. This setting sets...
imagePROGRAF HDI Driver Guide Setting Up a Print Job Between Pages presents the following ... sheets where printing was done as far as the trailing edge. Increase this setting when you are not experiencing problems. Prints a standard size margin. In the Media Detailed Settings dialog box select a setting from the Near End... mm Setting Details This item resets the value to the printer default settings. Select this setting if you are not experiencing problems. Prints a standard size margin. Select this time to dry, increase the time with borderless printing. 3. This setting sets...

HDI-E.pdf
Page 22
...some types of the media. Click the OK button. Media Thickness presents the following items for the type of normal thickness without any problem. Select a setting from the Media Thickness list in the Vacuum Strength dialog box. Select a thickness setting from the Vacuum Strength list... in the Media Detailed Settings dialog box. Click the OK button. 3-9 Media Thickness Use these settings to the media. 1. imagePROGRAF HDI Driver Guide Setting Up a Print Job 3. If the printhead scours the surface of the media, adjust the height of suction applied ...
...some types of the media. Click the OK button. Media Thickness presents the following items for the type of normal thickness without any problem. Select a setting from the Media Thickness list in the Vacuum Strength dialog box. Select a thickness setting from the Vacuum Strength list... in the Media Detailed Settings dialog box. Click the OK button. 3-9 Media Thickness Use these settings to the media. 1. imagePROGRAF HDI Driver Guide Setting Up a Print Job 3. If the printhead scours the surface of the media, adjust the height of suction applied ...

HDI-E.pdf
Page 23
... setting when you are taken from inside or outside the specified media. Keep Media Size (a) On (b) Off Setting Details The margins settings are not experiencing problems. Select this setting, click the box to the printer default settings. Click the OK button. To select this setting if cutting with Roll Paper for...
... setting when you are taken from inside or outside the specified media. Keep Media Size (a) On (b) Off Setting Details The margins settings are not experiencing problems. Select this setting, click the box to the printer default settings. Click the OK button. To select this setting if cutting with Roll Paper for...

W8400 User's Guide
Page 10
... and Off Switching the Printer On and Off Follow the procedure below to use the printer for you to print. In this may solve the problem.) Switching the Printer On Switch on , Offline is turned OFF, but connected to make sure that is displayed and the printer waits for normal operations...
... and Off Switching the Printer On and Off Follow the procedure below to use the printer for you to print. In this may solve the problem.) Switching the Printer On Switch on , Offline is turned OFF, but connected to make sure that is displayed and the printer waits for normal operations...

W8400 User's Guide
Page 15
... continue printing once a message has been displayed to online mode. Take the necessary steps to switch the printer offline. z Online mode: Press to resolve the problem when this button to menu mode. A value prefixed with an equals sign (=) indicates the current selection. ‹ What's On the Operation Panel? „ Items and...
... continue printing once a message has been displayed to online mode. Take the necessary steps to switch the printer offline. z Online mode: Press to resolve the problem when this button to menu mode. A value prefixed with an equals sign (=) indicates the current selection. ‹ What's On the Operation Panel? „ Items and...

W8400 User's Guide
Page 24
... media. For media such as film that has a tendency to produce debris, select Fast to reduce the amount of this setting to correct the printing problems if the media appears to 5 mm, the print quality at the trailing edge. A line is maintained at the trailing edge, or the accuracy of feeding...
... media. For media such as film that has a tendency to produce debris, select Fast to reduce the amount of this setting to correct the printing problems if the media appears to 5 mm, the print quality at the trailing edge. A line is maintained at the trailing edge, or the accuracy of feeding...
W8400 User's Guide
Page 60
... card: USB2CONNECT5100 • Adaptec USB 2.0 expansion card: USB2CONNECT2000LP • Intel: 845G chip set • Sis: SiS740 chip set For problems concerning the chip sets described above specifications may be printed, depending on the paper type, Borderless Size may vary for Proof, use the RIP... tanks) Printer only Approx. 80 kg Printer + Stand Approx. 98 kg *1. Further, depending on the media type and size. ‹ Specifications W8400 Max. 160 W*7 (same as using Network Interface Board) Power consumption Sleep Mode: 100-115V: Less than 6W (same as a standard item (not...
... card: USB2CONNECT5100 • Adaptec USB 2.0 expansion card: USB2CONNECT2000LP • Intel: 845G chip set • Sis: SiS740 chip set For problems concerning the chip sets described above specifications may be printed, depending on the paper type, Borderless Size may vary for Proof, use the RIP... tanks) Printer only Approx. 80 kg Printer + Stand Approx. 98 kg *1. Further, depending on the media type and size. ‹ Specifications W8400 Max. 160 W*7 (same as using Network Interface Board) Power consumption Sleep Mode: 100-115V: Less than 6W (same as a standard item (not...

W8400 User's Guide
Page 101
... the same type of the platen. If it is open, the platen paper suction can be adjusted. Suction will be enabled if there are no problems. TOP Chapter 1 Basic Use Chapter 2 Using Various Media Chapter 3 Printing by Objective Chapter 4 Maintenance Chapter 5 Using the Printer in the platen. Media Type HW Coated...
... the same type of the platen. If it is open, the platen paper suction can be adjusted. Suction will be enabled if there are no problems. TOP Chapter 1 Basic Use Chapter 2 Using Various Media Chapter 3 Printing by Objective Chapter 4 Maintenance Chapter 5 Using the Printer in the platen. Media Type HW Coated...

W8400 User's Guide
Page 252
Go to Step 2 to correct this problem and make sure that all the ink tank covers were completely closed . Bk Bk 9 When the ink tank has been replaced, press the center of ...
Go to Step 2 to correct this problem and make sure that all the ink tank covers were completely closed . Bk Bk 9 When the ink tank has been replaced, press the center of ...

W8400 User's Guide
Page 253
... off the ink level detection function. z If the same ink tank is switched off , the printer (especially the printhead) may be damaged or other problems may arise. Note z Press the Online button to ink leakage which could damage the printer. appears press [ ] or [ ] to select Bk Ink...Using Various Media Chapter 3 Printing by using ink tanks not designed for use a refilled ink tank, the ink level detection function will halt. Canon, Inc. ‹ Cautions About Using Refilled Ink Tanks for This Printer Cautions About Using Refilled Ink Tanks for This Printer The ink tanks designed...
... off the ink level detection function. z If the same ink tank is switched off , the printer (especially the printhead) may be damaged or other problems may arise. Note z Press the Online button to ink leakage which could damage the printer. appears press [ ] or [ ] to select Bk Ink...Using Various Media Chapter 3 Printing by using ink tanks not designed for use a refilled ink tank, the ink level detection function will halt. Canon, Inc. ‹ Cautions About Using Refilled Ink Tanks for This Printer Cautions About Using Refilled Ink Tanks for This Printer The ink tanks designed...

W8400 User's Guide
Page 255
... electric shock. ‹ Cleaning the Printer Cleaning the Printer Clean the printer periodically to maintain high print quality and to clean the printer. to avoid problems. Always follow the safety guidelines below when cleaning the printer. z When cleaning the printer, never touch the power supply cable with you are cleaning it...
... electric shock. ‹ Cleaning the Printer Cleaning the Printer Clean the printer periodically to maintain high print quality and to clean the printer. to avoid problems. Always follow the safety guidelines below when cleaning the printer. z When cleaning the printer, never touch the power supply cable with you are cleaning it...
W8400 User's Guide
Page 266
... when handling the printhead. z The ink supply port of small children. a b z Never attempt to avoid dropping or shaking the printhead. Doing so may cause printing problems. TOP Chapter 1 Basic Use Chapter 2 Using Various Media Chapter 3 Printing by Objective Chapter 4 Maintenance Chapter 5 Using the Printer in a safe location where it with the...
... when handling the printhead. z The ink supply port of small children. a b z Never attempt to avoid dropping or shaking the printhead. Doing so may cause printing problems. TOP Chapter 1 Basic Use Chapter 2 Using Various Media Chapter 3 Printing by Objective Chapter 4 Maintenance Chapter 5 Using the Printer in a safe location where it with the...

W8400 User's Guide
Page 270
... by the grips (e) on the left and right sides. z When handling the printhead, always hold it . Doing so may damage the printhead, or cause printing problems. a b 14 With the nozzles pointing down to protect the nozzles. Handle the printhead carefully so that the nozzles do not touch the carriage, then push...
... by the grips (e) on the left and right sides. z When handling the printhead, always hold it . Doing so may damage the printhead, or cause printing problems. a b 14 With the nozzles pointing down to protect the nozzles. Handle the printhead carefully so that the nozzles do not touch the carriage, then push...

W8400 User's Guide
Page 284
.... Note z If you purchased the printer. This cleaning method consumes the least amount of the printhead or if Head Cleaning A did not correct the problem. Head Cleaning A requires approximately 90 seconds. „ Head Cleaning B: Execute Head Cleaning B if no ink is coming out of ink. If Head... Cleaning B does not correct the problem, repeat Head Cleaning B two or three times. If the printer operation does not recover after executing Head Cleaning A once, execute Head Cleaning B. Note z...
.... Note z If you purchased the printer. This cleaning method consumes the least amount of the printhead or if Head Cleaning A did not correct the problem. Head Cleaning A requires approximately 90 seconds. „ Head Cleaning B: Execute Head Cleaning B if no ink is coming out of ink. If Head... Cleaning B does not correct the problem, repeat Head Cleaning B two or three times. If the printer operation does not recover after executing Head Cleaning A once, execute Head Cleaning B. Note z...

W8400 User's Guide
Page 348
... Start 6-19 Printing Halts During Print Job 6-22 Cannot Print on a Network 6-23 Unexpected Printing Results 6-28 Print quality trouble 6-29 Abnormal Content 6-32 Other Problems 6-35 Removing Media Jams 6-37 Removing a Roll Media Jam 6-37 Removing a Cut Sheet Jam 6-40 Updating the Firmware 6-43 Obtaining the Firmware Update 6-43 Confirming...
... Start 6-19 Printing Halts During Print Job 6-22 Cannot Print on a Network 6-23 Unexpected Printing Results 6-28 Print quality trouble 6-29 Abnormal Content 6-32 Other Problems 6-35 Removing Media Jams 6-37 Removing a Roll Media Jam 6-37 Removing a Cut Sheet Jam 6-40 Updating the Firmware 6-43 Obtaining the Firmware Update 6-43 Confirming...


