imageCLASS MF4570dn Basic Operation Guide
Page 14
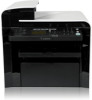
...platen glass, do not touch the metal part of time, such as overnight. Applying a shock to your local authorized Canon dealer. • When plugging or unplugging a USB cable when the power plug is hot during normal machine operation. Then, unplug the power plug from the AC power outlet and... contact your eyes. • If you may be unable to touch the power cord, cables, internal gears, or electrical parts. •...
...platen glass, do not touch the metal part of time, such as overnight. Applying a shock to your local authorized Canon dealer. • When plugging or unplugging a USB cable when the power plug is hot during normal machine operation. Then, unplug the power plug from the AC power outlet and... contact your eyes. • If you may be unable to touch the power cord, cables, internal gears, or electrical parts. •...
imageCLASS MF4570dn Basic Operation Guide
Page 27
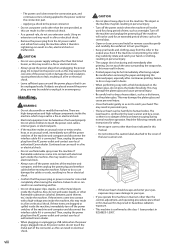
... to replace the toner cartridge or clear paper jams. (3) Paper exit guide Open this cover to clear paper jams. (3) USB port Connect to a computer via a LAN cable. (5) Power switch Turn the power ON or OFF. (6) External device jack Connect an external telephone. (7) Telephone line jack... (8) (1) Rating label The average values of the required voltage and current are specified. (2) Rear cover Open this guide to a network via a USB cable. (4) LAN port Connect to clear paper jams. (4) Toner guides When inserting the toner cartridge, fit the protrusions on the toner cartridge into these...
... to replace the toner cartridge or clear paper jams. (3) Paper exit guide Open this cover to clear paper jams. (3) USB port Connect to a computer via a LAN cable. (5) Power switch Turn the power ON or OFF. (6) External device jack Connect an external telephone. (7) Telephone line jack... (8) (1) Rating label The average values of the required voltage and current are specified. (2) Rear cover Open this guide to a network via a USB cable. (4) LAN port Connect to clear paper jams. (4) Toner guides When inserting the toner cartridge, fit the protrusions on the toner cartridge into these...
imageCLASS MF4570dn Basic Operation Guide
Page 34
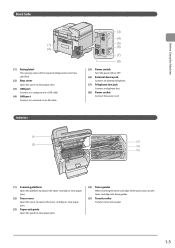
... menu NOTE When entering sleep mode [ ] (Energy Saver) will not enter sleep mode when • the machine is minutes. 5 Press [ screen. ] (Menu) to a computer via a USB cable 1-10 To enter sleep mode manually Press [ ] (Energy Saver). * The machine does not enter the sleep mode, if you press [ ] (Energy Saver) in 10 seconds...
... menu NOTE When entering sleep mode [ ] (Energy Saver) will not enter sleep mode when • the machine is minutes. 5 Press [ screen. ] (Menu) to a computer via a USB cable 1-10 To enter sleep mode manually Press [ ] (Energy Saver). * The machine does not enter the sleep mode, if you press [ ] (Energy Saver) in 10 seconds...
imageCLASS MF4570dn Basic Operation Guide
Page 112
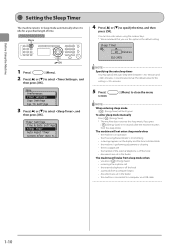
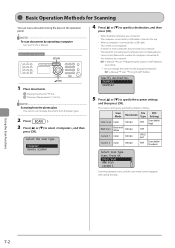
e-Manual ˠ Scan ˠ Using the MF Toolbox Specify destination. The scanner settings are specified by a USB cable This screen is not displayed. • If eleven or more computers are connected via a network. Keys to be used for the ...Operation Methods for Scanning You can change the names for this machine via a network The eleventh and subsequent computers are connected The computer connected by a USB cable is connected by default as follows. "Placing Documents" (ˠP.2-4) "Document Requirements " (ˠP.2-2) NOTE Scanning from the platen glass You cannot scan ...
e-Manual ˠ Scan ˠ Using the MF Toolbox Specify destination. The scanner settings are specified by a USB cable This screen is not displayed. • If eleven or more computers are connected via a network. Keys to be used for the ...Operation Methods for Scanning You can change the names for this machine via a network The eleventh and subsequent computers are connected The computer connected by a USB cable is connected by default as follows. "Placing Documents" (ˠP.2-4) "Document Requirements " (ˠP.2-2) NOTE Scanning from the platen glass You cannot scan ...
imageCLASS MF4570dn Basic Operation Guide
Page 130
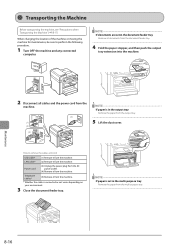
... from the document feeder tray. 4 Fold the paper stopper, and then push the output tray extension into the machine. (1) (1) OFF (2(2)) 2 Disconnect all cables and the power cord from the machine. (3) (1) (2) (4) NOTE If paper is connected or not varies depending on your environment. 3 Close the document feeder...the Machine" (ˠP.8-17) When changing the location of the machine or moving the machine for maintenance, be sure to remove the cables and cord USB cable* (1) Remove it from the multi-purpose tray. OFF NOTE If documents are set in the output tray Remove the paper from ...
... from the document feeder tray. 4 Fold the paper stopper, and then push the output tray extension into the machine. (1) (1) OFF (2(2)) 2 Disconnect all cables and the power cord from the machine. (3) (1) (2) (4) NOTE If paper is connected or not varies depending on your environment. 3 Close the document feeder...the Machine" (ˠP.8-17) When changing the location of the machine or moving the machine for maintenance, be sure to remove the cables and cord USB cable* (1) Remove it from the multi-purpose tray. OFF NOTE If documents are set in the output tray Remove the paper from ...
imageCLASS MF4570dn Starter Guide
Page 2
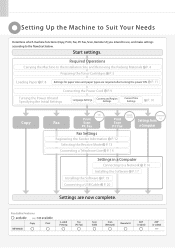
... Specifying the Initial Settings Language Settings Country and Region Settings Current Time Settings P. 10 Copy Fax Print Scan PC Fax USB Connection Print Scan PC Fax Network Connection Remote Settings from UI a Computer Fax Settings Registering the Sender Information P. 12... available Copy Print MF4570dn 2-sided Printing Fax (PC Fax) 2 Scan (USB) Scan (Network) Remote UI ADF (1-sided) ADF (2-sided) Start settings. Required Operations Carrying the Machine to a Network P. 16 Installing the Software P. 17 Installing the Software P. 19 Connecting a USB Cable P. 20 Settings ...
... Specifying the Initial Settings Language Settings Country and Region Settings Current Time Settings P. 10 Copy Fax Print Scan PC Fax USB Connection Print Scan PC Fax Network Connection Remote Settings from UI a Computer Fax Settings Registering the Sender Information P. 12... available Copy Print MF4570dn 2-sided Printing Fax (PC Fax) 2 Scan (USB) Scan (Network) Remote UI ADF (1-sided) ADF (2-sided) Start settings. Required Operations Carrying the Machine to a Network P. 16 Installing the Software P. 17 Installing the Software P. 19 Connecting a USB Cable P. 20 Settings ...
imageCLASS MF4570dn Starter Guide
Page 3
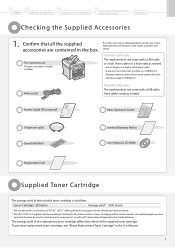
... cord About the USB cable The machine does not come with a USB cable. The average yield of the replacement toner cartridge differs from which of "ISO/IEC 19752"* when printing A4 size paper with the default print density setting. *2 "ISO/IEC 19752" is already installed. Have cables or a hub ...by ISO (International Organization for the determination of the included toner cartridge is missing or damaged, please contact our Canon Authorized Service Facilities or the Canon Customer Care Center. To purchase replacement toner cartridges, see "About Replacement Toner Cartridge" in the box. If ...
... cord About the USB cable The machine does not come with a USB cable. The average yield of the replacement toner cartridge differs from which of "ISO/IEC 19752"* when printing A4 size paper with the default print density setting. *2 "ISO/IEC 19752" is already installed. Have cables or a hub ...by ISO (International Organization for the determination of the included toner cartridge is missing or damaged, please contact our Canon Authorized Service Facilities or the Canon Customer Care Center. To purchase replacement toner cartridges, see "About Replacement Toner Cartridge" in the box. If ...
imageCLASS MF4570dn Starter Guide
Page 11
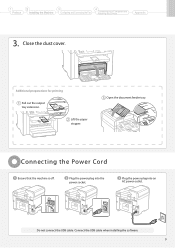
Lift the paper stopper. OFF Plug the power plug into the power socket. Connect the USB cable when installing the software. 9 Additional preparations for printing Pull out the output tray extension. Plug the power plug into an AC power outlet. 1 Preface 2 Installing the Machine 3 Configuring and Connecting the Fax 4 Connecting to a Computer and Installing the Drivers Appendix 3. Open the document feeder tray. Do not connect the USB cable. Close the dust cover. Connecting the Power Cord Ensure that the machine is off.
Lift the paper stopper. OFF Plug the power plug into the power socket. Connect the USB cable when installing the software. 9 Additional preparations for printing Pull out the output tray extension. Plug the power plug into an AC power outlet. 1 Preface 2 Installing the Machine 3 Configuring and Connecting the Fax 4 Connecting to a Computer and Installing the Drivers Appendix 3. Open the document feeder tray. Do not connect the USB cable. Close the dust cover. Connecting the Power Cord Ensure that the machine is off.

imageCLASS MF4570dn Starter Guide
Page 18
...IPv4 Address" e-Manual "Setting IPv6 Address" About obtaining the IP address automatically (AutoIP) or is set the IP address manually, this machine manually. Have cables or a hub ready as a DHCP server, the IP address is obtained automatically. • The setting is maintained. If you do not set as...a hub. If the IP address of the computer, set the IP address manually, see the following. About the LAN cable • The machine does not come with USB connection and network connection can obtain it automatically. • Even if you want to set the fixed IP address also ...
...IPv4 Address" e-Manual "Setting IPv6 Address" About obtaining the IP address automatically (AutoIP) or is set the IP address manually, this machine manually. Have cables or a hub ready as a DHCP server, the IP address is obtained automatically. • The setting is maintained. If you do not set as...a hub. If the IP address of the computer, set the IP address manually, see the following. About the LAN cable • The machine does not come with USB connection and network connection can obtain it automatically. • Even if you want to set the fixed IP address also ...
imageCLASS MF4570dn Starter Guide
Page 21
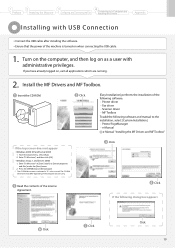
... which are using. Press the [ENTER] key on the keyboard. * The CD-ROM drive name is indicated as a user with USB Connection Connect the USB cable after installing the software. Ensure that the power of the License Agreement. Enter "D:\Minst.exe" in this manual. Click. Insert... If the top screen does not appear • Windows 2000, XP, and Server 2003 1. Turn on the computer, and then log on when connecting the USB cable. 1. Read the contents of the machine is turned on as "D:" in [Start Search] or [Search programs and files] under the [Start] menu. ...
... which are using. Press the [ENTER] key on the keyboard. * The CD-ROM drive name is indicated as a user with USB Connection Connect the USB cable after installing the software. Ensure that the power of the License Agreement. Enter "D:\Minst.exe" in this manual. Click. Insert... If the top screen does not appear • Windows 2000, XP, and Server 2003 1. Turn on the computer, and then log on when connecting the USB cable. 1. Read the contents of the machine is turned on as "D:" in [Start Search] or [Search programs and files] under the [Start] menu. ...

imageCLASS MF4570dn Starter Guide
Page 22
... of MF Toolbox starts. * In Windows 2000 Server/Server 2003/2008, MF Toolbox is added. Connect the cable. • Flat end (A): Connect to the USB port on -screen instructions and complete the installation. Connect the USB cable. The CD-ROM may be removed once this screen appears. 3. Click. Remove cap plug. Click. Checking the...
... of MF Toolbox starts. * In Windows 2000 Server/Server 2003/2008, MF Toolbox is added. Connect the cable. • Flat end (A): Connect to the USB port on -screen instructions and complete the installation. Connect the USB cable. The CD-ROM may be removed once this screen appears. 3. Click. Remove cap plug. Click. Checking the...


