imageCLASS MF4570dn Basic Operation Guide
Page 8
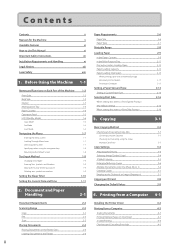
... xi Legal Notices xiii Laser Safety xvii 1. Printing from a Computer 4-1 Document Requirements 2-2 Installing the Printer Driver 4-2 Scanning Range 2-2 Printing from a Computer 4-3 Copy FAX Scan Placing Documents 2-2 Scaling Documents 4-3 2-3 Printing Multiple Pages on One Sheet 4-3 2-3 2-sided Printing 4-4...Density Selecting Image Quality (Copy) 2-Sided Copying Enlarging/Reducing Copies Multiple Documents onto One Sheet (N on the Platen Glass 2-4 Loading Document in the Feeder 2-4 ii Contents Contents ii Manuals for the Machine v Available Features vi...
... xi Legal Notices xiii Laser Safety xvii 1. Printing from a Computer 4-1 Document Requirements 2-2 Installing the Printer Driver 4-2 Scanning Range 2-2 Printing from a Computer 4-3 Copy FAX Scan Placing Documents 2-2 Scaling Documents 4-3 2-3 Printing Multiple Pages on One Sheet 4-3 2-3 2-sided Printing 4-4...Density Selecting Image Quality (Copy) 2-Sided Copying Enlarging/Reducing Copies Multiple Documents onto One Sheet (N on the Platen Glass 2-4 Loading Document in the Feeder 2-4 ii Contents Contents ii Manuals for the Machine v Available Features vi...
imageCLASS MF4570dn Basic Operation Guide
Page 9
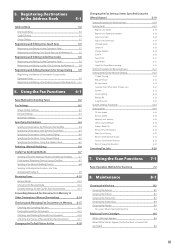
...the Receive Mode Detailed Settings for the Fax/Tel Auto Switch Mode Forwarding Received Fax Documents in Memory to Other Destinations (Manual Forwarding) Checking and Managing Fax Documents in the Address Book 5-1 Address Book 5-2 One-touch Keys 5-2 Coded Dialing ... Cleaning the Machine 8-2 Cleaning the Exterior 8-2 Cleaning the Interior 8-2 Cleaning the Fixing Unit 8-3 Cleaning the Platen Glass 8-4 Cleaning the Feeder 8-4 Precautions When Cleaning the Machine 8-4 Replacing Toner Cartridges 8-6 When a Message Appears 8-6 When White Streaks Appear On the Printouts or ...
...the Receive Mode Detailed Settings for the Fax/Tel Auto Switch Mode Forwarding Received Fax Documents in Memory to Other Destinations (Manual Forwarding) Checking and Managing Fax Documents in the Address Book 5-1 Address Book 5-2 One-touch Keys 5-2 Coded Dialing ... Cleaning the Machine 8-2 Cleaning the Exterior 8-2 Cleaning the Interior 8-2 Cleaning the Fixing Unit 8-3 Cleaning the Platen Glass 8-4 Cleaning the Feeder 8-4 Precautions When Cleaning the Machine 8-4 Replacing Toner Cartridges 8-6 When a Message Appears 8-6 When White Streaks Appear On the Printouts or ...
imageCLASS MF4570dn Basic Operation Guide
Page 10
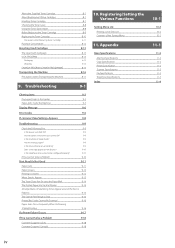
... Fix onto the Paper Well 9-14 The Printed Paper Has Vertical Streaks 9-14 Smudge Marks of the Setting Menu 11. Is the machine in the Feeder 9-3 Paper Jams Inside the Machine 9-3 Display Message 9-6 Error Codes 9-6 If Appears 9-8 Troubleshooting 9-9 Check the Following First Is the power switched ON? Are ... Fax Specifications Telephone Specifications Index 10-1 10-2 10-2 10-2 11-1 11-2 11-2 11-2 11-2 11-3 11-3 11-3 11-4 iv Troubleshooting 9-1 Clearing Jams 9-2 Document Jams in Sleep mode? Is the Error indicator on the display? Does a message appear on or blinking?
... Fix onto the Paper Well 9-14 The Printed Paper Has Vertical Streaks 9-14 Smudge Marks of the Setting Menu 11. Is the machine in the Feeder 9-3 Paper Jams Inside the Machine 9-3 Display Message 9-6 Error Codes 9-6 If Appears 9-8 Troubleshooting 9-9 Check the Following First Is the power switched ON? Are ... Fax Specifications Telephone Specifications Index 10-1 10-2 10-2 10-2 11-1 11-2 11-2 11-2 11-2 11-3 11-3 11-3 11-4 iv Troubleshooting 9-1 Clearing Jams 9-2 Document Jams in Sleep mode? Is the Error indicator on the display? Does a message appear on or blinking?

imageCLASS MF4570dn Basic Operation Guide
Page 26
... down. Before Using the Machine Names and Functions on Each Part of the Machine This section describes the parts and functions of the document feeder tray such as Legal size paper. (5) Document feeder tray Place documents here. (6) Document return tray Documents are output here. (9) Paper cassette Load paper here. Front Side (10) (4) (5) (1) (6) (2) (7) (14) (11) (8) (12) (3) (9) (13) (15...
... down. Before Using the Machine Names and Functions on Each Part of the Machine This section describes the parts and functions of the document feeder tray such as Legal size paper. (5) Document feeder tray Place documents here. (6) Document return tray Documents are output here. (9) Paper cassette Load paper here. Front Side (10) (4) (5) (1) (6) (2) (7) (14) (11) (8) (12) (3) (9) (13) (15...
imageCLASS MF4570dn Basic Operation Guide
Page 34
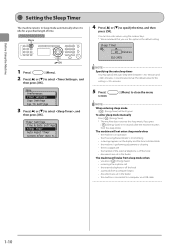
...if you press [ ] (Energy Saver) • receiving a fax or phone call • the external telephone is off the hook • documents are set in the feeder The machine will wake from sleep mode when • you press [ ] (Energy Saver) in one minute interval. Menu Preferences Timer Settings Copy Settings... is performing adjustment or cleaning • there is a paper jam • the handset of time. The default value for this option in the feeder • the machine is connected to a computer via a USB cable 1-10 Sleep Timer 10 minutes (10-240) NOTE Specifying the auto sleep timer...
...if you press [ ] (Energy Saver) • receiving a fax or phone call • the external telephone is off the hook • documents are set in the feeder The machine will wake from sleep mode when • you press [ ] (Energy Saver) in one minute interval. Menu Preferences Timer Settings Copy Settings... is performing adjustment or cleaning • there is a paper jam • the handset of time. The default value for this option in the feeder • the machine is connected to a computer via a USB cable 1-10 Sleep Timer 10 minutes (10-240) NOTE Specifying the auto sleep timer...

imageCLASS MF4570dn Basic Operation Guide
Page 37
... Scanning Range Copy FAX Scan Placing Documents Placing Documents on the Platen Glass Loading Document in the Feeder Paper Requirements Paper Size Paper Type Printable Range Loading Paper In the Paper Cassette In the Multi-Purpose Tray Precautions when Loading Paper Paper Loading ...
... Scanning Range Copy FAX Scan Placing Documents Placing Documents on the Platen Glass Loading Document in the Feeder Paper Requirements Paper Size Paper Type Printable Range Loading Paper In the Paper Cassette In the Multi-Purpose Tray Precautions when Loading Paper Paper Loading ...
imageCLASS MF4570dn Basic Operation Guide
Page 38
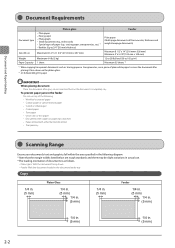
...Feeder: With the document loaded in the document feeder tray Copy 1/4 in. (5 mm) Platen Glass 1/4 in. (5 mm) 1/4 in. (5 mm) 1/4 in. (5 mm) Feeder 1/4 in. (5 mm) 1/4 in. (5 mm) 1/4 in. (5 mm) 1/4 in actual use. * The loading orientation of documents is completely dry. Document and Paper Handling Document Requirements Platen glass Feeder Document type • Plain paper • Heavy paper • Photograph • Small documents...m2) paper IMPORTANT When placing document Place the document after placing it face-down - To prevent paper jams in the feeder Do not use any of the...
...Feeder: With the document loaded in the document feeder tray Copy 1/4 in. (5 mm) Platen Glass 1/4 in. (5 mm) 1/4 in. (5 mm) 1/4 in. (5 mm) Feeder 1/4 in. (5 mm) 1/4 in. (5 mm) 1/4 in. (5 mm) 1/4 in actual use. * The loading orientation of documents is completely dry. Document and Paper Handling Document Requirements Platen glass Feeder Document type • Plain paper • Heavy paper • Photograph • Small documents...m2) paper IMPORTANT When placing document Place the document after placing it face-down - To prevent paper jams in the feeder Do not use any of the...

imageCLASS MF4570dn Basic Operation Guide
Page 40
... injury. • Do not press down . Document and Paper Handling Placing Documents This section describes placing the documents on the Platen Glass 1 Open the feeder. Placing Documents on the platen glass or loading them in the Feeder 1 Open the document feeder. 2 Spread the document guides a little wider than the document width. 3 Align the document with the arrow mark. The machine is...
... injury. • Do not press down . Document and Paper Handling Placing Documents This section describes placing the documents on the Platen Glass 1 Open the feeder. Placing Documents on the platen glass or loading them in the Feeder 1 Open the document feeder. 2 Spread the document guides a little wider than the document width. 3 Align the document with the arrow mark. The machine is...

imageCLASS MF4570dn Basic Operation Guide
Page 56
To apply the valid settings for copying. 1 Place documents. You can be loaded into the feeder. 2 Press [ ]. 4 Use numeric keys to enter the desired copy quantity (1 to 99). * Press [ ] (Clear) to copy operation which you ... all copy operations, see P.3-3 to P.3-6.) Density Image quality 2-Sided Enlarged/reduced Reduced layout Collating Sharpness The settings that are currently performing. "Placing Documents" (ˠP.2-4) "Document Requirements " (ˠP.2-2) * A maximum of 35 pages can specify up to 7 items. (for details, see "Changing the Default Values" (ˠP.3-9). 5 Press...
To apply the valid settings for copying. 1 Place documents. You can be loaded into the feeder. 2 Press [ ]. 4 Use numeric keys to enter the desired copy quantity (1 to 99). * Press [ ] (Clear) to copy operation which you ... all copy operations, see P.3-3 to P.3-6.) Density Image quality 2-Sided Enlarged/reduced Reduced layout Collating Sharpness The settings that are currently performing. "Placing Documents" (ˠP.2-4) "Document Requirements " (ˠP.2-2) * A maximum of 35 pages can specify up to 7 items. (for details, see "Changing the Default Values" (ˠP.3-9). 5 Press...
imageCLASS MF4570dn Basic Operation Guide
Page 62
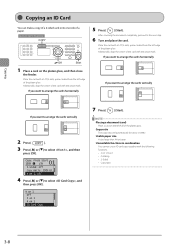
...the card with a 1/4" (5 mm) space created from the left edge of the platen glass. NOTE Placing a document (card) Place a card on 1: Off 4 Press [ ] or [ ] to select , and then ... A5 A5 B4 A4 If you want to . Additionally, align the center of the platen glass. After scanning the document completely, proceed to select , and then press [OK]. 01 Copy: Press Start 100% 1 LTR 2-Sided: Off.... 6 Turn and place the card. N on 1 Off 2 on 1 4 on the platen glass, and then close the feeder. Copying Copying an ID Card You can make a copy of a 2-sided card onto one side of the platen glass.
...the card with a 1/4" (5 mm) space created from the left edge of the platen glass. NOTE Placing a document (card) Place a card on 1: Off 4 Press [ ] or [ ] to select , and then ... A5 A5 B4 A4 If you want to . Additionally, align the center of the platen glass. After scanning the document completely, proceed to select , and then press [OK]. 01 Copy: Press Start 100% 1 LTR 2-Sided: Off.... 6 Turn and place the card. N on 1 Off 2 on 1 4 on the platen glass, and then close the feeder. Copying Copying an ID Card You can make a copy of a 2-sided card onto one side of the platen glass.

imageCLASS MF4570dn Basic Operation Guide
Page 86
When placing documents in the feeder Document scanning is finished. Sequential broadcast (ˠP.6-9) Using the Fax Functions 3 Set scanning settings for Fax" (ˠP.6-18). 5 Press [ ] (Start). The fax is sent when the scanning is started. To make the settings effective for all documents are scanned completely, select , and then press [OK]. 6-2 When placing documents on the...
When placing documents in the feeder Document scanning is finished. Sequential broadcast (ˠP.6-9) Using the Fax Functions 3 Set scanning settings for Fax" (ˠP.6-18). 5 Press [ ] (Start). The fax is sent when the scanning is started. To make the settings effective for all documents are scanned completely, select , and then press [OK]. 6-2 When placing documents on the...

imageCLASS MF4570dn Basic Operation Guide
Page 91
...after Making a Phone Call (Manual Sending) Send a fax manually in the feeder. e-Manual ˠ Setting Up the Machine ˠ Specifying Initial Fax Settings and Connecting a Telephone Cable ˠ Connecting a Telephone Line 2 Place documents in the following cases. • If you want to be used for ...• Scanning from the platen glass is not available. • The group dialing function is not available. • Scanning 2-sided documents is connected using a dial-line, you can send the tone signal temporarily using the following . Keys to this operation Hook FAX Tone...
...after Making a Phone Call (Manual Sending) Send a fax manually in the feeder. e-Manual ˠ Setting Up the Machine ˠ Specifying Initial Fax Settings and Connecting a Telephone Cable ˠ Connecting a Telephone Line 2 Place documents in the following cases. • If you want to be used for ...• Scanning from the platen glass is not available. • The group dialing function is not available. • Scanning 2-sided documents is connected using a dial-line, you can send the tone signal temporarily using the following . Keys to this operation Hook FAX Tone...
imageCLASS MF4570dn Basic Operation Guide
Page 116
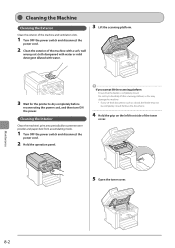
... to forcefully lift the scanning platform, as this may damage the machine. * If you cannot lift the scanning platform Ensure that the feeder is completely closed . Remove the documents. 4 Hold the grip on the left front side of the machine with a soft, well wrung out cloth dampened with water or ...platform. 3 Wait for the printer to dry completely before reconnecting the power cord, and then turn ON the power. If you set thick documents such as a book, the feeder may not be completely closed . Do not try to prevent toner powder and paper dust from accumulating inside. 1 Turn OFF the power ...
... to forcefully lift the scanning platform, as this may damage the machine. * If you cannot lift the scanning platform Ensure that the feeder is completely closed . Remove the documents. 4 Hold the grip on the left front side of the machine with a soft, well wrung out cloth dampened with water or ...platform. 3 Wait for the printer to dry completely before reconnecting the power cord, and then turn ON the power. If you set thick documents such as a book, the feeder may not be completely closed . Do not try to prevent toner powder and paper dust from accumulating inside. 1 Turn OFF the power ...

imageCLASS MF4570dn Basic Operation Guide
Page 118
...8226; Do not use tissue paper, paper towels, or similar materials for cleaning. Cleaning the Feeder If your documents have black streaks or appear dirty after scanning using the feeder, the roller inside the feeder with a well wrung out cloth dampened with water, and then wipe the area with a ...soft, dry cloth. 3 Clean the rollers (A) inside the feeder may be dirty. Precautions When Cleaning the...
...8226; Do not use tissue paper, paper towels, or similar materials for cleaning. Cleaning the Feeder If your documents have black streaks or appear dirty after scanning using the feeder, the roller inside the feeder with a well wrung out cloth dampened with water, and then wipe the area with a ...soft, dry cloth. 3 Clean the rollers (A) inside the feeder may be dirty. Precautions When Cleaning the...

imageCLASS MF4570dn Basic Operation Guide
Page 119
...with cold water. Touching the transfer roller (A) may tear the document or damage the machine. They can be printed The data is ...stains. Do not touch the fixing unit (A). IMPORTANT Do not touch the transfer roller (A). Precautions when closing the feeder Be careful not to be kept for approximately 5 minutes after the power plug is unplugged, the machine cannot ... fingers caught. To view jobs stored in memory, reserved sending data, etc. CAUTION Precautions when cleaning the feeder Do not dampen the cloth too much, as it becomes very hot during use. (A) Precautions if you turn...
...with cold water. Touching the transfer roller (A) may tear the document or damage the machine. They can be printed The data is ...stains. Do not touch the fixing unit (A). IMPORTANT Do not touch the transfer roller (A). Precautions when closing the feeder Be careful not to be kept for approximately 5 minutes after the power plug is unplugged, the machine cannot ... fingers caught. To view jobs stored in memory, reserved sending data, etc. CAUTION Precautions when cleaning the feeder Do not dampen the cloth too much, as it becomes very hot during use. (A) Precautions if you turn...

imageCLASS MF4570dn Basic Operation Guide
Page 123
... as this may be completely closed . Remove the documents. Maintenance 8-9 NOTE When the is completely closed . Do not try...cartridge. 6 Gently shake the toner cartridge five or six times to forcefully lift the scanning platform, as a book, the feeder may not be printed unclearly. 6 Press [ mode. ] (Menu) to return to You may conserve toner, however, ... or light colors may damage the machine. * If you cannot lift the scanning platform Ensure that the feeder is set to standby Before Replacing the Toner Cartridge Before replacing the toner cartridge, see "Replacing the Toner...
... as this may be completely closed . Remove the documents. Maintenance 8-9 NOTE When the is completely closed . Do not try...cartridge. 6 Gently shake the toner cartridge five or six times to forcefully lift the scanning platform, as a book, the feeder may not be printed unclearly. 6 Press [ mode. ] (Menu) to return to You may conserve toner, however, ... or light colors may damage the machine. * If you cannot lift the scanning platform Ensure that the feeder is set to standby Before Replacing the Toner Cartridge Before replacing the toner cartridge, see "Replacing the Toner...

imageCLASS MF4570dn Basic Operation Guide
Page 124
...machine. (A) (A) 2 Lift the scanning platform. 8 Close the toner cover. Do not try to forcefully close the toner cover Ensure that the feeder is properly set thick documents such as this may damage the machine. * If you set in the machine. If you cannot close the toner cover, as a book, ...the feeder may not be completely closed . Fit the protrusions (A) on each side of the toner cartridge into the guides located on each...
...machine. (A) (A) 2 Lift the scanning platform. 8 Close the toner cover. Do not try to forcefully close the toner cover Ensure that the feeder is properly set thick documents such as this may damage the machine. * If you set in the machine. If you cannot close the toner cover, as a book, ...the feeder may not be completely closed . Fit the protrusions (A) on each side of the toner cartridge into the guides located on each...
imageCLASS MF4570dn Basic Operation Guide
Page 130
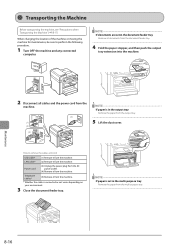
...cable* (2) Remove it from the machine. * Whether the cable is connected or not varies depending on your environment. 3 Close the document feeder tray. Transporting the Machine Before transporting the machine, see "Precautions when Transporting the Machine" (ˠP.8-17) When changing the location of ...tray. NOTE If paper is in the multi-purpose tray Remove the paper from the machine. OFF NOTE If documents are set in the document feeder tray Remove all documents from the document feeder tray. 4 Fold the paper stopper, and then push the output tray extension into the machine. (1) (1) ...
...cable* (2) Remove it from the machine. * Whether the cable is connected or not varies depending on your environment. 3 Close the document feeder tray. Transporting the Machine Before transporting the machine, see "Precautions when Transporting the Machine" (ˠP.8-17) When changing the location of ...tray. NOTE If paper is in the multi-purpose tray Remove the paper from the machine. OFF NOTE If documents are set in the document feeder tray Remove all documents from the document feeder tray. 4 Fold the paper stopper, and then push the output tray extension into the machine. (1) (1) ...
imageCLASS MF4570dn Basic Operation Guide
Page 160
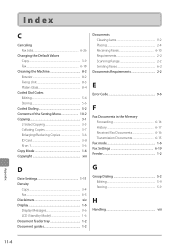
... Faxes 6-10 Requirements 2-2 Scanning Range 2-2 Sending Faxes 6-2 Documents Requirements 2-2 E Error Code 9-6 F Fax Documents in the Memory Forwarding 6-14 History 6-17 Received Fax Documents 6-16 Transmission Documents 6-15 Fax mode 1-6 Fax Settings 6-19 Feeder 1-2 D Date Settings 1-11 Density Copy 3-4 Fax 6-3 Disclaimers xiv Display 1-6 Display Messages 9-6 LCD (Standby Mode 1-6 Document feeder tray 1-2 Document guides 1-2 G Group Dialing 5-2 Editing 5-9 Storing 5-9 H Handling viii...
... Faxes 6-10 Requirements 2-2 Scanning Range 2-2 Sending Faxes 6-2 Documents Requirements 2-2 E Error Code 9-6 F Fax Documents in the Memory Forwarding 6-14 History 6-17 Received Fax Documents 6-16 Transmission Documents 6-15 Fax mode 1-6 Fax Settings 6-19 Feeder 1-2 D Date Settings 1-11 Density Copy 3-4 Fax 6-3 Disclaimers xiv Display 1-6 Display Messages 9-6 LCD (Standby Mode 1-6 Document feeder tray 1-2 Document guides 1-2 G Group Dialing 5-2 Editing 5-9 Storing 5-9 H Handling viii...
imageCLASS MF4570dn Starter Guide
Page 11
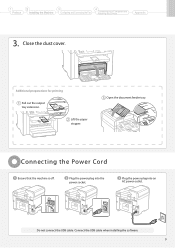
Plug the power plug into an AC power outlet. Connect the USB cable when installing the software. 9 Lift the paper stopper. OFF Plug the power plug into the power socket. Do not connect the USB cable. Additional preparations for printing Pull out the output tray extension. Open the document feeder tray. Connecting the Power Cord Ensure that the machine is off. Close the dust cover. 1 Preface 2 Installing the Machine 3 Configuring and Connecting the Fax 4 Connecting to a Computer and Installing the Drivers Appendix 3.
Plug the power plug into an AC power outlet. Connect the USB cable when installing the software. 9 Lift the paper stopper. OFF Plug the power plug into the power socket. Do not connect the USB cable. Additional preparations for printing Pull out the output tray extension. Open the document feeder tray. Connecting the Power Cord Ensure that the machine is off. Close the dust cover. 1 Preface 2 Installing the Machine 3 Configuring and Connecting the Fax 4 Connecting to a Computer and Installing the Drivers Appendix 3.


