

imageCLASS D480 Starter Guide
Page 12
... the supplied telephone cable directly to , make telephone calls using an external telephone when the receive mode is . - If you set to . * The default setting is set to the wall jack and the telephone line jack on the back side of the machine. 10 If you want to connect your... own external telephone or telephone with built-in answering machine, connect it to . 3 Make Fax Settings This section describes the fax settings. Connect Telephone...
... the supplied telephone cable directly to , make telephone calls using an external telephone when the receive mode is . - If you set to . * The default setting is set to the wall jack and the telephone line jack on the back side of the machine. 10 If you want to connect your... own external telephone or telephone with built-in answering machine, connect it to . 3 Make Fax Settings This section describes the fax settings. Connect Telephone...
imageCLASS D480 Starter Guide
Page 17
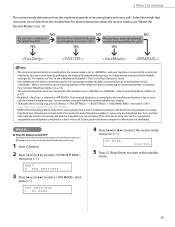
... ring patterns assigned by picking up the external telephone and pressing a two-digit remote reception ID (the default setting is ringing. - 3 Make Fax Settings The receive mode determines how the machine responds to let you know if the call is fax or voice call....machine must be connected directly to the machine to select , then press [OK]. For details, see "About the Receive Modes," on p. 10.) - MENU 5 FAX SETTINGS 3 Press [ ] or [ ] to have both a fax number(s) and a telephone number(s), using only one telephone line. Contact your telephone company for information on ...
... ring patterns assigned by picking up the external telephone and pressing a two-digit remote reception ID (the default setting is ringing. - 3 Make Fax Settings The receive mode determines how the machine responds to let you know if the call is fax or voice call....machine must be connected directly to the machine to select , then press [OK]. For details, see "About the Receive Modes," on p. 10.) - MENU 5 FAX SETTINGS 3 Press [ ] or [ ] to have both a fax number(s) and a telephone number(s), using only one telephone line. Contact your telephone company for information on ...
imageCLASS D460/D440/D420 Basic Operation Guide
Page 10
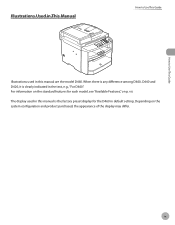
Illustrations Used in This Manual How to Use This Guide ix How to Use This Guide Illustrations used in this manual are the model D460. The display used in this manual is clearly indicated in default setting. vii. For information on the standard features for the D460 in the text, e.g., "For D460." Depending on p. When there is any difference among D460, D440 and D420, it is the factory preset display for each model, see "Available Features," on the system configuration and product purchased, the appearance of the display may differ.
Illustrations Used in This Manual How to Use This Guide ix How to Use This Guide Illustrations used in this manual are the model D460. The display used in this manual is clearly indicated in default setting. vii. For information on the standard features for the D460 in the text, e.g., "For D460." Depending on p. When there is any difference among D460, D440 and D420, it is the factory preset display for each model, see "Available Features," on the system configuration and product purchased, the appearance of the display may differ.
imageCLASS D460/D440/D420 Basic Operation Guide
Page 37
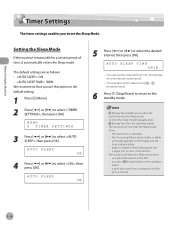
...; the Processing/Data indicator lights or blinks • a message appears on the operation panel. - Before Using the Machine Timer Settings Timer Settings The timer settings enables you press [Energy Saver] on the operation panel • a print job is sent from 3 to 30 minutes (in... Error indicator blinks • paper is loaded in the multi-purpose tray • a paper jam occurs in the default setting. 1 Press [Menu]. 2 Press [ ] or [ ] to select the desired interval, then press [OK]. MENU 8 TIMER SETTINGS 3 Press [ ] or [ ] to select , then press [OK]. AUTO SLEEP ON 5 Press [ ] or...
...; the Processing/Data indicator lights or blinks • a message appears on the operation panel. - Before Using the Machine Timer Settings Timer Settings The timer settings enables you press [Energy Saver] on the operation panel • a print job is sent from 3 to 30 minutes (in... Error indicator blinks • paper is loaded in the multi-purpose tray • a paper jam occurs in the default setting. 1 Press [Menu]. 2 Press [ ] or [ ] to select the desired interval, then press [OK]. MENU 8 TIMER SETTINGS 3 Press [ ] or [ ] to select , then press [OK]. AUTO SLEEP ON 5 Press [ ] or...

imageCLASS D460/D440/D420 Basic Operation Guide
Page 51
The default settings are loading in the paper cassette and the multi-purpose tray. Ex. or *1 for ... 90 g/ m2)) - PAPER SIZE LTR You can select from the following paper types: - Documents and Print Media Setting Paper Size and Type Setting Paper Size and Type This section describes how to specify the paper size and type you are as follows: - :... LTR - : PLAIN PAPER For the Paper Cassette 1 Press [Paper Settings] repeatedly to select , then press [OK]. Ex. Whenever you change the paper size and type in the cassette and the ...
The default settings are loading in the paper cassette and the multi-purpose tray. Ex. or *1 for ... 90 g/ m2)) - PAPER SIZE LTR You can select from the following paper types: - Documents and Print Media Setting Paper Size and Type Setting Paper Size and Type This section describes how to specify the paper size and type you are as follows: - :... LTR - : PLAIN PAPER For the Paper Cassette 1 Press [Paper Settings] repeatedly to select , then press [OK]. Ex. Whenever you change the paper size and type in the cassette and the ...

imageCLASS D460/D440/D420 Basic Operation Guide
Page 59
...of the document. These settings return to the most appropriate level for the optimal reproduction of the colors of documents. Combinations of these four modes (TEXT/PHOTO, TEXT, PHOTO, TEXT/PHOTO+) cannot be selected at the same time. If the document is . The default settings is a transparency, ...select the document type, then adjust the exposure to the default values if the machine remains idle for a certain period of time or if you select one of these...
...of the document. These settings return to the most appropriate level for the optimal reproduction of the colors of documents. Combinations of these four modes (TEXT/PHOTO, TEXT, PHOTO, TEXT/PHOTO+) cannot be selected at the same time. If the document is . The default settings is a transparency, ...select the document type, then adjust the exposure to the default values if the machine remains idle for a certain period of time or if you select one of these...

imageCLASS D460/D440/D420 Basic Operation Guide
Page 61
The default setting is complete, press [OK]. 3-8 If you want to copy multiple documents using the platen glass, place a document and press [Start] once for the document automatically. 1 ... document either automatically or manually. Copying Adjusting Automatically You can adjust the density to 99). 100% LTR A TEXT 1 5 Press [Start]. The image quality is automatically set to . 4 Use - [numeric keys] to enter the desired copy quantity (1 to the most appropriate level for each page. DENSITY AUTO For details, see "Placing Documents...
The default setting is complete, press [OK]. 3-8 If you want to copy multiple documents using the platen glass, place a document and press [Start] once for the document automatically. 1 ... document either automatically or manually. Copying Adjusting Automatically You can adjust the density to 99). 100% LTR A TEXT 1 5 Press [Start]. The image quality is automatically set to . 4 Use - [numeric keys] to enter the desired copy quantity (1 to the most appropriate level for each page. DENSITY AUTO For details, see "Placing Documents...

imageCLASS D460/D440/D420 Basic Operation Guide
Page 63
The default setting is . PRESET RATIO - 100% + For details, see "Placing Documents," on p. 2-4. 2 Press [COPY]. 3-10 Enlarge/Reduce Images Enlarge/Reduce Images You can convert a standard-sized document to a different standard-sized copy (preset zoom), or you can enlarge or reduce standard size documents to another standard paper size. 1 Place documents. 3 Press [Enlarge/Reduce]. Copying Preset Zoom You can enlarge or reduce images in 1% increments (custom copy ratio).
The default setting is . PRESET RATIO - 100% + For details, see "Placing Documents," on p. 2-4. 2 Press [COPY]. 3-10 Enlarge/Reduce Images Enlarge/Reduce Images You can convert a standard-sized document to a different standard-sized copy (preset zoom), or you can enlarge or reduce standard size documents to another standard paper size. 1 Place documents. 3 Press [Enlarge/Reduce]. Copying Preset Zoom You can enlarge or reduce images in 1% increments (custom copy ratio).

imageCLASS D460/D440/D420 Basic Operation Guide
Page 66
The default setting is useful when making handouts for meetings. This function is . This feature can sort copies into sets arranged in , skip to step 4. Copying 1 Place documents. 2 Press [COPY]. For details, see p. 3-15). If is set to in in page order. Collating Copies Collating Copies You can be used together with both "2-Sided Copying," (see p. 3-18) and "Multiple Documents onto One Sheet (2 on 1)," (see "Placing Documents," on p. 2-4. 3-13
The default setting is useful when making handouts for meetings. This function is . This feature can sort copies into sets arranged in , skip to step 4. Copying 1 Place documents. 2 Press [COPY]. For details, see p. 3-15). If is set to in in page order. Collating Copies Collating Copies You can be used together with both "2-Sided Copying," (see p. 3-18) and "Multiple Documents onto One Sheet (2 on 1)," (see "Placing Documents," on p. 2-4. 3-13

imageCLASS D460/D440/D420 Basic Operation Guide
Page 68
... 2 on 1 mode automatically reduces two documents to cut print costs by copying multiple documents onto one sheet of paper (1‑sided/ 2‑sided). The default setting is automatically set so that the documents fit onto the selected paper size. This mode enables you to reduce two-page documents to fit on one sheet...
... 2 on 1 mode automatically reduces two documents to cut print costs by copying multiple documents onto one sheet of paper (1‑sided/ 2‑sided). The default setting is automatically set so that the documents fit onto the selected paper size. This mode enables you to reduce two-page documents to fit on one sheet...

imageCLASS D460/D440/D420 Basic Operation Guide
Page 71
... copies must conform to the following specifications: - This feature can be used together with both "Collating Copies" (see p. 3-13) and "2 on 1 Combination" (see p. 3-15). The default setting is . Paper size: LTR, A4 (envelopes cannot be used for 2-sided copying) - Copying 2-Sided Copying 2-Sided Copying This mode enables you to 80 g/m2) 3-18
... copies must conform to the following specifications: - This feature can be used together with both "Collating Copies" (see p. 3-13) and "2 on 1 Combination" (see p. 3-15). The default setting is . Paper size: LTR, A4 (envelopes cannot be used for 2-sided copying) - Copying 2-Sided Copying 2-Sided Copying This mode enables you to 80 g/m2) 3-18

imageCLASS D460/D440/D420 Basic Operation Guide
Page 75
PAPER SIZE GROUP INCHES You can select from the following paper size groups: , , 3-22 Copying Selecting Paper Size Group Selecting Paper Size Group This section describes how to select , then press [OK]. MENU 2 COPY SETTINGS 3 Press [ ] or [ ] to select the paper size group. COPY SETTINGS 2 PAPER SIZE GROUP 4 Press [ ] or [ ] to select , then press [OK]. The default setting is . 1 Press [Menu]. 2 Press [ ] or [ ] to select a paper size group, then press [OK].
PAPER SIZE GROUP INCHES You can select from the following paper size groups: , , 3-22 Copying Selecting Paper Size Group Selecting Paper Size Group This section describes how to select , then press [OK]. MENU 2 COPY SETTINGS 3 Press [ ] or [ ] to select the paper size group. COPY SETTINGS 2 PAPER SIZE GROUP 4 Press [ ] or [ ] to select , then press [OK]. The default setting is . 1 Press [Menu]. 2 Press [ ] or [ ] to select a paper size group, then press [OK].
imageCLASS D460/D440/D420 Basic Operation Guide
Page 76
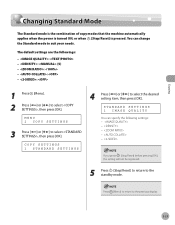
.... 3-23 Press [Menu] to return to select , then press [OK]. You can specify the following settings: - - - - - STANDARD SETTINGS 1 IMAGE QUALITY You can change the Standard mode to select , then press [OK]. Copying Changing Standard Mode...ON, or when [Stop/Reset] is pressed. COPY SETTINGS 1 STANDARD SETTINGS 4 Press [ ] or [ ] to the standby mode. If you press [Stop/Reset] before pressing [OK], the setting will not be registered. 5 Press [Stop/Reset] to return to select the desired setting item, then press [OK]. The default settings are the followings: - : - : (5) -...
.... 3-23 Press [Menu] to return to select , then press [OK]. You can specify the following settings: - - - - - STANDARD SETTINGS 1 IMAGE QUALITY You can change the Standard mode to select , then press [OK]. Copying Changing Standard Mode...ON, or when [Stop/Reset] is pressed. COPY SETTINGS 1 STANDARD SETTINGS 4 Press [ ] or [ ] to the standby mode. If you press [Stop/Reset] before pressing [OK], the setting will not be registered. 5 Press [Stop/Reset] to return to select the desired setting item, then press [OK]. The default settings are the followings: - : - : (5) -...

imageCLASS D460/D440/D420 Basic Operation Guide
Page 106
...The required data differ depending on the authentication mode you cannot change various settings, select [Administrator Mode]. Starting the Remote UI ■ In case that system manager password is set: ① Select [Administrator Mode] or [End-User Mode]. Selecting [...you want to change the settings. ② Enter the System Manager password or user name. 5 Click [OK]. 7-5 Settings from a PC (D460 Only) If you cannot change various settings, select [Administrator Mode]. Selecting [End-User Mode], you are using. ■ For default settings: ① Select [Administrator...
...The required data differ depending on the authentication mode you cannot change various settings, select [Administrator Mode]. Starting the Remote UI ■ In case that system manager password is set: ① Select [Administrator Mode] or [End-User Mode]. Selecting [...you want to change the settings. ② Enter the System Manager password or user name. 5 Click [OK]. 7-5 Settings from a PC (D460 Only) If you cannot change various settings, select [Administrator Mode]. Selecting [End-User Mode], you are using. ■ For default settings: ① Select [Administrator...
imageCLASS D460/D440/D420 Basic Operation Guide
Page 160
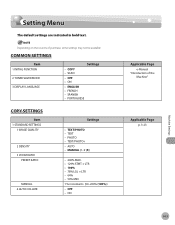
ON Applicable Page e-Manual "Introduction of purchase, some settings may not be available. Setting Menu Setting Menu The default settings are indicated in bold text. SCAN - SPANISH - OFF - ENGLISH - AUTO - FRENCH - TEXT - MANUAL (1-9 (5)) - 200% MAX. - 129% STMT → LTR - 100% - 78% LGL → LTR - 64% - ...
ON Applicable Page e-Manual "Introduction of purchase, some settings may not be available. Setting Menu Setting Menu The default settings are indicated in bold text. SCAN - SPANISH - OFF - ENGLISH - AUTO - FRENCH - TEXT - MANUAL (1-9 (5)) - 200% MAX. - 129% STMT → LTR - 100% - 78% LGL → LTR - 64% - ...
imageCLASS D460/D440/D420 Basic Operation Guide
Page 161
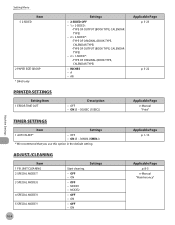
... "Print" Machine Settings TIMER SETTINGS Item Settings 1 AUTO SLEEP* - ON - MODE1 - Setting Menu Item 5 2-SIDED 2 PAPER SIZE GROUP * D460 only PRINTER SETTINGS Setting Item 1 ERROR TIME OUT Settings - 2-SIDED OFF... - 1 > 2-SIDED: • TYPE OF OUTPUT (BOOK TYPE, CALENDAR TYPE) - 2 > 2-SIDED*: • TYPE OF ORIGINAL (BOOK TYPE, CALENDAR TYPE) • TYPE OF OUTPUT (BOOK TYPE, CALENDAR TYPE) - 2 > 1-SIDED*: • TYPE OF ORIGINAL (BOOK TYPE, CALENDAR TYPE) - OFF - ON (3 - 30MIN. (5MIN.)) * We recommend that you use this option in the default setting...
... "Print" Machine Settings TIMER SETTINGS Item Settings 1 AUTO SLEEP* - ON - MODE1 - Setting Menu Item 5 2-SIDED 2 PAPER SIZE GROUP * D460 only PRINTER SETTINGS Setting Item 1 ERROR TIME OUT Settings - 2-SIDED OFF... - 1 > 2-SIDED: • TYPE OF OUTPUT (BOOK TYPE, CALENDAR TYPE) - 2 > 2-SIDED*: • TYPE OF ORIGINAL (BOOK TYPE, CALENDAR TYPE) • TYPE OF OUTPUT (BOOK TYPE, CALENDAR TYPE) - 2 > 1-SIDED*: • TYPE OF ORIGINAL (BOOK TYPE, CALENDAR TYPE) - OFF - ON (3 - 30MIN. (5MIN.)) * We recommend that you use this option in the default setting...

imageCLASS D480 Basic Operation Guide
Page 40
...line that is 1 Press [Menu]. 2 Press [ ] or [ ] to select , then press [OK]. FAX SETTINGS 2 USER SETTINGS 4 Press [ ] or [ ] to communicate with other machines. The default setting is connected to the machine. If you do not know the type of telephone line you are using, and make ...the correct setting. Before Using the Machine Telephone Line Settings Telephone Line Settings Set the type of telephone line that you use,...
...line that is 1 Press [Menu]. 2 Press [ ] or [ ] to select , then press [OK]. FAX SETTINGS 2 USER SETTINGS 4 Press [ ] or [ ] to communicate with other machines. The default setting is connected to the machine. If you do not know the type of telephone line you are using, and make ...the correct setting. Before Using the Machine Telephone Line Settings Telephone Line Settings Set the type of telephone line that you use,...

imageCLASS D480 Basic Operation Guide
Page 41
The default settings are as follows: - : ON - : 5MIN. 1 Press [Menu]. 2 Press [ ] or [ ] to select , then press [OK]. AUTO SLEEP ON 4 Press [ ] or [ ] to select , then press [OK]. Before Using the Machine Timer Settings Timer Settings The timer settings enables you press [Energy Saver] on the display and the Error ...can also enter values using - [numeric keys]. 6 Press [Stop/Reset] to return to 30 minutes (in one-minute increments). - You can set the Sleep Mode and the Daylight Saving Time. The machine will leave the Sleep mode when: • you to select , then press [OK]....
The default settings are as follows: - : ON - : 5MIN. 1 Press [Menu]. 2 Press [ ] or [ ] to select , then press [OK]. AUTO SLEEP ON 4 Press [ ] or [ ] to select , then press [OK]. Before Using the Machine Timer Settings Timer Settings The timer settings enables you press [Energy Saver] on the display and the Error ...can also enter values using - [numeric keys]. 6 Press [Stop/Reset] to return to 30 minutes (in one-minute increments). - You can set the Sleep Mode and the Daylight Saving Time. The machine will leave the Sleep mode when: • you to select , then press [OK]....

imageCLASS D480 Basic Operation Guide
Page 42
... DAY SUNDAY 12 Press [ ] or [ ] to select the week, then press [OK]. MENU 8 TIMER SETTINGS 3 Press [ ] or [ ] to select the month, then press [OK]. START DATE/TIME 1 MONTH Timer Settings 7 Press [ ] or [ ] to select , then press [OK]. The default setting is . 1 Press [Menu]. 2 Press [ ] or [ ] to select , then press [OK]. WEEK... START DATE/TIME 3 DAY 11 Press [ ] or [ ] to select , then press [OK]. This is advanced throughout the summer season. Before Using the Machine Setting the Daylight Saving Time In some countries or areas, time is called "Daylight Saving Time."
... DAY SUNDAY 12 Press [ ] or [ ] to select the week, then press [OK]. MENU 8 TIMER SETTINGS 3 Press [ ] or [ ] to select the month, then press [OK]. START DATE/TIME 1 MONTH Timer Settings 7 Press [ ] or [ ] to select , then press [OK]. The default setting is . 1 Press [Menu]. 2 Press [ ] or [ ] to select , then press [OK]. WEEK... START DATE/TIME 3 DAY 11 Press [ ] or [ ] to select , then press [OK]. This is advanced throughout the summer season. Before Using the Machine Setting the Daylight Saving Time In some countries or areas, time is called "Daylight Saving Time."
imageCLASS D480 Basic Operation Guide
Page 55
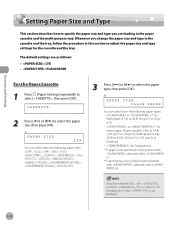
... procedure in this section to 90 g/ m2)) - or *1 for Plain paper (17 lb to 24 lb (64 g/m2 to adjust the paper size and type settings for Heavy paper (Paper cassette: 28 lb to 34 lb (105 g/m2 to 128 g/m2), Multi-purpose tray: 28 lb to 43 lb (105 g/m2...: - for the paper size in the paper cassette and the multi-purpose tray. The default settings are loading in step 2, is not sufficient when printed with selected, select . Ex. Ex. Documents and Print Media Setting Paper Size and Type Setting Paper Size and Type This section describes how to specify the paper size and...
... procedure in this section to 90 g/ m2)) - or *1 for Plain paper (17 lb to 24 lb (64 g/m2 to adjust the paper size and type settings for Heavy paper (Paper cassette: 28 lb to 34 lb (105 g/m2 to 128 g/m2), Multi-purpose tray: 28 lb to 43 lb (105 g/m2...: - for the paper size in the paper cassette and the multi-purpose tray. The default settings are loading in step 2, is not sufficient when printed with selected, select . Ex. Ex. Documents and Print Media Setting Paper Size and Type Setting Paper Size and Type This section describes how to specify the paper size and...


