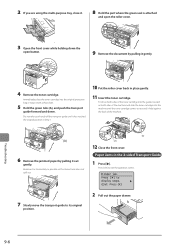
imageCLASS D1370/D1350/D1320 Basic Operation Guide
Page 10
... 8-14 8-15 Troubleshooting Clearing Jams Document Jams in the Feeder Paper Jams in the Output Area Paper Jams in the Multi-Purpose Tray Paper Jams in the Paper Drawer (Drawer 1 or 2) Paper Jams in the Back Cover and Duplex Unit Paper Jams in the Front Cover Paper Jams in the sleep mode? Is the telephone line connected or configured properly? (D1370/D1350 Only) If You Cannot...
imageCLASS D1370/D1350/D1320 Basic Operation Guide
Page 15
... removing jammed documents or paper, be careful not to allow necklaces, bracelets, or other flammable substances. This may result in low temperature burns, even though you inhale the toner, consult a physician immediately. The blade on your local authorized Canon dealer or the Canon help line. -- The power cord is inserted completely after cleaning the...
imageCLASS D1370/D1350/D1320 Basic Operation Guide
Page 17
... power plug into the auxiliary outlet on a carpet or mat, that generates electrical noise • When unplugging the power cord, keep interval of printing in paper jams or poor print quality. Air conditioner -- Shredder -- Equipment that fulfills the following locations, as on a computer. Installation Space Required installation space 52 3/4" (1,341 mm) 4" (100...
imageCLASS D1370/D1350/D1320 Basic Operation Guide
Page 18
...; For step-by using the information in length. • Depending on your locale or your telephone connection, you think your local authorized Canon dealer or the Canon help line. • The repairing parts and toner cartridges for the machine will be corrected by -step troubleshooting, e-mail technical support,... • Avoid shaking or applying a shock to this machine. • To prevent a paper jam, do not turn the power ON/OFF, open/close the operation panel or rear cover, and load/ unload paper in the middle of printing operation. • Be sure to remove the toner cartridge from ...
imageCLASS D1370/D1350/D1320 Basic Operation Guide
Page 26
...output tray. (10) Output tray Printed paper such as copies, prints and faxes come out from the output tray. (16) (15) (14) (13) (11) Open Button Push to open the front cover. (12) Front Cover Open this cover to replace the toner cartridge or clear paper jams. (13) Power Switch Turns the ...power ON or OFF. (14) Paper drawer Load paper here. (15) Cassette Feeding Unit-U1 (drawer 2) It is an optional paper drawer. (16) USB memory port Used to save scanned documents in USB memory...
imageCLASS D1370/D1350/D1320 Basic Operation Guide
Page 27
... labels, or envelopes that curl easily, because the printed paper remains flat when output. (8) Back cover Open this guide to clear paper jams. (4) (7) Sub-output tray Printed paper is stacked in reverse page order. Printed paper is output to insert the toner cartridge so that the ...(4) Telephone line jack Connect the telephone cable. (5) Power socket Connect the power cord. (6) Lower rear cover (3) Open this guide to clear paper jams. (2) (4) (5) (4) (1) Scanning area Used to scan documents from the feeder. (2) Platen glass Place your documents on the side of the ...
imageCLASS D1370/D1350/D1320 Basic Operation Guide
Page 35
...[ ] or [ ] and press [OK]. * You can set the auto sleep timer between and minutes, in the middle of adjustment or cleaning • a paper jam occurs • the handset of the external telephone is left unhooked The machine returns from sleep mode when • [ ] (Energy Saver) is pressed • ...appears on the screen and the Error indicator is blinking (except when and is displayed, or when is displayed when there are no jobs (D1370/D1350 Only)). • the machine is in one minute interval. Before Using the Machine Setting the Sleep Timer The machine automatically enters the ...
imageCLASS D1370/D1350/D1320 Basic Operation Guide
Page 38
...28 lb Bond (64 to 105 g/m²) Up to 50 sheets (Letter)*2 Up to 30 sheets (Legal)*2 *1 To copy transparent documents (for example, tracing paper or transparencies), make sure to place the documents face down • Feeder: With the document loaded in the document feeder tray Copy 9/32" (7 mm) ...Bond (80 g/m²) IMPORTANT To place your reference. Actual margins can vary. * Refer to know the practical printable area. 9/32" (7 mm) To prevent paper jams in the feeder Do not use any glue, ink, or correction fluid on the document is completely dry before placing it on the platen glass ...
imageCLASS D1370/D1350/D1320 Basic Operation Guide
Page 41
...IMPORTANT Up to fit the width of the paper. If the document guides are loaded, paper jams may occur, or the document may not be loaded. Document and Paper Handling 4 Align the document guides to 50 documents can become folded or torn, which may cause paper jams. Be sure to copy or scan the... document. The machine is complete Remove the document from the document delivery tray to avoid paper jams. Avoid scanning the same document more than 30 times. If more than 51...
imageCLASS D1370/D1350/D1320 Basic Operation Guide
Page 43
... the AC power outlet, and contact your local authorized Canon dealer or the Canon help line. Note that the paper is free of new unopened paper. Make sure to a fire or electrical shock. 2-7 Document and Paper Handling Paper Type The following paper types are somewhere between 64.4 to 75.2°F (... by using a stack of dust, lint, and oil stains. To prevent paper jams, do not print well: • Highly textured paper • Very smooth paper • Glossy paper Make sure that toner may not flow well into the paper. *4 Use only the types designed for up to 34 lb Bond (128...
imageCLASS D1370/D1350/D1320 Basic Operation Guide
Page 46
... are loose or tight, this may result in misfeeds or paper jams. In the Multi-Purpose Tray Before loading paper in the paper drawer. 1 Open the multi-purpose tray and pull out the auxiliary tray. 6 Make sure that the paper stack does not exceed the line of the load limit mark (A)....lines, this may result in misfeeds. (A) (A) When loading long-size paper open the tray extension. (A) 7 Specify the loaded paper size and type. Document and Paper Handling IMPORTANT Adjust the paper guides to copy or print on a different paper size or type from the one loaded in the multi-purpose tray, ...
imageCLASS D1370/D1350/D1320 Basic Operation Guide
Page 47
... the envelope and flatten curls as shown in misfeeds or paper jams. 2-11 IMPORTANT Adjust the paper guides to the paper width without space. purpose tray with the print side face up . "Paper Loading Capacity" (→P. 2-12) "Paper Loading Orientation" (→P. 2-13) 5 Be sure that the paper stack is loaded under the load limit guides (A). (A) When loading...
imageCLASS D1370/D1350/D1320 Basic Operation Guide
Page 48
... fingers. (C) IMPORTANT Adjust the paper guides to 89 g/m²) Approx. 50 sheets Approx. If the paper stack exceeds the load limit mark lines, this may result in misfeeds or paper jams. When using paper that has been poorly cut If you use paper that the paper stack does not exceed the line... of the paper. (B) Precautions when inserting the paper drawer Be careful not to catch your hands with the front ...
imageCLASS D1370/D1350/D1320 Basic Operation Guide
Page 60
... from 2-sided documents. Scan Next: Press Start SheetxCopy:1x1 Density: +-0 (2) Select using [ ] or [ ] and press [OK]. If the paper size switch lever is not securely attached, documents may not be fed properly or jammed. "1-sided Printing and 2-sided Printing" (→P. 4-4) 3-6 You can display the setting screen also by placing on 2-Sided copying...
imageCLASS D1370/D1350/D1320 Basic Operation Guide
Page 70
... the curling edges of printed document (Manual 2-sided printing) 2-sided printing can be executed correctly. • The display may be fed properly, or jammed. (1) Open the lower rear cover. To print on one in the e-Manual. 3 Select the page order from [Spooling at Host]. If the machine... on the front side is complete, the document is complete. You cannot make a print on the printed side again. 1 According to set the paper size switch lever accurately. * If not securely attached, documents may not be performed manually using a printed document. For instructions on how to print...
imageCLASS D1370/D1350/D1320 Basic Operation Guide
Page 139
Clearing Jams 9-2 Document Jams in the Feeder 9-2 Paper Jams in the Output Area 9-4 Paper Jams in the Multi-Purpose Tray 9-4 Paper Jams in the Paper Drawer (Drawer 1 or 2) 9-4 Paper Jams in the Back Cover and Duplex Unit 9-5 Paper Jams in the Front Cover 9-5 Paper Jams in the 2-sided Transport Guide 9-6 Onscreen Message ...the telephone line connected or configured properly? (D1370/D1350 Only) 9-13 If You Cannot Solve a Problem 9-13 When a Power Failure Occurs 9-14 Printing Results Are Not Good 9-15 Paper Curls 9-15 Paper Creases 9-16 Vertical Streaks Appear on the...
imageCLASS D1370/D1350/D1320 Basic Operation Guide
Page 140
... your local authorized Canon dealer or the Canon help line for this section to the machine. Document Jams in the Feeder Follow onscreen instructions as well as well. "Document Jams in the Feeder" (→P. 9-2) "Paper Jams in the Output Area" (→P. 9-4) "Paper Jams in the Multi-Purpose Tray" (→P. 9-4) "Paper Jams in the Paper Drawer (Drawer 1 or 2)" (→P. 9-4) "Paper Jams in the Back...
imageCLASS D1370/D1350/D1320 Basic Operation Guide
Page 142
... the procedure on the display, follow the steps below to remove jammed paper. 1 Press [ ]. Is all of the jammed paper removed? Paper Jams in the Multi-Purpose Tray Referring to the procedure on the display, follow the steps below to remove jammed paper. 1 Press [ ]. Is all of the jammed paper removed? Perform the procedure at the position that is indicated...
imageCLASS D1370/D1350/D1320 Basic Operation Guide
Page 143
... machine is ready to print. Paper jam. Troubleshooting 4 Set the paper drawer. Is all of the jammed paper removed? Yes No 3 Remove the jammed paper by pulling it out gently. The machine is ready to print. Press [ ] to remove jammed paper. 1 Press [ ]. Paper Jams in the Back Cover and Duplex...cover. 5 Open the lower rear cover. 6 Remove the jammed paper by pulling it out gently. Paper jam. Close back cover if it is jammed in the optional paper drawer (Drawer 2), also pull out this drawer halfway. 3 Remove the jammed paper by pulling it out gently. 7 Close the lower rear ...
imageCLASS D1370/D1350/D1320 Basic Operation Guide
Page 144
...sides of the toner cartridge into the guides located on both sides of the machine. (A) 6 Remove the jammed paper by pulling it gently. Press [ ] to exit the operation screen. Paper Jams in place gently. 11 Insert the toner cartridge. Immediately place the toner cartridge into the machine until it ...(A) (A) 12 Close the front cover. Troubleshooting 4 Remove the toner cartridge. Press [OK] to display steps. (End: Press OK) 2 Pull out the paper drawer. 9-6 2 If you are using the multi-purpose tray, close it. 8 Hold the part where the green seal is held against the back of ...