
iPF710 User Manual
Page 10
...NetWare Network Settings 529 Installing imagePROGRAF Device Setup Utility 530 Configuring the IP Address Using imagePROGRAF Device Setup Utility 530 Network Setting (Macintosh 531 Configuring the Printer Driver Destination (Macintosh 531 Configuring the Printer's AppleTalk Network Settings 532 ... Better Print Quality 542 Adjusting the Printhead 542 Correcting Print Misalignment 542 Adjusting the Printhead Alignment Automatically 542 Adjusting the Printhead Alignment Manually 544 Adjusting the Printhead Orientation 546 Adjusting the Printhead Height 548 Adjusting the feed amount ...
...NetWare Network Settings 529 Installing imagePROGRAF Device Setup Utility 530 Configuring the IP Address Using imagePROGRAF Device Setup Utility 530 Network Setting (Macintosh 531 Configuring the Printer Driver Destination (Macintosh 531 Configuring the Printer's AppleTalk Network Settings 532 ... Better Print Quality 542 Adjusting the Printhead 542 Correcting Print Misalignment 542 Adjusting the Printhead Alignment Automatically 542 Adjusting the Printhead Alignment Manually 544 Adjusting the Printhead Orientation 546 Adjusting the Printhead Height 548 Adjusting the feed amount ...

iPF710 User Manual
Page 11
... Cartridge Capacity 586 When to Replace the Maintenance Cartridge 587 Cleaning the Printer 588 Cleaning the Printer Exterior...588 Cleaning Inside the Top Cover 589 Cleaning the Paper Retainer...591 Cleaning the Printhead...593 Other Maintenance 594 Preparing to Transfer the Printer 594 Updating the Firmware...598 Troubleshooting 599 Frequently Asked Questions 599 Frequently...
... Cartridge Capacity 586 When to Replace the Maintenance Cartridge 587 Cleaning the Printer 588 Cleaning the Printer Exterior...588 Cleaning Inside the Top Cover 589 Cleaning the Paper Retainer...591 Cleaning the Printhead...593 Other Maintenance 594 Preparing to Transfer the Printer 594 Updating the Firmware...598 Troubleshooting 599 Frequently Asked Questions 599 Frequently...
iPF710 User Manual
Page 13
... 640 Use another paper...640 Cannot print as specified...640 Cannot adjust band...640 Cannot adjust printhead...640 Messages regarding printheads 641 Cannot adjust printhead...641 Cannot adjust band...641 PHead needs cleaning...641 Problem with Printhead...641 Printhead error...642 Messages regarding the maintenance cartridge 643 No maintenance cartridge...643 Prepare for maint cart...
... 640 Use another paper...640 Cannot print as specified...640 Cannot adjust band...640 Cannot adjust printhead...640 Messages regarding printheads 641 Cannot adjust printhead...641 Cannot adjust band...641 PHead needs cleaning...641 Problem with Printhead...641 Printhead error...642 Messages regarding the maintenance cartridge 643 No maintenance cartridge...643 Prepare for maint cart...
iPF710 User Manual
Page 27
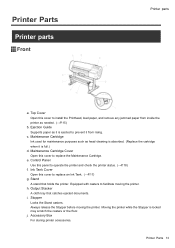
... Cover Open this panel to prevent it from inside the printer as head cleaning is absorbed. (Replace the cartridge when it is locked may scratch the casters or the oor. Equipped with casters to install the Printhead, load paper, and remove any jammed paper from rising.... c. h. Accessory Box For storing printer accessories. Stopper Locks the Stand casters. Maintenance Cartridge Cover Open this cover to facilitate moving ...
... Cover Open this panel to prevent it from inside the printer as head cleaning is absorbed. (Replace the cartridge when it is locked may scratch the casters or the oor. Equipped with casters to install the Printhead, load paper, and remove any jammed paper from rising.... c. h. Accessory Box For storing printer accessories. Stopper Locks the Stand casters. Maintenance Cartridge Cover Open this cover to facilitate moving ...

iPF710 User Manual
Page 29
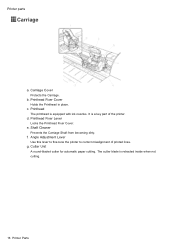
...Important in printing. (→P.16) d. Cleaning Brush When cleaning inside the Top Cover or clearing paper jams. Printer Parts 15 c. The Vacuum holes on the Platen. Carriage Moves the Printhead. f. b. Paper Alignment Line Align paper with this brush to sweep away paper dust on the platen hold.... g. Carriage Shaft The Carriage slides along this part when cleaning inside of paper during borderless printing. i. h. Platen The Printhead moves across the platen to touch this shaft. Linear Scale The linear scale serves a key role in place. Top Cover (Inside...
...Important in printing. (→P.16) d. Cleaning Brush When cleaning inside the Top Cover or clearing paper jams. Printer Parts 15 c. The Vacuum holes on the Platen. Carriage Moves the Printhead. f. b. Paper Alignment Line Align paper with this brush to sweep away paper dust on the platen hold.... g. Carriage Shaft The Carriage slides along this part when cleaning inside of paper during borderless printing. i. h. Platen The Printhead moves across the platen to touch this shaft. Linear Scale The linear scale serves a key role in place. Top Cover (Inside...
iPF710 User Manual
Page 30
... is equipped with ink nozzles. e. Shaft Cleaner Prevents the Carriage Shaft from becoming dirty. d. f. b. Angle Adjustment Lever Use this lever to ne-tune the printer to correct misalignment of the printer. Printer parts Carriage a. It is a key part of printed lines. Printhead Fixer Lever Locks the Printhead Fixer Cover. Carriage Cover Protects the Carriage. c.
... is equipped with ink nozzles. e. Shaft Cleaner Prevents the Carriage Shaft from becoming dirty. d. f. b. Angle Adjustment Lever Use this lever to ne-tune the printer to correct misalignment of the printer. Printer parts Carriage a. It is a key part of printed lines. Printhead Fixer Lever Locks the Printhead Fixer Cover. Carriage Cover Protects the Carriage. c.

iPF710 User Manual
Page 33
Display Screen Shows the printer menu, as well as needed. (→P.119) Menu mode: Press this button to display the menu one level lower. Color Labels These labels indicate the Ink Tank colors. The labels correspond to display the previous menu item or setting value. n. o. i. ◄ Button ... ejection, as the printer status and messages. Instructions for at least a second to display the menu one level higher. Stop Button Hold down this button to the ink levels on . (→P.60) You can press any button except the Power button to clean the Printhead ( Head Cleaning A...
Display Screen Shows the printer menu, as well as needed. (→P.119) Menu mode: Press this button to display the menu one level lower. Color Labels These labels indicate the Ink Tank colors. The labels correspond to display the previous menu item or setting value. n. o. i. ◄ Button ... ejection, as the printer status and messages. Instructions for at least a second to display the menu one level higher. Stop Button Hold down this button to the ink levels on . (→P.60) You can press any button except the Power button to clean the Printhead ( Head Cleaning A...

iPF710 User Manual
Page 35
...for three seconds to do so. Load/Eject Button By pressing this button, you press this button to bring the printer online again. Color Labels These labels indicate the Ink Tank colors. Stop Button Hold down this button to cancel print jobs in the direction of ejection, as the... on. (→P.60) You can check instructions on the Paper Source Section is loaded. Press this button if the Display Screen indicates to clean the Printhead ( Head Cleaning A ). q. o. j. ▲ Button Ofine mode: Press this button to rewind the roll manually. (→P.119) Menu mode: ...
...for three seconds to do so. Load/Eject Button By pressing this button, you press this button to bring the printer online again. Color Labels These labels indicate the Ink Tank colors. Stop Button Hold down this button to cancel print jobs in the direction of ejection, as the... on. (→P.60) You can check instructions on the Paper Source Section is loaded. Press this button if the Display Screen indicates to clean the Printhead ( Head Cleaning A ). q. o. j. ▲ Button Ofine mode: Press this button to rewind the roll manually. (→P.119) Menu mode: ...
iPF710 User Manual
Page 36
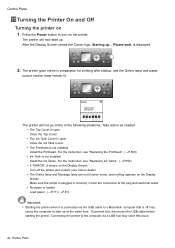
... Cover. • The Ink Tank Cover is open Close the Ink Tank Cover. • The Printhead is displayed. 2. For the instruction, see "Replacing the Printhead". (→P.569) • Ink Tank is off the printer and contact your Canon dealer. • The Online lamp and Message lamp are not lit (even once), and nothing appears...
... Cover. • The Ink Tank Cover is open Close the Ink Tank Cover. • The Printhead is displayed. 2. For the instruction, see "Replacing the Printhead". (→P.569) • Ink Tank is off the printer and contact your Canon dealer. • The Online lamp and Message lamp are not lit (even once), and nothing appears...

iPF710 User Manual
Page 45
... the problem is solved. The following operations are available from the main menu during printing. • Printhead cleaning • Manual adjustment of the paper feed amount • Display of printer-related information For a description of specic items available in the main menu, see "Main Menu...the following case even if you press the Menu button. • An error message is displayed: Switches to all print jobs. Printer Menu Operations The printer menu includes a main menu and submenus. • Main menu operations when no print job is in progress (→P.31) •...
... the problem is solved. The following operations are available from the main menu during printing. • Printhead cleaning • Manual adjustment of the paper feed amount • Display of printer-related information For a description of specic items available in the main menu, see "Main Menu...the following case even if you press the Menu button. • An error message is displayed: Switches to all print jobs. Printer Menu Operations The printer menu includes a main menu and submenus. • Main menu operations when no print job is in progress (→P.31) •...

iPF710 User Manual
Page 62
...Rep. In this case, manually advance the roll before cutting it will not be cut the roll at all, or if printing is faint, oddly colored, or contains foreign substances. Ink Tank When replacing the Ink Tank, choose Yes and follow the instructions on menu levels and values, see "Menu ... if a roll is general, not specic in nature.) Choose Menu Map to print a test pattern for HP-GL/2 printing. (→P.52) Adjust Printer Adjust the Printhead alignment or amount of feed by Head Cleaning A. Choose Print Job Log to print a record of print jobs, including the paper type and size...
...Rep. In this case, manually advance the roll before cutting it will not be cut the roll at all, or if printing is faint, oddly colored, or contains foreign substances. Ink Tank When replacing the Ink Tank, choose Yes and follow the instructions on menu levels and values, see "Menu ... if a roll is general, not specic in nature.) Choose Menu Map to print a test pattern for HP-GL/2 printing. (→P.52) Adjust Printer Adjust the Printhead alignment or amount of feed by Head Cleaning A. Choose Print Job Log to print a record of print jobs, including the paper type and size...

iPF710 User Manual
Page 64
... Item (The paper type is Off, note that paper jams or Platen soiling may occur. However, note that choosing Print Length may be cut. 50 Printer Parts The printed surface may result in slight banding in consideration of the paper will take longer if you measured (as a percentage). Specify exact paper... paper is loaded askew when detection is displayed here.)(*1) Roll DryingTime Scan Wait Time Feed Priority Adjust Length Head Height Skew Check Lv. Adjust the Printhead height. (→P.548) If you select Off.
... Item (The paper type is Off, note that paper jams or Platen soiling may occur. However, note that choosing Print Length may be cut. 50 Printer Parts The printed surface may result in slight banding in consideration of the paper will take longer if you measured (as a percentage). Specify exact paper... paper is loaded askew when detection is displayed here.)(*1) Roll DryingTime Scan Wait Time Feed Priority Adjust Length Head Height Skew Check Lv. Adjust the Printhead height. (→P.548) If you select Off.
iPF710 User Manual
Page 68
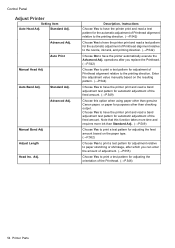
...Choose Yes to have the printer print and read a band adjustment test pattern for automatic adjustment of the feed amount. (→P.549) Choose this function takes more time and requires more ink than genuine Canon paper, or paper for adjustment of Printhead alignment relative to the ...printing direction. Enter the adjustment value manually based on the resulting pattern. (→P.544) Choose Yes to have the printer automatically execute the Advanced Adj. Choose Yes...
...Choose Yes to have the printer print and read a band adjustment test pattern for automatic adjustment of the feed amount. (→P.549) Choose this function takes more time and requires more ink than genuine Canon paper, or paper for adjustment of Printhead alignment relative to the ...printing direction. Enter the adjustment value manually based on the resulting pattern. (→P.544) Choose Yes to have the printer automatically execute the Advanced Adj. Choose Yes...
iPF710 User Manual
Page 70
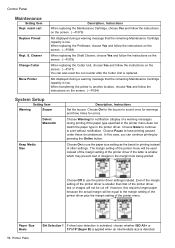
... Maintenance Cartridge, choose Yes and follow the instructions on the screen. (→P.579) Not displayed during a warning message that of the printer driver is smaller than that the remaining Maintenance Cartridge capacity is low. Choose Warning for the buzzer to print without notication. ... or images will not be cut counter after the Cutter Unit is smaller, which may prevent text or images in the printer driver. When replacing the Printhead, choose Yes and follow the instructions on the screen. (→P.569) When replacing the Shaft Cleaner, choose Yes and follow...
... Maintenance Cartridge, choose Yes and follow the instructions on the screen. (→P.579) Not displayed during a warning message that of the printer driver is smaller than that the remaining Maintenance Cartridge capacity is low. Choose Warning for the buzzer to print without notication. ... or images will not be cut counter after the Cutter Unit is smaller, which may prevent text or images in the printer driver. When replacing the Printhead, choose Yes and follow the instructions on the screen. (→P.569) When replacing the Shaft Cleaner, choose Yes and follow...

iPF710 User Manual
Page 73
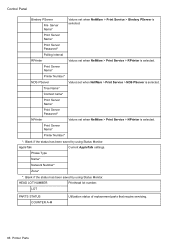
...8594;P.37) Setting Item Description, Instructions Head Cleaning Specify Printhead cleaning options. (→P.568) Choose Head Cleaning A if printing is not improved by Head Cleaning A. Fine Band Adj. IP Displays the printer's IP address. Error Log Displays the most recent error ...Information Setting Item System Info Version Firm Description, Instructions Displays the printer rmware version. Choose Head Cleaning B if no ink is printed at all, or if printing is faint, oddly colored, or contains foreign substances. Ext I/F Displays the name of...
...8594;P.37) Setting Item Description, Instructions Head Cleaning Specify Printhead cleaning options. (→P.568) Choose Head Cleaning A if printing is not improved by Head Cleaning A. Fine Band Adj. IP Displays the printer's IP address. Error Log Displays the most recent error ...Information Setting Item System Info Version Firm Description, Instructions Displays the printer rmware version. Choose Head Cleaning B if no ink is printed at all, or if printing is faint, oddly colored, or contains foreign substances. Ext I/F Displays the name of...

iPF710 User Manual
Page 76
...9658; button. 4. Checking the information in the Status Print report The following information is displayed in the Status Print report. Canon imagePROGRAF iPFxxxx Status Print Printer model Firm Boot MIT(DBF) MIT(DB) S/N MC C,M,Y,MBK,MBK2,BK Firmware Version Boot ROM Version MIT Database Format Version...61441;ve-level scale. Roll Cut Sheet Type Information on the loaded paper. Press ▲ or ▼ to paper feeding. 62 Printer Parts Printhead adjustment value. If using sheets, load paper A4/Letter-sized. Media Menu Roll Media Type Check Remain. Settings related to select Status...
...9658; button. 4. Checking the information in the Status Print report The following information is displayed in the Status Print report. Canon imagePROGRAF iPFxxxx Status Print Printer model Firm Boot MIT(DBF) MIT(DB) S/N MC C,M,Y,MBK,MBK2,BK Firmware Version Boot ROM Version MIT Database Format Version...61441;ve-level scale. Roll Cut Sheet Type Information on the loaded paper. Press ▲ or ▼ to paper feeding. 62 Printer Parts Printhead adjustment value. If using sheets, load paper A4/Letter-sized. Media Menu Roll Media Type Check Remain. Settings related to select Status...
iPF710 User Manual
Page 80
...LOT PARTS STATUS COUNTER A-M Utilization status of replacement parts that require servicing. 66 Printer Parts Print Server Name* Printer Number* *: Blank if the status has been saved by using Status Monitor. ...Control Panel Bindery PServer File Server Name* Values set when NetWare > Print Service > Bindery PServer is selected. Print Server Name* Print Server Password* Polling Interval RPrinter Values set when NetWare > Print Service > NPrinter is selected. HEAD LOT NUMBER Printhead...
...LOT PARTS STATUS COUNTER A-M Utilization status of replacement parts that require servicing. 66 Printer Parts Print Server Name* Printer Number* *: Blank if the status has been saved by using Status Monitor. ...Control Panel Bindery PServer File Server Name* Values set when NetWare > Print Service > Bindery PServer is selected. Print Server Name* Print Server Password* Polling Interval RPrinter Values set when NetWare > Print Service > NPrinter is selected. HEAD LOT NUMBER Printhead...
iPF710 User Manual
Page 84
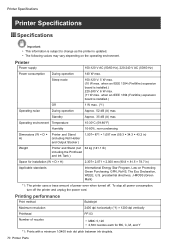
... × D × H) 2,307× 2,071 × 2,000 mm (90.8 × 81.5 × 78.7 in ) Weight Printer and Stand (not 64 kg (141.1 lb) including the Printhead and Ink Tank ) Space for BK, C, M, and Y *1: Prints with a minimum 1/2400 inch dot pitch between ink droplets. 70... Printer Parts Printing performance Print method Bubblejet Maximum resolution 2400 dpi horizontally (*1) × 1200 dpi vertically Printhead PF-03 Number of power even when turned off the printer and unplug the power cord. when an IEEE 1394 (...
... × D × H) 2,307× 2,071 × 2,000 mm (90.8 × 81.5 × 78.7 in ) Weight Printer and Stand (not 64 kg (141.1 lb) including the Printhead and Ink Tank ) Space for BK, C, M, and Y *1: Prints with a minimum 1/2400 inch dot pitch between ink droplets. 70... Printer Parts Printing performance Print method Bubblejet Maximum resolution 2400 dpi horizontally (*1) × 1200 dpi vertically Printhead PF-03 Number of power even when turned off the printer and unplug the power cord. when an IEEE 1394 (...

iPF710 User Manual
Page 119
... paper has been advanced, specify the type of paper as you expected, adjust the paper feed amount and Printhead height. (→P.549) (→P.548) Note • After you load the roll, the printer automatically shows a menu for each type of paper. Press the Menu button to select Roll Media Type, ...then press the ► button. 3. Handling Paper 105 Be sure to select the type of paper to use correctly before printing. • Because the printer ne-tunes the feed amount for selection of the paper type on the Display Screen, unless a barcode has been printed on the roll or...
... paper has been advanced, specify the type of paper as you expected, adjust the paper feed amount and Printhead height. (→P.549) (→P.548) Note • After you load the roll, the printer automatically shows a menu for each type of paper. Press the Menu button to select Roll Media Type, ...then press the ► button. 3. Handling Paper 105 Be sure to select the type of paper to use correctly before printing. • Because the printer ne-tunes the feed amount for selection of the paper type on the Display Screen, unless a barcode has been printed on the roll or...

iPF710 User Manual
Page 143
...9650; or ▼ to select Paper Details, and then press the ► button. 3. Handling rolls Reducing Dust from Cutting Rolls The printer is equipped with a function to reduce cutting dust for paper that wrinkles easily, such as Backlit Film that are printed at the leading ... select CutDustReduct., and then press the ► button. 5. Press ▲ or ▼ to be activated for some types of paper loaded in the printer, and then press the ► button. 4. Deactivate this function to select the type of paper. You can set up this function before borderless printing. ...
...9650; or ▼ to select Paper Details, and then press the ► button. 3. Handling rolls Reducing Dust from Cutting Rolls The printer is equipped with a function to reduce cutting dust for paper that wrinkles easily, such as Backlit Film that are printed at the leading ... select CutDustReduct., and then press the ► button. 5. Press ▲ or ▼ to be activated for some types of paper loaded in the printer, and then press the ► button. 4. Deactivate this function to select the type of paper. You can set up this function before borderless printing. ...


