
iPF710 User Manual
Page 10
... Print Services 524 Specifying NetWare Protocols 527 Configuring NetWare Network Settings 529 Installing imagePROGRAF Device Setup Utility 530 Configuring the IP Address Using imagePROGRAF Device Setup Utility 530 Network Setting (Macintosh 531 Configuring the Printer Driver Destination (Macintosh 531 Configuring the Printer's AppleTalk Network Settings 532 Configuring the Destination for AppleTalk Network (Macintosh 533 Configuring the Destination for TCP/IP...
... Print Services 524 Specifying NetWare Protocols 527 Configuring NetWare Network Settings 529 Installing imagePROGRAF Device Setup Utility 530 Configuring the IP Address Using imagePROGRAF Device Setup Utility 530 Network Setting (Macintosh 531 Configuring the Printer Driver Destination (Macintosh 531 Configuring the Printer's AppleTalk Network Settings 532 Configuring the Destination for AppleTalk Network (Macintosh 533 Configuring the Destination for TCP/IP...

iPF710 User Manual
Page 50
... press the ► button. Note • If a conrmation message is displayed regarding the setting you enter for the printer is not the same as network settings. 1. Press ▲ or ▼ to each eld for entering numbers. 6. Repeat these steps until the desired menu...9660; to execute, and then press the OK button. Repeat steps 2 and 3 to select Interface Setup, and then press the ► button. 2. After two seconds, the menu command is applied, and the printer goes online. The setting is executed. Press ▲ or ▼ to continue entering numbers. 8. ...
... press the ► button. Note • If a conrmation message is displayed regarding the setting you enter for the printer is not the same as network settings. 1. Press ▲ or ▼ to each eld for entering numbers. 6. Repeat these steps until the desired menu...9660; to execute, and then press the OK button. Repeat steps 2 and 3 to select Interface Setup, and then press the ► button. 2. After two seconds, the menu command is applied, and the printer goes online. The setting is executed. Press ▲ or ▼ to continue entering numbers. 8. ...

iPF710 User Manual
Page 62
...printing a test pattern. (→P.54) Interface Setup Congure the EOP timer and network settings. (→P.55) Maintenance Access maintenance settings when replacing the Printhead or preparing to move the printer. (→P.56) System Setup Specify the printer system settings, including the date format and ... nozzles. Ink Tank When replacing the Ink Tank, choose Yes and follow the instructions on ink consumption is faint, oddly colored, or contains foreign substances. Control Panel Main Menu Settings Main menu items are described in nature.) Choose Menu Map to...
...printing a test pattern. (→P.54) Interface Setup Congure the EOP timer and network settings. (→P.55) Maintenance Access maintenance settings when replacing the Printhead or preparing to move the printer. (→P.56) System Setup Specify the printer system settings, including the date format and ... nozzles. Ink Tank When replacing the Ink Tank, choose Yes and follow the instructions on ink consumption is faint, oddly colored, or contains foreign substances. Control Panel Main Menu Settings Main menu items are described in nature.) Choose Menu Map to...

iPF710 User Manual
Page 69
...to use. Specify the frame type to use settings values of Comm.Mode and Ethernet Type. Return Defaults/Execute? Printer Parts 55 Control Panel Interface Setup Setting Item EOP Timer TCP/IP IP Mode NetWare Protocol IP Setting NetWare DHCP BOOTP RARP IP Address Subnet Mask ...changes, choose Register Setting. Choose the LAN transfer rate. To apply your changes, choose Register Setting. Choose Off to the printer, as well as the network subnet mask and default gateway. Choose the expansion interface. is entered manually. Choose the print service. Displays the MAC address....
...to use. Specify the frame type to use settings values of Comm.Mode and Ethernet Type. Return Defaults/Execute? Printer Parts 55 Control Panel Interface Setup Setting Item EOP Timer TCP/IP IP Mode NetWare Protocol IP Setting NetWare DHCP BOOTP RARP IP Address Subnet Mask ...changes, choose Register Setting. Choose the LAN transfer rate. To apply your changes, choose Register Setting. Choose Off to the printer, as well as the network subnet mask and default gateway. Choose the expansion interface. is entered manually. Choose the print service. Displays the MAC address....
iPF710 User Manual
Page 77
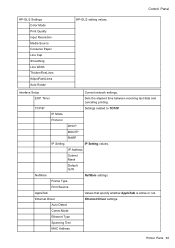
... and canceling printing. Control Panel HP-GL/2 Settings Color Mode Print Quality Input Resolution Media Source Conserve Paper Line Cap Smoothing Line Width ThickenFineLines AdjustFaintLines Auto Rotate HP-GL/2 setting values. Ethernet Driver Ethernet Driver settings. Interface Setup Current network settings. Auto Detect Comm.Mode Ethernet Type Spanning Tree MAC Address Printer Parts 63
... and canceling printing. Control Panel HP-GL/2 Settings Color Mode Print Quality Input Resolution Media Source Conserve Paper Line Cap Smoothing Line Width ThickenFineLines AdjustFaintLines Auto Rotate HP-GL/2 setting values. Ethernet Driver Ethernet Driver settings. Interface Setup Current network settings. Auto Detect Comm.Mode Ethernet Type Spanning Tree MAC Address Printer Parts 63
iPF710 User Manual
Page 99
... • During this setup process, the printer will not be listed among available printers if it is off or disconnected. • By factory default, the AppleTalk protocol is connected via USB, Canon FireWire(iPF) if connected via IEEE 1394, or AppleTalk, Canon IP(iPF), or Bonjour if connected via a network. • For Canon IP(iPF) connections, enter...
... • During this setup process, the printer will not be listed among available printers if it is off or disconnected. • By factory default, the AppleTalk protocol is connected via USB, Canon FireWire(iPF) if connected via IEEE 1394, or AppleTalk, Canon IP(iPF), or Bonjour if connected via a network. • For Canon IP(iPF) connections, enter...

iPF710 User Manual
Page 101
... corner of copies, and so on activating AppleTalk protocol, see "Conguring the Printer Driver Destination (Macintosh)". (→P.531) Important • During this setup process, the printer will not be listed in AppleTalk network. For instructions on . Selecting the printer Before printing, you must enable the AppleTalk protocol before printing. Running several applications while...
... corner of copies, and so on activating AppleTalk protocol, see "Conguring the Printer Driver Destination (Macintosh)". (→P.531) Important • During this setup process, the printer will not be listed in AppleTalk network. For instructions on . Selecting the printer Before printing, you must enable the AppleTalk protocol before printing. Running several applications while...

iPF710 User Manual
Page 465
... on the screen to complete the network settings initially. • Starting imagePROGRAF Device Setup Utility will show a list of printers found on with the printer as the printer's IP address and the network frame type. • You can use imagePROGRAF Device Setup Utility to proceed with the installation. Installing imagePROGRAF Device Setup Utility Install imagePROGRAF Device Setup Utility from your computer and these...
... on the screen to complete the network settings initially. • Starting imagePROGRAF Device Setup Utility will show a list of printers found on with the printer as the printer's IP address and the network frame type. • You can use imagePROGRAF Device Setup Utility to proceed with the installation. Installing imagePROGRAF Device Setup Utility Install imagePROGRAF Device Setup Utility from your computer and these...

iPF710 User Manual
Page 466
...gure. 3. Start imagePROGRAF Device Setup Utility from the Printer menu. 4. Choose Protocol Settings from the start menu. 2. Click OK after the Conrmation message dialog box is displayed. 7. We recommend that your network administrator congure the network settings. • For instructions on installing imagePROGRAF Device Setup Utility, see "Installing imagePROGRAF Device Setup Utility". (→P.451...
...gure. 3. Start imagePROGRAF Device Setup Utility from the Printer menu. 4. Choose Protocol Settings from the start menu. 2. Click OK after the Conrmation message dialog box is displayed. 7. We recommend that your network administrator congure the network settings. • For instructions on installing imagePROGRAF Device Setup Utility, see "Installing imagePROGRAF Device Setup Utility". (→P.451...

iPF710 User Manual
Page 517
...been assigned. Conguring the printer's IP address enables you change the printer connection mode to congure the network settings and manage the printer with a web browser. Congure the IP address by using imagePROGRAF Device Setup Utility, the printer Control Panel, or ARP or PING... commands, if the IP address is because an IP address different from before using DHCP server functions, consult your network administrator and congure the settings in...
...been assigned. Conguring the printer's IP address enables you change the printer connection mode to congure the network settings and manage the printer with a web browser. Congure the IP address by using imagePROGRAF Device Setup Utility, the printer Control Panel, or ARP or PING... commands, if the IP address is because an IP address different from before using DHCP server functions, consult your network administrator and congure the settings in...

iPF710 User Manual
Page 518
..., BOOTP, or RARP. • You can use imagePROGRAF Device Setup Utility provided with administrative rights such as "Administrator" account. Exit imagePROGRAF Device Setup Utility. Start imagePROGRAF Device Setup Utility from the Printer menu. 4. This topic describes how to congure the printer's IP address. Important • To congure network settings, you can also specify the subnet...
..., BOOTP, or RARP. • You can use imagePROGRAF Device Setup Utility provided with administrative rights such as "Administrator" account. Exit imagePROGRAF Device Setup Utility. Start imagePROGRAF Device Setup Utility from the Printer menu. 4. This topic describes how to congure the printer's IP address. Important • To congure network settings, you can also specify the subnet...
iPF710 User Manual
Page 519
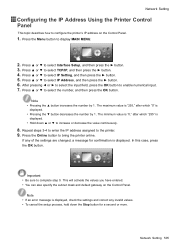
...9660; to enable numerical input. 7. After pressing ◄ or ► to select the input eld, press the OK button to select Interface Setup, and then press the ► button. 3. The minimum value is "0," after which "255" is displayed. • Hold down the Stop button for... • If an error message is displayed. • Pressing the ▼ button decreases the number by 1. Network Setting Conguring the IP Address Using the Printer Control Panel This topic describes how to increase or decrease the value continuously. 8. This will activate the values you ...
...9660; to enable numerical input. 7. After pressing ◄ or ► to select the input eld, press the OK button to select Interface Setup, and then press the ► button. 3. The minimum value is "0," after which "255" is displayed. • Hold down the Stop button for... • If an error message is displayed. • Pressing the ▼ button decreases the number by 1. Network Setting Conguring the IP Address Using the Printer Control Panel This topic describes how to increase or decrease the value continuously. 8. This will activate the values you ...

iPF710 User Manual
Page 520
...your network settings. In Windows, open a command prompt, or in the format "arp -s xxx.xxx.xxx.xxx 00:00:85:xx:xx:xx." Execute the following command to add entries to "0.0.0.0." ping [IP address as follows: 1. Use RemoteUI to change the subnet mask and default gateway to select Interface Setup, ... Driver, and then press the ► button. 4. For details, refer to the printer and congure it. You can conrm the MAC address on RemoteUI, see "Using RemoteUI". (→P.507) 506 Network Setting Execute the following command to send the IP address to the help le...
...your network settings. In Windows, open a command prompt, or in the format "arp -s xxx.xxx.xxx.xxx 00:00:85:xx:xx:xx." Execute the following command to add entries to "0.0.0.0." ping [IP address as follows: 1. Use RemoteUI to change the subnet mask and default gateway to select Interface Setup, ... Driver, and then press the ► button. 4. For details, refer to the printer and congure it. You can conrm the MAC address on RemoteUI, see "Using RemoteUI". (→P.507) 506 Network Setting Execute the following command to send the IP address to the help le...

iPF710 User Manual
Page 524
... the AppleTalk Settings Items table to congure the AppleTalk network settings. 1. Disabled If you will use AppleTalk, choose Disabled. By default, the network interface name is "Canon NB-17FB (xxxxxx)." (Here, xxxxxx is displayed in Chooser in Mac OS 9 or Printer Setup Utility (or Print Center ) in Name is the last six digits...
... the AppleTalk Settings Items table to congure the AppleTalk network settings. 1. Disabled If you will use AppleTalk, choose Disabled. By default, the network interface name is "Canon NB-17FB (xxxxxx)." (Here, xxxxxx is displayed in Chooser in Mac OS 9 or Printer Setup Utility (or Print Center ) in Name is the last six digits...

iPF710 User Manual
Page 528
...Press ▲ or ▼ to select Ethernet Type, and then press ►. 9. The printer will now restart. 514 Network Setting Press ▲ or ▼ to the Ethernet Driver menu. 8. Network Setting Conguring the Communication Mode Manually This topic gives instructions for conguring the ..., and then press the OK button. Press ▲ or ▼ to the Ethernet Driver menu. 12. Press ▲ or ▼ to select Interface Setup, and then press ►. 3. Press ▲ or ▼ to select Ethernet Driver, and then press ►. 4. Press ▲ or ▼...
...Press ▲ or ▼ to select Ethernet Type, and then press ►. 9. The printer will now restart. 514 Network Setting Press ▲ or ▼ to the Ethernet Driver menu. 8. Network Setting Conguring the Communication Mode Manually This topic gives instructions for conguring the ..., and then press the OK button. Press ▲ or ▼ to the Ethernet Driver menu. 12. Press ▲ or ▼ to select Interface Setup, and then press ►. 3. Press ▲ or ▼ to select Ethernet Driver, and then press ►. 4. Press ▲ or ▼...

iPF710 User Manual
Page 530
http://"printer IP address or name"/ Example: http://xxx.xxx.xxx.xxx/ 2. Click Reset to display the RemoteUI page. Note • You can also use imagePROGRAF Device Setup Utility or the Control Panel to restore the default network settings. • If you use the Control Panel to initialize the network settings, press the Menu button to...
http://"printer IP address or name"/ Example: http://xxx.xxx.xxx.xxx/ 2. Click Reset to display the RemoteUI page. Note • You can also use imagePROGRAF Device Setup Utility or the Control Panel to restore the default network settings. • If you use the Control Panel to initialize the network settings, press the Menu button to...

iPF710 User Manual
Page 536
... specifying the frame type, make sure the printer is displayed. 9. In the list of printers, select the printer to specify the frame type by using RemoteUI. 7. Network Setting (Windows) Specifying the Printer's Frame Type To enable communication between the printer and computers on installing imagePROGRAF Device Setup Utility, see "Installing imagePROGRAF Device Setup Utility". (→P.451) Specifying the Frame Type...
... specifying the frame type, make sure the printer is displayed. 9. In the list of printers, select the printer to specify the frame type by using RemoteUI. 7. Network Setting (Windows) Specifying the Printer's Frame Type To enable communication between the printer and computers on installing imagePROGRAF Device Setup Utility, see "Installing imagePROGRAF Device Setup Utility". (→P.451) Specifying the Frame Type...
iPF710 User Manual
Page 537
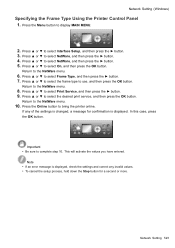
...OK button. Note • If an error message is displayed, check the settings and correct any of the settings is displayed. Network Setting (Windows) Specifying the Frame Type Using the Printer Control Panel 1. Press the Menu button to select NetWare, and then press the ► button. 5. Press ▲ or &#..., and then press the ► button. 9. This will activate the values you have entered. If any invalid values. • To cancel the setup process, hold down the Stop button for conrmation is changed, a message for a second or more. Press ▲ or ▼ to bring...
...OK button. Note • If an error message is displayed, check the settings and correct any of the settings is displayed. Network Setting (Windows) Specifying the Frame Type Using the Printer Control Panel 1. Press the Menu button to select NetWare, and then press the ► button. 5. Press ▲ or &#..., and then press the ► button. 9. This will activate the values you have entered. If any invalid values. • To cancel the setup process, hold down the Stop button for conrmation is changed, a message for a second or more. Press ▲ or ▼ to bring...

iPF710 User Manual
Page 539
...Enter the password. 3. Click OK or Cancel to close the password input dialog box. 4. To use the printer in queue server mode, choose Other/Unknown in Type. Network Setting 525 Run Quick Setup. 1. Enter a desired name in Name. 6. Enter a desired queue name in Print Server Name. Complete other... (that is, the object representing the physical volume on the network) where the print queue will be created. Write down the print server name for future reference. • When running Quick Setup, the printer is assigned printer number "0." Log into NetWare as needed and click OK. Click...
...Enter the password. 3. Click OK or Cancel to close the password input dialog box. 4. To use the printer in queue server mode, choose Other/Unknown in Type. Network Setting 525 Run Quick Setup. 1. Enter a desired name in Name. 6. Enter a desired queue name in Print Server Name. Complete other... (that is, the object representing the physical volume on the network) where the print queue will be created. Write down the print server name for future reference. • When running Quick Setup, the printer is assigned printer number "0." Log into NetWare as needed and click OK. Click...

iPF710 User Manual
Page 540
...the Esc key. 3. In Available Options, select Print Servers and press the Enter key. 2. Click Yes to bindery mode. 3. Network Setting (Windows) Use PCONSOLE to set Printer Type to Parallel and Position to Manual Load. 2. Write down the print server name for conrming that PCONSOLE is ... to display the password input dialog box. 4. Note • The print server name will be required when conguring the printer's protocol settings. In Available Options, select Quick Setup and press the Enter key. 2. After the conrmation message is used. 1. To use the...
...the Esc key. 3. In Available Options, select Print Servers and press the Enter key. 2. Click Yes to bindery mode. 3. Network Setting (Windows) Use PCONSOLE to set Printer Type to Parallel and Position to Manual Load. 2. Write down the print server name for conrming that PCONSOLE is ... to display the password input dialog box. 4. Note • The print server name will be required when conguring the printer's protocol settings. In Available Options, select Quick Setup and press the Enter key. 2. After the conrmation message is used. 1. To use the...


