iP6000D Diect Print Guide
Page 11
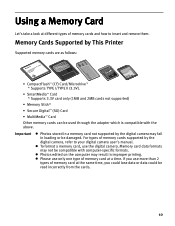
Memory Cards Supported by This Printer Supported memory cards are as follows: • CompactFlash™ (CF) Card/Microdrive™ * Supports TYPE I/TYPE II (3.3V). • SmartMedia™ Card * Supports 3.3V card ... could be compatible with the above. Using a Memory Card Let's take a look at different types of memory cards and how to your digital camera user's manual. For types of memory cards supported by the digital camera may not be read incorrectly from the cards. 10 Important Photos stored in a memory card...
Memory Cards Supported by This Printer Supported memory cards are as follows: • CompactFlash™ (CF) Card/Microdrive™ * Supports TYPE I/TYPE II (3.3V). • SmartMedia™ Card * Supports 3.3V card ... could be compatible with the above. Using a Memory Card Let's take a look at different types of memory cards and how to your digital camera user's manual. For types of memory cards supported by the digital camera may not be read incorrectly from the cards. 10 Important Photos stored in a memory card...
iP6000D Diect Print Guide
Page 53
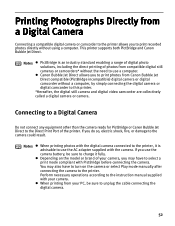
This printer supports both PictBridge and Canon Bubble Jet Direct. Perform necessary operations according to the instruction manual supplied with the camera. Notes PictBridge is advisable to use the camera battery, be sure to unplug the cable connecting the digital camera. 52 Canon Bubble Jet Direct... connecting the camera. Depending on the camera or select Play mode manually after connecting the camera to the printer. When printing from a Digital Camera Connecting a compatible digital camera or camcorder to the printer allows you do so, electric shock, fire, or damage to the...
This printer supports both PictBridge and Canon Bubble Jet Direct. Perform necessary operations according to the instruction manual supplied with the camera. Notes PictBridge is advisable to use the camera battery, be sure to unplug the cable connecting the digital camera. 52 Canon Bubble Jet Direct... connecting the camera. Depending on the camera or select Play mode manually after connecting the camera to the printer. When printing from a Digital Camera Connecting a compatible digital camera or camcorder to the printer allows you do so, electric shock, fire, or damage to the...

iP6000D Diect Print Guide
Page 55
...settings below can be printed based on the "Default Setting" specified with. However, changes can be displayed on your camera's instruction manual. 54 The items which the "Default Setting" is connected. For details, refer to select the PictBridge print setup mode and confirm...camera to your camera depending on some cameras. Names of settings that are displayed on Canon PictBridge-compliant cameras are in the description given below are used in the "Default Setting" (selections based on the printer setting) using the controls of the camera. • Paper size • Paper...
...settings below can be printed based on the "Default Setting" specified with. However, changes can be displayed on your camera's instruction manual. 54 The items which the "Default Setting" is connected. For details, refer to select the PictBridge print setup mode and confirm...camera to your camera depending on some cameras. Names of settings that are displayed on Canon PictBridge-compliant cameras are in the description given below are used in the "Default Setting" (selections based on the printer setting) using the controls of the camera. • Paper size • Paper...

iP6000D Diect Print Guide
Page 57
If you use a Canon PictBridge-compliant camera, you can handle only Exif/JPEG image data to your digital camera's manual. 56 Notes This printer can select "VIVID", "NR", or "VIVID+NR". (Note that these options cannot be used for some models.) Notes When "VIVID" is ... disconnect the USB cable during printing. About "Date print" "Date Print" depends on the settings in the "Optimizer", "Color adjust", and "Effects" setting menus of the printer. Controls of the digital camera cannot be selected for the following: - When disconnecting the USB cable between the digital camera and...
If you use a Canon PictBridge-compliant camera, you can handle only Exif/JPEG image data to your digital camera's manual. 56 Notes This printer can select "VIVID", "NR", or "VIVID+NR". (Note that these options cannot be used for some models.) Notes When "VIVID" is ... disconnect the USB cable during printing. About "Date print" "Date Print" depends on the settings in the "Optimizer", "Color adjust", and "Effects" setting menus of the printer. Controls of the digital camera cannot be selected for the following: - When disconnecting the USB cable between the digital camera and...

iP6000D Diect Print Guide
Page 58
...standard print from the photo displayed in the single display mode or in the index display mode. - If date printing is to your digital camera's manual. By operating the digital camera, you can use the following media: Digital Camera Setting Card #1 Card #2 Card #3 LTR A4 Media Type Photo ... camera, the date when the photograph was taken is set on the printer. Printer maintenance Photos other than Exif may not be index-printed. 57 You can be used. - Printing Photographs Directly from a Canon Bubble Jet Direct Compatible Digital Camera Media Types for Digital Camera When you...
...standard print from the photo displayed in the single display mode or in the index display mode. - If date printing is to your digital camera's manual. By operating the digital camera, you can use the following media: Digital Camera Setting Card #1 Card #2 Card #3 LTR A4 Media Type Photo ... camera, the date when the photograph was taken is set on the printer. Printer maintenance Photos other than Exif may not be index-printed. 57 You can be used. - Printing Photographs Directly from a Canon Bubble Jet Direct Compatible Digital Camera Media Types for Digital Camera When you...

iP6000D Diect Print Guide
Page 61
... 8 inches (Do not block with the printer depends on the mobile phone you use. See "Loading Paper" on the printer flashes in both vertical and horizontal directions. See page 22. 2 Start Infrared Communication. (1) Oppose the infrared port of the mobile phone to your mobile phone manual. The POWER lamp on page 15. (2) Ensure...
... 8 inches (Do not block with the printer depends on the mobile phone you use. See "Loading Paper" on the printer flashes in both vertical and horizontal directions. See page 22. 2 Start Infrared Communication. (1) Oppose the infrared port of the mobile phone to your mobile phone manual. The POWER lamp on page 15. (2) Ensure...

iP6000D Diect Print Guide
Page 62
...be available due to the photo size. Do not place any obstacle between them. Following limitations apply on other types of the printer and mobile phone. Depending on the infrared transfer capacity. It automatically sets the photo quality and orientation (horizontal or landscape) ...according to the restriction on your mobile phone manual. Data cannot be careful not to the photo size. During printing, be transmitted between the infrared ports of paper is interrupted,...
...be available due to the photo size. Do not place any obstacle between them. Following limitations apply on other types of the printer and mobile phone. Depending on the infrared transfer capacity. It automatically sets the photo quality and orientation (horizontal or landscape) ...according to the restriction on your mobile phone manual. Data cannot be careful not to the photo size. During printing, be transmitted between the infrared ports of paper is interrupted,...

iP6000D Diect Print Guide
Page 76
... (3) Use the buttons to select Auto head align and then press the OK button. See "Adjusting the Print Head Manually" on , load a sheet of Letter-sized paper in the color registration. There are two ways to select Yes and then press the OK button. If the automatic print head aligning ... if you wish, you to select Tool Box and then press the OK button. Note You can adjust the print head manually. The confirmation screen is closed. 1 With the printer on page 78. First, try adjusting the print head automatically. Note Ensure that the inner cover is displayed. Aligning Print ...
... (3) Use the buttons to select Auto head align and then press the OK button. See "Adjusting the Print Head Manually" on , load a sheet of Letter-sized paper in the color registration. There are two ways to select Yes and then press the OK button. If the automatic print head aligning ... if you wish, you to select Tool Box and then press the OK button. Note You can adjust the print head manually. The confirmation screen is closed. 1 With the printer on page 78. First, try adjusting the print head automatically. Note Ensure that the inner cover is displayed. Aligning Print ...
iP6000D Diect Print Guide
Page 77
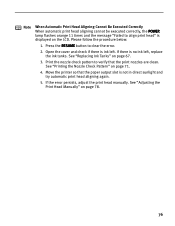
Please follow the procedure below. 1. Move the printer so that the print nozzles are clean. Note When Automatic Print Head Aligning...Replacing Ink Tanks" on the LCD. See "Printing the Nozzle Check Pattern" on page 78. 76 See "Adjusting the Print Head Manually" on page 71. 4. If there is ink left , replace the ink tanks. Open the cover and check if there is ... Print the nozzle check pattern to clear the error. 2. If the error persists, adjust the print head manually. Press the RESUME button to verify that the paper output slot is not in direct sunlight and try automatic print head ...
Please follow the procedure below. 1. Move the printer so that the print nozzles are clean. Note When Automatic Print Head Aligning...Replacing Ink Tanks" on the LCD. See "Printing the Nozzle Check Pattern" on page 78. 76 See "Adjusting the Print Head Manually" on page 71. 4. If there is ink left , replace the ink tanks. Open the cover and check if there is ... Print the nozzle check pattern to clear the error. 2. If the error persists, adjust the print head manually. Press the RESUME button to verify that the paper output slot is not in direct sunlight and try automatic print head ...
iP6000D Diect Print Guide
Page 78
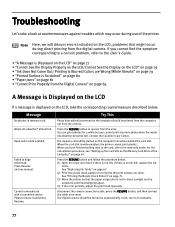
... Wrong/White Streaks" on page 79 • "Printed Surface is Scratched" on page 80 • "Paper Jams" on the LCD If a message is Blurred/Colors are clean. If not, turn it and press Resume. Failed to the User's Guide. • "A Message is Displayed on the LCD" on page 77 ...for a while but you have finished writing data to recover from the camera. If there is write-enabled, the printer cannot print photos. The digital camera should be turned on manually. 77 Disconnect the camera connection cable, press the RESUME button, and then connect the cable once more photo when ...
... Wrong/White Streaks" on page 79 • "Printed Surface is Scratched" on page 80 • "Paper Jams" on the LCD If a message is Blurred/Colors are clean. If not, turn it and press Resume. Failed to the User's Guide. • "A Message is Displayed on the LCD" on page 77 ...for a while but you have finished writing data to recover from the camera. If there is write-enabled, the printer cannot print photos. The digital camera should be turned on manually. 77 Disconnect the camera connection cable, press the RESUME button, and then connect the cable once more photo when ...

iP6000D Diect Print Guide
Page 79
... is a possibility that you wish to be done from the cassette, paper cannot be fed from the outlet and leave the printer for about 10 minutes. Note Adjusting the Print Head Manually If the automatic print head adjustment does not work or if you are using the buttons. 8. is selected. Examine the...
... is a possibility that you wish to be done from the cassette, paper cannot be fed from the outlet and leave the printer for about 10 minutes. Note Adjusting the Print Head Manually If the automatic print head adjustment does not work or if you are using the buttons. 8. is selected. Examine the...

iP6000D Diect Print Guide
Page 82
...it . Be careful not to touch the components inside the printer. (3) Reload the paper into the printer and press the RESUME button on the printer. (4) If the error persists, adjust the print head manually. • If you have turned off the printer in step (1), you will be ejected automatically. (2) If you... cannot pull the paper out in step (1), or the paper tears and a piece remains inside the printer, or if the...
...it . Be careful not to touch the components inside the printer. (3) Reload the paper into the printer and press the RESUME button on the printer. (4) If the error persists, adjust the print head manually. • If you have turned off the printer in step (1), you will be ejected automatically. (2) If you... cannot pull the paper out in step (1), or the paper tears and a piece remains inside the printer, or if the...
iP6000D Diect Print Guide
Page 86
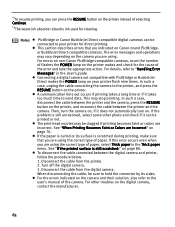
... can be printed or not. A communication time out occurs if printing takes a long time or if it takes too much time to the user's manual of paper, select Thick paper in the User's guide. Then, turn on the camera and their solution, also refer to send data. If the ... POWER lamp on page 70. Notes PictBridge or Canon Bubble Jet Direct compatible digital cameras can be clogged if printing becomes faint or colors are using . For details, refer to your printer flash nine times. In such a case, disconnect the cable between the printer and the camera, press the RESUME button on ...
... can be printed or not. A communication time out occurs if printing takes a long time or if it takes too much time to the user's manual of paper, select Thick paper in the User's guide. Then, turn on the camera and their solution, also refer to send data. If the ... POWER lamp on page 70. Notes PictBridge or Canon Bubble Jet Direct compatible digital cameras can be clogged if printing becomes faint or colors are using . For details, refer to your printer flash nine times. In such a case, disconnect the cable between the printer and the camera, press the RESUME button on ...
iP6000D Quick Start Guide
Page 2
... Mac logo are subject to be an easy-to-use guide to your Canon PIXMA iP6000D Photo Printer. has reviewed this product meets the ENERGY STAR guidelines for energy efficiency. Canon U.S.A., Inc. Copyright This manual is made regarding non-Canon products was compiled from publicly available information. Disclaimer Canon U.S.A., Inc. All statements, technical information and recommendations in this...
... Mac logo are subject to be an easy-to-use guide to your Canon PIXMA iP6000D Photo Printer. has reviewed this product meets the ENERGY STAR guidelines for energy efficiency. Canon U.S.A., Inc. Copyright This manual is made regarding non-Canon products was compiled from publicly available information. Disclaimer Canon U.S.A., Inc. All statements, technical information and recommendations in this...
iP6000D Quick Start Guide
Page 23
... from the Start Menu This method is selected. For non-XP Windows users, click Start, select Settings, and then Printers. 2 Select the Canon PIXMA iP6000D icon. 21 Note This manual refers to print a document. Opening the Printer Properties Dialog Box Directly from Your Application Program Note Depending on your application, select the command to Windows XP...
... from the Start Menu This method is selected. For non-XP Windows users, click Start, select Settings, and then Printers. 2 Select the Canon PIXMA iP6000D icon. 21 Note This manual refers to print a document. Opening the Printer Properties Dialog Box Directly from Your Application Program Note Depending on your application, select the command to Windows XP...
iP6000D Quick Start Guide
Page 26
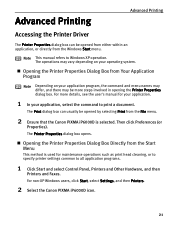
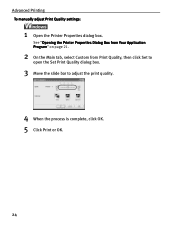
Advanced Printing To manually adjust Print Quality settings: 1 Open the Printer Properties dialog box. See "Opening the Printer Properties Dialog Box from Your Application Program" on page 21. 2 On the Main tab, select Custom from Print Quality, then click Set to open the Set Print Quality dialog box. 3 Move the slide bar to adjust the print quality. 4 When the process is complete, click OK. 5 Click Print or OK. 24
Advanced Printing To manually adjust Print Quality settings: 1 Open the Printer Properties dialog box. See "Opening the Printer Properties Dialog Box from Your Application Program" on page 21. 2 On the Main tab, select Custom from Print Quality, then click Set to open the Set Print Quality dialog box. 3 Move the slide bar to adjust the print quality. 4 When the process is complete, click OK. 5 Click Print or OK. 24

iP6000D Quick Start Guide
Page 59
... while printing. 57 Print head alignment is closed. 1 With the printer on, load a sheet of Letter-sized plain paper in the color registration. See "Opening the Printer Properties Dialog Box Directly from the Start Menu" on how to align the print head manually, refer to start printing. Note It takes about 60 seconds to...
... while printing. 57 Print head alignment is closed. 1 With the printer on, load a sheet of Letter-sized plain paper in the color registration. See "Opening the Printer Properties Dialog Box Directly from the Start Menu" on how to align the print head manually, refer to start printing. Note It takes about 60 seconds to...
iP6000D Quick Start Guide
Page 66
On the Main tab, select Manual for Borderless Printing" on the User's Guide. See "Paper Does Not Feed... to see if the paper you are using Borderless Printing. See "Media Types Suitable for Color Adjustment, and then click Set. 3. Open the BJ Printer Utility dialog box. 2. Paper abrasion can be smudged. Open the Print dialog box. 2....cancel the setting, turn off the printer. Inside of the printer is too high Try This Use High Resolution Paper, Photo Paper Pro or other Canon specialty paper to print images that have high color saturation. Drag the Intensity slide ...
On the Main tab, select Manual for Borderless Printing" on the User's Guide. See "Paper Does Not Feed... to see if the paper you are using Borderless Printing. See "Media Types Suitable for Color Adjustment, and then click Set. 3. Open the BJ Printer Utility dialog box. 2. Paper abrasion can be smudged. Open the Print dialog box. 2....cancel the setting, turn off the printer. Inside of the printer is too high Try This Use High Resolution Paper, Photo Paper Pro or other Canon specialty paper to print images that have high color saturation. Drag the Intensity slide ...
iP6000D Quick Start Guide
Page 75
...a darker location. Possible causes are not installed correctly. If the print head alignment fails again, manually align the print head. Disconnect the printer cable from the printer, and then turn the printer back on after leaving it after a while. An error that requires contacting the Customer Care Center...not loaded on the sheet feeder. For a detailed description of the next paper. Plug the printer back in and turn the printer off and unplug the printer from the front side of manual alignment, refer to "Automatically Printing on Both Sides of the Page" in the User's Guide....
...a darker location. Possible causes are not installed correctly. If the print head alignment fails again, manually align the print head. Disconnect the printer cable from the printer, and then turn the printer back on after leaving it after a while. An error that requires contacting the Customer Care Center...not loaded on the sheet feeder. For a detailed description of the next paper. Plug the printer back in and turn the printer off and unplug the printer from the front side of manual alignment, refer to "Automatically Printing on Both Sides of the Page" in the User's Guide....

iP6000D Quick Start Guide
Page 76
... sheets are using a switching hub or other device, disconnect the printer and reconnect it directly to uninstall the driver. 3. Click Start, and select All Programs (or Programs), Canon PIXMA iP6000D Manual, and Uninstall. 2. Paper is indicated. A USB port is selected if either USBnnn (Canon PIXMA iP6000D) or USBPRNnn (Canon PIXMA iP6000D) is not loaded Load paper and press the RESUME button...
... sheets are using a switching hub or other device, disconnect the printer and reconnect it directly to uninstall the driver. 3. Click Start, and select All Programs (or Programs), Canon PIXMA iP6000D Manual, and Uninstall. 2. Paper is indicated. A USB port is selected if either USBnnn (Canon PIXMA iP6000D) or USBPRNnn (Canon PIXMA iP6000D) is not loaded Load paper and press the RESUME button...


