iP6000D Diect Print Guide
Page 5
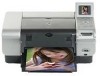
Press this button is pressed during printing, the printer aborts printing. (16)Print Button Press to start printing according to Print." See "Trimming and Rotating the Sections you have made. (9) Buttons Use these buttons, ... to trim the photo being displayed. See "Browsing Photos in the Memory Card on the Computer" on the LCD. 4 Trimming" on page 63. (12)Paper Feed Switch Selects the paper source. Pressing this button in the memory card onto the computer's hard disk. See "Saving Data in the Memory Card onto the Computer" on...
Press this button is pressed during printing, the printer aborts printing. (16)Print Button Press to start printing according to Print." See "Trimming and Rotating the Sections you have made. (9) Buttons Use these buttons, ... to trim the photo being displayed. See "Browsing Photos in the Memory Card on the Computer" on the LCD. 4 Trimming" on page 63. (12)Paper Feed Switch Selects the paper source. Pressing this button in the memory card onto the computer's hard disk. See "Saving Data in the Memory Card onto the Computer" on...
iP6000D Diect Print Guide
Page 17
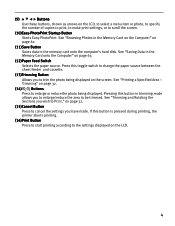
... of the printer You can use the sheet feeder. Load one sheet at a time in the cassette. Loading paper in both types of paper without removing and reloading paper. To change the paper source, use the paper feed switch on both the sheet feeder and cassette makes the following paper feed methods available: • Changing the paper source to feed different types...
... of the printer You can use the sheet feeder. Load one sheet at a time in the cassette. Loading paper in both types of paper without removing and reloading paper. To change the paper source, use the paper feed switch on both the sheet feeder and cassette makes the following paper feed methods available: • Changing the paper source to feed different types...

iP6000D Diect Print Guide
Page 18
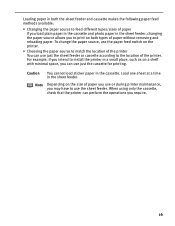
... it. Loading the Print Media in the Sheet Feeder In this example, description is provided using Photo Paper Plus Glossy 4" x 6" in your printer. • Refer to Load Paper. (1) Open and pull out the paper support. (3) Press the paper feed switch so that the sheet feeder lamp is curled, gently bend the corners in the opposite direction until...
... it. Loading the Print Media in the Sheet Feeder In this example, description is provided using Photo Paper Plus Glossy 4" x 6" in your printer. • Refer to Load Paper. (1) Open and pull out the paper support. (3) Press the paper feed switch so that the sheet feeder lamp is curled, gently bend the corners in the opposite direction until...

iP6000D Diect Print Guide
Page 21
... packaged with the print side facing down. (2) Align the paper stack against the right side of the printer. 1 Cassette Lamp 2 (1) Open the paper output tray and pull out the extension completely. (2) Press the paper feed switch so that the cassette lamp is lit. 3 Loading the Paper. (1) Load the paper into the cassette with your media. 20 Push the...
... packaged with the print side facing down. (2) Align the paper stack against the right side of the printer. 1 Cassette Lamp 2 (1) Open the paper output tray and pull out the extension completely. (2) Press the paper feed switch so that the cassette lamp is lit. 3 Loading the Paper. (1) Load the paper into the cassette with your media. 20 Push the...
iP6000D Diect Print Guide
Page 23
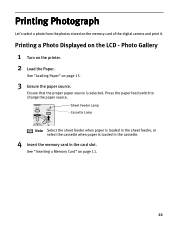
... in the sheet feeder, or select the cassette when paper is selected. See "Inserting a Memory Card" on the printer. 2 Load the Paper. See "Loading Paper" on page 15. 3 Ensure the paper source. Ensure that the proper paper source is loaded in the cassette. 4 Insert the memory card in the card slot. Press the paper feed switch to change the...
... in the sheet feeder, or select the cassette when paper is selected. See "Inserting a Memory Card" on the printer. 2 Load the Paper. See "Loading Paper" on page 15. 3 Ensure the paper source. Ensure that the proper paper source is loaded in the cassette. 4 Insert the memory card in the card slot. Press the paper feed switch to change the...
iP6000D Diect Print Guide
Page 72
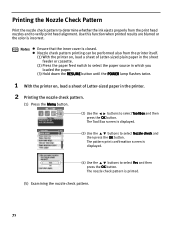
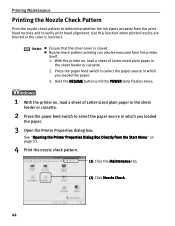
...color is closed. Printing the Nozzle Check Pattern Print the nozzle check pattern to determine whether the ink ejects properly from the printer itself. (1) With the printer on, load a sheet of Letter-sized plain paper in the sheet feeder or cassette. (2) Press the paper feed switch to select the paper... source in which you loaded the paper. (3) Hold down the RESUME button until...
...color is closed. Printing the Nozzle Check Pattern Print the nozzle check pattern to determine whether the ink ejects properly from the printer itself. (1) With the printer on, load a sheet of Letter-sized plain paper in the sheet feeder or cassette. (2) Press the paper feed switch to select the paper... source in which you loaded the paper. (3) Hold down the RESUME button until...
iP6000D Diect Print Guide
Page 85
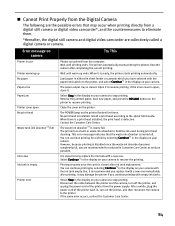
... can continue printing for a while by selecting Continue*1 in the display on your camera with the paper feed switch on the printer, and select Continue*1 in use Printer warming up ends. When it . It may occur when printing directly from a digital still camera or digital video camcorder*, and the ...video camcorder are printed from the power supply. Remove the jammed paper, load new paper, and press the RESUME button on the printer, and then reconnect the camera to the Quick Start Guide. The POWER lamp on the printer flashes five times. But, it to hold the ink used ...
... can continue printing for a while by selecting Continue*1 in the display on your camera with the paper feed switch on the printer, and select Continue*1 in use Printer warming up ends. When it . It may occur when printing directly from a digital still camera or digital video camcorder*, and the ...video camcorder are printed from the power supply. Remove the jammed paper, load new paper, and press the RESUME button on the printer, and then reconnect the camera to the Quick Start Guide. The POWER lamp on the printer flashes five times. But, it to hold the ink used ...
iP6000D Diect Print Guide
Page 88
...71 Nozzle Check Pattern (Examining 72 Nozzle Check Pattern (Printing 71 NR 56 O OK Button 3 Operation Panel 3 Optimizer (Print Settings 29 P Paper Feed Switch 4, 22 Paper Jams 81 Photo Gallery 5, 22 Photo Optimizer PRO 29 Photo Print 5, 25 PictBridge 52 POP 29 POWER Button 3 POWER Lamp 3 Print all 6,...3, 27 sheet feeder 15 Sheet Feeder Lamp 22 Simulate illustration 29 SmartMedia Card 10 SmartMedia card 12, 13 Sticker print 6, 37 T Thick paper 7, 80 Tool Box 6 Trimming 32 Trimming Button 4, 32 Trimming Guide 32 U USB Memory Card Settings 64 V VIVID 56 Vivid Photo 29...
...71 Nozzle Check Pattern (Examining 72 Nozzle Check Pattern (Printing 71 NR 56 O OK Button 3 Operation Panel 3 Optimizer (Print Settings 29 P Paper Feed Switch 4, 22 Paper Jams 81 Photo Gallery 5, 22 Photo Optimizer PRO 29 Photo Print 5, 25 PictBridge 52 POP 29 POWER Button 3 POWER Lamp 3 Print all 6,...3, 27 sheet feeder 15 Sheet Feeder Lamp 22 Simulate illustration 29 SmartMedia Card 10 SmartMedia card 12, 13 Sticker print 6, 37 T Thick paper 7, 80 Tool Box 6 Trimming 32 Trimming Button 4, 32 Trimming Guide 32 U USB Memory Card Settings 64 V VIVID 56 Vivid Photo 29...

iP6000D Quick Start Guide
Page 6
...Canon Speciality Media" on the size of paper you use or during printer maintenance, you regularly print onto. You can also specify the type/size of paper to be fed from the cassette whenever you to configure the printer driver beforehand. To change the paper source, use the paper feed switch on the printer... driver settings, refer to "Changing the Paper Source" in both the sheet ...
...Canon Speciality Media" on the size of paper you use or during printer maintenance, you regularly print onto. You can also specify the type/size of paper to be fed from the cassette whenever you to configure the printer driver beforehand. To change the paper source, use the paper feed switch on the printer... driver settings, refer to "Changing the Paper Source" in both the sheet ...

iP6000D Quick Start Guide
Page 7
... information on the specialty media Canon provides for detailed instructions on how to "Canon Speciality Media" on page 13. Basic Printing Loading Paper in the User's Guide for use with the printer driver. sheet feeder lamp 1 2 (2) 1 Open the paper output tray. 2 Pull out the paper output tray extension completely. (3) Press the paper feed switch so that the sheet feeder...
... information on the specialty media Canon provides for detailed instructions on how to "Canon Speciality Media" on page 13. Basic Printing Loading Paper in the User's Guide for use with the printer driver. sheet feeder lamp 1 2 (2) 1 Open the paper output tray. 2 Pull out the paper output tray extension completely. (3) Press the paper feed switch so that the sheet feeder...

iP6000D Quick Start Guide
Page 9
...or Credit Card-sized paper, or up to 10 sheets of 5" x 7"-sized paper. (3) Press the paper feed switch so that the sheet feeder lamp is curled, gently bend the corners in the cassette. Load one sheet at a time in the printer driver. For a detailed description of the printer driver settings, refer to... load sticker paper in the opposite direction until the paper becomes completely flat. Notes For detailed information on the specialty media Canon provides for detailed instructions on how to load envelopes and specialty media into the sheet feeder and align the paper stack against ...
...or Credit Card-sized paper, or up to 10 sheets of 5" x 7"-sized paper. (3) Press the paper feed switch so that the sheet feeder lamp is curled, gently bend the corners in the cassette. Load one sheet at a time in the printer driver. For a detailed description of the printer driver settings, refer to... load sticker paper in the opposite direction until the paper becomes completely flat. Notes For detailed information on the specialty media Canon provides for detailed instructions on how to load envelopes and specialty media into the sheet feeder and align the paper stack against ...

iP6000D Quick Start Guide
Page 12
Basic Printing 5 Prepare the paper output tray. (1) 1 Open the paper output tray. 2 Pull out the paper output tray extension completely. For details, refer to "Changing the Paper Source" in the User's Guide. 10 Note You can also select the paper source with the printer driver. cassette 1 lamp 2 (2) Press the paper feed switch so that the cassette lamp is lit.
Basic Printing 5 Prepare the paper output tray. (1) 1 Open the paper output tray. 2 Pull out the paper output tray extension completely. For details, refer to "Changing the Paper Source" in the User's Guide. 10 Note You can also select the paper source with the printer driver. cassette 1 lamp 2 (2) Press the paper feed switch so that the cassette lamp is lit.

iP6000D Quick Start Guide
Page 13
... the direction of 5" x 7"sized paper. (2) Slide the paper guides to fit the loaded paper stack. (3) Press the paper feed switch so that the cassette lamp is lit. (4) Select 4" x 6" or 5" x 7" from Paper Size in the cassette for a long time. Basic Printing Loading 4" x 6" or 5" x 7"-Sized Paper in the Cassette Do not leave photo paper, such as Photo Paper Pro, in the printer driver.
... the direction of 5" x 7"sized paper. (2) Slide the paper guides to fit the loaded paper stack. (3) Press the paper feed switch so that the cassette lamp is lit. (4) Select 4" x 6" or 5" x 7" from Paper Size in the cassette for a long time. Basic Printing Loading 4" x 6" or 5" x 7"-Sized Paper in the Cassette Do not leave photo paper, such as Photo Paper Pro, in the printer driver.
iP6000D Quick Start Guide
Page 17
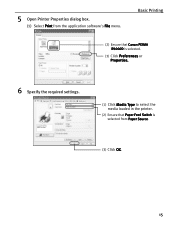
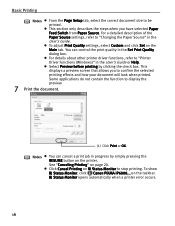
5 Open Printer Properties dialog box. (1) Select Print from Paper Source. (3) Click OK. 15 Basic Printing (2) Ensure that Canon PIXMA iP6000D is selected. (3) Click Preferences or Properties. 6 Specify the required settings. (1) Click Media Type to select the media loaded in the printer. (2) Ensure that Paper Feed Switch is selected from the application software's File menu.
5 Open Printer Properties dialog box. (1) Select Print from Paper Source. (3) Click OK. 15 Basic Printing (2) Ensure that Canon PIXMA iP6000D is selected. (3) Click Preferences or Properties. 6 Specify the required settings. (1) Click Media Type to select the media loaded in the printer. (2) Ensure that Paper Feed Switch is selected from the application software's File menu.
iP6000D Quick Start Guide
Page 18
...Print Quality dialog box. Select Preview before printing by simply pressing the RESUME button on the printer. This displays a preview screen that allows you have selected Paper Feed Switch from Paper Source. Some applications do not contain the function to be printed. See "Canceling Printing"...page 20. To show BJ Status Monitor, click Canon PIXMA iP6000... For a detailed description of the Paper Source settings, refer to "Printer Driver Functions (Windows)" in the User's Guide. BJ Status Monitor opens automatically when a printer error occurs. 16 Basic Printing Notes From the ...
...Print Quality dialog box. Select Preview before printing by simply pressing the RESUME button on the printer. This displays a preview screen that allows you have selected Paper Feed Switch from Paper Source. Some applications do not contain the function to be printed. See "Canceling Printing"...page 20. To show BJ Status Monitor, click Canon PIXMA iP6000... For a detailed description of the Paper Source settings, refer to "Printer Driver Functions (Windows)" in the User's Guide. BJ Status Monitor opens automatically when a printer error occurs. 16 Basic Printing Notes From the ...

iP6000D Quick Start Guide
Page 20
... Select iP6000D from the Format for pop-up menu. (3) Select the desired paper size from the Paper Size pop-up menu. 18 The Print dialog box opens. (2) Select Quality & Media from the pop-up menu. (3) Select the desired media type from Media Type popup menu. (4) Ensure that Paper Feed Switch is selected... from the Paper Source pop-up menu. (5) Select the print mode appropriate to your document from the Print Mode pop-up menu. (4) Click OK. ...
... Select iP6000D from the Format for pop-up menu. (3) Select the desired paper size from the Paper Size pop-up menu. 18 The Print dialog box opens. (2) Select Quality & Media from the pop-up menu. (3) Select the desired media type from Media Type popup menu. (4) Ensure that Paper Feed Switch is selected... from the Paper Source pop-up menu. (5) Select the print mode appropriate to your document from the Print Mode pop-up menu. (4) Click OK. ...
iP6000D Quick Start Guide
Page 21
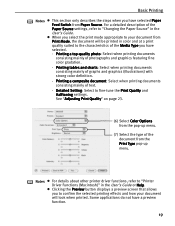
... do not have selected Paper Feed Switch from the Print Type pop-up menu. For a detailed description of photographs and graphics featuring fine color gradation. - See "Adjusting Print Quality" on page 23. (6) Select Color Options from the pop-up menu. (7) Select the type of the document from Paper Source. Detailed Setting: Select to "Printer Driver Functions (Macintosh...
... do not have selected Paper Feed Switch from the Print Type pop-up menu. For a detailed description of photographs and graphics featuring fine color gradation. - See "Adjusting Print Quality" on page 23. (6) Select Color Options from the pop-up menu. (7) Select the type of the document from Paper Source. Detailed Setting: Select to "Printer Driver Functions (Macintosh...

iP6000D Quick Start Guide
Page 37
.... For example, using this feature, you want to use from Paper Source. For more information, refer to the Photo Application Guide. 6 Select the paper. (1) Click the Paper Selection tab. (2) Ensure that Paper Feed Switch is selected from Paper Source. (3) Select the size of the paper you have selected Paper Feed Switch from Media Type. Increases the number of copies. Decreases the...
.... For example, using this feature, you want to use from Paper Source. For more information, refer to the Photo Application Guide. 6 Select the paper. (1) Click the Paper Selection tab. (2) Ensure that Paper Feed Switch is selected from Paper Source. (3) Select the size of the paper you have selected Paper Feed Switch from Media Type. Increases the number of copies. Decreases the...
iP6000D Quick Start Guide
Page 46
... the color is closed. Notes Ensure that the inner cover is incorrect. Press the paper feed switch to select the paper source in which you loaded the paper. 3. Hold the RESUME button until the POWER lamp flashes twice. 1 With the printer on , load a sheet of Letter-sized plain paper in the sheet feeder or cassette. 2 Press the paper feed switch to...
... the color is closed. Notes Ensure that the inner cover is incorrect. Press the paper feed switch to select the paper source in which you loaded the paper. 3. Hold the RESUME button until the POWER lamp flashes twice. 1 With the printer on , load a sheet of Letter-sized plain paper in the sheet feeder or cassette. 2 Press the paper feed switch to...
iP6000D Quick Start Guide
Page 48
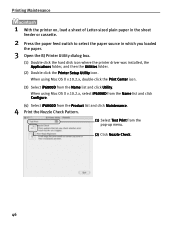
...iP6000D from the Product list and click Maintenance. 4 Print the Nozzle Check Pattern. (1) Select Test Print from the Name list and click Utility. Printing Maintenance 1 With the printer on, load a sheet of Letter-sized plain paper in the sheet feeder or cassette. 2 Press the paper feed switch to select the paper... source in which you loaded the paper. 3 Open the BJ Printer Utility dialog box. (1) Double-click the ...
...iP6000D from the Product list and click Maintenance. 4 Print the Nozzle Check Pattern. (1) Select Test Print from the Name list and click Utility. Printing Maintenance 1 With the printer on, load a sheet of Letter-sized plain paper in the sheet feeder or cassette. 2 Press the paper feed switch to select the paper... source in which you loaded the paper. 3 Open the BJ Printer Utility dialog box. (1) Double-click the ...


