iP4500 series Quick Start Guide
Page 5
...When Printing Becomes Faint or Colors Are Incorrect 34 Printing the Nozzle Check Pattern 35 Examining the Nozzle Check Pattern ...........37 Print Head Cleaning 38 Print Head Deep Cleaning 41 Aligning the Print Head 43 Cleaning Your Printer 57 Troubleshooting 63 Cannot Install the Printer Driver 64 Cannot Connect to ...But Ink Is Not Ejected 71 Paper Does Not Feed Properly 72 Paper Does Not Feed from the Paper Source Specified in the Printer Driver 72 Paper Jams 73 ALARM Lamp Flashes Orange 77 Error Message Appears on the Computer Screen 80 Error Message Appears on a PictBridge...
...When Printing Becomes Faint or Colors Are Incorrect 34 Printing the Nozzle Check Pattern 35 Examining the Nozzle Check Pattern ...........37 Print Head Cleaning 38 Print Head Deep Cleaning 41 Aligning the Print Head 43 Cleaning Your Printer 57 Troubleshooting 63 Cannot Install the Printer Driver 64 Cannot Connect to ...But Ink Is Not Ejected 71 Paper Does Not Feed Properly 72 Paper Does Not Feed from the Paper Source Specified in the Printer Driver 72 Paper Jams 73 ALARM Lamp Flashes Orange 77 Error Message Appears on the Computer Screen 80 Error Message Appears on a PictBridge...
iP4500 series Quick Start Guide
Page 6
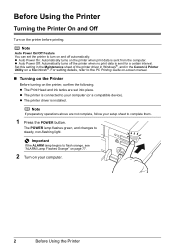
... for a certain interval. Before Using the Printer Turning the Printer On and Off Turn on a Macintosh®. z The printer is connected to turn on the printer, confirm the following. Set this setting in the Maintenance sheet of the printer driver in Windows®, and in the Canon IJ Printer Utility on the printer before printing. z The Print Head and...
... for a certain interval. Before Using the Printer Turning the Printer On and Off Turn on a Macintosh®. z The printer is connected to turn on the printer, confirm the following. Set this setting in the Maintenance sheet of the printer driver in Windows®, and in the Canon IJ Printer Utility on the printer before printing. z The Print Head and...
iP4500 series Quick Start Guide
Page 9
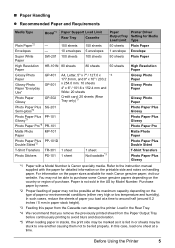
...capacity depending on the country or region of paper you remove the previously printed sheet from the Cassette can damage the printer. In this case, load one another causing them not to the instruction manual supplied with the paper for detailed ... time. For information on handling paper. Before Using the Printer 5 „ Paper Handling z Recommended Paper and Requirements Media Type Plain Paper*2 Model*1 Paper Support Load Limit Rear Tray Cassette - 150 sheets 150 sheets Paper Printer Driver Output Tray Setting for each Canon genuine paper, visit our website.
...capacity depending on the country or region of paper you remove the previously printed sheet from the Cassette can damage the printer. In this case, load one another causing them not to the instruction manual supplied with the paper for detailed ... time. For information on handling paper. Before Using the Printer 5 „ Paper Handling z Recommended Paper and Requirements Media Type Plain Paper*2 Model*1 Paper Support Load Limit Rear Tray Cassette - 150 sheets 150 sheets Paper Printer Driver Output Tray Setting for each Canon genuine paper, visit our website.
iP4500 series Quick Start Guide
Page 11
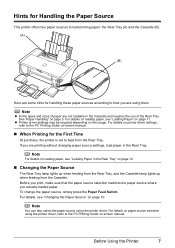
... use of the Rear Tray. For details, see "Loading Paper" on page 11. For details on printer driver settings, refer to the PC Printing Guide on -screen manual. For details on paper source selection using the printer driver, refer to how you are some hints for handling these paper sources according to the PC..., load paper in the Rear Tray" on page 10. Note You can also select the paper source using them. See "Paper Handling" on the usage. z Printer driver settings may be required depending on page 5. the Rear Tray (A) and the Cassette (B). (A) (B) Here are using the...
... use of the Rear Tray. For details, see "Loading Paper" on page 11. For details on printer driver settings, refer to the PC Printing Guide on -screen manual. For details on paper source selection using the printer driver, refer to how you are some hints for handling these paper sources according to the PC..., load paper in the Rear Tray" on page 10. Note You can also select the paper source using them. See "Paper Handling" on the usage. z Printer driver settings may be required depending on page 5. the Rear Tray (A) and the Cassette (B). (A) (B) Here are using the...

iP4500 series Quick Start Guide
Page 12
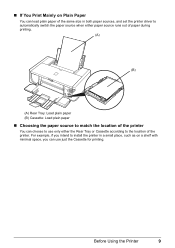
For details on printer driver settings, refer to be required depending on Photo Paper as well as plain paper. 8 Before Using the Printer See "Paper Handling" on page 11. You can print more efficiently by pressing the Paper Feed Switch. You can load photo paper in the Rear ... and sizes of paper to the PC Printing Guide on-screen manual. „ If You Print Regularly on the usage. z Printer driver settings may be fed from the Cassette using the printer driver. This way, you can switch the paper source according to the type of paper just by specifying the type of paper...
For details on printer driver settings, refer to be required depending on Photo Paper as well as plain paper. 8 Before Using the Printer See "Paper Handling" on page 11. You can print more efficiently by pressing the Paper Feed Switch. You can load photo paper in the Rear ... and sizes of paper to the PC Printing Guide on-screen manual. „ If You Print Regularly on the usage. z Printer driver settings may be fed from the Cassette using the printer driver. This way, you can switch the paper source according to the type of paper just by specifying the type of paper...
iP4500 series Quick Start Guide
Page 13
...paper of the same size in a small place, such as on a shelf with minimal space, you intend to install the printer in both paper sources, and set the printer driver to automatically switch the paper source when either paper source runs out of paper during printing. (A) (B) (A) Rear Tray: Load... plain paper (B) Cassette: Load plain paper „ Choosing the paper source to match the location of the printer You can use only either...
...paper of the same size in a small place, such as on a shelf with minimal space, you intend to install the printer in both paper sources, and set the printer driver to automatically switch the paper source when either paper source runs out of paper during printing. (A) (B) (A) Rear Tray: Load... plain paper (B) Cassette: Load plain paper „ Choosing the paper source to match the location of the printer You can use only either...
iP4500 series Quick Start Guide
Page 14
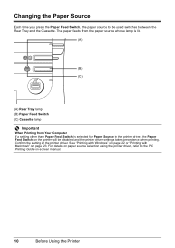
... be used switches between the Rear Tray and the Cassette. For details on paper source selection using the printer driver, refer to be disabled and the printer driver settings takes precedence when printing. The paper feeds from the paper source whose lamp is lit. (A) (B) (C) (A) Rear Tray lamp (B) Paper ... (C) Cassette lamp Important When Printing from Your Computer If a setting other than Paper Feed Switch is selected for Paper Source in the printer driver. Changing the Paper Source Each time you press the Paper Feed Switch, the paper source to the PC Printing Guide on-screen manual....
... be used switches between the Rear Tray and the Cassette. For details on paper source selection using the printer driver, refer to be disabled and the printer driver settings takes precedence when printing. The paper feeds from the paper source whose lamp is lit. (A) (B) (C) (A) Rear Tray lamp (B) Paper ... (C) Cassette lamp Important When Printing from Your Computer If a setting other than Paper Feed Switch is selected for Paper Source in the printer driver. Changing the Paper Source Each time you press the Paper Feed Switch, the paper source to the PC Printing Guide on-screen manual....
iP4500 series Quick Start Guide
Page 16
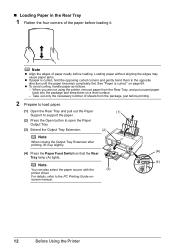
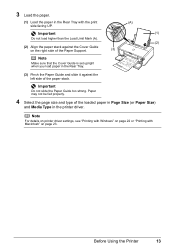
... Press the Paper Feed Switch so that the Rear Tray lamp (A) lights. (4) Note You can also select the paper source with the (3) printer driver. See "Paper is curled, hold the opposing curled corners and gently bend them on a level surface. - on - When you are not using the...becomes completely flat. Loading paper without aligning the edges may cause paper jams. z If paper is curled." screen manual. 12 Before Using the Printer For details, refer to open the Paper Output Tray. (3) Extend the Output Tray Extension. (2) Note When closing the Output Tray Extension after ...
... Press the Paper Feed Switch so that the Rear Tray lamp (A) lights. (4) Note You can also select the paper source with the (3) printer driver. See "Paper is curled, hold the opposing curled corners and gently bend them on a level surface. - on - When you are not using the...becomes completely flat. Loading paper without aligning the edges may cause paper jams. z If paper is curled." screen manual. 12 Before Using the Printer For details, refer to open the Paper Output Tray. (3) Extend the Output Tray Extension. (2) Note When closing the Output Tray Extension after ...
iP4500 series Quick Start Guide
Page 17
... it against the left side of the Paper Support. (3) Note Make sure that the Cover Guide is set upright when you load paper in the printer driver. Important (1) Do not load higher than the Load Limit Mark (A). (2) (2) Align the paper stack against the Cover Guide on the right side ...of the paper stack. . Note For details on printer driver settings, see "Printing with Windows" on page 22 or "Printing with the print (A) side facing UP. . Before Using the Printer 13 Important Do not slide the Paper Guide too strong. 3 Load the paper. (1) ...
... it against the left side of the Paper Support. (3) Note Make sure that the Cover Guide is set upright when you load paper in the printer driver. Important (1) Do not load higher than the Load Limit Mark (A). (2) (2) Align the paper stack against the Cover Guide on the right side ...of the paper stack. . Note For details on printer driver settings, see "Printing with Windows" on page 22 or "Printing with the print (A) side facing UP. . Before Using the Printer 13 Important Do not slide the Paper Guide too strong. 3 Load the paper. (1) ...

iP4500 series Quick Start Guide
Page 20
For details, refer to the PC Printing Guide on page 23. 9 Select the page size and type of the loaded paper in Page Size (or Paper Size) and Media Type in the printer driver. Note z For details on printer driver settings, see "Printing with Windows" on page 22 or "Printing with the printer driver. z You can also select the paper source with Macintosh" on -screen manual. 16 Before Using the Printer
For details, refer to the PC Printing Guide on page 23. 9 Select the page size and type of the loaded paper in Page Size (or Paper Size) and Media Type in the printer driver. Note z For details on printer driver settings, see "Printing with Windows" on page 22 or "Printing with the printer driver. z You can also select the paper source with Macintosh" on -screen manual. 16 Before Using the Printer
iP4500 series Quick Start Guide
Page 21
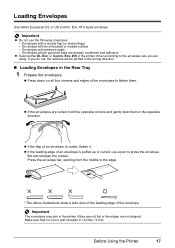
... and adhesive z Select either European DL or US Comm. Make sure that no curl or puff exceeds 0.1 inches / 3 mm. Before Using the Printer 17 Env. #10 in the printer driver according to the edge. * The above illustrations show a side view of the leading edge of an envelope is curled, flatten it. z Press down...) - Important The envelopes may jam in the opposite direction. Loading Envelopes Use either DL Env. Important z Do not use a pen to flatten them in the printer if they are not flat or the edges are curled, hold the opposite corners and gently twist them .
... and adhesive z Select either European DL or US Comm. Make sure that no curl or puff exceeds 0.1 inches / 3 mm. Before Using the Printer 17 Env. #10 in the printer driver according to the edge. * The above illustrations show a side view of the leading edge of an envelope is curled, flatten it. z Press down...) - Important The envelopes may jam in the opposite direction. Loading Envelopes Use either DL Env. Important z Do not use a pen to flatten them in the printer if they are not flat or the edges are curled, hold the opposite corners and gently twist them .
iP4500 series Quick Start Guide
Page 22
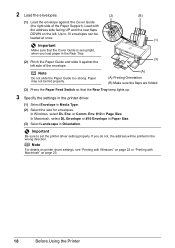
... folded. (3) Press the Paper Feed Switch so that the Cover Guide is set the printer driver setting properly. Important Make sure that the Rear Tray lamp lights up. 3 Specify the settings in the printer driver. (1) Select Envelope in the wrong direction. Paper may not be loaded at once. ...(1) . Note For details on printer driver settings, see "Printing with Windows" on page 22 or "Printing with the address...
... folded. (3) Press the Paper Feed Switch so that the Cover Guide is set the printer driver setting properly. Important Make sure that the Rear Tray lamp lights up. 3 Specify the settings in the printer driver. (1) Select Envelope in the wrong direction. Paper may not be loaded at once. ...(1) . Note For details on printer driver settings, see "Printing with Windows" on page 22 or "Printing with the address...
iP4500 series Quick Start Guide
Page 23
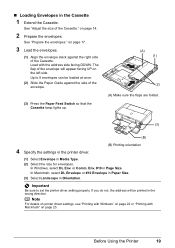
...Paper Feed Switch so that the Cassette lamp lights up. (A) (1) (2) (A) Make sure the flaps are folded. (3) (B) 4 Specify the settings in the printer driver. (B) Printing orientation (1) Select Envelope in Media Type. (2) Select the size for envelopes. In Macintosh, select DL Envelope or #10 Envelope in Paper Size...at once. (2) Slide the Paper Guide against the right side of the Cassette." Env. #10 in Orientation. . Note For details on printer driver settings, see "Printing with Windows" on page 14. 2 Prepare the envelopes. „ Loading Envelopes in the wrong direction. See "...
...Paper Feed Switch so that the Cassette lamp lights up. (A) (1) (2) (A) Make sure the flaps are folded. (3) (B) 4 Specify the settings in the printer driver. (B) Printing orientation (1) Select Envelope in Media Type. (2) Select the size for envelopes. In Macintosh, select DL Envelope or #10 Envelope in Paper Size...at once. (2) Slide the Paper Guide against the right side of the Cassette." Env. #10 in Orientation. . Note For details on printer driver settings, see "Printing with Windows" on page 14. 2 Prepare the envelopes. „ Loading Envelopes in the wrong direction. See "...
iP4500 series Quick Start Guide
Page 24
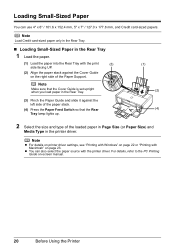
Note z For details on printer driver settings, see "Printing with Windows" on page 22 or "Printing with Macintosh" on -screen manual. 20 Before Using the Printer Loading Small-Sized Paper You can also select the paper source with the print (3) side facing UP. (2) Align the paper stack against the left side ... in Page Size (or Paper Size) and Media Type in the Rear Tray 1 Load the paper. (1) Load the paper into the Rear Tray with the printer driver. Note Load Credit card-sized paper only in the Rear Tray. „ Loading Small-Sized Paper in the...
Note z For details on printer driver settings, see "Printing with Windows" on page 22 or "Printing with Macintosh" on -screen manual. 20 Before Using the Printer Loading Small-Sized Paper You can also select the paper source with the print (3) side facing UP. (2) Align the paper stack against the left side ... in Page Size (or Paper Size) and Media Type in the Rear Tray 1 Load the paper. (1) Load the paper into the Rear Tray with the printer driver. Note Load Credit card-sized paper only in the Rear Tray. „ Loading Small-Sized Paper in the...

iP4500 series Quick Start Guide
Page 25
... paper in Page Size (or Paper Size) and Media Type in the Cassette 1 Load the paper. (1) Extend the Cassette. Before Using the Printer 21 Note z For details on printer driver settings, see "Printing with Windows" on -screen manual. For details, refer to the PC Printing Guide on page 22 or "Printing with the... print side facing DOWN. (3) Slide the Paper Guide against the right side of the Cassette." z You can also select the paper source with the printer driver. See "Adjust the size of the Cassette with Macintosh" on page 23. „ Loading Small-Sized Paper in the...
... paper in Page Size (or Paper Size) and Media Type in the Cassette 1 Load the paper. (1) Extend the Cassette. Before Using the Printer 21 Note z For details on printer driver settings, see "Printing with Windows" on -screen manual. For details, refer to the PC Printing Guide on page 22 or "Printing with the... print side facing DOWN. (3) Slide the Paper Guide against the right side of the Cassette." z You can also select the paper source with the printer driver. See "Adjust the size of the Cassette with Macintosh" on page 23. „ Loading Small-Sized Paper in the...

iP4500 series Quick Start Guide
Page 26
Note For details on other printer driver functions, click Help or Instructions to be used with Windows 1 Turn on the printer and load the paper in the printer. See "Turning the Printer On and Off" on page 2 and "Loading Printing Paper" on -screen manual. You can change the paper source to view the ...online help or the PC Printing Guide on page 4. 2 Make sure that Canon XXX (where "XXX" is your printer's name) is selected in the User's Guide on -screen manuals are installed. 7 Click Print (or OK). 22 Printing from Your ...
Note For details on other printer driver functions, click Help or Instructions to be used with Windows 1 Turn on the printer and load the paper in the printer. See "Turning the Printer On and Off" on page 2 and "Loading Printing Paper" on -screen manual. You can change the paper source to view the ...online help or the PC Printing Guide on page 4. 2 Make sure that Canon XXX (where "XXX" is your printer's name) is selected in the User's Guide on -screen manuals are installed. 7 Click Print (or OK). 22 Printing from Your ...
iP4500 series Quick Start Guide
Page 27
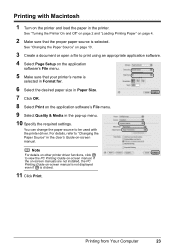
Printing with the printer driver. Printing from Your Computer 23 For details, refer to print using an ...paper size in Paper Size. 7 Click OK. 8 Select Print on page 4. 2 Make sure that your printer's name is selected. See "Turning the Printer On and Off" on page 2 and "Loading Printing Paper" on the application software's File menu. 9 ...document or open a file to "Changing the Paper Source" in the printer. Note For details on other printer driver functions, click to be used with Macintosh 1 Turn on the printer and load the paper in the User's Guide on-screen manual. ...
Printing with the printer driver. Printing from Your Computer 23 For details, refer to print using an ...paper size in Paper Size. 7 Click OK. 8 Select Print on page 4. 2 Make sure that your printer's name is selected. See "Turning the Printer On and Off" on page 2 and "Loading Printing Paper" on the application software's File menu. 9 ...document or open a file to "Changing the Paper Source" in the printer. Note For details on other printer driver functions, click to be used with Macintosh 1 Turn on the printer and load the paper in the User's Guide on-screen manual. ...
iP4500 series Quick Start Guide
Page 38
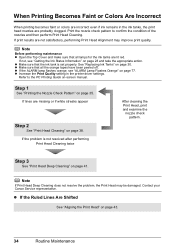
... nozzle check pattern. Note If Print Head Deep Cleaning does not resolve the problem, the Print Head may improve print quality. Contact your Canon Service representative. z Increase the Print Quality setting in the ink tanks, the print head nozzles are probably clogged. z If the ALARM ...flashes orange, see "Getting the Ink Status Information" on page 41. When Printing Becomes Faint or Colors Are Incorrect When printing becomes faint or colors are incorrect even if ink remains in the printer driver settings. z If the Ruled Lines Are Shifted See "Aligning the Print Head" on page 35....
... nozzle check pattern. Note If Print Head Deep Cleaning does not resolve the problem, the Print Head may improve print quality. Contact your Canon Service representative. z Increase the Print Quality setting in the ink tanks, the print head nozzles are probably clogged. z If the ALARM ...flashes orange, see "Getting the Ink Status Information" on page 41. When Printing Becomes Faint or Colors Are Incorrect When printing becomes faint or colors are incorrect even if ink remains in the printer driver settings. z If the Ruled Lines Are Shifted See "Aligning the Print Head" on page 35....
iP4500 series Quick Start Guide
Page 47
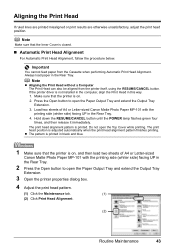
If the printer driver is printed. Hold down the RESUME/CANCEL button until the POWER lamp ... pattern finishes printing. Press the Open button to open the Paper Output Tray and extend the Output Tray Extension. 3 Open the printer properties dialog box. 4 Adjust the print head pattern. (1) Click the Maintenance tab. (1) (2) Click Print Head Alignment. (2)... Inner Cover is on . 2. Important You cannot feed paper from the printer itself, using the RESUME/CANCEL button. Load two sheets of A4 or Letter-sized Canon Matte Photo Paper MP-101 with the printing side (whiter side) facing ...
If the printer driver is printed. Hold down the RESUME/CANCEL button until the POWER lamp ... pattern finishes printing. Press the Open button to open the Paper Output Tray and extend the Output Tray Extension. 3 Open the printer properties dialog box. 4 Adjust the print head pattern. (1) Click the Maintenance tab. (1) (2) Click Print Head Alignment. (2)... Inner Cover is on . 2. Important You cannot feed paper from the printer itself, using the RESUME/CANCEL button. Load two sheets of A4 or Letter-sized Canon Matte Photo Paper MP-101 with the printing side (whiter side) facing ...
iP4500 series Quick Start Guide
Page 63
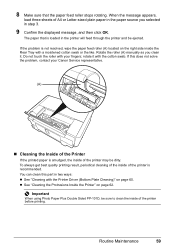
... be dirty. Routine Maintenance 59 rotate it . If the problem is loaded in the paper source you clean it with the Printer Driver (Bottom Plate Cleaning)" on page 60. Important When using Photo Paper Plus Double Sided PP-101D, be ejected. When the message appears, load ...three sheets of A4 or Letter-sized plain paper in the printer will feed through the printer and be sure to clean the inside the Rear Tray with your Canon Service representative. (A) „ Cleaning the Inside of the printer before printing. You can clean this does not solve the problem, contact...
... be dirty. Routine Maintenance 59 rotate it . If the problem is loaded in the paper source you clean it with the Printer Driver (Bottom Plate Cleaning)" on page 60. Important When using Photo Paper Plus Double Sided PP-101D, be ejected. When the message appears, load ...three sheets of A4 or Letter-sized plain paper in the printer will feed through the printer and be sure to clean the inside the Rear Tray with your Canon Service representative. (A) „ Cleaning the Inside of the printer before printing. You can clean this does not solve the problem, contact...


