Quick Start Guide
Page 5
... Safety Precautions 3 Before Using the Printer 6 Included Items 6 Turning the Printer On and Off 6 Loading Printing Paper 8 Printing from Your Computer 16 Printing with Windows 16 Printing with Macintosh 17 Routine Maintenance 18 When Printing Becomes Faint or Colors Are Incorrect 18 Printing the Nozzle ...FINE Cartridge 31 Keeping the Best Printing Results 36 Cleaning Your Printer 37 Troubleshooting 43 Cannot Install the Printer Driver 44 The USB Connection Does Not Work Properly 45 Print Results Not Satisfactory 46 Printer Does Not Start 50 Paper Does Not Feed Properly 51 ...
... Safety Precautions 3 Before Using the Printer 6 Included Items 6 Turning the Printer On and Off 6 Loading Printing Paper 8 Printing from Your Computer 16 Printing with Windows 16 Printing with Macintosh 17 Routine Maintenance 18 When Printing Becomes Faint or Colors Are Incorrect 18 Printing the Nozzle ...FINE Cartridge 31 Keeping the Best Printing Results 36 Cleaning Your Printer 37 Troubleshooting 43 Cannot Install the Printer Driver 44 The USB Connection Does Not Work Properly 45 Print Results Not Satisfactory 46 Printer Does Not Start 50 Paper Does Not Feed Properly 51 ...

Quick Start Guide
Page 16
...and media type settings according to the left when you finish printing. 3 Load the paper. (1) Load the paper in the printer driver. For details on printer driver settings, see "Printing with Windows" on page 16 or "Printing with Macintosh" on any other type of paper. (1) (2) (3) Note If the corners or...the Rear Tray. (A) (3) Pinch the Paper Guide and slide it against the left when printing on page 17. 12 Before Using the Printer Paper may improve print quality. 2 Prepare to the right. The Paper Thickness Lever switches the clearance between the Print Head and the ...
...and media type settings according to the left when you finish printing. 3 Load the paper. (1) Load the paper in the printer driver. For details on printer driver settings, see "Printing with Windows" on page 16 or "Printing with Macintosh" on any other type of paper. (1) (2) (3) Note If the corners or...the Rear Tray. (A) (3) Pinch the Paper Guide and slide it against the left when printing on page 17. 12 Before Using the Printer Paper may improve print quality. 2 Prepare to the right. The Paper Thickness Lever switches the clearance between the Print Head and the ...
Quick Start Guide
Page 18
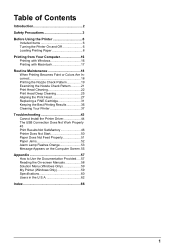
...the envelope against the left when you do not, the address will be fed properly. (3) Set the Paper Thickness Lever to the right. In Windows®, select DL Env. Env. #10 in Orientation. Reset the Paper Thickness Lever to the left side of the Rear Tray. (B) Load ... (3) (A) Printing orientation (B) Make sure the flaps are folded. 3 Specify the settings in the printer driver. (1) Select Envelope in the wrong direction. Note For details on printer driver settings, see "Printing with Windows" on page 16 or "Printing with the address side facing UP and the rear flaps DOWN on...
...the envelope against the left when you do not, the address will be fed properly. (3) Set the Paper Thickness Lever to the right. In Windows®, select DL Env. Env. #10 in Orientation. Reset the Paper Thickness Lever to the left side of the Rear Tray. (B) Load ... (3) (A) Printing orientation (B) Make sure the flaps are folded. 3 Specify the settings in the printer driver. (1) Select Envelope in the wrong direction. Note For details on printer driver settings, see "Printing with Windows" on page 16 or "Printing with the address side facing UP and the rear flaps DOWN on...
Quick Start Guide
Page 19
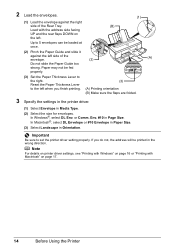
Do not slide the Paper Guide too strong. For details on printer driver settings, see "Printing with Windows" on page 16 or "Printing with the print side facing UP. (2) Pinch the Paper Guide and slide it against the left . (3) 2 Specify the page size ... against the right side of the Rear Tray with Macintosh" on page 17. Important Always load paper in the printer driver. Note Select the size and type of the (1) paper stack. Before Using the Printer 15 „ Loading Small-Sized Paper You can cause the paper to be fed properly. (3) Set the Paper...
Do not slide the Paper Guide too strong. For details on printer driver settings, see "Printing with Windows" on page 16 or "Printing with the print side facing UP. (2) Pinch the Paper Guide and slide it against the left . (3) 2 Specify the page size ... against the right side of the Rear Tray with Macintosh" on page 17. Important Always load paper in the printer driver. Note Select the size and type of the (1) paper stack. Before Using the Printer 15 „ Loading Small-Sized Paper You can cause the paper to be fed properly. (3) Set the Paper...
Quick Start Guide
Page 20
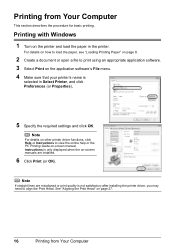
... the procedure for basic printing. Note For details on -screen manuals are misaligned or print quality is only displayed when the on other printer driver functions, click Help or Instructions to align the Print Head. Note If straight lines are installed. 6 Click Print (or OK). Printing... from Your Computer Printing with Windows 1 Turn on -screen manual. Instructions is not satisfactory after installing the printer driver, you may need to view the online help or the PC Printing Guide on the...
... the procedure for basic printing. Note For details on -screen manuals are misaligned or print quality is only displayed when the on other printer driver functions, click Help or Instructions to align the Print Head. Note If straight lines are installed. 6 Click Print (or OK). Printing... from Your Computer Printing with Windows 1 Turn on -screen manual. Instructions is not satisfactory after installing the printer driver, you may need to view the online help or the PC Printing Guide on the...
Quick Start Guide
Page 48
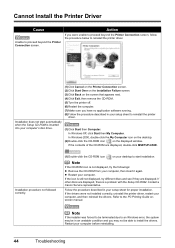
...the contents of the CD-ROM are displayed, there is inserted into your computer, then insert it again. Contact a Canon Service representative. Refer to reinstall the printer driver. (1)Click Start then Computer. Note If the CD-ROM icon is still not displayed, try the followings: z Remove ... Setup CD-ROM is a problem with the Setup CD-ROM. Cannot Install the Printer Driver Cause Unable to proceed beyond the Printer Connection screen, follow the procedure below to reinstall the printer driver. In Windows 2000, double-click the My Computer icon on the desktop. (2)Double-click the ...
...the contents of the CD-ROM are displayed, there is inserted into your computer, then insert it again. Contact a Canon Service representative. Refer to reinstall the printer driver. (1)Click Start then Computer. Note If the CD-ROM icon is still not displayed, try the followings: z Remove ... Setup CD-ROM is a problem with the Setup CD-ROM. Cannot Install the Printer Driver Cause Unable to proceed beyond the Printer Connection screen, follow the procedure below to reinstall the printer driver. In Windows 2000, double-click the My Computer icon on the desktop. (2)Double-click the ...
Quick Start Guide
Page 59
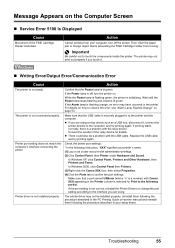
... interface you are using . The printer driver may have occurred in your printer's name. (1)Log on page 53. Message Appears on . If the Power lamp is a number) with administrator privilege. (2)Click Control Panel, then Printer under Hardware and Sound. In Windows 2000, click Control Panel then Printers. (3)Right-click the Canon XXX icon, then select Properties. (4)Click...
... interface you are using . The printer driver may have occurred in your printer's name. (1)Log on page 53. Message Appears on . If the Power lamp is a number) with administrator privilege. (2)Click Control Panel, then Printer under Hardware and Sound. In Windows 2000, click Control Panel then Printers. (3)Right-click the Canon XXX icon, then select Properties. (4)Click...

Quick Start Guide
Page 63
... to launch menu items by using the menu screen that appears automatically when your printer. Solution Menu (Windows Only) This menu screen helps you to open the printer driver or the status monitor screen and confirm or change both the printer settings or status. For details, refer to the Introduction to Solution Menu on the...
... to launch menu items by using the menu screen that appears automatically when your printer. Solution Menu (Windows Only) This menu screen helps you to open the printer driver or the status monitor screen and confirm or change both the printer settings or status. For details, refer to the Introduction to Solution Menu on the...

Easy Setup Instructions
Page 2
... software to install appears, confirm the contents, then click Install. The printer driver, On-screen Manuals, and application software are installed automatically. screen instructions...screen reappears in the User's Guide on your product. Serial Number m When the PIXMA Extended Survey Program screen appears, confirm the message. Remove the Setup CD-ROM ... • Log on the inside of Canon printers. The software installation screen may appear during the installation process. "Windows Vista" is located on as "Windows Vista") installation. 3 Software Installation Note ...
... software to install appears, confirm the contents, then click Install. The printer driver, On-screen Manuals, and application software are installed automatically. screen instructions...screen reappears in the User's Guide on your product. Serial Number m When the PIXMA Extended Survey Program screen appears, confirm the message. Remove the Setup CD-ROM ... • Log on the inside of Canon printers. The software installation screen may appear during the installation process. "Windows Vista" is located on as "Windows Vista") installation. 3 Software Installation Note ...


