
ZR Instruction Manual
Page 1
...WARNING: TO REDUCE THE RISK OF FIRE OR ELECTRIC SHOCK, DO NOT E EXPOSE THIS PRODUCT TO RAIN OR MOISTURE. Digital Video Camcorder, ZR This device complies with Part 15 of FCC Rules. Use of shielded cable is connected. • Consult the dealer or...within an equilateral triangle, is no guarantee that may cause harmful interference to provide reasonable protection against harmful interference in a particular installation. Canon U.S.A. REFER SERVICING TO QUALIFIED SERVICE PERSONNEL. However, there is intended to alert the user to stop operation of important operating and ...
...WARNING: TO REDUCE THE RISK OF FIRE OR ELECTRIC SHOCK, DO NOT E EXPOSE THIS PRODUCT TO RAIN OR MOISTURE. Digital Video Camcorder, ZR This device complies with Part 15 of FCC Rules. Use of shielded cable is connected. • Consult the dealer or...within an equilateral triangle, is no guarantee that may cause harmful interference to provide reasonable protection against harmful interference in a particular installation. Canon U.S.A. REFER SERVICING TO QUALIFIED SERVICE PERSONNEL. However, there is intended to alert the user to stop operation of important operating and ...

ZR Instruction Manual
Page 2
...-600A Compact Power Adapter is equipped with respect to proper grounding of the mast and supporting structure, grounding of antenna discharge unit, connection to the Canon Digital Video Camcorder ZR and all its accessories. If the plug still fails to fit, contact your electrician to . 4. source indicated on an unstable cart, stand, tripod, bracket...
...-600A Compact Power Adapter is equipped with respect to proper grounding of the mast and supporting structure, grounding of antenna discharge unit, connection to the Canon Digital Video Camcorder ZR and all its accessories. If the plug still fails to fit, contact your electrician to . 4. source indicated on an unstable cart, stand, tripod, bracket...

ZR Instruction Manual
Page 4
...Thank you for Choosing a Canon ......... 6 Setting the Self-Timer 46 Introducing the ZR 7 Mastering the Basics ~ When Making Manual Adjustments ...~ Adjusting Exposure Manually 47 Adjusting Focus Manually 49 Powering Your Camcorder 8 Setting the White Balance... 50 Loading a Cassette 11 Basic Recording 13 Zooming 16 Using the LCD Screen 17 Playing back a Cassette 19 Connections for Making Better Videos...
...Thank you for Choosing a Canon ......... 6 Setting the Self-Timer 46 Introducing the ZR 7 Mastering the Basics ~ When Making Manual Adjustments ...~ Adjusting Exposure Manually 47 Adjusting Focus Manually 49 Powering Your Camcorder 8 Setting the White Balance... 50 Loading a Cassette 11 Basic Recording 13 Zooming 16 Using the LCD Screen 17 Playing back a Cassette 19 Connections for Making Better Videos...
ZR Instruction Manual
Page 5
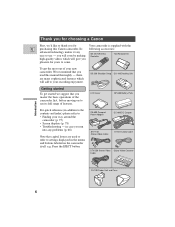
... for years to thank you for Your camcorder is supplied with the E purchasing this manual thoroughly - CA-600 Compact Power Adapter DC-600 DC Coupler STV-150 Stereo Video Cable S-150 S-video Cable STV-250 Stereo Video Digital Video Cassette Cable FU-100 Finder Unit and ...: • Finding your new camcorder, We recommend that you master the basic operations of your way around the camcorder (p. 75) • Screen displays (p. 78) • Troubleshooting - Thank you for choosing a Canon First, we suggest that you read this Canon camcorder. SS-200 Shoulder Strap DU-100...
... for years to thank you for Your camcorder is supplied with the E purchasing this manual thoroughly - CA-600 Compact Power Adapter DC-600 DC Coupler STV-150 Stereo Video Cable S-150 S-video Cable STV-250 Stereo Video Digital Video Cassette Cable FU-100 Finder Unit and ...: • Finding your new camcorder, We recommend that you master the basic operations of your way around the camcorder (p. 75) • Screen displays (p. 78) • Troubleshooting - Thank you for choosing a Canon First, we suggest that you read this Canon camcorder. SS-200 Shoulder Strap DU-100...
ZR Instruction Manual
Page 6
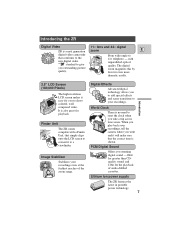
... even at the furthest reaches of audio-dubbed cassettes. Finder Unit The ZR comes complete with unparalleled optical quality. Introducing the ZR Digital Video 11× lens and 44× digital ZR is a next generation zoom E digital video camcorder that conforms to the new digital video Mini standard to give you stunning digital sound -16bit for greater...
... even at the furthest reaches of audio-dubbed cassettes. Finder Unit The ZR comes complete with unparalleled optical quality. Introducing the ZR Digital Video 11× lens and 44× digital ZR is a next generation zoom E digital video camcorder that conforms to the new digital video Mini standard to give you stunning digital sound -16bit for greater...
ZR Instruction Manual
Page 13
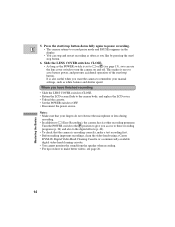
... the LENS COVER switch to make a test recording first. • Before making important recordings, clean the video heads using a Canon DVM-CL Digital Video Head Cleaning Cassette or a commercially available digital video head cleaning cassette. • You cannot monitor the sound from the speaker when recording. • For tips...to turn the camera on how to CLOSE. • As long as white balance and shutter speed. It is recording correctly, make better videos, see page 13), you have finished recording • Slide the LENS COVER switch to CLOSE. • Return the LCD screen flush ...
... the LENS COVER switch to make a test recording first. • Before making important recordings, clean the video heads using a Canon DVM-CL Digital Video Head Cleaning Cassette or a commercially available digital video head cleaning cassette. • You cannot monitor the sound from the speaker when recording. • For tips...to turn the camera on how to CLOSE. • As long as white balance and shutter speed. It is recording correctly, make better videos, see page 13), you have finished recording • Slide the LENS COVER switch to CLOSE. • Return the LCD screen flush ...
ZR Instruction Manual
Page 18
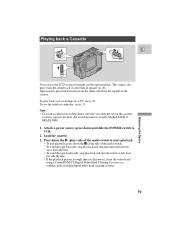
... accidental recording, make sure that it exposes the hole (the switch position is rough (mosaic-like noise), clean the video heads using a Canon DVM-CL Digital Video Head Cleaning Cassette or a commercially available digital video head cleaning cassette. 19 Operate basic playback functions from the lens. • To wind the tape backwards, stop playback...
... accidental recording, make sure that it exposes the hole (the switch position is rough (mosaic-like noise), clean the video heads using a Canon DVM-CL Digital Video Head Cleaning Cassette or a commercially available digital video head cleaning cassette. 19 Operate basic playback functions from the lens. • To wind the tape backwards, stop playback...
ZR Instruction Manual
Page 19
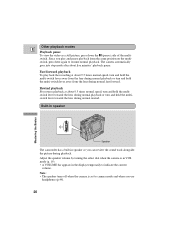
... and hold the multi-switch lever away from the lens during normal fast forward. Mastering the Basics Other playback modes E Playback pause To view the video as a still picture, press down the a (pause) side of the multiswitch. Fast forward playback To play and pause playback from the lens during normal playback... normal rewind. Adjust the speaker volume by turning the select dial when the camera is set to resume normal playback. Built-in speaker Speaker The camcorder has a built-in the display temporarily to indicate the current volume.
... and hold the multi-switch lever away from the lens during normal fast forward. Mastering the Basics Other playback modes E Playback pause To view the video as a still picture, press down the a (pause) side of the multiswitch. Fast forward playback To play and pause playback from the lens during normal playback... normal rewind. Adjust the speaker volume by turning the select dial when the camera is set to resume normal playback. Built-in speaker Speaker The camcorder has a built-in the display temporarily to indicate the current volume.
ZR Instruction Manual
Page 21
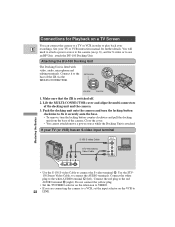
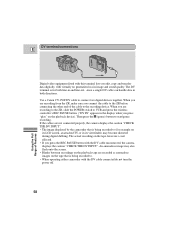
...your TV (or VCR) has an S-video input terminal S-150 S-video Cable STV-150 Stereo Video Cable INPUT S-VIDEO VIDEO AUDIO L R V L R S • Use the S-150 S-video Cable to connect the S-video terminal d. See your TV or VCR instruction manual for S-video or to use an RF Unit, ...attach the DU-100 Docking Unit. Lift the MULTI-CONNECTOR cover and align the multi-connectors of the ZR...
...your TV (or VCR) has an S-video input terminal S-150 S-video Cable STV-150 Stereo Video Cable INPUT S-VIDEO VIDEO AUDIO L R V L R S • Use the S-150 S-video Cable to connect the S-video terminal d. See your TV or VCR instruction manual for S-video or to use an RF Unit, ...attach the DU-100 Docking Unit. Lift the MULTI-CONNECTOR cover and align the multi-connectors of the ZR...
ZR Instruction Manual
Page 22
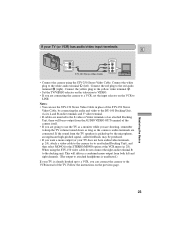
...audio terminals are connecting the camera to a VCR, set the input selector on the previous page. Mastering the Basics 23 When using the STV-150 video cable do not connect the right audio terminal R to the white audio terminal 7 (left and right channels. (The output to attached headphones is ...unaffected.) If your TV is picked up to a VCR, you are connected. If your TV does not have audio/video terminals, p. 24), attach a video cable to the camera (or to the red audio terminal 9 (right). Connect the white plug to the docking unit. If the sound...
...audio terminals are connecting the camera to a VCR, set the input selector on the previous page. Mastering the Basics 23 When using the STV-150 video cable do not connect the right audio terminal R to the white audio terminal 7 (left and right channels. (The output to attached headphones is ...unaffected.) If your TV is picked up to a VCR, you are connected. If your TV does not have audio/video terminals, p. 24), attach a video cable to the camera (or to the red audio terminal 9 (right). Connect the white plug to the docking unit. If the sound...

ZR Instruction Manual
Page 23
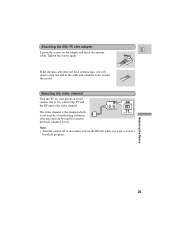
... to the antenna input on the TV. • Use the coaxial cable with the DU-100 Docking Unit. If your TV does not have audio/video terminals E TV with coaxial antenna cable 1 V L R RU-100 RF Unit 2 3 VHF TV with flat twin-lead antenna cable RU-100 RF Unit Mastering the Basics... 2 V L R 300-75 ohm adapter 3 VHF 75-300 ohm adapter To connect the camera directly to a TV which does not have audio/video terminals, you will need to use the optional RU-100 RF Unit together with F-connectors. Select MONO for the STEREO/MONO option at the VCR...
... to the antenna input on the TV. • Use the coaxial cable with the DU-100 Docking Unit. If your TV does not have audio/video terminals E TV with coaxial antenna cable 1 V L R RU-100 RF Unit 2 3 VHF TV with flat twin-lead antenna cable RU-100 RF Unit Mastering the Basics... 2 V L R 300-75 ohm adapter 3 VHF 75-300 ohm adapter To connect the camera directly to a TV which does not have audio/video terminals, you will need to use the optional RU-100 RF Unit together with F-connectors. Select MONO for the STEREO/MONO option at the VCR...
ZR Instruction Manual
Page 24
...-75 ohm adapter E Loosen the screws on the camera (see p. 19), and set the TV and the RF unit to the video channel. 4CH 3CH TO TV FROM ANT The video channel is the channel which is not used by a broadcasting station in your area and can be used for cassette playback... antenna cable does not have antenna lugs, you want to strip one end of the cable and wind the wires around the screws. Selecting the video channel Turn the TV on, start playback on the adapter and insert the antenna cable. Tighten the screws again.
...-75 ohm adapter E Loosen the screws on the camera (see p. 19), and set the TV and the RF unit to the video channel. 4CH 3CH TO TV FROM ANT The video channel is the channel which is not used by a broadcasting station in your area and can be used for cassette playback... antenna cable does not have antenna lugs, you want to strip one end of the cable and wind the wires around the screws. Selecting the video channel Turn the TV on, start playback on the adapter and insert the antenna cable. Tighten the screws again.

ZR Instruction Manual
Page 25
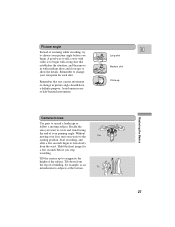
... the camera, always replace its protective cap. • Make sure that the subject is slightly to position your left hand. Watch out for Making Better Videos Holding the camera E For maximum stability, grip the camera firmly with your right hand and keep your right elbow pressed against your eye off the...
... the camera, always replace its protective cap. • Make sure that the subject is slightly to position your left hand. Watch out for Making Better Videos Holding the camera E For maximum stability, grip the camera firmly with your right hand and keep your right elbow pressed against your eye off the...
ZR Instruction Manual
Page 26
A good way to tell a story with video is to begin with a long shot that any camera movement or change your picture angle before you want to cover and stand facing the end ...
A good way to tell a story with video is to begin with a long shot that any camera movement or change your picture angle before you want to cover and stand facing the end ...
ZR Instruction Manual
Page 43
...controls the speaker volume once you can monitor the sound while MIC m AUDIO recording by attaching stereo VIDEO OUT headphones to the camera via the DU-100 Docking Unit's MIC terminal. Audio Recording Selecting ... tape using this terminal also doubles as the Audio Video Out socket). DV/OUT You can connect an external microphone to the camera's terminal (this camcorder. • For details of Features 44 Headphones and...records on stereo 2, see p. 28) AUDIO MODE••16bit ZR can record sound in two audio modes - 16 bit (48kHz, 2 channel) and 12 bit (32 kHz,...
...controls the speaker volume once you can monitor the sound while MIC m AUDIO recording by attaching stereo VIDEO OUT headphones to the camera via the DU-100 Docking Unit's MIC terminal. Audio Recording Selecting ... tape using this terminal also doubles as the Audio Video Out socket). DV/OUT You can connect an external microphone to the camera's terminal (this camcorder. • For details of Features 44 Headphones and...records on stereo 2, see p. 28) AUDIO MODE••16bit ZR can record sound in two audio modes - 16 bit (48kHz, 2 channel) and 12 bit (32 kHz,...
ZR Instruction Manual
Page 49
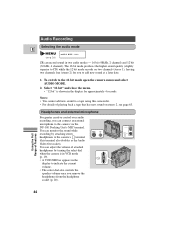
... will get better results by setting the white balance yourself, or using one of the two preset modes: Indoor Mode • Under halogen or studio/video lighting • Subject is of one dominant color • Close ups Outdoor mode • In daylight, especially for a wide range of Features 50 a) For the...
... will get better results by setting the white balance yourself, or using one of the two preset modes: Indoor Mode • Under halogen or studio/video lighting • Subject is of one dominant color • Close ups Outdoor mode • In daylight, especially for a wide range of Features 50 a) For the...
ZR Instruction Manual
Page 50
The camera returns to the AUTO setting when you shoot with studio/video lighting, use the (indoor) mode. • During normal outdoor shooting, setting to record with one dominant color, such as sky, sea or forest. Close-ups ...
The camera returns to the AUTO setting when you shoot with studio/video lighting, use the (indoor) mode. • During normal outdoor shooting, setting to record with one dominant color, such as sky, sea or forest. Close-ups ...

ZR Instruction Manual
Page 56
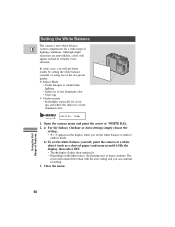
...VCR as soon as the section you monitor the picture on the VCR. Editing to copy appears on the screen. 4. S-150 S-video Cable STV-150 Stereo Video Cable V L R S INPUT S-VIDEO E VIDEO AUDIO L R Record the scenes you want to VCR, and load your edited recording is complete. Slide the camera's POWER switch ... recordings in record pause mode. • See your recorded cassette slightly ahead of the section you want to a VCR Playback the tape on the camcorder. Prepare the TV and VCR. • Turn on the TV and set its input selector to copy, then stop playback on the camera. 5....
...VCR as soon as the section you monitor the picture on the VCR. Editing to copy appears on the screen. 4. S-150 S-video Cable STV-150 Stereo Video Cable V L R S INPUT S-VIDEO E VIDEO AUDIO L R Record the scenes you want to VCR, and load your edited recording is complete. Slide the camera's POWER switch ... recordings in record pause mode. • See your recorded cassette slightly ahead of the section you want to a VCR Playback the tape on the camcorder. Prepare the TV and VCR. • Turn on the TV and set its input selector to copy, then stop playback on the camera. 5....
ZR Instruction Manual
Page 57
...properly, the camera displays the caution "CHECK THE DV INPUT". • The image displayed by the camcorder that is not affected. • If you press the REC PAUSE button with the DV cable ... displays the caution "CHECK THE DV INPUT". Use a Canon CV-150F DV cable to start/pause recording. When you are recording to the ZR, slide the POWER switch to VCR and press the wireless... recordings on the playback device). DV terminal/connections E Digital video equipment fitted with this terminal lets you connect the cable to the ZR before connecting the other end of Features If the cables are...
...properly, the camera displays the caution "CHECK THE DV INPUT". • The image displayed by the camcorder that is not affected. • If you press the REC PAUSE button with the DV cable ... displays the caution "CHECK THE DV INPUT". Use a Canon CV-150F DV cable to start/pause recording. When you are recording to the ZR, slide the POWER switch to VCR and press the wireless... recordings on the playback device). DV terminal/connections E Digital video equipment fitted with this terminal lets you connect the cable to the ZR before connecting the other end of Features If the cables are...

ZR Instruction Manual
Page 63
.... • Do not use the finder unit or LCD screen as battery packs and cassettes. 64 Additional Information Storage If you take the camera from video lighting equipment. • Do not take it to accessories such as a carrying handle. Handle the camera gently. • Vibration or shock can damage the lens...
.... • Do not use the finder unit or LCD screen as battery packs and cassettes. 64 Additional Information Storage If you take the camera from video lighting equipment. • Do not take it to accessories such as a carrying handle. Handle the camera gently. • Vibration or shock can damage the lens...


