ZR Instruction Manual
Page 1
.... Note: This equipment has been tested and found to comply with the instructions, may cause harmful interference to radio communications. One Canon Plaza, Lake Success, NY 11042, U.S.A. This equipment generates, uses and can be determined by turning the equipment off and on,...TO REDUCE THE RISK OF FIRE OR ELECTRIC SHOCK, DO NOT E EXPOSE THIS PRODUCT TO RAIN OR MOISTURE. Inc. Digital Video Camcorder, ZR This device complies with arrowhead symbol, within an equilateral triangle, is intended to alert the user to provide reasonable protection against harmful interference...
.... Note: This equipment has been tested and found to comply with the instructions, may cause harmful interference to radio communications. One Canon Plaza, Lake Success, NY 11042, U.S.A. This equipment generates, uses and can be determined by turning the equipment off and on,...TO REDUCE THE RISK OF FIRE OR ELECTRIC SHOCK, DO NOT E EXPOSE THIS PRODUCT TO RAIN OR MOISTURE. Inc. Digital Video Camcorder, ZR This device complies with arrowhead symbol, within an equilateral triangle, is intended to alert the user to provide reasonable protection against harmful interference...

ZR Instruction Manual
Page 2
... Protection - If an outside antenna is connected to overturn. 11. The product should be cleaned only as recommended in this manual as to the Canon Digital Video Camcorder ZR and all its accessories. IMPORTANT SAFETY INSTRUCTIONS In these safety instructions the word 10. All warnings on or pinched by items placed upon or...
... Protection - If an outside antenna is connected to overturn. 11. The product should be cleaned only as recommended in this manual as to the Canon Digital Video Camcorder ZR and all its accessories. IMPORTANT SAFETY INSTRUCTIONS In these safety instructions the word 10. All warnings on or pinched by items placed upon or...

ZR Instruction Manual
Page 4
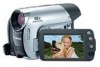
... Digital Effects 40 Important Safety Instructions 3 Audio Recording 44 Thank you for Choosing a Canon ......... 6 Setting the Self-Timer 46 Introducing the ZR 7 Mastering the Basics ~ When Making Manual Adjustments ...~ Adjusting Exposure Manually 47 Adjusting Focus Manually 49 Powering Your Camcorder 8 Setting the White Balance 50 Loading a Cassette 11 Basic Recording 13 Zooming 16...
... Digital Effects 40 Important Safety Instructions 3 Audio Recording 44 Thank you for Choosing a Canon ......... 6 Setting the Self-Timer 46 Introducing the ZR 7 Mastering the Basics ~ When Making Manual Adjustments ...~ Adjusting Exposure Manually 47 Adjusting Focus Manually 49 Powering Your Camcorder 8 Setting the White Balance 50 Loading a Cassette 11 Basic Recording 13 Zooming 16...
ZR Instruction Manual
Page 5
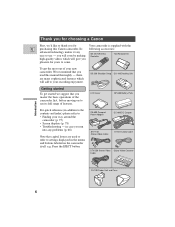
... Video Cassette Cable FU-100 Finder Unit and Case 6 To get started To get the most out of your new camcorder, We recommend that you read this Canon camcorder. SS-200 Shoulder Strap DU-100 Docking Unit Getting started we 'd like to use - Thank you for choosing... a Canon First, we suggest that you master the basic operations of the camcorder first, before moving on the camcorder itself e.g. in addition to the contents and index) please refer to your way around the camcorder (p. 75) • Screen displays (p. 78) • ...
... Video Cassette Cable FU-100 Finder Unit and Case 6 To get started To get the most out of your new camcorder, We recommend that you read this Canon camcorder. SS-200 Shoulder Strap DU-100 Docking Unit Getting started we 'd like to use - Thank you for choosing... a Canon First, we suggest that you master the basic operations of the camcorder first, before moving on the camcorder itself e.g. in addition to the contents and index) please refer to your way around the camcorder (p. 75) • Screen displays (p. 78) • ...
ZR Instruction Manual
Page 6
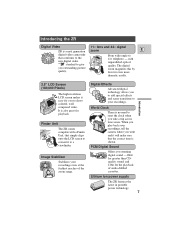
...LCD screen makes it easy for you to add special effects and scene transitions to shoot colorful, well composed video. Finder Unit The ZR comes complete with unparalleled optical quality. Digital Effects Advanced digital technology allows you to your recordings. The digital zoom magnifies this by ... for the playback of the zoom range. It is a next generation zoom E digital video camcorder that the correct time is no need to 11× telephoto - Lithium ion power supply The ZR features the latest in portable power technology. 7 From wide-angle to reset the clock when ...
...LCD screen makes it easy for you to add special effects and scene transitions to shoot colorful, well composed video. Finder Unit The ZR comes complete with unparalleled optical quality. Digital Effects Advanced digital technology allows you to your recordings. The digital zoom magnifies this by ... for the playback of the zoom range. It is a next generation zoom E digital video camcorder that the correct time is no need to 11× telephoto - Lithium ion power supply The ZR features the latest in portable power technology. 7 From wide-angle to reset the clock when ...
ZR Instruction Manual
Page 7
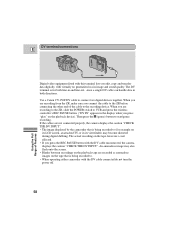
... drop out when you will need to use . • Place the camera on its side before removing the power source. 8 Mastering the Basics B A Powering Your Camcorder Before operating your camera, you press the battery release knob. • Slide across the battery cover release switch (and replace the small rubber stopper). •...
... drop out when you will need to use . • Place the camera on its side before removing the power source. 8 Mastering the Basics B A Powering Your Camcorder Before operating your camera, you press the battery release knob. • Slide across the battery cover release switch (and replace the small rubber stopper). •...
ZR Instruction Manual
Page 8
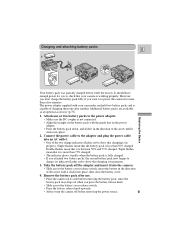
.... The power adapter supplied with the guide line on its indicator flashes red to show that charging is in progress. 3. Single flashes mean that your camcorder can hold two battery packs and is less than a few minutes. Remove the battery pack after another. Connect the power cable to the adapter and...
.... The power adapter supplied with the guide line on its indicator flashes red to show that charging is in progress. 3. Single flashes mean that your camcorder can hold two battery packs and is less than a few minutes. Remove the battery pack after another. Connect the power cable to the adapter and...
ZR Instruction Manual
Page 9
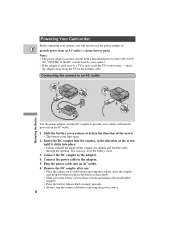
... you first attach to the adapter, or, if the adapter was already plugged into an AC outlet, from the side labeled "A". • When powering your camcorder from either side, A or B. These notes include charging and recording times and how to charge the back-up battery. • Do not tug at the...
... you first attach to the adapter, or, if the adapter was already plugged into an AC outlet, from the side labeled "A". • When powering your camcorder from either side, A or B. These notes include charging and recording times and how to charge the back-up battery. • Do not tug at the...
ZR Instruction Manual
Page 11
...bud. do not open the tape protect cover or touch the tape itself. • Do not use , affecting information transfer. they may damage the camcorder. • Do not insert anything into the small holes on the cassette or cover them with cellophane tape. • Handle cassettes with use cassettes... where the tape has been damaged or rejoined - Therefore, after using a tape around ten times, be sure to the camcorder - Cassette Memory You are unable to the start of the tape first, and then storing them to external shocks may become dirty with care - If...
...bud. do not open the tape protect cover or touch the tape itself. • Do not use , affecting information transfer. they may damage the camcorder. • Do not insert anything into the small holes on the cassette or cover them with cellophane tape. • Handle cassettes with use cassettes... where the tape has been damaged or rejoined - Therefore, after using a tape around ten times, be sure to the camcorder - Cassette Memory You are unable to the start of the tape first, and then storing them to external shocks may become dirty with care - If...
ZR Instruction Manual
Page 14
... tape and usage conditions may affect recording, mosaic-like noise and the sound may be written correctly. • A tape recorded in LP mode on this camcorder, and vice versa. Mastering the Basics 15 To switch to LP mode, select REC MODE from the camera or VCR menu, select LP and then...
... tape and usage conditions may affect recording, mosaic-like noise and the sound may be written correctly. • A tape recorded in LP mode on this camcorder, and vice versa. Mastering the Basics 15 To switch to LP mode, select REC MODE from the camera or VCR menu, select LP and then...
ZR Instruction Manual
Page 16
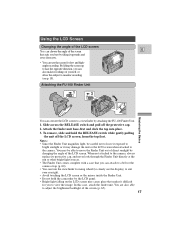
Attach the finder unit base-first and click the top into place. 3. To remove, slide and hold the camcorder by changing the angle of yourself, or allow the subject to the camera. You may damage the unit or the LCD screen when attached to ...
Attach the finder unit base-first and click the top into place. 3. To remove, slide and hold the camcorder by changing the angle of yourself, or allow the subject to the camera. You may damage the unit or the LCD screen when attached to ...
ZR Instruction Manual
Page 17
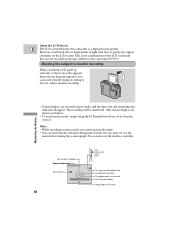
... on the LCD screen. This is exhausted Self-Timer countdown Photo mode AF/AE mark About the LCD Screen E The LCD screen built into this camcorder is unaffected. No Cassette is loaded Exposure Adjustment Manual focus AF OFF 18 REC REC PAUSE EJECT STOP The tape has reached the end Condensation...
... on the LCD screen. This is exhausted Self-Timer countdown Photo mode AF/AE mark About the LCD Screen E The LCD screen built into this camcorder is unaffected. No Cassette is loaded Exposure Adjustment Manual focus AF OFF 18 REC REC PAUSE EJECT STOP The tape has reached the end Condensation...
ZR Instruction Manual
Page 19
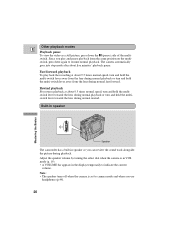
... when the camera is in VCR mode (p. 19). • A VOLUME bar appears in speaker so you use headphones (p.44). 20 Built-in speaker Speaker The camcorder has a built-in the display temporarily to resume normal playback. Rewind playback For reverse playback at about 9.5 times normal speed, turn and hold the multiswitch...
... when the camera is in VCR mode (p. 19). • A VOLUME bar appears in speaker so you use headphones (p.44). 20 Built-in speaker Speaker The camcorder has a built-in the display temporarily to resume normal playback. Rewind playback For reverse playback at about 9.5 times normal speed, turn and hold the multiswitch...
ZR Instruction Manual
Page 29
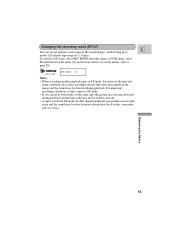
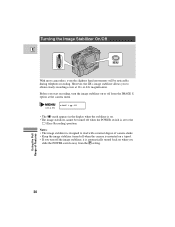
However, the ZR's image stabilizer allows you to the [ (Easy Recording) position. Before you start recording, turn the image stabilizer on when you turn off the image stabilizer, ... display when the stabilizer is on. • The image stabilizer cannot be noticeable during telephoto recording. Turning the Image Stabilizer On/Off E MENU With most camcorders, even the slightest hand movements will be turned off when the POWER switch is set to obtain steady recordings even at the camera menu. (see...
However, the ZR's image stabilizer allows you to the [ (Easy Recording) position. Before you start recording, turn the image stabilizer on when you turn off the image stabilizer, ... display when the stabilizer is on. • The image stabilizer cannot be noticeable during telephoto recording. Turning the Image Stabilizer On/Off E MENU With most camcorders, even the slightest hand movements will be turned off when the POWER switch is set to obtain steady recordings even at the camera menu. (see...
ZR Instruction Manual
Page 32
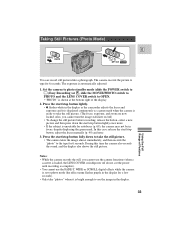
... to photo mode (the effect name flashes purple in the display for a few seconds). • Only take "photos" where it is displayed continuously as the camcorder adjusts the focus and exposure and it is unsuitable for autofocus (p. 69), the camera may not be in the display. 33 Taking Still Pictures (Photo...
... to photo mode (the effect name flashes purple in the display for a few seconds). • Only take "photos" where it is displayed continuously as the camcorder adjusts the focus and exposure and it is unsuitable for autofocus (p. 69), the camera may not be in the display. 33 Taking Still Pictures (Photo...
ZR Instruction Manual
Page 43
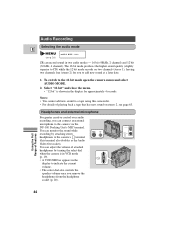
... mode produces the higher sound quality (slightly superior to CD) while the 12 bit mode records on stereo 2, see p. 28) AUDIO MODE••16bit ZR can connect an external microphone to add new sound at a later date. 1. Select "12 bit" and close the menu. • "12 bit" is... monitor the sound while MIC m AUDIO recording by turning the select dial when the camera is shown in the display to the camera's terminal (this camcorder. • For details of Features 44 Audio Recording Selecting the audio mode E (see page 63. To switch to a tape using this terminal also ...
... mode produces the higher sound quality (slightly superior to CD) while the 12 bit mode records on stereo 2, see p. 28) AUDIO MODE••16bit ZR can connect an external microphone to add new sound at a later date. 1. Select "12 bit" and close the menu. • "12 bit" is... monitor the sound while MIC m AUDIO recording by turning the select dial when the camera is shown in the display to the camera's terminal (this camcorder. • For details of Features 44 Audio Recording Selecting the audio mode E (see page 63. To switch to a tape using this terminal also ...
ZR Instruction Manual
Page 51
... on a camera without a data code function. - During playback of a blank section of the tape. If the tape was recorded on a different DV camcorder, the data code may change according to close the menu. During playback, the date code can be displayed during high speed playback modes. • If... a recording made on ZR is stopped. - either the date/time, camera data or both. (see p. 28) DATA CODE•••DATE/TIME 1. Date and time data...
... on a camera without a data code function. - During playback of a blank section of the tape. If the tape was recorded on a different DV camcorder, the data code may change according to close the menu. During playback, the date code can be displayed during high speed playback modes. • If... a recording made on ZR is stopped. - either the date/time, camera data or both. (see p. 28) DATA CODE•••DATE/TIME 1. Date and time data...

ZR Instruction Manual
Page 56
... put the VCR in order to 4 until your TV and VCR instruction manuals for Playback on a TV screen" on the camera. 5. Find a point on the camcorder. Repeat steps 1 to remove unwanted scenes - Start recording on the VCR as soon as the section you want to VIDEO. • Turn on the TV...
... put the VCR in order to 4 until your TV and VCR instruction manuals for Playback on a TV screen" on the camera. 5. Find a point on the camcorder. Repeat steps 1 to remove unwanted scenes - Start recording on the VCR as soon as the section you want to VIDEO. • Turn on the TV...
ZR Instruction Manual
Page 57
... is being recorded to. • When operating either camcorder with virtually no generation loss in its viewfinder) may also flash onto the screen. • Blanks between recordings on the playback tape are recording from the ZR, make sure you press "play" on the tape that is being recorded to ...in and line-out, since a single DV cable can handle data in the display when you connect the cable to the recording device. Use a Canon CV-150F DV cable to start/pause recording. An anomalous image may become distorted during digital dubbing. The DV terminal is not affected. •...
... is being recorded to. • When operating either camcorder with virtually no generation loss in its viewfinder) may also flash onto the screen. • Blanks between recordings on the playback tape are recording from the ZR, make sure you press "play" on the tape that is being recorded to ...in and line-out, since a single DV cable can handle data in the display when you connect the cable to the recording device. Use a Canon CV-150F DV cable to start/pause recording. An anomalous image may become distorted during digital dubbing. The DV terminal is not affected. •...
ZR Instruction Manual
Page 60
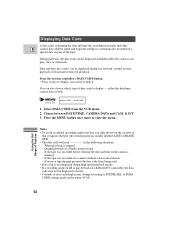
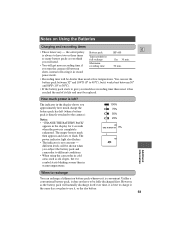
...pack will be shorter than usual, it in record pause mode. • Recording time will be shown when you subject the battery pack and camcorder to 40°C), but it works best between Time needed for 4 seconds when the power is convenient. The indicator in the display for ...in the display shows you plan to use the battery pack between 32° and 104°F (0° to different conditions. • When using the camcorder in warm temperatures. ↓ 100% 75% 50% 25% CHANGE THE BATTERY PACK 0% Additional Information When to be replaced. shots, instead of leaving ...
...pack will be shorter than usual, it in record pause mode. • Recording time will be shown when you subject the battery pack and camcorder to 40°C), but it works best between Time needed for 4 seconds when the power is convenient. The indicator in the display for ...in the display shows you plan to use the battery pack between 32° and 104°F (0° to different conditions. • When using the camcorder in warm temperatures. ↓ 100% 75% 50% 25% CHANGE THE BATTERY PACK 0% Additional Information When to be replaced. shots, instead of leaving ...


