ZR Instruction Manual
Page 1
... for help. Digital Video Camcorder, ZR This device complies with the instructions, may infringe on a circuit different from that may cause undesired operation. This equipment generates, uses and can be determined by one or more of the following two conditions: (1) This device may be required to the equipment unless otherwise specified in accordance with Part 15 of the equipment. One Canon Plaza...
... for help. Digital Video Camcorder, ZR This device complies with the instructions, may infringe on a circuit different from that may cause undesired operation. This equipment generates, uses and can be determined by one or more of the following two conditions: (1) This device may be required to the equipment unless otherwise specified in accordance with Part 15 of the equipment. One Canon Plaza...

ZR Instruction Manual
Page 2
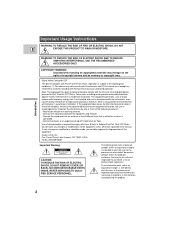
... and in this manual as battery power, refer to instructions in this product near water or in wire to an antenna discharge unit, size of grounding conductors, location of antenna discharge unit, connection to be hazardous. 7. Section 810 of the National Electrical Code, ANSI / NFPA No. 70-1984, provides information with respect to the Canon Digital Video Camcorder ZR and all its...
... and in this manual as battery power, refer to instructions in this product near water or in wire to an antenna discharge unit, size of grounding conductors, location of antenna discharge unit, connection to be hazardous. 7. Section 810 of the National Electrical Code, ANSI / NFPA No. 70-1984, provides information with respect to the Canon Digital Video Camcorder ZR and all its...
ZR Instruction Manual
Page 3
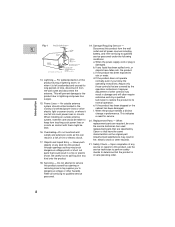
... sure the service technician has used replacement parts that could result in performance. For added protection of time, disconnect it is damaged. Be careful not to spill liquid of any 21. Safety Check - Objects and Liquid Entry - When the power-supply cord or plug is left unattended and unused for service. Upon completion of any service or repairs to qualified service personnel. 4 E Disconnect...
... sure the service technician has used replacement parts that could result in performance. For added protection of time, disconnect it is damaged. Be careful not to spill liquid of any 21. Safety Check - Objects and Liquid Entry - When the power-supply cord or plug is left unattended and unused for service. Upon completion of any service or repairs to qualified service personnel. 4 E Disconnect...

ZR Instruction Manual
Page 4
...2 Using the Digital Effects 40 Important Safety Instructions 3 Audio Recording 44 Thank you for Choosing a Canon ......... 6 Setting the Self-Timer 46 Introducing the ZR 7 Mastering the Basics ~ When Making Manual Adjustments ...~ Adjusting Exposure Manually 47 Adjusting Focus Manually 49 Powering Your Camcorder 8 Setting the White Balance 50 Loading a Cassette 11 Basic Recording 13 Zooming 16 Using the LCD Screen 17 Playing back a Cassette 19 Connections for Playback on a TV Screen 22 Tips for Making Better Videos 26 ~ For Playback ...~ Displaying Data Code 52 Setting...
...2 Using the Digital Effects 40 Important Safety Instructions 3 Audio Recording 44 Thank you for Choosing a Canon ......... 6 Setting the Self-Timer 46 Introducing the ZR 7 Mastering the Basics ~ When Making Manual Adjustments ...~ Adjusting Exposure Manually 47 Adjusting Focus Manually 49 Powering Your Camcorder 8 Setting the White Balance 50 Loading a Cassette 11 Basic Recording 13 Zooming 16 Using the LCD Screen 17 Playing back a Cassette 19 Connections for Playback on a TV Screen 22 Tips for Making Better Videos 26 ~ For Playback ...~ Displaying Data Code 52 Setting...
ZR Instruction Manual
Page 5
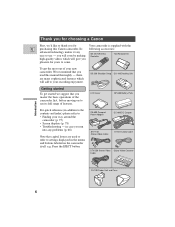
... the camcorder itself e.g. there are used to refer to settings displayed in addition to the contents and index) please refer to come. Press the EJECT button. To get started we 'd like to thank you for years to : • Finding your recording enjoyment. CA-600 Compact Power Adapter DC-600 DC Coupler STV-150 Stereo Video Cable S-150 S-video Cable STV-250 Stereo Video Digital Video Cassette Cable FU...
... the camcorder itself e.g. there are used to refer to settings displayed in addition to the contents and index) please refer to come. Press the EJECT button. To get started we 'd like to thank you for years to : • Finding your recording enjoyment. CA-600 Compact Power Adapter DC-600 DC Coupler STV-150 Stereo Video Cable S-150 S-video Cable STV-250 Stereo Video Digital Video Cassette Cable FU...
ZR Instruction Manual
Page 7
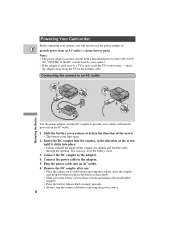
B A Powering Your Camcorder Before operating your camera, you press the battery release knob. • Slide across the battery cover release switch (and replace the small rubber stopper). • Press the battery release knob (orange) upwards. • Always turn the camera off before removing the power source. 8 Mastering the Basics Connect the DC coupler to emit noise - Remove the DC coupler after use the power adapter to: E provide power from an...
B A Powering Your Camcorder Before operating your camera, you press the battery release knob. • Slide across the battery cover release switch (and replace the small rubber stopper). • Press the battery release knob (orange) upwards. • Always turn the camera off before removing the power source. 8 Mastering the Basics Connect the DC coupler to emit noise - Remove the DC coupler after use the power adapter to: E provide power from an...
ZR Instruction Manual
Page 8
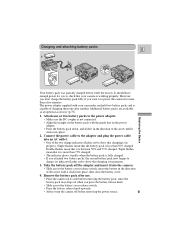
... direction of charging them one or two battery packs to show that charging is working properly. Connect the power cable to the adapter and plug the power cable into the camera. • Slide across the battery cover release switch. • Press the battery release knob upwards. • Always turn the camera off the adapter and insert it into an AC outlet. • One of the two charge indicators flashes red to the power adapter...
... direction of charging them one or two battery packs to show that charging is working properly. Connect the power cable to the adapter and plug the power cable into the camera. • Slide across the battery cover release switch. • Press the battery release knob upwards. • Always turn the camera off the adapter and insert it into an AC outlet. • One of the two charge indicators flashes red to the power adapter...
ZR Instruction Manual
Page 13
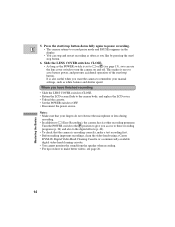
... manual settings, such as white balance and shutter speed. E • The camera returns to record pause mode and PAUSE reappears in the display. • You can stop and restart recording as often as the POWER switch is recording correctly, make better videos, see page 13), you like by pressing the start/ stop button down fully again to turn the camera on how to remember your fingers do not obstruct the microphone or lens during recording...
... manual settings, such as white balance and shutter speed. E • The camera returns to record pause mode and PAUSE reappears in the display. • You can stop and restart recording as often as the POWER switch is recording correctly, make better videos, see page 13), you like by pressing the start/ stop button down fully again to turn the camera on how to remember your fingers do not obstruct the microphone or lens during recording...
ZR Instruction Manual
Page 15
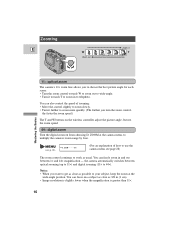
... W buttons on the wireless controller adjust the picture angle, but not the zoom speed. 44× digital zoom Turn the digital zoom on a subject as close as usual. You can freely zoom in (1 cm). • Image resolution is slightly lower when the magnification is greater than 11×. 16 You can also control the speed of how to use the camera menu see page 28) The zoom control continues to work...
... W buttons on the wireless controller adjust the picture angle, but not the zoom speed. 44× digital zoom Turn the digital zoom on a subject as close as usual. You can freely zoom in (1 cm). • Image resolution is slightly lower when the magnification is greater than 11×. 16 You can also control the speed of how to use the camera menu see page 28) The zoom control continues to work...
ZR Instruction Manual
Page 17
... can also use the wireless controller. Notes: • While recording in mirror mode you lift the LCD panel up vertically so that it at the menu before turning the screen upright. Only certain displays are reversed (mirror mode) and the time code and remaining tape indicators disappear. No Cassette is loaded Exposure Adjustment Manual focus AF OFF 18 REC REC PAUSE EJECT STOP The tape has reached the end Condensation warning The battery pack...
... can also use the wireless controller. Notes: • While recording in mirror mode you lift the LCD panel up vertically so that it at the menu before turning the screen upright. Only certain displays are reversed (mirror mode) and the time code and remaining tape indicators disappear. No Cassette is loaded Exposure Adjustment Manual focus AF OFF 18 REC REC PAUSE EJECT STOP The tape has reached the end Condensation warning The battery pack...
ZR Instruction Manual
Page 32
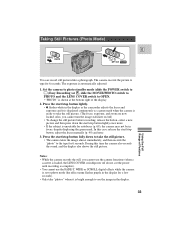
... flashes purple in focus, despite displaying the green mark. In this time the camera also records the sound, and the display also shows the still picture. Press the start /stop button lightly. • flashes white in the display as a green mark when the camera is bright enough to see the image in the display. 33 During this case: release the start /stop button, adjust the focus manually (p. 49) and retry. 3. Taking Still Pictures (Photo Mode) MOVIE PHOTO E OFF VCR POWER Using...
... flashes purple in focus, despite displaying the green mark. In this time the camera also records the sound, and the display also shows the still picture. Press the start /stop button lightly. • flashes white in the display as a green mark when the camera is bright enough to see the image in the display. 33 During this case: release the start /stop button, adjust the focus manually (p. 49) and retry. 3. Taking Still Pictures (Photo Mode) MOVIE PHOTO E OFF VCR POWER Using...
ZR Instruction Manual
Page 50
... white balance setting remains in the memory. • If you slide the POWER switch away from the P setting. • When the LENS COVER switch is set a more accurate white balance. • If the lighting conditions change, reset the white balance by certain types of fluorescent or mercury vapor lights. Correct white balance cannot be obtained for two types of Features 51 Setting the white balance manually will probably work better than auto white balance when shooting: E Subjects with studio/video lighting, use the (indoor) mode...
... white balance setting remains in the memory. • If you slide the POWER switch away from the P setting. • When the LENS COVER switch is set a more accurate white balance. • If the lighting conditions change, reset the white balance by certain types of fluorescent or mercury vapor lights. Correct white balance cannot be obtained for two types of Features 51 Setting the white balance manually will probably work better than auto white balance when shooting: E Subjects with studio/video lighting, use the (indoor) mode...
ZR Instruction Manual
Page 54
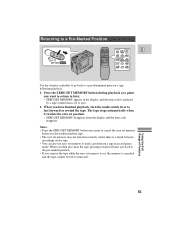
... function correctly where there is a break between recordings on the tape. • You can also use zero set memory to mark a position on a tape following playback. 1. Returning to a Pre-Marked Position OFF VCR POWER W T 2 WIRELESS CONTROLLER WL-D67 MENU ZERO SET MEMORY TV SCREEN DATA CODE SEARCH SELECT PAUSEa REW PLAYe FF STOP3 E Use the wireless controller to go back to a pre-determined point on a tape in the display, and the time code is replaced...
... function correctly where there is a break between recordings on the tape. • You can also use zero set memory to mark a position on a tape following playback. 1. Returning to a Pre-Marked Position OFF VCR POWER W T 2 WIRELESS CONTROLLER WL-D67 MENU ZERO SET MEMORY TV SCREEN DATA CODE SEARCH SELECT PAUSEa REW PLAYe FF STOP3 E Use the wireless controller to go back to a pre-determined point on a tape in the display, and the time code is replaced...
ZR Instruction Manual
Page 55
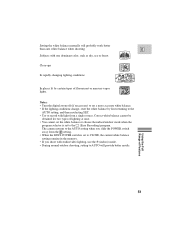
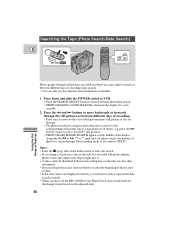
... the data code is not displayed correctly you will not be able to operate the date search correctly. • When you can only use this function from the Remote Controller. 1. Press the and buttons to move backwards or forwards through . Searching the Tape (Photo Search/Date Search) E OFF VCR POWER W T 2 WIRELESS CONTROLLER WL-D67 SEARCH SELECT Using the Full Range of Features Move quickly through still pictures recorded anywhere on a tape (photo...
... the data code is not displayed correctly you will not be able to operate the date search correctly. • When you can only use this function from the Remote Controller. 1. Press the and buttons to move backwards or forwards through . Searching the Tape (Photo Search/Date Search) E OFF VCR POWER W T 2 WIRELESS CONTROLLER WL-D67 SEARCH SELECT Using the Full Range of Features Move quickly through still pictures recorded anywhere on a tape (photo...

ZR Instruction Manual
Page 56
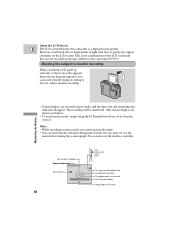
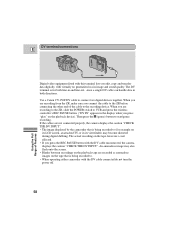
... "Connections for details. 3. S-150 S-video Cable STV-150 Stereo Video Cable V L R S INPUT S-VIDEO E VIDEO AUDIO L R Record the scenes you want to copy. 2. Connect the camera to a VCR Playback the tape on the camera. 5. or combine different shots to copy, then stop playback on the camcorder. Load a blank cassette, and put the VCR in order to copy appears on the VCR as soon as the section you want to create your TV and VCR instruction manuals for Playback on a TV screen...
... "Connections for details. 3. S-150 S-video Cable STV-150 Stereo Video Cable V L R S INPUT S-VIDEO E VIDEO AUDIO L R Record the scenes you want to copy. 2. Connect the camera to a VCR Playback the tape on the camera. 5. or combine different shots to copy, then stop playback on the camcorder. Load a blank cassette, and put the VCR in order to copy appears on the VCR as soon as the section you want to create your TV and VCR instruction manuals for Playback on a TV screen...
ZR Instruction Manual
Page 57
... cable can handle data in the display when you connect the cable to the recording device. When you are recording from the ZR, make sure you press "play" on the tape, however, is for example on its LCD screen, an attached TV, or in image and sound quality. When you are recording to the ZR, slide the POWER switch to VCR and press the wireless controller's REC PAUSE button. ("DV IN" appears in both directions. Use a Canon...
... cable can handle data in the display when you connect the cable to the recording device. When you are recording from the ZR, make sure you press "play" on the tape, however, is for example on its LCD screen, an attached TV, or in image and sound quality. When you are recording to the ZR, slide the POWER switch to VCR and press the wireless controller's REC PAUSE button. ("DV IN" appears in both directions. Use a Canon...
ZR Instruction Manual
Page 64
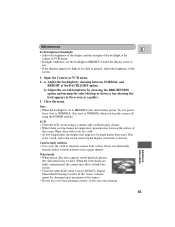
... times). • Do not use chemically treated cloth or volatile solvents such as a guide). 3. Camera body and lens • Use a soft, dry cloth to NORMAL when you turn the camera off using the POWER switch.) LCD • Clean the LCD screen using Canon's DVM-CL Digital Video Head Cleaning Cassette. Note: • When the backlight is set to NORMAL. (It is reset to clean the camera body or lens. Maintenance E LCD (brightness/backlight) • Adjust the brightness of the display...
... times). • Do not use chemically treated cloth or volatile solvents such as a guide). 3. Camera body and lens • Use a soft, dry cloth to NORMAL when you turn the camera off using the POWER switch.) LCD • Clean the LCD screen using Canon's DVM-CL Digital Video Head Cleaning Cassette. Note: • When the backlight is set to NORMAL. (It is reset to clean the camera body or lens. Maintenance E LCD (brightness/backlight) • Adjust the brightness of the display...
ZR Instruction Manual
Page 70
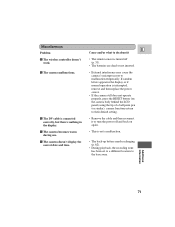
... setting. • Remove the cable and then reconnect it • The remote sensor is connected correctly, but there's nothing in the display or if normal operation is interrupted, remove and then replace the power source. • If the camera still does not operate properly, press the RESET button (on again. • This is not a malfunction. • The back-up battery needs recharging (p. 62). • During playback, the recording...
... setting. • Remove the cable and then reconnect it • The remote sensor is connected correctly, but there's nothing in the display or if normal operation is interrupted, remove and then replace the power source. • If the camera still does not operate properly, press the RESET button (on again. • This is not a malfunction. • The back-up battery needs recharging (p. 62). • During playback, the recording...
ZR Instruction Manual
Page 81
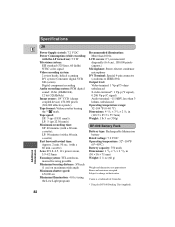
... 82 Battery type: Rechargeable lithium ion LP: 90 minutes (with a 60 min. BP-608 Battery Pack cassette); cassette) Battery capacity: 750 mAh Lens: F/1.8-2.5, 11× power zoom, Dimensions: 1 3/16 × 5/8 × 2 /13 16 in Tape speed: (118.5 × 85.5 × 55.7mm) SP: 3/4 ips (18.81 mm/s); Subject to IEEE1394) SD system) Output level: Digital component recording Video terminal: 1 Vp-p/75 ohms Audio recording system: PCM digital unbalanced sound: 16...
... 82 Battery type: Rechargeable lithium ion LP: 90 minutes (with a 60 min. BP-608 Battery Pack cassette); cassette) Battery capacity: 750 mAh Lens: F/1.8-2.5, 11× power zoom, Dimensions: 1 3/16 × 5/8 × 2 /13 16 in Tape speed: (118.5 × 85.5 × 55.7mm) SP: 3/4 ips (18.81 mm/s); Subject to IEEE1394) SD system) Output level: Digital component recording Video terminal: 1 Vp-p/75 ohms Audio recording system: PCM digital unbalanced sound: 16...
ZR Instruction Manual
Page 83
P E Pause, Record, 13 Photo Mode, 33 Photo Search, 56 Playback, 19 Playback Connection, 22 Playback pause, 20 Portrait, 38 Power Adapter, 8 Powering your camcoder, 8 Pre-Marked Position, 55 Preparing the Camera, 60 Problems, 68 R Recharging the Battery Pack, 61 Recording, 13 Recording Programs, 36 Record Pause Mode, 13 Record Review, 34 Record Search, 34 Remote Control, 31 Remote Sensor, 31 Rewind, 20 S Sand & Snow, 39 Screen Displays, 78 Scroll, 40 Self-Timer, 46 Sepia, 41 Shoulder Strap, 60 16:9, 43...
P E Pause, Record, 13 Photo Mode, 33 Photo Search, 56 Playback, 19 Playback Connection, 22 Playback pause, 20 Portrait, 38 Power Adapter, 8 Powering your camcoder, 8 Pre-Marked Position, 55 Preparing the Camera, 60 Problems, 68 R Recharging the Battery Pack, 61 Recording, 13 Recording Programs, 36 Record Pause Mode, 13 Record Review, 34 Record Search, 34 Remote Control, 31 Remote Sensor, 31 Rewind, 20 S Sand & Snow, 39 Screen Displays, 78 Scroll, 40 Self-Timer, 46 Sepia, 41 Shoulder Strap, 60 16:9, 43...


