ZR Instruction Manual
Page 1
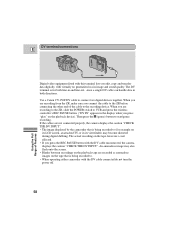
...can radiate radio frequency energy and, if not installed and use in a particular installation. NO USER SERVICEABLE PARTS INSIDE. Digital Video Camcorder, ZR This device complies with arrowhead symbol, within an equilateral triangle, is intended to alert the user to the presence of FCC Rules.... Operation is required to the equipment unless otherwise specified in the literature accompanying the product. 2 Use of the FCC Rules. Canon U.S.A. These limits are designed to persons. If this device must accept any changes or modifications to comply with the limits for help...
...can radiate radio frequency energy and, if not installed and use in a particular installation. NO USER SERVICEABLE PARTS INSIDE. Digital Video Camcorder, ZR This device complies with arrowhead symbol, within an equilateral triangle, is intended to alert the user to the presence of FCC Rules.... Operation is required to the equipment unless otherwise specified in the literature accompanying the product. 2 Use of the FCC Rules. Canon U.S.A. These limits are designed to persons. If this device must accept any changes or modifications to comply with the limits for help...

ZR Instruction Manual
Page 2
... insert the plug fully into the power outlet only one blade wider than the other). Introduction 3. If an outside antenna is connected to the Canon Digital Video Camcorder ZR and all its accessories. All warnings on or pinched by items placed upon or against voltage surges and built-up static charges. Power Sources...
... insert the plug fully into the power outlet only one blade wider than the other). Introduction 3. If an outside antenna is connected to the Canon Digital Video Camcorder ZR and all its accessories. All warnings on or pinched by items placed upon or against voltage surges and built-up static charges. Power Sources...

ZR Instruction Manual
Page 4
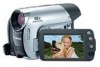
... number and other vital information here and retain this product may be found on the bottom of the camera. Model Name ZR Serial No. 5 Contents Introduction Using the Various Recording Programs 36 E Important Usage Instructions 2 Using the Digital Effects 40 Important... 3 Audio Recording 44 Thank you for Choosing a Canon ......... 6 Setting the Self-Timer 46 Introducing the ZR 7 Mastering the Basics ~ When Making Manual Adjustments ...~ Adjusting Exposure Manually 47 Adjusting Focus Manually 49 Powering Your Camcorder 8 Setting the White Balance 50 Loading a Cassette ...
... number and other vital information here and retain this product may be found on the bottom of the camera. Model Name ZR Serial No. 5 Contents Introduction Using the Various Recording Programs 36 E Important Usage Instructions 2 Using the Digital Effects 40 Important... 3 Audio Recording 44 Thank you for Choosing a Canon ......... 6 Setting the Self-Timer 46 Introducing the ZR 7 Mastering the Basics ~ When Making Manual Adjustments ...~ Adjusting Exposure Manually 47 Adjusting Focus Manually 49 Powering Your Camcorder 8 Setting the White Balance 50 Loading a Cassette ...
ZR Instruction Manual
Page 5
... are many sophisticated features which will add to your way around the camcorder (p. 75) • Screen displays (p. 78) • Troubleshooting - Thank you for choosing a Canon First, we suggest that you master the basic operations of the camcorder first, before moving on the camcorder itself e.g. Its following accessories: advanced technology makes it very easy to...
... are many sophisticated features which will add to your way around the camcorder (p. 75) • Screen displays (p. 78) • Troubleshooting - Thank you for choosing a Canon First, we suggest that you master the basic operations of the camcorder first, before moving on the camcorder itself e.g. Its following accessories: advanced technology makes it very easy to...
ZR Instruction Manual
Page 6
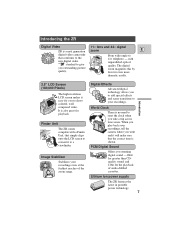
... Video 11× lens and 44× digital ZR is a next generation zoom E digital video camcorder that simply clips onto the LCD screen to convert it to a viewfinder. with a Finder Unit, that conforms to the new digital video Mini standard to ...-dubbed cassettes. World Clock There is also great for the playback of the zoom range. Lithium ion power supply The ZR features the latest in portable power technology. 7 Finder Unit The ZR comes complete with unparalleled optical quality. From wide-angle to reset the clock when you stunning digital sound -16bit for...
... Video 11× lens and 44× digital ZR is a next generation zoom E digital video camcorder that simply clips onto the LCD screen to convert it to a viewfinder. with a Finder Unit, that conforms to the new digital video Mini standard to ...-dubbed cassettes. World Clock There is also great for the playback of the zoom range. Lithium ion power supply The ZR features the latest in portable power technology. 7 Finder Unit The ZR comes complete with unparalleled optical quality. From wide-angle to reset the clock when you stunning digital sound -16bit for...
ZR Instruction Manual
Page 7
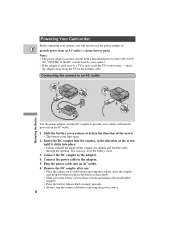
... the opening. Connect the power cable to the adapter. 4. Connect the DC coupler to the adapter. 5. You can now close the battery cover. 3. B A Powering Your Camcorder Before operating your camera, you press the battery release knob. • Slide across the battery cover release switch (and replace the small rubber stopper). •...
... the opening. Connect the power cable to the adapter. 4. Connect the DC coupler to the adapter. 5. You can now close the battery cover. 3. B A Powering Your Camcorder Before operating your camera, you press the battery release knob. • Slide across the battery cover release switch (and replace the small rubber stopper). •...
ZR Instruction Manual
Page 8
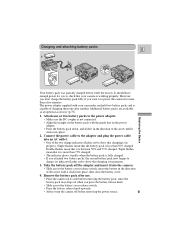
... the power adapter. • Make sure the DC coupler is in the direction of charging them one or two battery packs to show that your camcorder can hold two battery packs and is capable of the arrow until it into the camera. • Slide across the battery cover release switch. •...
... the power adapter. • Make sure the DC coupler is in the direction of charging them one or two battery packs to show that your camcorder can hold two battery packs and is capable of the arrow until it into the camera. • Slide across the battery cover release switch. •...
ZR Instruction Manual
Page 9
... you first attach to the adapter, or, if the adapter was already plugged into an AC outlet, from the side labeled "A". • When powering your camcorder from an AC outlet, you remove the DC coupler from either side, A or B. These notes include charging and recording times and how to charge the...
... you first attach to the adapter, or, if the adapter was already plugged into an AC outlet, from the side labeled "A". • When powering your camcorder from an AC outlet, you remove the DC coupler from either side, A or B. These notes include charging and recording times and how to charge the...
ZR Instruction Manual
Page 11
... tab on the cassette so that it exposes the hole. (This switch position is closed, and the red mark covered. they may damage the camcorder. • Do not insert anything into the small holes on the cassette or cover them upright. • A cassette with metal plated terminals ...may cause internal damage. • Store cassettes in the display. Therefore, after using a tape around ten times, be sure to the camcorder - dropping them or exposing them to external shocks may become dirty with use, affecting information transfer. do not open the tape protect cover or ...
... tab on the cassette so that it exposes the hole. (This switch position is closed, and the red mark covered. they may damage the camcorder. • Do not insert anything into the small holes on the cassette or cover them upright. • A cassette with metal plated terminals ...may cause internal damage. • Store cassettes in the display. Therefore, after using a tape around ten times, be sure to the camcorder - dropping them or exposing them to external shocks may become dirty with use, affecting information transfer. do not open the tape protect cover or ...
ZR Instruction Manual
Page 14
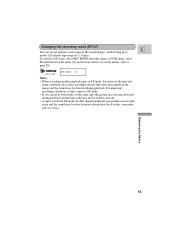
... menus, refer to LP mode, select REC MODE from the camera or VCR menu, select LP and then close the menu (for instructions on this camcorder, and vice versa. To switch to page 28). (see p. 28) REC MODE••••LP Notes: • When recording and playing back tapes...
... menus, refer to LP mode, select REC MODE from the camera or VCR menu, select LP and then close the menu (for instructions on this camcorder, and vice versa. To switch to page 28). (see p. 28) REC MODE••••LP Notes: • When recording and playing back tapes...
ZR Instruction Manual
Page 16
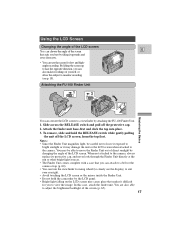
..., be careful not to leave it exposed to bright sunlight or it may be able to view the image. To remove, slide and hold the camcorder by attaching the FU-100 Finder Unit. 1. Slide across the RELEASE switch and pull off the LCD screen, from you to move the Finder Unit...
..., be careful not to leave it exposed to bright sunlight or it may be able to view the image. To remove, slide and hold the camcorder by attaching the FU-100 Finder Unit. 1. Slide across the RELEASE switch and pull off the LCD screen, from you to move the Finder Unit...
ZR Instruction Manual
Page 17
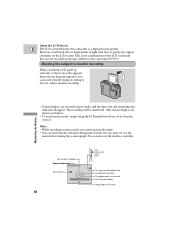
... mirror mode you cannot operate the menu. • You can also use the wireless controller. About the LCD Screen E The LCD screen built into this camcorder is not a malfunction of light (red, blue or green) may appear constantly on the tape. (Effective dots: more than 99.99%) Allowing the subject to...
... mirror mode you cannot operate the menu. • You can also use the wireless controller. About the LCD Screen E The LCD screen built into this camcorder is not a malfunction of light (red, blue or green) may appear constantly on the tape. (Effective dots: more than 99.99%) Allowing the subject to...
ZR Instruction Manual
Page 19
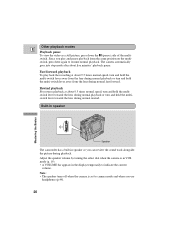
...). • A VOLUME bar appears in speaker so you can review the sound track alongside the picture during normal fast forward. Built-in speaker Speaker The camcorder has a built-in the display temporarily to camera mode and when you play back the recording at about 9.5 times normal speed, turn and hold the...
...). • A VOLUME bar appears in speaker so you can review the sound track alongside the picture during normal fast forward. Built-in speaker Speaker The camcorder has a built-in the display temporarily to camera mode and when you play back the recording at about 9.5 times normal speed, turn and hold the...
ZR Instruction Manual
Page 29
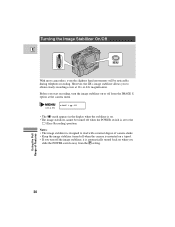
... On/Off E MENU With most camcorders, even the slightest hand movements will be turned off when the POWER switch is automatically turned back on when you turn the image stabilizer on a tripod. • If you slide the POWER switch away from the IMAGE S. However, the ZR's image stabilizer allows you start recording...
... On/Off E MENU With most camcorders, even the slightest hand movements will be turned off when the POWER switch is automatically turned back on when you turn the image stabilizer on a tripod. • If you slide the POWER switch away from the IMAGE S. However, the ZR's image stabilizer allows you start recording...
ZR Instruction Manual
Page 32
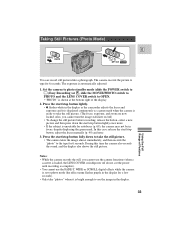
... Using the Full Range of the display. 2. The exposure is bright enough to photo mode (the effect name flashes purple in the display as the camcorder adjusts the focus and exposure and it is automatically adjusted. 1. Also, you cannot use the camera functions (when a cassette is loaded, the LENS COVER switch...
... Using the Full Range of the display. 2. The exposure is bright enough to photo mode (the effect name flashes purple in the display as the camcorder adjusts the focus and exposure and it is automatically adjusted. 1. Also, you cannot use the camera functions (when a cassette is loaded, the LENS COVER switch...
ZR Instruction Manual
Page 43
To switch to the camera's terminal (this camcorder. • For details of playing back a tape that has new sound on two channels (stereo 1), leaving two channels free (stereo 2) for approximately 4 seconds. Select "12 ... can record sound in the display for you to CD) while the 12 bit mode records on stereo 2, see p. 28) AUDIO MODE••16bit ZR can connect an external microphone to the camera via the DU-100 Docking Unit's MIC terminal. You can monitor the sound while MIC m AUDIO recording...
To switch to the camera's terminal (this camcorder. • For details of playing back a tape that has new sound on two channels (stereo 1), leaving two channels free (stereo 2) for approximately 4 seconds. Select "12 ... can record sound in the display for you to CD) while the 12 bit mode records on stereo 2, see p. 28) AUDIO MODE••16bit ZR can connect an external microphone to the camera via the DU-100 Docking Unit's MIC terminal. You can monitor the sound while MIC m AUDIO recording...
ZR Instruction Manual
Page 51
...fast forward, rewind, reverse playback, forward and reverse x2 playback. You can be displayed during high speed playback modes. • If a recording made on ZR is in, play, slow or still mode. Select DATA CODE from being read "- - -" in the camera's memory. - Choose between DATE/TIME, CAMERA... section of data code to display - Displaying Data Code A data code, containing the date and time the recording was made on a different DV camcorder, the data code may not be displayed correctly. • Contents of data code display may change according to D/TIME SEL. During playback, the ...
...fast forward, rewind, reverse playback, forward and reverse x2 playback. You can be displayed during high speed playback modes. • If a recording made on ZR is in, play, slow or still mode. Select DATA CODE from being read "- - -" in the camera's memory. - Choose between DATE/TIME, CAMERA... section of data code to display - Displaying Data Code A data code, containing the date and time the recording was made on a different DV camcorder, the data code may not be displayed correctly. • Contents of data code display may change according to D/TIME SEL. During playback, the ...

ZR Instruction Manual
Page 56
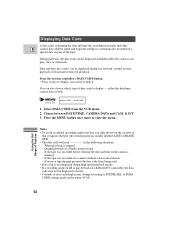
... the section you can edit your TV and VCR instruction manuals for Playback on a TV screen" on the screen. 4. Basic Recording 1. Find a point on the camcorder. Pause the VCR at the end of the section you monitor the picture on the TV and set it back while you want to copy...
... the section you can edit your TV and VCR instruction manuals for Playback on a TV screen" on the screen. 4. Basic Recording 1. Find a point on the camcorder. Pause the VCR at the end of the section you monitor the picture on the TV and set it back while you want to copy...
ZR Instruction Manual
Page 57
..., however, is being recorded to. • When operating either camcorder with the DV cable connected do not turn the power off. 58 Using the Full Range of the cable to the ZR before connecting the other end of Features Use a Canon CV-150F DV cable to start/pause recording. If the cables... are not connected properly, the camera displays the caution "CHECK THE DV INPUT". • The image displayed by the camcorder that is not affected. •...
..., however, is being recorded to. • When operating either camcorder with the DV cable connected do not turn the power off. 58 Using the Full Range of the cable to the ZR before connecting the other end of Features Use a Canon CV-150F DV cable to start/pause recording. If the cables... are not connected properly, the camera displays the caution "CHECK THE DV INPUT". • The image displayed by the camcorder that is not affected. •...
ZR Instruction Manual
Page 60
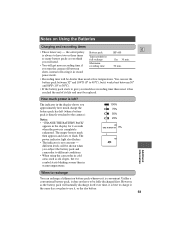
... areas such as you think you will need. • You will be shorter than in the display shows you subject the battery pack and camcorder to flash. However, as the battery pack will be shown when you approximately how much power is always to have to the camera): Notes...replaced. How much charge the battery pack has left ? The empty battery mark then appears and starts to different conditions. • When using the camcorder in record pause mode. • Recording time will naturally discharge itself over time, it works best between Time needed for 4 seconds when the ...
... areas such as you think you will need. • You will be shorter than in the display shows you subject the battery pack and camcorder to flash. However, as the battery pack will be shown when you approximately how much power is always to have to the camera): Notes...replaced. How much charge the battery pack has left ? The empty battery mark then appears and starts to different conditions. • When using the camcorder in record pause mode. • Recording time will naturally discharge itself over time, it works best between Time needed for 4 seconds when the ...


