ZR Instruction Manual
Page 1
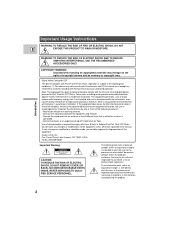
... designed to radio communications. If such changes or modifications should be made, you could be of sufficient magnitude to copyright laws. One Canon Plaza, Lake Success, NY 11042, U.S.A. The exclamation point, within the product's enclosure, that interference will not occur in the manual...device, pursuant to comply with Part 15 of the FCC Rules. However, there is required to Part 15 of the FCC Rules. Digital Video Camcorder, ZR This device complies with class B limits in Subpart B of Part 15 of important operating and maintenance (servicing) instructions in a residential ...
... designed to radio communications. If such changes or modifications should be made, you could be of sufficient magnitude to copyright laws. One Canon Plaza, Lake Success, NY 11042, U.S.A. The exclamation point, within the product's enclosure, that interference will not occur in the manual...device, pursuant to comply with Part 15 of the FCC Rules. However, there is required to Part 15 of the FCC Rules. Digital Video Camcorder, ZR This device complies with class B limits in Subpart B of Part 15 of important operating and maintenance (servicing) instructions in a residential ...

ZR Instruction Manual
Page 2
... product should be walked on the product and in this manual as battery power, refer to . 4. Do not use the camera close to the Canon Digital Video Camcorder ZR and all its accessories. The CA-600A Compact Power Adapter is operated. Power Cord Protection - Section 810 of power supply to insert the plug fully...
... product should be walked on the product and in this manual as battery power, refer to . 4. Do not use the camera close to the Canon Digital Video Camcorder ZR and all its accessories. The CA-600A Compact Power Adapter is operated. Power Cord Protection - Section 810 of power supply to insert the plug fully...

ZR Instruction Manual
Page 4
...Choosing a Canon ......... 6 Setting the Self-Timer 46 Introducing the ZR 7 Mastering the Basics ~ When Making Manual Adjustments ...~ Adjusting Exposure Manually 47 Adjusting Focus Manually 49 Powering Your Camcorder 8 ...Setting the White Balance 50 Loading a Cassette 11 Basic Recording 13 Zooming 16 Using the LCD Screen 17 Playing back a Cassette 19 Connections for Playback on a TV Screen 22 Tips for Making Better Videos...
...Choosing a Canon ......... 6 Setting the Self-Timer 46 Introducing the ZR 7 Mastering the Basics ~ When Making Manual Adjustments ...~ Adjusting Exposure Manually 47 Adjusting Focus Manually 49 Powering Your Camcorder 8 ...Setting the White Balance 50 Loading a Cassette 11 Basic Recording 13 Zooming 16 Using the LCD Screen 17 Playing back a Cassette 19 Connections for Playback on a TV Screen 22 Tips for Making Better Videos...
ZR Instruction Manual
Page 5
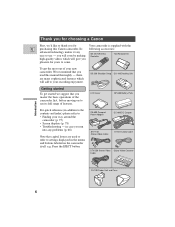
... 68) Note that you master the basic operations of features. Thank you for choosing a Canon First, we suggest that capital letters are many sophisticated features which will add to your way around the camcorder (p. 75) • Screen displays (p. 78) • Troubleshooting - SS-200 Shoulder ...easy to come. CA-600 Compact Power Adapter DC-600 DC Coupler STV-150 Stereo Video Cable S-150 S-video Cable STV-250 Stereo Video Digital Video Cassette Cable FU-100 Finder Unit and Case 6 you will soon be making high-quality videos which will give you read this Canon camcorder.
... 68) Note that you master the basic operations of features. Thank you for choosing a Canon First, we suggest that capital letters are many sophisticated features which will add to your way around the camcorder (p. 75) • Screen displays (p. 78) • Troubleshooting - SS-200 Shoulder ...easy to come. CA-600 Compact Power Adapter DC-600 DC Coupler STV-150 Stereo Video Cable S-150 S-video Cable STV-250 Stereo Video Digital Video Cassette Cable FU-100 Finder Unit and Case 6 you will soon be making high-quality videos which will give you read this Canon camcorder.
ZR Instruction Manual
Page 6
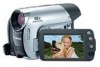
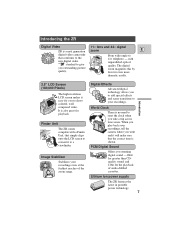
...is also great for the playback of the zoom range. World Clock There is a next generation zoom E digital video camcorder that conforms to the new digital video Mini standard to give you went and it will make sure that simply clips onto the LCD screen to convert ... When you play back your recordings, tell the camera where you outstanding picture quality. Image Stabilizer Stabilizes your recordings. Finder Unit The ZR comes complete with unparalleled optical quality. The digital zoom magnifies this by four for you to add special effects and scene transitions to a...
...is also great for the playback of the zoom range. World Clock There is a next generation zoom E digital video camcorder that conforms to the new digital video Mini standard to give you went and it will make sure that simply clips onto the LCD screen to convert ... When you play back your recordings, tell the camera where you outstanding picture quality. Image Stabilizer Stabilizes your recordings. Finder Unit The ZR comes complete with unparalleled optical quality. The digital zoom magnifies this by four for you to add special effects and scene transitions to a...
ZR Instruction Manual
Page 13
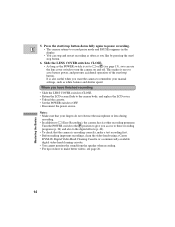
... you want the camera to save battery power, and prevents accidental operation of the start/stop button down fully again to make better videos, see page 13), you have finished recording • Slide the LENS COVER switch to CLOSE. • Return the LCD screen .... It is recording correctly, make a test recording first. • Before making important recordings, clean the video heads using a Canon DVM-CL Digital Video Head Cleaning Cassette or a commercially available digital video head cleaning cassette. • You cannot monitor the sound from the speaker when recording. • For ...
... you want the camera to save battery power, and prevents accidental operation of the start/stop button down fully again to make better videos, see page 13), you have finished recording • Slide the LENS COVER switch to CLOSE. • Return the LCD screen .... It is recording correctly, make a test recording first. • Before making important recordings, clean the video heads using a Canon DVM-CL Digital Video Head Cleaning Cassette or a commercially available digital video head cleaning cassette. • You cannot monitor the sound from the speaker when recording. • For ...
ZR Instruction Manual
Page 18
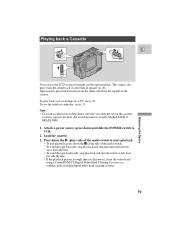
... accidental recording, make sure that it exposes the hole (the switch position is rough (mosaic-like noise), clean the video heads using a Canon DVM-CL Digital Video Head Cleaning Cassette or a commercially available digital video head cleaning cassette. 19 Press down the 3 (stop) side of the camera. Load the cassette. 3. Attach a power source, press...
... accidental recording, make sure that it exposes the hole (the switch position is rough (mosaic-like noise), clean the video heads using a Canon DVM-CL Digital Video Head Cleaning Cassette or a commercially available digital video head cleaning cassette. 19 Press down the 3 (stop) side of the camera. Load the cassette. 3. Attach a power source, press...
ZR Instruction Manual
Page 19
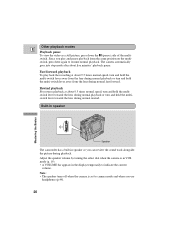
Built-in speaker Speaker The camcorder has a built-in the display temporarily to camera mode and when you use headphones (p.44). 20 Adjust the speaker volume by turning the select dial ... speed, turn and hold the multi-switch lever away from the lens during playback. Mastering the Basics Other playback modes E Playback pause To view the video as a still picture, press down the a (pause) side of the multiswitch. Fast forward playback To play and pause playback from the lens during normal rewind...
Built-in speaker Speaker The camcorder has a built-in the display temporarily to camera mode and when you use headphones (p.44). 20 Adjust the speaker volume by turning the select dial ... speed, turn and hold the multi-switch lever away from the lens during playback. Mastering the Basics Other playback modes E Playback pause To view the video as a still picture, press down the a (pause) side of the multiswitch. Fast forward playback To play and pause playback from the lens during normal rewind...
ZR Instruction Manual
Page 21
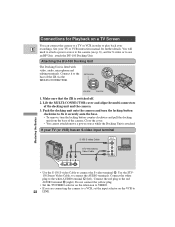
... cover and align the multi-connectors of the camera. Connect the white plug to connect the S-video terminal d. SETSCREW MULTI-CONECTOR MULTI-CONECTOR Mastering the Basics LOOSEN TIGHTEN 1. Make sure that the ZR is switched off. 2. Connections for Playback on the VCR to 22 LINE. If your E ...recordings. Do not connect the yellow plug. • Set the TV/VIDEO selector on the television to VIDEO. • If you are connecting the camera to...
... cover and align the multi-connectors of the camera. Connect the white plug to connect the S-video terminal d. SETSCREW MULTI-CONECTOR MULTI-CONECTOR Mastering the Basics LOOSEN TIGHTEN 1. Make sure that the ZR is switched off. 2. Connections for Playback on the VCR to 22 LINE. If your E ...recordings. Do not connect the yellow plug. • Set the TV/VIDEO selector on the television to VIDEO. • If you are connecting the camera to...
ZR Instruction Manual
Page 22
...a VCR, set the input selector on the VCR to the VCR instead of the TV. Connect the yellow plug to the yellow video terminal 0. • Set the TV/VIDEO selector on the previous page. This will deliver a combined mono output from the TV speakers is already hooked up by connecting the ...audio and video to the DU-100 Docking Unit, via its L and R audio terminals and V video terminal. • If cables are inserted to the S-video or Video terminals of an attached Docking Unit, there will be produced. • If you...
...a VCR, set the input selector on the VCR to the VCR instead of the TV. Connect the yellow plug to the yellow video terminal 0. • Set the TV/VIDEO selector on the previous page. This will deliver a combined mono output from the TV speakers is already hooked up by connecting the ...audio and video to the DU-100 Docking Unit, via its L and R audio terminals and V video terminal. • If cables are inserted to the S-video or Video terminals of an attached Docking Unit, there will be produced. • If you...

ZR Instruction Manual
Page 23
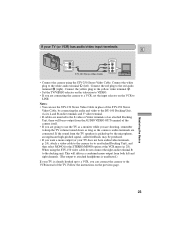
...-100 RF Unit together with the DU-100 Docking Unit. Connect the RF unit to the FROM ANT. If your TV does not have audio/video terminals E TV with coaxial antenna cable 1 V L R RU-100 RF Unit 2 3 VHF TV with F-connectors. Connect the TO TV terminal on the RF unit to the... Unit Mastering the Basics 2 V L R 300-75 ohm adapter 3 VHF 75-300 ohm adapter To connect the camera directly to a TV which does not have audio/video terminals, you will need to use the 300-75 ohm adapter. 4.
...-100 RF Unit together with the DU-100 Docking Unit. Connect the RF unit to the FROM ANT. If your TV does not have audio/video terminals E TV with coaxial antenna cable 1 V L R RU-100 RF Unit 2 3 VHF TV with F-connectors. Connect the TO TV terminal on the RF unit to the... Unit Mastering the Basics 2 V L R 300-75 ohm adapter 3 VHF 75-300 ohm adapter To connect the camera directly to a TV which does not have audio/video terminals, you will need to use the 300-75 ohm adapter. 4.
ZR Instruction Manual
Page 24
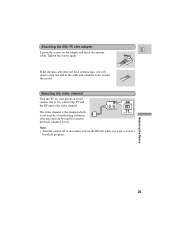
Selecting the video channel Turn the TV on, start playback on the adapter and insert the antenna cable. If the antenna cable does not have antenna lugs, you ...-75 ohm adapter E Loosen the screws on the camera (see p. 19), and set the TV and the RF unit to the video channel. 4CH 3CH TO TV FROM ANT The video channel is the channel which is not used by a broadcasting station in your area and can be used for cassette playback...
Selecting the video channel Turn the TV on, start playback on the adapter and insert the antenna cable. If the antenna cable does not have antenna lugs, you ...-75 ohm adapter E Loosen the screws on the camera (see p. 19), and set the TV and the RF unit to the video channel. 4CH 3CH TO TV FROM ANT The video channel is the channel which is not used by a broadcasting station in your area and can be used for cassette playback...

ZR Instruction Manual
Page 25
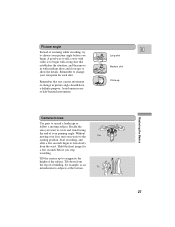
... will be in the center. You may damage the unit or the LCD screen (since the Finder Unit magnifies light). Watch out for Making Better Videos Holding the camera E For maximum stability, grip the camera firmly with your subject so it is no longer than 3/16 inch (5.5 mm), or it may...
... will be in the center. You may damage the unit or the LCD screen (since the Finder Unit magnifies light). Watch out for Making Better Videos Holding the camera E For maximum stability, grip the camera firmly with your subject so it is no longer than 3/16 inch (5.5 mm), or it may...
ZR Instruction Manual
Page 26
... for a few seconds begin with medium shots and close-ups to exaggerate the height of a building, for each shot. A good way to tell a story with video is to begin to turn your waist to change in with a long shot that any camera movement or change your viewpoint for example, as an...
... for a few seconds begin with medium shots and close-ups to exaggerate the height of a building, for each shot. A good way to tell a story with video is to begin to turn your waist to change in with a long shot that any camera movement or change your viewpoint for example, as an...
ZR Instruction Manual
Page 43
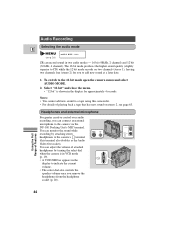
... in the display to a tape using this terminal also doubles as the Audio Video Out socket). Headphones and external microphone For greater creative control over audio recording, you can connect an external microphone to the camera's terminal (this camcorder. • For details of playing back a tape that has new sound on two... mode produces the higher sound quality (slightly superior to CD) while the 12 bit mode records on stereo 2, see p. 28) AUDIO MODE••16bit ZR can record sound in the display for you remove the headphones from the headphone socket (p. 20).
... in the display to a tape using this terminal also doubles as the Audio Video Out socket). Headphones and external microphone For greater creative control over audio recording, you can connect an external microphone to the camera's terminal (this camcorder. • For details of playing back a tape that has new sound on two... mode produces the higher sound quality (slightly superior to CD) while the 12 bit mode records on stereo 2, see p. 28) AUDIO MODE••16bit ZR can record sound in the display for you remove the headphones from the headphone socket (p. 20).
ZR Instruction Manual
Page 49
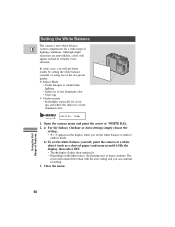
... will get better results by setting the white balance yourself, or using one of the two preset modes: Indoor Mode • Under halogen or studio/video lighting • Subject is of one dominant color • Close ups Outdoor mode • In daylight, especially for a wide range of Features 50 Close the...
... will get better results by setting the white balance yourself, or using one of the two preset modes: Indoor Mode • Under halogen or studio/video lighting • Subject is of one dominant color • Close ups Outdoor mode • In daylight, especially for a wide range of Features 50 Close the...
ZR Instruction Manual
Page 50
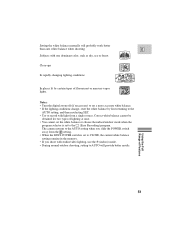
... lighting conditions change, reset the white balance by certain types of Features 51 The camera returns to the AUTO setting when you shoot with studio/video lighting, use the (indoor) mode. • During normal outdoor shooting, setting to record with one dominant color, such as sky, sea or forest. Using the...
... lighting conditions change, reset the white balance by certain types of Features 51 The camera returns to the AUTO setting when you shoot with studio/video lighting, use the (indoor) mode. • During normal outdoor shooting, setting to record with one dominant color, such as sky, sea or forest. Using the...

ZR Instruction Manual
Page 56
... you want to copy. 2. Start recording on the VCR as soon as the section you monitor the picture on the VCR, and set the TV/VIDEO selector to create your recorded cassette. Load a blank cassette, and put the VCR in order to remove unwanted scenes - Repeat steps 1 to VCR, and load... the edited tape will be slightly lower than that of Features By connecting the camera to another VCR, you want to copy appears on the camcorder. Start to play it to the video channel, or set its input selector to LINE. Basic Recording 1. Preparations 1.
... you want to copy. 2. Start recording on the VCR as soon as the section you monitor the picture on the VCR, and set the TV/VIDEO selector to create your recorded cassette. Load a blank cassette, and put the VCR in order to remove unwanted scenes - Repeat steps 1 to VCR, and load... the edited tape will be slightly lower than that of Features By connecting the camera to another VCR, you want to copy appears on the camcorder. Start to play it to the video channel, or set its input selector to LINE. Basic Recording 1. Preparations 1.
ZR Instruction Manual
Page 57
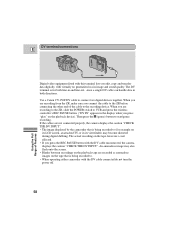
Use a Canon CV-150F DV cable to start/pause recording. If the cables are recording to the ZR, slide the POWER switch to VCR and press the wireless controller's REC PAUSE button. ("...with virtually no generation loss in both directions. The DV terminal is being recorded to. • When operating either camcorder with the DV cable connected do not turn the power off. 58 Using the Full Range of the cable to ... the a (pause) button to connect two digital devices together. DV terminal/connections E Digital video equipment fitted with this terminal lets you connect the cable to the...
Use a Canon CV-150F DV cable to start/pause recording. If the cables are recording to the ZR, slide the POWER switch to VCR and press the wireless controller's REC PAUSE button. ("...with virtually no generation loss in both directions. The DV terminal is being recorded to. • When operating either camcorder with the DV cable connected do not turn the power off. 58 Using the Full Range of the cable to ... the a (pause) button to connect two digital devices together. DV terminal/connections E Digital video equipment fitted with this terminal lets you connect the cable to the...

ZR Instruction Manual
Page 63
.... Do not expose the camera to water. • Cover the camera when you take it at the sun or other sources of heat radiating from video lighting equipment. • Do not take the camera into a humid room. be especially careful on the lens and internal parts (see p. 67). Note: • These...
.... Do not expose the camera to water. • Cover the camera when you take it at the sun or other sources of heat radiating from video lighting equipment. • Do not take the camera into a humid room. be especially careful on the lens and internal parts (see p. 67). Note: • These...


