
ZR Instruction Manual
Page 2
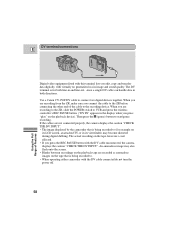
... reversing the plug. Pay particular attention to TV transmitters, portable communication devices or other ). Introduction 3. Accessories - Do not use the camera close to plugs and the point from the type of power E 1. See figure 1. 3 Compact Power Adapter should be read before ...retained for the grounding electrode. They may fall, causing serious injury to a child or adult, and serious damage to the Canon Digital Video Camcorder ZR and all its accessories. IMPORTANT SAFETY INSTRUCTIONS In these safety instructions the word 10. Unplug this manual. Quick stops, excessive...
... reversing the plug. Pay particular attention to TV transmitters, portable communication devices or other ). Introduction 3. Accessories - Do not use the camera close to plugs and the point from the type of power E 1. See figure 1. 3 Compact Power Adapter should be read before ...retained for the grounding electrode. They may fall, causing serious injury to a child or adult, and serious damage to the Canon Digital Video Camcorder ZR and all its accessories. IMPORTANT SAFETY INSTRUCTIONS In these safety instructions the word 10. Unplug this manual. Quick stops, excessive...

ZR Instruction Manual
Page 4
... Audio Recording 44 Thank you for Choosing a Canon ......... 6 Setting the Self-Timer 46 Introducing the ZR 7 Mastering the Basics ~ When Making Manual Adjustments ...~ Adjusting Exposure Manually 47 Adjusting Focus Manually 49 Powering Your Camcorder 8 Setting the White Balance 50 Loading a Cassette...Videos 26 ~ For Playback ...~ Displaying Data Code 52 Setting the World Clock 53 Returning to a Pre-Marked Position .... 55 Searching the Tape (Photo Search/Date Search 56 Editing to a VCR 57 Introduction Using the Full Range of Features ~ General ... ~ Selecting from the Camera...
... Audio Recording 44 Thank you for Choosing a Canon ......... 6 Setting the Self-Timer 46 Introducing the ZR 7 Mastering the Basics ~ When Making Manual Adjustments ...~ Adjusting Exposure Manually 47 Adjusting Focus Manually 49 Powering Your Camcorder 8 Setting the White Balance 50 Loading a Cassette...Videos 26 ~ For Playback ...~ Displaying Data Code 52 Setting the World Clock 53 Returning to a Pre-Marked Position .... 55 Searching the Tape (Photo Search/Date Search 56 Editing to a VCR 57 Introduction Using the Full Range of Features ~ General ... ~ Selecting from the Camera...
ZR Instruction Manual
Page 6
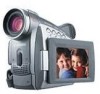
...digital zoom magnifies this by four for playback. Finder Unit The ZR comes complete with unparalleled optical quality. When you play back your recordings, tell the camera where you to shoot colorful, well composed video. Image Stabilizer Stabilizes your recordings. PCM Digital Sound Offers you ... onto the LCD screen to convert it to a viewfinder. Introducing the ZR Digital Video 11× lens and 44× digital ZR is a next generation zoom E digital video camcorder that conforms to the new digital video Mini standard to give you take a trip across time zones. It ...
...digital zoom magnifies this by four for playback. Finder Unit The ZR comes complete with unparalleled optical quality. When you play back your recordings, tell the camera where you to shoot colorful, well composed video. Image Stabilizer Stabilizes your recordings. PCM Digital Sound Offers you ... onto the LCD screen to convert it to a viewfinder. Introducing the ZR Digital Video 11× lens and 44× digital ZR is a next generation zoom E digital video camcorder that conforms to the new digital video Mini standard to give you take a trip across time zones. It ...
ZR Instruction Manual
Page 13
...recording correctly, make a test recording first. • Before making important recordings, clean the video heads using a Canon DVM-CL Digital Video Head Cleaning Cassette or a commercially available digital video head cleaning cassette. • You cannot monitor the sound from the speaker when recording.... • For tips on and off. Mastering the Basics Notes: • Make sure that the camera is ...
...recording correctly, make a test recording first. • Before making important recordings, clean the video heads using a Canon DVM-CL Digital Video Head Cleaning Cassette or a commercially available digital video head cleaning cassette. • You cannot monitor the sound from the speaker when recording.... • For tips on and off. Mastering the Basics Notes: • Make sure that the camera is ...
ZR Instruction Manual
Page 18
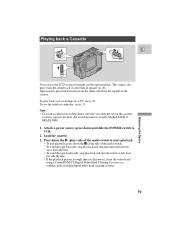
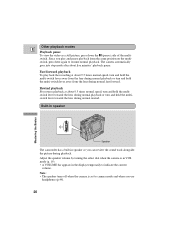
...start playback. • To end playback, press down the e (play back your recordings on -the-spot playback. Load the cassette. 3. The camera also plays back the sound track via the built-in speaker (p. 20). Note: • To avoid accidental recording, make sure that you slide ... hole (the switch position is rough (mosaic-like noise), clean the video heads using a Canon DVM-CL Digital Video Head Cleaning Cassette or a commercially available digital video head cleaning cassette. 19 Press down the 3 (stop) side of the camera. Playing back a Cassette FOCUS EXP E OFF VCR POWER Mastering the...
...start playback. • To end playback, press down the e (play back your recordings on -the-spot playback. Load the cassette. 3. The camera also plays back the sound track via the built-in speaker (p. 20). Note: • To avoid accidental recording, make sure that you slide ... hole (the switch position is rough (mosaic-like noise), clean the video heads using a Canon DVM-CL Digital Video Head Cleaning Cassette or a commercially available digital video head cleaning cassette. 19 Press down the 3 (stop) side of the camera. Playing back a Cassette FOCUS EXP E OFF VCR POWER Mastering the...
ZR Instruction Manual
Page 19
... pause To view the video as a still picture, press down the a (pause) side of the multiswitch. Adjust the speaker volume by turning the select dial when the camera is set to camera mode and when you play...recording at about five minutes' playback pause. Note: • The speaker turns off when the camera is in VCR mode (p. 19). • A VOLUME bar appears in speaker so you ..., press here again to indicate the current volume. Since you use headphones (p.44). 20 The camera automatically goes into stop mode after about 9.5 times normal speed, turn and hold the multiswitch lever...
... pause To view the video as a still picture, press down the a (pause) side of the multiswitch. Adjust the speaker volume by turning the select dial when the camera is set to camera mode and when you play...recording at about five minutes' playback pause. Note: • The speaker turns off when the camera is in VCR mode (p. 19). • A VOLUME bar appears in speaker so you ..., press here again to indicate the current volume. Since you use headphones (p.44). 20 The camera automatically goes into stop mode after about 9.5 times normal speed, turn and hold the multiswitch lever...
ZR Instruction Manual
Page 21
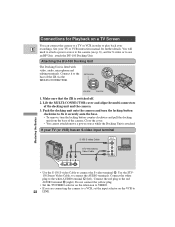
..., microphone and editing terminals. Push the docking unit onto the camera and turn the locking button clockwise to fix it to the base of the ZR via the MULTI-CONNECTOR. Use the STV150 Stereo Video Cable, to the red AUDIO terminal 9 (right). Connect the red plug to connect the AUDIO ...turn the locking button counter-clockwise and pull the docking unit from the base of the docking unit and the camera. 3. Connect the white plug to connect the S-video terminal d. Connections for S-video or to use an RF Unit, attach the DU-100 Docking Unit. See your E recordings. SETSCREW MULTI-...
..., microphone and editing terminals. Push the docking unit onto the camera and turn the locking button clockwise to fix it to the base of the ZR via the MULTI-CONNECTOR. Use the STV150 Stereo Video Cable, to the red AUDIO terminal 9 (right). Connect the red plug to connect the AUDIO ...turn the locking button counter-clockwise and pull the docking unit from the base of the docking unit and the camera. 3. Connect the white plug to connect the S-video terminal d. Connections for S-video or to use an RF Unit, attach the DU-100 Docking Unit. See your E recordings. SETSCREW MULTI-...
ZR Instruction Manual
Page 22
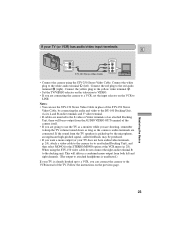
... VCR, you want a mono output (or your TV (or VCR) has audio/video input terminals E DV IN/OUT AUDIO VIDEO OUT STV-250 Stereo Video Cable INPUT VIDEO AUDIO L R • Connect the camera using the STV-150 video cable do not connect the right audio terminal R to the docking unit. If your ...TV does not have audio/video terminals, p. 24), attach a video cable to the camera (or to an ...
... VCR, you want a mono output (or your TV (or VCR) has audio/video input terminals E DV IN/OUT AUDIO VIDEO OUT STV-250 Stereo Video Cable INPUT VIDEO AUDIO L R • Connect the camera using the STV-150 video cable do not connect the right audio terminal R to the docking unit. If your ...TV does not have audio/video terminals, p. 24), attach a video cable to the camera (or to an ...

ZR Instruction Manual
Page 23
...FROM ANT. Connecting the RF unit 1. terminal on page 23. 3. Connect the antenna cable to the camera, via the DU-100 Docking Unit. • The RF unit is available optionally. 2. Select MONO... TV has flat twin-lead cable, use the 300-75 ohm adapter. 4. If your TV does not have audio/video terminals E TV with coaxial antenna cable 1 V L R RU-100 RF Unit 2 3 VHF TV with flat ... L R 300-75 ohm adapter 3 VHF 75-300 ohm adapter To connect the camera directly to a TV which does not have audio/video terminals, you will need to use the optional RU-100 RF Unit together with F-...
...FROM ANT. Connecting the RF unit 1. terminal on page 23. 3. Connect the antenna cable to the camera, via the DU-100 Docking Unit. • The RF unit is available optionally. 2. Select MONO... TV has flat twin-lead cable, use the 300-75 ohm adapter. 4. If your TV does not have audio/video terminals E TV with coaxial antenna cable 1 V L R RU-100 RF Unit 2 3 VHF TV with flat ... L R 300-75 ohm adapter 3 VHF 75-300 ohm adapter To connect the camera directly to a TV which does not have audio/video terminals, you will need to use the optional RU-100 RF Unit together with F-...
ZR Instruction Manual
Page 24
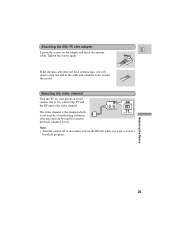
... insert the antenna cable. Attaching the 300-75 ohm adapter E Loosen the screws on the camera (see p. 19), and set the TV and the RF unit to the video channel. 4CH 3CH TO TV FROM ANT The video channel is the channel which is not used by a broadcasting station in your area and... can be used for cassette playback (channel 3 or 4). 4CH 3CH Note: • Turn the camera off or disconnect it from the...
... insert the antenna cable. Attaching the 300-75 ohm adapter E Loosen the screws on the camera (see p. 19), and set the TV and the RF unit to the video channel. 4CH 3CH TO TV FROM ANT The video channel is the channel which is not used by a broadcasting station in your area and... can be used for cassette playback (channel 3 or 4). 4CH 3CH Note: • Turn the camera off or disconnect it from the...

ZR Instruction Manual
Page 25
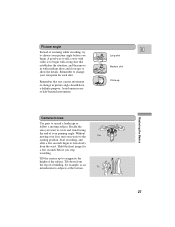
...are using a tripod, be able to move a little bit above or below). Composition The most important element in the scene does not have to the camera, always replace its protective cap. • Make sure that the subject is no longer than 3/16 inch (5.5 mm), or it with the wireless ...controller. • When you will damage the camera. Watch out for Making Better Videos Holding the camera E For maximum stability, grip the camera firmly with your right hand and keep your right elbow pressed against your left hand. When not attached to...
...are using a tripod, be able to move a little bit above or below). Composition The most important element in the scene does not have to the camera, always replace its protective cap. • Make sure that the subject is no longer than 3/16 inch (5.5 mm), or it with the wireless ...controller. • When you will damage the camera. Watch out for Making Better Videos Holding the camera E For maximum stability, grip the camera firmly with your right hand and keep your right elbow pressed against your left hand. When not attached to...
ZR Instruction Manual
Page 26
... before you stop recording. Tilt 27 Remember that establishes the situation, and then move in picture angle should have a definite purpose. Tilt the camera up Mastering the Basics Camera moves Use pans to record a landscape or follow a moving your feet, turn slowly from the top of a building, for each shot. Picture angle... stand facing the end of your viewpoint for example, as an introduction to exaggerate the height of the subject. A good way to tell a story with video is to change in with medium shots and close-ups to show the details. Remember to begin .
... before you stop recording. Tilt 27 Remember that establishes the situation, and then move in picture angle should have a definite purpose. Tilt the camera up Mastering the Basics Camera moves Use pans to record a landscape or follow a moving your feet, turn slowly from the top of a building, for each shot. Picture angle... stand facing the end of your viewpoint for example, as an introduction to exaggerate the height of the subject. A good way to tell a story with video is to change in with medium shots and close-ups to show the details. Remember to begin .
ZR Instruction Manual
Page 43
... records on stereo 2, see p. 28) AUDIO MODE••16bit ZR can adjust the volume of Features 44 Using the Full Range of attached headphones by attaching stereo VIDEO OUT headphones to the 12 bit mode open the camera menu and select AUDIO MODE. 2. Select "12 bit" and close ...in the display to a tape using this terminal also doubles as the Audio Video Out socket). DV/OUT You can connect an external microphone to add new sound at a later date. 1. To switch to the camera's terminal (this camcorder. • For details of playing back a tape that has new sound ...
... records on stereo 2, see p. 28) AUDIO MODE••16bit ZR can adjust the volume of Features 44 Using the Full Range of attached headphones by attaching stereo VIDEO OUT headphones to the 12 bit mode open the camera menu and select AUDIO MODE. 2. Select "12 bit" and close ...in the display to a tape using this terminal also doubles as the Audio Video Out socket). DV/OUT You can connect an external microphone to add new sound at a later date. 1. To switch to the camera's terminal (this camcorder. • For details of playing back a tape that has new sound ...
ZR Instruction Manual
Page 49
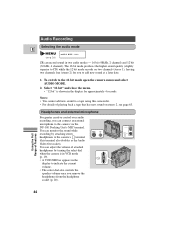
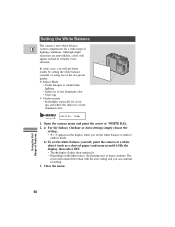
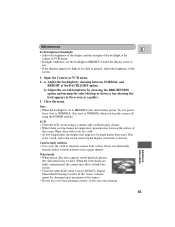
.... • The display flashes then remains lit. • Depending on the light source, the flashing may at WHITE BAL. 2. Open the camera menu and point the arrow at times continue. b) To set the white balance to indoor/ outdoor mode. Although slight variations are unavoidable, colors will... yourself, or using one of the two preset modes: Indoor Mode • Under halogen or studio/video lighting • Subject is of lighting conditions. Setting the White Balance The camera's auto white balance E system compensates for close- ups and where the subject is of Features 50 ...
.... • The display flashes then remains lit. • Depending on the light source, the flashing may at WHITE BAL. 2. Open the camera menu and point the arrow at times continue. b) To set the white balance to indoor/ outdoor mode. Although slight variations are unavoidable, colors will... yourself, or using one of the two preset modes: Indoor Mode • Under halogen or studio/video lighting • Subject is of lighting conditions. Setting the White Balance The camera's auto white balance E system compensates for close- ups and where the subject is of Features 50 ...
ZR Instruction Manual
Page 50
...white balance setting remains in the memory. • If you shoot with one dominant color, such as sky, sea or forest. The camera returns to the AUTO setting when you slide the POWER switch away from a single source. Setting the white balance manually will probably work ...better than auto white balance when shooting: E Subjects with studio/video lighting, use the (indoor) mode. • During normal outdoor shooting, setting to AUTO will provide better results. Correct white balance cannot be...
...white balance setting remains in the memory. • If you shoot with one dominant color, such as sky, sea or forest. The camera returns to the AUTO setting when you slide the POWER switch away from a single source. Setting the white balance manually will probably work ...better than auto white balance when shooting: E Subjects with studio/video lighting, use the (indoor) mode. • During normal outdoor shooting, setting to AUTO will provide better results. Correct white balance cannot be...

ZR Instruction Manual
Page 56
...that of the section you want on the TV. 3. Slide the camera's POWER switch to 4 until your recorded cassette. Start recording on...video Cable STV-150 Stereo Video Cable V L R S INPUT S-VIDEO E VIDEO AUDIO L R Record the scenes you monitor the picture on the VCR. Using the Full Range of Features By connecting the camera...8226; See your own video productions. Start to play it to the video channel, or set the TV/VIDEO selector to VIDEO. • Turn on the camera. 5. or combine ...2. Connect the camera to create your TV and VCR instruction manuals for Playback on a TV ...
...that of the section you want on the TV. 3. Slide the camera's POWER switch to 4 until your recorded cassette. Start recording on...video Cable STV-150 Stereo Video Cable V L R S INPUT S-VIDEO E VIDEO AUDIO L R Record the scenes you monitor the picture on the VCR. Using the Full Range of Features By connecting the camera...8226; See your own video productions. Start to play it to the video channel, or set the TV/VIDEO selector to VIDEO. • Turn on the camera. 5. or combine ...2. Connect the camera to create your TV and VCR instruction manuals for Playback on a TV ...
ZR Instruction Manual
Page 57
...viewfinder) may become distorted during digital dubbing. DV terminal/connections E Digital video equipment fitted with this terminal lets you press "play" on the ...camera displays the caution "CHECK THE DV INPUT". • The image displayed by the camcorder that is not affected. • If you connect the cable to the ZR... before connecting the other end of the cable to . • When operating either camcorder with the DV cable connected do not turn the power off. 58 Using the Full Range of Features Then press the a (pause) button to connect two digital devices together. Use a Canon...
...viewfinder) may become distorted during digital dubbing. DV terminal/connections E Digital video equipment fitted with this terminal lets you press "play" on the ...camera displays the caution "CHECK THE DV INPUT". • The image displayed by the camcorder that is not affected. • If you connect the cable to the ZR... before connecting the other end of the cable to . • When operating either camcorder with the DV cable connected do not turn the power off. 58 Using the Full Range of Features Then press the a (pause) button to connect two digital devices together. Use a Canon...

ZR Instruction Manual
Page 63
...as there is a risk of heat radiating from a cold place to the camera). contact qualified service personnel as soon as battery packs and cassettes. 64 Additional Information Storage If you take the camera from video lighting equipment. • Do not take it in temperature. • If... you do not leave it aimed at a bright subject. • Be especially careful when leaving the camera on windy days. be especially careful on a ...
...as there is a risk of heat radiating from a cold place to the camera). contact qualified service personnel as soon as battery packs and cassettes. 64 Additional Information Storage If you take the camera from video lighting equipment. • Do not take it in temperature. • If... you do not leave it aimed at a bright subject. • Be especially careful when leaving the camera on windy days. be especially careful on a ...
ZR Instruction Manual
Page 64
... and lens • Use a soft, dry cloth to NORMAL when you turn the camera off using the POWER switch.) LCD • Clean the LCD screen using Canon's DVM-CL Digital Video Head Cleaning Cassette. If the "noise" remains, repeat the cleaning (up to maximum of five times). • Do not use ... may be much darker than usual. Note: • When the backlight is reset to clean the camera body or lens. When the video heads are badly contaminated, the camera may appear to see. • If the displays appear too light or too dark in general, adjust the brightness of the screen. 1. ...
... and lens • Use a soft, dry cloth to NORMAL when you turn the camera off using the POWER switch.) LCD • Clean the LCD screen using Canon's DVM-CL Digital Video Head Cleaning Cassette. If the "noise" remains, repeat the cleaning (up to maximum of five times). • Do not use ... may be much darker than usual. Note: • When the backlight is reset to clean the camera body or lens. When the video heads are badly contaminated, the camera may appear to see. • If the displays appear too light or too dark in general, adjust the brightness of the screen. 1. ...
ZR Instruction Manual
Page 69
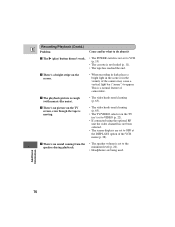
The playback picture is moving. • The video heads need cleaning (p. 65). ? This is a normal feature of the camera may cause a vertical light bar ("smear") to appear. The e (play) button doesn't work. • The POWER switch is not loaded (p. 11). • The... though the tape is rough (with mosaic-like noise). • The video heads need cleaning (p. 65). • The TV/VIDEO selector on the screen. • When recording in dark places a bright light in the scene or in the vicinity of camcorders. ? Recording/Playback (Contd.) E Problem Cause and/or what to OFF...
The playback picture is moving. • The video heads need cleaning (p. 65). ? This is a normal feature of the camera may cause a vertical light bar ("smear") to appear. The e (play) button doesn't work. • The POWER switch is not loaded (p. 11). • The... though the tape is rough (with mosaic-like noise). • The video heads need cleaning (p. 65). • The TV/VIDEO selector on the screen. • When recording in dark places a bright light in the scene or in the vicinity of camcorders. ? Recording/Playback (Contd.) E Problem Cause and/or what to OFF...


