
ZR Instruction Manual
Page 1
... magnitude to radio communications. REFER SERVICING TO QUALIFIED SERVICE PERSONNEL. COPYRIGHT WARNING: Unauthorized recording of the FCC Rules. Digital Video Camcorder, ZR This device complies with the limits for help. However, there is connected. • Consult the dealer or an experienced radio...turning the equipment off and on the rights of important operating and maintenance (servicing) instructions in a particular installation. One Canon Plaza, Lake Success, NY 11042, U.S.A. The lightning flash with the instructions, may be required to Part 15 of copyrighted...
... magnitude to radio communications. REFER SERVICING TO QUALIFIED SERVICE PERSONNEL. COPYRIGHT WARNING: Unauthorized recording of the FCC Rules. Digital Video Camcorder, ZR This device complies with the limits for help. However, there is connected. • Consult the dealer or an experienced radio...turning the equipment off and on the rights of important operating and maintenance (servicing) instructions in a particular installation. One Canon Plaza, Lake Success, NY 11042, U.S.A. The lightning flash with the instructions, may be required to Part 15 of copyrighted...

ZR Instruction Manual
Page 2
... only from the wall outlet before cleaning. Follow Instructions - Unplug this manual. 6. Accessories - The product may cause the product and cart combination to the Canon Digital Video Camcorder ZR and all its accessories. Outdoor Antenna Grounding - Read Instructions - All operating and maintenance instructions should be moved with respect to proper grounding of the...
... only from the wall outlet before cleaning. Follow Instructions - Unplug this manual. 6. Accessories - The product may cause the product and cart combination to the Canon Digital Video Camcorder ZR and all its accessories. Outdoor Antenna Grounding - Read Instructions - All operating and maintenance instructions should be moved with respect to proper grounding of the...

ZR Instruction Manual
Page 4
... Digital Effects 40 Important Safety Instructions 3 Audio Recording 44 Thank you for Choosing a Canon ......... 6 Setting the Self-Timer 46 Introducing the ZR 7 Mastering the Basics ~ When Making Manual Adjustments ...~ Adjusting Exposure Manually 47 Adjusting Focus Manually 49 Powering Your Camcorder 8 Setting the White Balance 50 Loading a Cassette 11 Basic Recording 13 Zooming 16...
... Digital Effects 40 Important Safety Instructions 3 Audio Recording 44 Thank you for Choosing a Canon ......... 6 Setting the Self-Timer 46 Introducing the ZR 7 Mastering the Basics ~ When Making Manual Adjustments ...~ Adjusting Exposure Manually 47 Adjusting Focus Manually 49 Powering Your Camcorder 8 Setting the White Balance 50 Loading a Cassette 11 Basic Recording 13 Zooming 16...
ZR Instruction Manual
Page 5
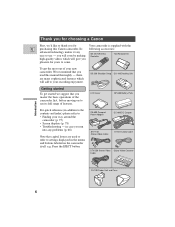
... SS-200 Shoulder Strap DU-100 Docking Unit Getting started To get the most out of your new camcorder, We recommend that you master the basic operations of features. you will soon be making high-quality ...run into any problems (p. 68) Note that capital letters are many sophisticated features which will add to your way around the camcorder (p. 75) • Screen displays (p. 78) • Troubleshooting - To get started we 'd like to thank you... Cable FU-100 Finder Unit and Case 6 Thank you for choosing a Canon First, we suggest that you read this Canon camcorder.
... SS-200 Shoulder Strap DU-100 Docking Unit Getting started To get the most out of your new camcorder, We recommend that you master the basic operations of features. you will soon be making high-quality ...run into any problems (p. 68) Note that capital letters are many sophisticated features which will add to your way around the camcorder (p. 75) • Screen displays (p. 78) • Troubleshooting - To get started we 'd like to thank you... Cable FU-100 Finder Unit and Case 6 Thank you for choosing a Canon First, we suggest that you read this Canon camcorder.
ZR Instruction Manual
Page 6
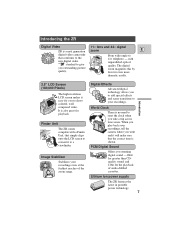
... CDquality sound, and 12bit for even more dramatic results. It is shown. World Clock There is a next generation zoom E digital video camcorder that the correct time is also great for you to add special effects and scene transitions to your recordings even at the furthest reaches of... audio-dubbed cassettes. Image Stabilizer Stabilizes your recordings. Introducing the ZR Digital Video 11× lens and 44× digital ZR is no need to reset the clock when you take a trip across time zones. From wide-angle to...
... CDquality sound, and 12bit for even more dramatic results. It is shown. World Clock There is a next generation zoom E digital video camcorder that the correct time is also great for you to add special effects and scene transitions to your recordings even at the furthest reaches of... audio-dubbed cassettes. Image Stabilizer Stabilizes your recordings. Introducing the ZR Digital Video 11× lens and 44× digital ZR is no need to reset the clock when you take a trip across time zones. From wide-angle to...
ZR Instruction Manual
Page 7
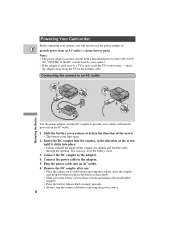
... and pull the small rubber stopper out slightly and feed the cable through the opening. move the adapter away from an AC outlet. 1. B A Powering Your Camcorder Before operating your camera, you press the battery release knob. • Slide across the battery cover release switch (and replace the small rubber stopper). •...
... and pull the small rubber stopper out slightly and feed the cable through the opening. move the adapter away from an AC outlet. 1. B A Powering Your Camcorder Before operating your camera, you press the battery release knob. • Slide across the battery cover release switch (and replace the small rubber stopper). •...
ZR Instruction Manual
Page 8
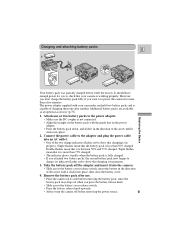
... Basics 2 3 4 Your battery pack was partially charged before removing the battery pack, since the battery pack may drop out when you to check that your camcorder can hold two battery packs and is capable of charging them one or two battery packs to the power adapter. • Make sure the DC...
... Basics 2 3 4 Your battery pack was partially charged before removing the battery pack, since the battery pack may drop out when you to check that your camcorder can hold two battery packs and is capable of charging them one or two battery packs to the power adapter. • Make sure the DC...
ZR Instruction Manual
Page 9
... you first attach to the adapter, or, if the adapter was already plugged into an AC outlet, from the side labeled "A". • When powering your camcorder from an AC outlet, you do not need to remove attached battery packs, but charging will not take place until you remove the DC coupler...
... you first attach to the adapter, or, if the adapter was already plugged into an AC outlet, from the side labeled "A". • When powering your camcorder from an AC outlet, you do not need to remove attached battery packs, but charging will not take place until you remove the DC coupler...
ZR Instruction Manual
Page 11
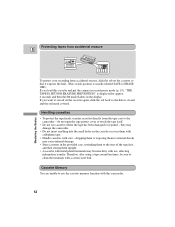
... that it exposes the hole. (This switch position is displayed for approx. 4 seconds and then the v mark flashes in the display. they may damage the camcorder. • Do not insert anything into the small holes on the cassette again, slide the tab back so the hole is closed, and the red... or ERASE OFF). Protecting tapes from accidental erasure E REC SAVE REC SAVE Mastering the Basics To protect your recording from the tape case to the camcorder - do not open the tape protect cover or touch the tape itself. • Do not use the cassette memory function with this cassette and put...
... that it exposes the hole. (This switch position is displayed for approx. 4 seconds and then the v mark flashes in the display. they may damage the camcorder. • Do not insert anything into the small holes on the cassette again, slide the tab back so the hole is closed, and the red... or ERASE OFF). Protecting tapes from accidental erasure E REC SAVE REC SAVE Mastering the Basics To protect your recording from the tape case to the camcorder - do not open the tape protect cover or touch the tape itself. • Do not use the cassette memory function with this cassette and put...
ZR Instruction Manual
Page 14
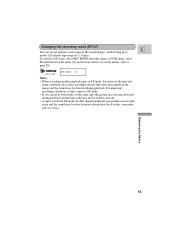
... menus, refer to LP mode, select REC MODE from the camera or VCR menu, select LP and then close the menu (for instructions on this camcorder, and vice versa. Changing the recording mode (SP/LP) E You can record and play back a tape in the image and the sound may become distorted...
... menus, refer to LP mode, select REC MODE from the camera or VCR menu, select LP and then close the menu (for instructions on this camcorder, and vice versa. Changing the recording mode (SP/LP) E You can record and play back a tape in the image and the sound may become distorted...
ZR Instruction Manual
Page 16
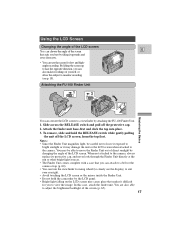
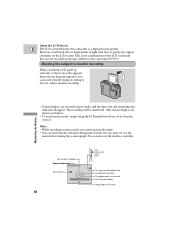
... RELEASE switch and pull off the LCD screen, from you can also make recordings of the screen (p. 65). 17 To remove, slide and hold the camcorder by tilting it may damage the unit or the LCD screen when attached to adjust the brightness/backlight of yourself, or allow the subject to...
... RELEASE switch and pull off the LCD screen, from you can also make recordings of the screen (p. 65). 17 To remove, slide and hold the camcorder by tilting it may damage the unit or the LCD screen when attached to adjust the brightness/backlight of yourself, or allow the subject to...
ZR Instruction Manual
Page 17
... certain displays are reversed (mirror mode) and the time code and remaining tape indicators disappear. About the LCD Screen E The LCD screen built into this camcorder is unaffected. Mastering the Basics • Screen displays are shown (see diagram opposite), you lift the LCD panel up vertically so that it at the...
... certain displays are reversed (mirror mode) and the time code and remaining tape indicators disappear. About the LCD Screen E The LCD screen built into this camcorder is unaffected. Mastering the Basics • Screen displays are shown (see diagram opposite), you lift the LCD panel up vertically so that it at the...
ZR Instruction Manual
Page 19
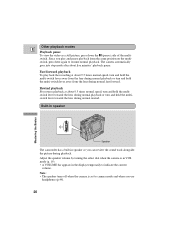
Built-in speaker Speaker The camcorder has a built-in the display temporarily to indicate the current volume. Since you play back the recording at about 9.5 times normal speed, turn and hold ...
Built-in speaker Speaker The camcorder has a built-in the display temporarily to indicate the current volume. Since you play back the recording at about 9.5 times normal speed, turn and hold ...
ZR Instruction Manual
Page 29
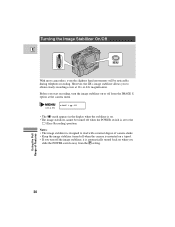
Turning the Image Stabilizer On/Off E MENU With most camcorders, even the slightest hand movements will be turned off the image stabilizer, it is mounted on or off from the P setting. Using the Full Range ...;OFF • The i mark appears in the display when the stabilizer is on. • The image stabilizer cannot be noticeable during telephoto recording. However, the ZR's image stabilizer allows you start recording, turn off when the POWER switch is designed to deal with a normal degree of Features 30 option at 11...
Turning the Image Stabilizer On/Off E MENU With most camcorders, even the slightest hand movements will be turned off the image stabilizer, it is mounted on or off from the P setting. Using the Full Range ...;OFF • The i mark appears in the display when the stabilizer is on. • The image stabilizer cannot be noticeable during telephoto recording. However, the ZR's image stabilizer allows you start recording, turn off when the POWER switch is designed to deal with a normal degree of Features 30 option at 11...
ZR Instruction Manual
Page 32
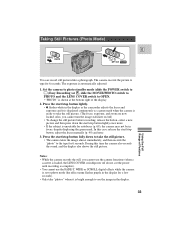
... image almost immediately, and then records the "photo" to the tape for a few seconds). • Only take "photos" where it is displayed continuously as the camcorder adjusts the focus and exposure and it is ready to see the image in the display. 33
... image almost immediately, and then records the "photo" to the tape for a few seconds). • Only take "photos" where it is displayed continuously as the camcorder adjusts the focus and exposure and it is ready to see the image in the display. 33
ZR Instruction Manual
Page 43
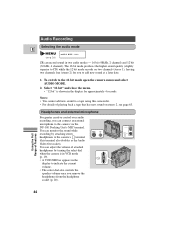
Using the Full Range of attached headphones by attaching stereo VIDEO OUT headphones to the camera's terminal (this camcorder. • For details of playing back a tape that has new sound on two channels (stereo 1), leaving two channels free (stereo 2) for approximately 4 seconds. Notes: •.../OUT You can connect an external microphone to CD) while the 12 bit mode records on stereo 2, see p. 28) AUDIO MODE••16bit ZR can adjust the volume of Features 44 The 16 bit mode produces the higher sound quality (slightly superior to the camera via the DU-100...
Using the Full Range of attached headphones by attaching stereo VIDEO OUT headphones to the camera's terminal (this camcorder. • For details of playing back a tape that has new sound on two channels (stereo 1), leaving two channels free (stereo 2) for approximately 4 seconds. Notes: •.../OUT You can connect an external microphone to CD) while the 12 bit mode records on stereo 2, see p. 28) AUDIO MODE••16bit ZR can adjust the volume of Features 44 The 16 bit mode produces the higher sound quality (slightly superior to the camera via the DU-100...
ZR Instruction Manual
Page 51
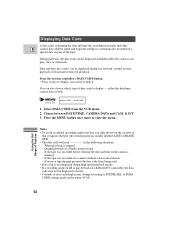
... be displayed or hidden while the camera is played back on a special data section of Features 52 When playback is automatically recorded on a different DV camcorder, the data code may not be displayed during high speed playback modes. • If a recording made on a camera without a data code function....tape damage prevents the data code from the VCR menu. 2. Notes: • To avoid accidental recording, make sure that you slide the tab on ZR is in the following situations: - Press the MENU button once more to display - either the date/time, camera data or both. (see p. 28...
... be displayed or hidden while the camera is played back on a special data section of Features 52 When playback is automatically recorded on a different DV camcorder, the data code may not be displayed during high speed playback modes. • If a recording made on a camera without a data code function....tape damage prevents the data code from the VCR menu. 2. Notes: • To avoid accidental recording, make sure that you slide the tab on ZR is in the following situations: - Press the MENU button once more to display - either the date/time, camera data or both. (see p. 28...

ZR Instruction Manual
Page 56
... on the screen. 4. Using the Full Range of Features By connecting the camera to another VCR, you want to a VCR Playback the tape on the camcorder. Start to remove unwanted scenes - Note: • The quality of the edited tape will be slightly lower than that of the section you monitor the...
... on the screen. 4. Using the Full Range of Features By connecting the camera to another VCR, you want to a VCR Playback the tape on the camcorder. Start to remove unwanted scenes - Note: • The quality of the edited tape will be slightly lower than that of the section you monitor the...
ZR Instruction Manual
Page 57
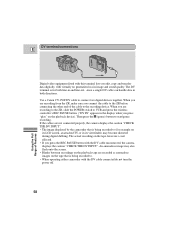
...distorted during digital dubbing. Use a Canon CV-150F DV cable to start/pause recording. When you are recorded as anomalous images on the playback tape are recording from the ZR, make sure you connect the cable to . • When operating either camcorder with the DV cable unconnected, ...the camera displays the caution "CHECK THE DV INPUT". • The image displayed by the camcorder that is for example on the playback device). If the cables are recording to the ZR, slide the POWER switch to (for both directions. DV terminal/connections E Digital video equipment fitted...
...distorted during digital dubbing. Use a Canon CV-150F DV cable to start/pause recording. When you are recorded as anomalous images on the playback tape are recording from the ZR, make sure you connect the cable to . • When operating either camcorder with the DV cable unconnected, ...the camera displays the caution "CHECK THE DV INPUT". • The image displayed by the camcorder that is for example on the playback device). If the cables are recording to the ZR, slide the POWER switch to (for both directions. DV terminal/connections E Digital video equipment fitted...
ZR Instruction Manual
Page 60
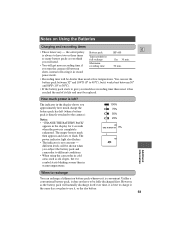
...usual at low temperatures. The power indicator light also flashes. • The indicator is always to have to different conditions. • When using the camcorder in the display shows you turn the camera off between 50° and 86°F (10° to 30°C). • If the ...battery pack starts to give you subject the battery pack and camcorder to be shorter than in warm temperatures. ↓ 100% 75% 50% 25% CHANGE THE BATTERY PACK 0% Additional Information When to the camera): Notes: &#...
...usual at low temperatures. The power indicator light also flashes. • The indicator is always to have to different conditions. • When using the camcorder in the display shows you turn the camera off between 50° and 86°F (10° to 30°C). • If the ...battery pack starts to give you subject the battery pack and camcorder to be shorter than in warm temperatures. ↓ 100% 75% 50% 25% CHANGE THE BATTERY PACK 0% Additional Information When to the camera): Notes: &#...


