
ZR Instruction Manual
Page 1
...Important Usage Instructions WARNING: TO REDUCE THE RISK OF FIRE OR ELECTRIC SHOCK, DO NOT E EXPOSE THIS PRODUCT TO RAIN OR MOISTURE. One Canon Plaza, Lake Success, NY 11042, U.S.A. COPYRIGHT WARNING: Unauthorized recording of copyrighted materials may be required to radio or television reception, which can ... WARNING: TO REDUCE THE RISK OF ELECTRIC SHOCK AND TO REDUCE ANNOYING INTERFERENCE, USE THE RECOMMENDED ACCESSORIES ONLY. Digital Video Camcorder, ZR This device complies with Part 15 of important operating and maintenance (servicing) instructions in a particular installation.
...Important Usage Instructions WARNING: TO REDUCE THE RISK OF FIRE OR ELECTRIC SHOCK, DO NOT E EXPOSE THIS PRODUCT TO RAIN OR MOISTURE. One Canon Plaza, Lake Success, NY 11042, U.S.A. COPYRIGHT WARNING: Unauthorized recording of copyrighted materials may be required to radio or television reception, which can ... WARNING: TO REDUCE THE RISK OF ELECTRIC SHOCK AND TO REDUCE ANNOYING INTERFERENCE, USE THE RECOMMENDED ACCESSORIES ONLY. Digital Video Camcorder, ZR This device complies with Part 15 of important operating and maintenance (servicing) instructions in a particular installation.

ZR Instruction Manual
Page 2
... the camera. 8. Polarization - The CA-600A Compact Power Adapter is a safety feature. If the plug still fails to fit, contact your electrician to the Canon Digital Video Camcorder ZR and all its accessories. Power Cord Protection - Pay particular attention to insert the plug fully into the power outlet only one blade wider than...
... the camera. 8. Polarization - The CA-600A Compact Power Adapter is a safety feature. If the plug still fails to fit, contact your electrician to the Canon Digital Video Camcorder ZR and all its accessories. Power Cord Protection - Pay particular attention to insert the plug fully into the power outlet only one blade wider than...

ZR Instruction Manual
Page 4
...Instructions 3 Audio Recording 44 Thank you for Choosing a Canon ......... 6 Setting the Self-Timer 46 Introducing the ZR 7 Mastering the Basics ~ When Making Manual Adjustments ...~ Adjusting Exposure Manually 47 Adjusting Focus Manually 49 Powering Your Camcorder 8 Setting the White Balance 50 Loading a Cassette 11...on Using the Batteries 61 Setting the Audio Mix 63 Maintenance 64 Troubleshooting 68 The ZR System Diagram 72 Optional Accessories 73 Finding Your Way Around the ZR ....... 75 Screen Displays 78 Specifications 82 Index 83 The serial number of Purchase ...
...Instructions 3 Audio Recording 44 Thank you for Choosing a Canon ......... 6 Setting the Self-Timer 46 Introducing the ZR 7 Mastering the Basics ~ When Making Manual Adjustments ...~ Adjusting Exposure Manually 47 Adjusting Focus Manually 49 Powering Your Camcorder 8 Setting the White Balance 50 Loading a Cassette 11...on Using the Batteries 61 Setting the Audio Mix 63 Maintenance 64 Troubleshooting 68 The ZR System Diagram 72 Optional Accessories 73 Finding Your Way Around the ZR ....... 75 Screen Displays 78 Specifications 82 Index 83 The serial number of Purchase ...
ZR Instruction Manual
Page 5
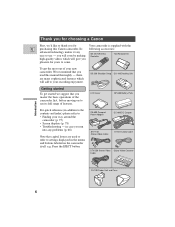
...please refer to: • Finding your recording enjoyment. Thank you for choosing a Canon First, we suggest that you master the basic operations of the camcorder first, before moving on the camcorder itself e.g. LCD Cover BP-608 Battery Pack Introduction For quick reference (in the...STV-250 Stereo Video Digital Video Cassette Cable FU-100 Finder Unit and Case 6 you read this Canon camcorder. Press the EJECT button. in case you for Your camcorder is supplied with the E purchasing this manual thoroughly - Its following accessories: advanced technology makes it ...
...please refer to: • Finding your recording enjoyment. Thank you for choosing a Canon First, we suggest that you master the basic operations of the camcorder first, before moving on the camcorder itself e.g. LCD Cover BP-608 Battery Pack Introduction For quick reference (in the...STV-250 Stereo Video Digital Video Cassette Cable FU-100 Finder Unit and Case 6 you read this Canon camcorder. Press the EJECT button. in case you for Your camcorder is supplied with the E purchasing this manual thoroughly - Its following accessories: advanced technology makes it ...
ZR Instruction Manual
Page 6
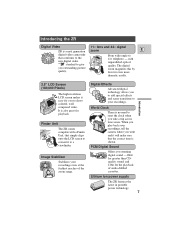
...shoot colorful, well composed video. From wide-angle to 11× telephoto - World Clock There is a next generation zoom E digital video camcorder that conforms to the new digital video Mini standard to give you outstanding picture quality. PCM Digital Sound Offers you went and it will make... Unit, that the correct time is also great for you to add special effects and scene transitions to your recordings. Finder Unit The ZR comes complete with unparalleled optical quality. The digital zoom magnifies this by four for the playback of the zoom range. Image Stabilizer Stabilizes ...
...shoot colorful, well composed video. From wide-angle to 11× telephoto - World Clock There is a next generation zoom E digital video camcorder that conforms to the new digital video Mini standard to give you outstanding picture quality. PCM Digital Sound Offers you went and it will make... Unit, that the correct time is also great for you to add special effects and scene transitions to your recordings. Finder Unit The ZR comes complete with unparalleled optical quality. The digital zoom magnifies this by four for the playback of the zoom range. Image Stabilizer Stabilizes ...
ZR Instruction Manual
Page 7
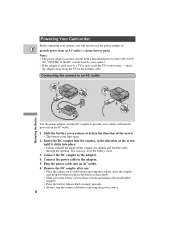
... out slightly and feed the cable through the opening. You can now close the battery cover. 3. Connect the power cable to the adapter. 5. B A Powering Your Camcorder Before operating your camera, you will need to use . • Place the camera on its side before removing the coupler, since the coupler may cause...
... out slightly and feed the cable through the opening. You can now close the battery cover. 3. Connect the power cable to the adapter. 5. B A Powering Your Camcorder Before operating your camera, you will need to use . • Place the camera on its side before removing the coupler, since the coupler may cause...
ZR Instruction Manual
Page 8
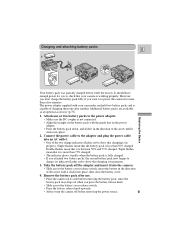
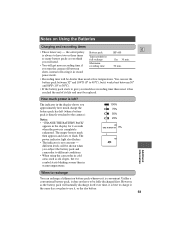
... is less than a few minutes. Charging and attaching battery packs E 1 Mastering the Basics 2 3 4 Your battery pack was partially charged before it to check that your camcorder can hold two battery packs and is capable of charging them one or two battery packs to show that charging is in the direction of...
... is less than a few minutes. Charging and attaching battery packs E 1 Mastering the Basics 2 3 4 Your battery pack was partially charged before it to check that your camcorder can hold two battery packs and is capable of charging them one or two battery packs to show that charging is in the direction of...
ZR Instruction Manual
Page 9
... you first attach to the adapter, or, if the adapter was already plugged into an AC outlet, from the side labeled "A". • When powering your camcorder from an AC outlet, you do not need to charge the back-up battery. • Do not tug at the DC Coupler cable, or bend...
... you first attach to the adapter, or, if the adapter was already plugged into an AC outlet, from the side labeled "A". • When powering your camcorder from an AC outlet, you do not need to charge the back-up battery. • Do not tug at the DC Coupler cable, or bend...
ZR Instruction Manual
Page 11
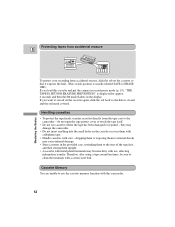
...cotton wool bud. Protecting tapes from accidental erasure E REC SAVE REC SAVE Mastering the Basics To protect your recording from the tape case to the camcorder - If you want to external shocks may cause internal damage. • Store cassettes in the display. Handling cassettes • To protect the...back so the hole is usually labeled SAVE or ERASE OFF). If you load this camcorder. 12 dropping them or exposing them upright. • A cassette with metal plated terminals may damage the camcorder. • Do not insert anything into the small holes on the cassette so that...
...cotton wool bud. Protecting tapes from accidental erasure E REC SAVE REC SAVE Mastering the Basics To protect your recording from the tape case to the camcorder - If you want to external shocks may cause internal damage. • Store cassettes in the display. Handling cassettes • To protect the...back so the hole is usually labeled SAVE or ERASE OFF). If you load this camcorder. 12 dropping them or exposing them upright. • A cassette with metal plated terminals may damage the camcorder. • Do not insert anything into the small holes on the cassette so that...
ZR Instruction Manual
Page 14
..., refer to SP mode. • If you record in both modes on the same tape, the picture may become distorted when played back on this camcorder, and vice versa. LP extends tape usage by 1.5 times.
..., refer to SP mode. • If you record in both modes on the same tape, the picture may become distorted when played back on this camcorder, and vice versa. LP extends tape usage by 1.5 times.
ZR Instruction Manual
Page 16
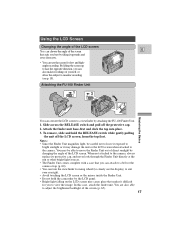
.... Attaching the FU-100 Finder Unit 1 3 RELEASE E 2 Mastering the Basics You can convert the LCD screen to the camera. To remove, slide and hold the camcorder by the LCD panel. • Bright light falling on the LCD screen may be careful not to leave it exposed to bright sunlight or it...
.... Attaching the FU-100 Finder Unit 1 3 RELEASE E 2 Mastering the Basics You can convert the LCD screen to the camera. To remove, slide and hold the camcorder by the LCD panel. • Bright light falling on the LCD screen may be careful not to leave it exposed to bright sunlight or it...
ZR Instruction Manual
Page 17
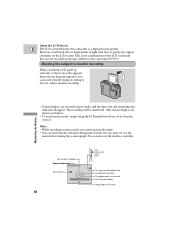
... AF/AE mark You can watch yourself during recording or let your subject monitor recording. About the LCD Screen E The LCD screen built into this camcorder is not a malfunction of light (red, blue or green) may appear constantly on the tape. (Effective dots: more than 99.99%) Allowing the subject to...
... AF/AE mark You can watch yourself during recording or let your subject monitor recording. About the LCD Screen E The LCD screen built into this camcorder is not a malfunction of light (red, blue or green) may appear constantly on the tape. (Effective dots: more than 99.99%) Allowing the subject to...
ZR Instruction Manual
Page 19
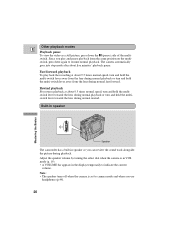
... the lens during normal fast forward. Fast forward playback To play and pause playback from the lens during normal rewind. Built-in speaker Speaker The camcorder has a built-in the display temporarily to resume normal playback. Since you play back the recording at about five minutes' playback pause. Rewind playback For...
... the lens during normal fast forward. Fast forward playback To play and pause playback from the lens during normal rewind. Built-in speaker Speaker The camcorder has a built-in the display temporarily to resume normal playback. Since you play back the recording at about five minutes' playback pause. Rewind playback For...
ZR Instruction Manual
Page 29
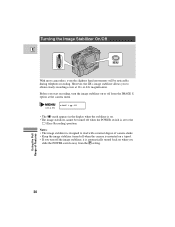
... back on when you to deal with a normal degree of Features 30 However, the ZR's image stabilizer allows you slide the POWER switch away from the IMAGE S. Turning the Image Stabilizer On/Off E MENU With most camcorders, even the slightest hand movements will be turned off the image stabilizer, it is set...
... back on when you to deal with a normal degree of Features 30 However, the ZR's image stabilizer allows you slide the POWER switch away from the IMAGE S. Turning the Image Stabilizer On/Off E MENU With most camcorders, even the slightest hand movements will be turned off the image stabilizer, it is set...
ZR Instruction Manual
Page 32
... Also, you cannot use the FADE-T, WIDE or SCROLL digital effects while the camera is set to see the image in the display as the camcorder adjusts the focus and exposure and it is displayed continuously as a green mark when the camera is shown at the bottom right of Features You...
... Also, you cannot use the FADE-T, WIDE or SCROLL digital effects while the camera is set to see the image in the display as the camcorder adjusts the focus and exposure and it is displayed continuously as a green mark when the camera is shown at the bottom right of Features You...
ZR Instruction Manual
Page 43
...higher sound quality (slightly superior to CD) while the 12 bit mode records on stereo 2, see p. 28) AUDIO MODE••16bit ZR can record sound in the display for you can connect an external microphone to indicate the current volume. • The select dial also ...open the camera menu and select AUDIO MODE. 2. Audio Recording Selecting the audio mode E (see page 63. To switch to the camera's terminal (this camcorder. • For details of playing back a tape that has new sound on two channels (stereo 1), leaving two channels free (stereo 2) for approximately 4 ...
...higher sound quality (slightly superior to CD) while the 12 bit mode records on stereo 2, see p. 28) AUDIO MODE••16bit ZR can record sound in the display for you can connect an external microphone to indicate the current volume. • The select dial also ...open the camera menu and select AUDIO MODE. 2. Audio Recording Selecting the audio mode E (see page 63. To switch to the camera's terminal (this camcorder. • For details of playing back a tape that has new sound on two channels (stereo 1), leaving two channels free (stereo 2) for approximately 4 ...
ZR Instruction Manual
Page 51
... and reverse x2 playback. During playback, the date code can be displayed during high speed playback modes. • If a recording made on ZR is played back on a different DV camcorder, the data code may change according to display - Choose between DATE/TIME, CAMERA DATA and CAM. & D/T. 3. Displaying Data Code A data code, containing...
... and reverse x2 playback. During playback, the date code can be displayed during high speed playback modes. • If a recording made on ZR is played back on a different DV camcorder, the data code may change according to display - Choose between DATE/TIME, CAMERA DATA and CAM. & D/T. 3. Displaying Data Code A data code, containing...

ZR Instruction Manual
Page 56
... on the camera. 5. Connect the camera to the VCR. • See "Connections for details. 3. Slide the camera's POWER switch to VIDEO. • Turn on the camcorder. Start recording on the VCR as soon as the section you want on p. 22. 2. Find a point on the screen. 4. Editing to a VCR Playback the tape...
... on the camera. 5. Connect the camera to the VCR. • See "Connections for details. 3. Slide the camera's POWER switch to VIDEO. • Turn on the camcorder. Start recording on the VCR as soon as the section you want on p. 22. 2. Find a point on the screen. 4. Editing to a VCR Playback the tape...
ZR Instruction Manual
Page 57
... however, is being recorded to connect two digital devices together. An anomalous image may become distorted during digital dubbing. Use a Canon CV-150F DV cable to . • When operating either camcorder with the DV cable connected do not turn the power off. 58 Using the Full Range of the cable to start... is being recorded to VCR and press the wireless controller's REC PAUSE button. ("DV IN" appears in the display when you are recording to the ZR, slide the POWER switch to (for both line-in and line-out, since a single DV cable can handle data in its viewfinder) may also ...
... however, is being recorded to connect two digital devices together. An anomalous image may become distorted during digital dubbing. Use a Canon CV-150F DV cable to . • When operating either camcorder with the DV cable connected do not turn the power off. 58 Using the Full Range of the cable to start... is being recorded to VCR and press the wireless controller's REC PAUSE button. ("DV IN" appears in the display when you are recording to the ZR, slide the POWER switch to (for both line-in and line-out, since a single DV cable can handle data in its viewfinder) may also ...
ZR Instruction Manual
Page 60
... a conventional battery pack, it in record pause mode. • Recording time will be shown when you subject the battery pack and camcorder to different conditions. • When using the camcorder in cold areas such as you think you will need. • You will be shorter than usual, it has reached the end...
... a conventional battery pack, it in record pause mode. • Recording time will be shown when you subject the battery pack and camcorder to different conditions. • When using the camcorder in cold areas such as you think you will need. • You will be shorter than usual, it has reached the end...


