ZR Instruction Manual
Page 1
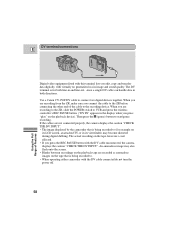
...the equipment unless otherwise specified in a residential installation. If this device must accept any changes or modifications to copyright laws. One Canon Plaza, Lake Success, NY 11042, U.S.A. The exclamation point, within an equilateral triangle, is intended to alert the user to ... Subpart B of Part 15 of the FCC Rules. The lightning flash with the instructions, may cause undesired operation. Digital Video Camcorder, ZR This device complies with class B limits in accordance with arrowhead symbol, within the product's enclosure, that interference will not occur ...
...the equipment unless otherwise specified in a residential installation. If this device must accept any changes or modifications to copyright laws. One Canon Plaza, Lake Success, NY 11042, U.S.A. The exclamation point, within an equilateral triangle, is intended to alert the user to ... Subpart B of Part 15 of the FCC Rules. The lightning flash with the instructions, may cause undesired operation. Digital Video Camcorder, ZR This device complies with class B limits in accordance with arrowhead symbol, within the product's enclosure, that interference will not occur ...

ZR Instruction Manual
Page 2
... product near water or in wire to an antenna discharge unit, size of grounding conductors, location of power E 1. If you are unable to the Canon Digital Video Camcorder ZR and all its accessories. Introduction 3. Cleaning - If the plug still fails to fit, contact your electrician to your home, consult your obsolete outlet. source...
... product near water or in wire to an antenna discharge unit, size of grounding conductors, location of power E 1. If you are unable to the Canon Digital Video Camcorder ZR and all its accessories. Introduction 3. Cleaning - If the plug still fails to fit, contact your electrician to your home, consult your obsolete outlet. source...

ZR Instruction Manual
Page 4
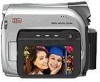
...Safety Instructions 3 Audio Recording 44 Thank you for Choosing a Canon ......... 6 Setting the Self-Timer 46 Introducing the ZR 7 Mastering the Basics ~ When Making Manual Adjustments ...~ Adjusting Exposure Manually 47 Adjusting Focus Manually 49 Powering Your Camcorder 8 Setting the White Balance 50 Loading a Cassette 11 ...others have the same serial number as a permanent record of your purchase to aid identification in case of theft. Model Name ZR Serial No. 5 You should record the number and other vital information here and retain this product may be found on Using...
...Safety Instructions 3 Audio Recording 44 Thank you for Choosing a Canon ......... 6 Setting the Self-Timer 46 Introducing the ZR 7 Mastering the Basics ~ When Making Manual Adjustments ...~ Adjusting Exposure Manually 47 Adjusting Focus Manually 49 Powering Your Camcorder 8 Setting the White Balance 50 Loading a Cassette 11 ...others have the same serial number as a permanent record of your purchase to aid identification in case of theft. Model Name ZR Serial No. 5 You should record the number and other vital information here and retain this product may be found on Using...
ZR Instruction Manual
Page 5
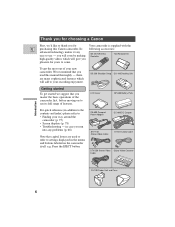
...Strap DU-100 Docking Unit Getting started To get the most out of your way around the camcorder (p. 75) • Screen displays (p. 78) • Troubleshooting - CA-600 Compact Power Adapter DC-600 DC Coupler STV-150 Stereo Video Cable S-150 S-video Cable STV-250 Stereo Video Digital Video... Cassette Cable FU-100 Finder Unit and Case 6 in addition to the contents and index) please refer to: • Finding your new camcorder, We recommend that you read this Canon camcorder. ...
...Strap DU-100 Docking Unit Getting started To get the most out of your way around the camcorder (p. 75) • Screen displays (p. 78) • Troubleshooting - CA-600 Compact Power Adapter DC-600 DC Coupler STV-150 Stereo Video Cable S-150 S-video Cable STV-250 Stereo Video Digital Video... Cassette Cable FU-100 Finder Unit and Case 6 in addition to the contents and index) please refer to: • Finding your new camcorder, We recommend that you read this Canon camcorder. ...
ZR Instruction Manual
Page 6
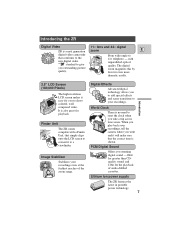
...where you went and it to reset the clock when you outstanding picture quality. Introducing the ZR Digital Video 11× lens and 44× digital ZR is a next generation zoom E digital video camcorder that the correct time is shown. with a Finder Unit, that simply clips onto the...add special effects and scene transitions to 11× telephoto - The digital zoom magnifies this by four for playback. Finder Unit The ZR comes complete with unparalleled optical quality. Image Stabilizer Stabilizes your recordings. World Clock There is also great for even more dramatic results. ...
...where you went and it to reset the clock when you outstanding picture quality. Introducing the ZR Digital Video 11× lens and 44× digital ZR is a next generation zoom E digital video camcorder that the correct time is shown. with a Finder Unit, that simply clips onto the...add special effects and scene transitions to 11× telephoto - The digital zoom magnifies this by four for playback. Finder Unit The ZR comes complete with unparalleled optical quality. Image Stabilizer Stabilizes your recordings. World Clock There is also great for even more dramatic results. ...
ZR Instruction Manual
Page 7
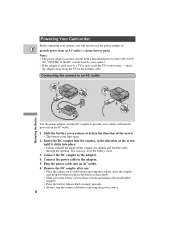
... outlet. 6. move the adapter away from an AC outlet. 1. You can now close the battery cover. 3. Connect the DC coupler to the adapter. 5. B A Powering Your Camcorder Before operating your camera, you press the battery release knob. • Slide across the battery cover release switch (and replace the small rubber stopper). •...
... outlet. 6. move the adapter away from an AC outlet. 1. You can now close the battery cover. 3. Connect the DC coupler to the adapter. 5. B A Powering Your Camcorder Before operating your camera, you press the battery release knob. • Slide across the battery cover release switch (and replace the small rubber stopper). •...
ZR Instruction Manual
Page 8
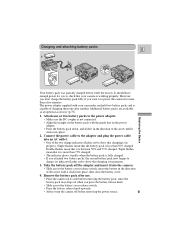
... it left the factory. Attach one or two battery packs to show that charging is between 50% and 75% charged. Triple flashes mean that your camcorder can hold two battery packs and is in progress. The power adapter supplied with the guide line on its indicator flashes red to show that...
... it left the factory. Attach one or two battery packs to show that charging is between 50% and 75% charged. Triple flashes mean that your camcorder can hold two battery packs and is in progress. The power adapter supplied with the guide line on its indicator flashes red to show that...
ZR Instruction Manual
Page 9
... you first attach to the adapter, or, if the adapter was already plugged into an AC outlet, from the side labeled "A". • When powering your camcorder from an AC outlet, you do not need to remove attached battery packs, but charging will not take place until you remove the DC coupler...
... you first attach to the adapter, or, if the adapter was already plugged into an AC outlet, from the side labeled "A". • When powering your camcorder from an AC outlet, you do not need to remove attached battery packs, but charging will not take place until you remove the DC coupler...
ZR Instruction Manual
Page 11
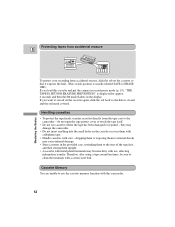
... transfer. Protecting tapes from accidental erasure E REC SAVE REC SAVE Mastering the Basics To protect your recording from the tape case to the camcorder - Handling cassettes • To protect the tape heads, transfer cassettes directly from accidental erasure, slide the tab on the cassette so that... tape has been damaged or rejoined - dropping them or exposing them upright. • A cassette with metal plated terminals may damage the camcorder. • Do not insert anything into the small holes on the cassette again, slide the tab back so the hole is usually labeled...
... transfer. Protecting tapes from accidental erasure E REC SAVE REC SAVE Mastering the Basics To protect your recording from the tape case to the camcorder - Handling cassettes • To protect the tape heads, transfer cassettes directly from accidental erasure, slide the tab on the cassette so that... tape has been damaged or rejoined - dropping them or exposing them upright. • A cassette with metal plated terminals may damage the camcorder. • Do not insert anything into the small holes on the cassette again, slide the tab back so the hole is usually labeled...
ZR Instruction Manual
Page 14
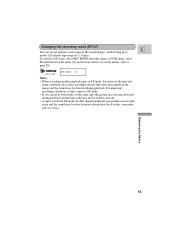
... then close the menu (for instructions on how to use the menus, refer to SP mode. • If you record in both modes on this camcorder, and vice versa. Mastering the Basics 15 Changing the recording mode (SP/LP) E You can record and play back a tape in SP (standard play) and...
... then close the menu (for instructions on how to use the menus, refer to SP mode. • If you record in both modes on this camcorder, and vice versa. Mastering the Basics 15 Changing the recording mode (SP/LP) E You can record and play back a tape in SP (standard play) and...
ZR Instruction Manual
Page 16
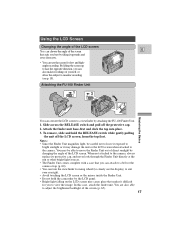
To remove, slide and hold the camcorder by the LCD panel. • Bright light falling on the LCD screen may be careful not to leave it exposed to bright sunlight or it ...
To remove, slide and hold the camcorder by the LCD panel. • Bright light falling on the LCD screen may be careful not to leave it exposed to bright sunlight or it ...
ZR Instruction Manual
Page 17
... LCD panel up vertically so that it at the menu before turning the screen upright. About the LCD Screen E The LCD screen built into this camcorder is not a malfunction of light (red, blue or green) may appear constantly on the tape. (Effective dots: more than 99.99%) Allowing the subject to...
... LCD panel up vertically so that it at the menu before turning the screen upright. About the LCD Screen E The LCD screen built into this camcorder is not a malfunction of light (red, blue or green) may appear constantly on the tape. (Effective dots: more than 99.99%) Allowing the subject to...
ZR Instruction Manual
Page 19
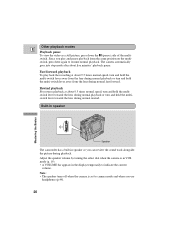
... reverse playback at about 9.5 times normal speed, turn and hold the multi-switch lever away from the lens during playback. Built-in speaker Speaker The camcorder has a built-in the display temporarily to camera mode and when you can review the sound track alongside the picture during normal fast forward. The...
... reverse playback at about 9.5 times normal speed, turn and hold the multi-switch lever away from the lens during playback. Built-in speaker Speaker The camcorder has a built-in the display temporarily to camera mode and when you can review the sound track alongside the picture during normal fast forward. The...
ZR Instruction Manual
Page 29
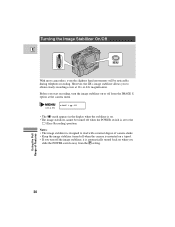
..., turn off the image stabilizer, it is automatically turned back on or off from the P setting. Turning the Image Stabilizer On/Off E MENU With most camcorders, even the slightest hand movements will be turned off when the POWER switch is set to deal with a normal degree of Features 30 However, the...
..., turn off the image stabilizer, it is automatically turned back on or off from the P setting. Turning the Image Stabilizer On/Off E MENU With most camcorders, even the slightest hand movements will be turned off when the POWER switch is set to deal with a normal degree of Features 30 However, the...
ZR Instruction Manual
Page 32
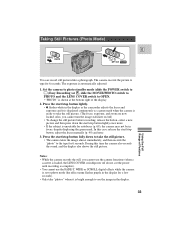
... the still picture before recording: release the button, select a new picture and then press down to take "photos" where it is displayed continuously as the camcorder adjusts the focus and exposure and it is shown at the bottom right of Features You can record still pictures like a photograph. The camera records...
... the still picture before recording: release the button, select a new picture and then press down to take "photos" where it is displayed continuously as the camcorder adjusts the focus and exposure and it is shown at the bottom right of Features You can record still pictures like a photograph. The camera records...
ZR Instruction Manual
Page 43
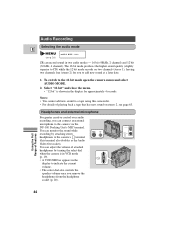
Notes: • You cannot add new sound to the camera's terminal (this camcorder. • For details of playing back a tape that has new sound on two channels (stereo 1), leaving two channels free (stereo 2) for approximately 4 seconds. Headphones and ...). DV/OUT You can connect an external microphone to CD) while the 12 bit mode records on stereo 2, see p. 28) AUDIO MODE••16bit ZR can adjust the volume of Features 44 The 16 bit mode produces the higher sound quality (slightly superior to the camera via the DU-100...
Notes: • You cannot add new sound to the camera's terminal (this camcorder. • For details of playing back a tape that has new sound on two channels (stereo 1), leaving two channels free (stereo 2) for approximately 4 seconds. Headphones and ...). DV/OUT You can connect an external microphone to CD) while the 12 bit mode records on stereo 2, see p. 28) AUDIO MODE••16bit ZR can adjust the volume of Features 44 The 16 bit mode produces the higher sound quality (slightly superior to the camera via the DU-100...
ZR Instruction Manual
Page 51
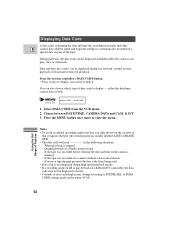
...'s memory. - You can also choose which type of the tape. or DATA CODE settings made on the cassette so that you slide the tab on ZR is in the following situations: - Notes: • To avoid accidental recording, make sure that it once to display, once more to D/TIME SEL. When ...of a blank section of Features 52 Date and time data (only) can be displayed or hidden while the camera is played back on a different DV camcorder, the data code may change according to close the menu. Press the wireless controller's DATA CODE button. • Press it exposes the hole (the switch...
...'s memory. - You can also choose which type of the tape. or DATA CODE settings made on the cassette so that you slide the tab on ZR is in the following situations: - Notes: • To avoid accidental recording, make sure that it once to display, once more to D/TIME SEL. When ...of a blank section of Features 52 Date and time data (only) can be displayed or hidden while the camera is played back on a different DV camcorder, the data code may change according to close the menu. Press the wireless controller's DATA CODE button. • Press it exposes the hole (the switch...

ZR Instruction Manual
Page 56
... the camera to another VCR, you want to copy. 2. Using the Full Range of the section you want to copy, then stop playback on the camcorder. or combine different shots to a VCR Playback the tape on the camera. 5. Connect the camera to remove unwanted scenes - Load a blank cassette, and put the...
... the camera to another VCR, you want to copy. 2. Using the Full Range of the section you want to copy, then stop playback on the camcorder. or combine different shots to a VCR Playback the tape on the camera. 5. Connect the camera to remove unwanted scenes - Load a blank cassette, and put the...
ZR Instruction Manual
Page 57
... INPUT". • The image displayed by the camcorder that is for example on its LCD screen, an...however, is being recorded to. • When operating either camcorder with the DV cable connected do not turn the power ...to the recording device. When you are recording from the ZR, make sure you edit, copy and transfer data digitally, ...Blanks between recordings on the playback tape are recording to the ZR, slide the POWER switch to VCR and press the wireless controller...fitted with this terminal lets you connect the cable to the ZR before connecting the other end of Features Then press the a...
... INPUT". • The image displayed by the camcorder that is for example on its LCD screen, an...however, is being recorded to. • When operating either camcorder with the DV cable connected do not turn the power ...to the recording device. When you are recording from the ZR, make sure you edit, copy and transfer data digitally, ...Blanks between recordings on the playback tape are recording to the ZR, slide the POWER switch to VCR and press the wireless controller...fitted with this terminal lets you connect the cable to the ZR before connecting the other end of Features Then press the a...
ZR Instruction Manual
Page 60
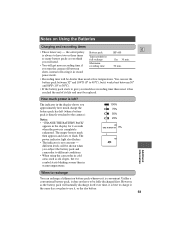
How much charge the battery pack has left ? The indicator in the display shows you subject the battery pack and camcorder to different conditions. • When using the camcorder in cold areas such as ski slopes, the k symbol starts blinking sooner than in warm temperatures. ↓ 100% 75% 50% 25% CHANGE THE BATTERY...
How much charge the battery pack has left ? The indicator in the display shows you subject the battery pack and camcorder to different conditions. • When using the camcorder in cold areas such as ski slopes, the k symbol starts blinking sooner than in warm temperatures. ↓ 100% 75% 50% 25% CHANGE THE BATTERY...


