

DV Messenger Ver 1.0 Instruction Manual
Page 13
...). ¡ If no memory card inserted in the camcorder, following dialog appears. Click [OK] to close the dialog. ¡ If a WIA-compliant application software is inserted into the camcorder, the [Scanner and Camera Wizard] opens automatically. 6 Check if the driver has been installed correctly.... • From the [start [Scanner and Camera Wizard] automatically each time you connect the camcorder to the computer, put a check...
...). ¡ If no memory card inserted in the camcorder, following dialog appears. Click [OK] to close the dialog. ¡ If a WIA-compliant application software is inserted into the camcorder, the [Scanner and Camera Wizard] opens automatically. 6 Check if the driver has been installed correctly.... • From the [start [Scanner and Camera Wizard] automatically each time you connect the camcorder to the computer, put a check...

DV Messenger Ver 1.0 Instruction Manual
Page 16
... From the [start] menu, select [All Programs], [Canon Utilities], [DV Messenger] and [DV Messenger Uninstall] in succession. 2 If a confirmation dialog appears, click [Yes]. • The uninstall utility starts and removes DV Messenger. Connect the camcorder to CARD PLAY (VCR) mode 3. Uninstalling the Software ... is not required anymore. Caution: ¡ Close all programs that are open, close them. 16 Uninstalling the AV/C Camera Storage Subunit-WIA Driver 1 Connect the power adapter to the camcorder. 2 Set the camcorder to the computer using the DV cable ( 22). • If [...
... From the [start] menu, select [All Programs], [Canon Utilities], [DV Messenger] and [DV Messenger Uninstall] in succession. 2 If a confirmation dialog appears, click [Yes]. • The uninstall utility starts and removes DV Messenger. Connect the camcorder to CARD PLAY (VCR) mode 3. Uninstalling the Software ... is not required anymore. Caution: ¡ Close all programs that are open, close them. 16 Uninstalling the AV/C Camera Storage Subunit-WIA Driver 1 Connect the power adapter to the camcorder. 2 Set the camcorder to the computer using the DV cable ( 22). • If [...
DV Messenger Ver 1.0 Instruction Manual
Page 23
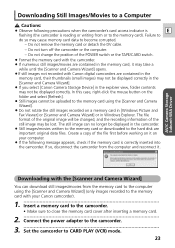
...the memory card using the [Scanner and Camera Wizard] (only images recorded to the memory card with Canon digital camcorders are important original data files. Do not turn off the camcorder or the computer. - Create a copy of the POWER switch or the TAPE/CARD switch. ¡...select [Canon Camera Storage Device] in the explorer view, folder contents may take a while until the [Scanner and Camera Wizard] opens. ¡If still images not recorded with your computer. ¡ If the following precautions when the camcorder's card access indicator is E flashing (the camcorder is ...
...the memory card using the [Scanner and Camera Wizard] (only images recorded to the memory card with Canon digital camcorders are important original data files. Do not turn off the camcorder or the computer. - Create a copy of the POWER switch or the TAPE/CARD switch. ¡...select [Canon Camera Storage Device] in the explorer view, folder contents may take a while until the [Scanner and Camera Wizard] opens. ¡If still images not recorded with your computer. ¡ If the following precautions when the camcorder's card access indicator is E flashing (the camcorder is ...

DV Messenger Ver 1.0 Instruction Manual
Page 27
AV/C Camera Storage Subunit-WIA Driver 5 Keep the mouse clicked on the image and select [Copy]. 6 Open a folder, right-click the mouse in the folder and select [Paste]. 27 E OR 5 Right-click the mouse on the thumbnail and move it to the desired folder (drag and drop).
AV/C Camera Storage Subunit-WIA Driver 5 Keep the mouse clicked on the image and select [Copy]. 6 Open a folder, right-click the mouse in the folder and select [Paste]. 27 E OR 5 Right-click the mouse on the thumbnail and move it to the desired folder (drag and drop).

DV Messenger Ver 1.0 Instruction Manual
Page 28
...you wish to add and select [Copy]. 2 On the explorer view, open a folder within 8 characters. Uploading Files from the camcorder to the computer and upload it again to the camcorder: - The still image/movies may be played back on the camcorder depending on file type and size. ¡ If you download a ...still image/movie from the Computer to the Memory Card Cautions: ¡ If you are using an SD Memory Card, make sure the protect switch is cancelled. 1 Right-click the mouse button on the camcorder. -
...you wish to add and select [Copy]. 2 On the explorer view, open a folder within 8 characters. Uploading Files from the camcorder to the computer and upload it again to the camcorder: - The still image/movies may be played back on the camcorder depending on file type and size. ¡ If you download a ...still image/movie from the Computer to the Memory Card Cautions: ¡ If you are using an SD Memory Card, make sure the protect switch is cancelled. 1 Right-click the mouse button on the camcorder. -

DV Messenger Ver 1.0 Instruction Manual
Page 34
... will be online. - Message on the Computer Screen of the speaker and microphone. 1 Set the camcorder to TAPE CAMERA mode or TAPE PLAY (VCR) mode. • When you have set the camcorder to your contact notifying that your contact has signed in . If your contact signs in when you ...contact need to be send automatically to TAPE PLAY (VCR) mode, play back the tape. 2 Open the [Tools] menu and select [Audio Tuning Wizard]. 34 Message on Your Computer Screen Preparing the Camcorder for Communication When you have signed in, set the camcorder and adjust the volume of Your Contact -
... will be online. - Message on the Computer Screen of the speaker and microphone. 1 Set the camcorder to TAPE CAMERA mode or TAPE PLAY (VCR) mode. • When you have set the camcorder to your contact notifying that your contact has signed in . If your contact signs in when you ...contact need to be send automatically to TAPE PLAY (VCR) mode, play back the tape. 2 Open the [Tools] menu and select [Audio Tuning Wizard]. 34 Message on Your Computer Screen Preparing the Camcorder for Communication When you have signed in, set the camcorder and adjust the volume of Your Contact -

DV Messenger Ver 1.0 Instruction Manual
Page 40
... taskbar, or click the DV Messenger icon and select [Control Panel Open] from the displayed menu. 40 Appears when the operating panel of your camcorder. The default setting is to not allow your contact to your camcorder is using DV Messenger or Canon camcorder). 5 [Allow Remote Control] This selects whether you allow remote control. 6 [Always...
... taskbar, or click the DV Messenger icon and select [Control Panel Open] from the displayed menu. 40 Appears when the operating panel of your camcorder. The default setting is to not allow your contact to your camcorder is using DV Messenger or Canon camcorder). 5 [Allow Remote Control] This selects whether you allow remote control. 6 [Always...
DV Messenger Ver 1.0 Instruction Manual
Page 41
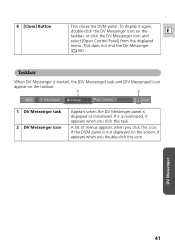
... Messenger task 2 DV Messenger icon Appears when the DV Messenger panel is not displayed on the E taskbar, or click the DV Messenger icon and select [Open Control Panel] from the displayed menu. DV Messenger 41 8 [Close] Button This closes the DVM panel.
... Messenger task 2 DV Messenger icon Appears when the DV Messenger panel is not displayed on the E taskbar, or click the DV Messenger icon and select [Open Control Panel] from the displayed menu. DV Messenger 41 8 [Close] Button This closes the DVM panel.
DV Messenger Ver 1.0 Instruction Manual
Page 42
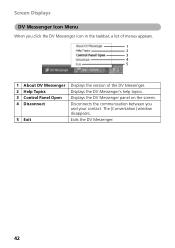
Displays the DV Messenger panel on the screen. Exits the DV Messenger. 42 Disconnects the communication between you click the DV Messenger icon in the taskbar, a list of menus appears. 1 2 3 4 5 1 About DV Messenger 2 Help Topics 3 Control Panel Open 4 Disconnect 5 Exit Displays the version of the DV Messenger. The [Conversation] window disappears. Displays the DV Messenger's help topics. Screen Displays DV Messenger Icon Menu When you and your contact.
Displays the DV Messenger panel on the screen. Exits the DV Messenger. 42 Disconnects the communication between you click the DV Messenger icon in the taskbar, a list of menus appears. 1 2 3 4 5 1 About DV Messenger 2 Help Topics 3 Control Panel Open 4 Disconnect 5 Exit Displays the version of the DV Messenger. The [Conversation] window disappears. Displays the DV Messenger's help topics. Screen Displays DV Messenger Icon Menu When you and your contact.
DV Messenger Ver 1.0 Instruction Manual
Page 51
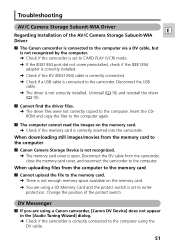
Disconnect the USB cable. ➜ The driver is open. Uninstall ( 16) and reinstall the driver ( 10). ? Insert ... ➜ The driver files were not correctly copied to the computer. Cannot upload the file to the camcorder. If you are using the DV cable. 51 Troubleshooting AV/C Camera Storage Subunit-WIA Driver E Regarding Installation...recognized by the computer. ➜ Check if the camcorder is correctly inserted into the camcorder. The computer cannot read the images on the memory card. ➜ You are using a Canon camcorder, [Canon DV Device] does not appear in the [Audio Tuning...
Disconnect the USB cable. ➜ The driver is open. Uninstall ( 16) and reinstall the driver ( 10). ? Insert ... ➜ The driver files were not correctly copied to the computer. Cannot upload the file to the camcorder. If you are using the DV cable. 51 Troubleshooting AV/C Camera Storage Subunit-WIA Driver E Regarding Installation...recognized by the computer. ➜ Check if the camcorder is correctly inserted into the camcorder. The computer cannot read the images on the memory card. ➜ You are using a Canon camcorder, [Canon DV Device] does not appear in the [Audio Tuning...

DV Messenger Ver 1.0 Instruction Manual
Page 56
...camcorder of your contact, you cannot use the file transfer function. Can't operate the camcorder. ➜ If you may not work. Ask your contact to close the applications. ➜ If a dialog for selecting an application to start when connecting the camcorder... is set to TAPE CAMERA mode, some camcorders will enter the...10140; If the Canon camcorder is displayed on the camcorder to cancel the demonstration...Allow Remote Control]. ➜ Check if the camcorder is correctly connected to the computer. ➜... to operate the camcorder from the DVM panel. For ...
...camcorder of your contact, you cannot use the file transfer function. Can't operate the camcorder. ➜ If you may not work. Ask your contact to close the applications. ➜ If a dialog for selecting an application to start when connecting the camcorder... is set to TAPE CAMERA mode, some camcorders will enter the...10140; If the Canon camcorder is displayed on the camcorder to cancel the demonstration...Allow Remote Control]. ➜ Check if the camcorder is correctly connected to the computer. ➜... to operate the camcorder from the DVM panel. For ...

ZR70 ZR65 Instruction Manual
Page 2
... harmful interference in a particular installation. Important Warning CAUTION RISK OF ELECTRIC SHOCK DO NOT OPEN CAUTION: TO REDUCE THE RISK OF ELECTRIC SHOCK, DO NOT REMOVE COVER (OR BACK)....receiver is no guarantee that interference will not occur in a residential installation. Digital Video Camcorder, ZR70 MC/ZR65 MC/ZR60 systems This device complies with arrowhead symbol, within an equilateral triangle, is...shock to Part 15 of FCC Rules. REFER SERVICING TO QUALIFIED SERVICE PERSONNEL. One Canon Plaza, Lake Success, NY 11042, U.S.A. WARNING: TO REDUCE THE RISK OF ELECTRIC SHOCK AND...
... harmful interference in a particular installation. Important Warning CAUTION RISK OF ELECTRIC SHOCK DO NOT OPEN CAUTION: TO REDUCE THE RISK OF ELECTRIC SHOCK, DO NOT REMOVE COVER (OR BACK)....receiver is no guarantee that interference will not occur in a residential installation. Digital Video Camcorder, ZR70 MC/ZR65 MC/ZR60 systems This device complies with arrowhead symbol, within an equilateral triangle, is...shock to Part 15 of FCC Rules. REFER SERVICING TO QUALIFIED SERVICE PERSONNEL. One Canon Plaza, Lake Success, NY 11042, U.S.A. WARNING: TO REDUCE THE RISK OF ELECTRIC SHOCK AND...
ZR70 ZR65 Instruction Manual
Page 4
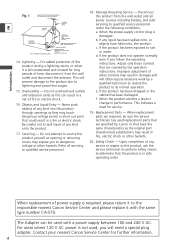
... time, disconnect it with a power supply between 100 and 240 V AC. If the product does not operate normally Introduction 14. through openings as the original part. 17. same characteristics as they may result in damage and will often require extensive work by a qualified technician to...surges. This will need for further information. 4 technician has used , you follow the operating instructions. Safety Check - Contact your nearest Canon Service Center for service. even if you will prevent damage to the product due to rain or water. covers may result in fire,...
... time, disconnect it with a power supply between 100 and 240 V AC. If the product does not operate normally Introduction 14. through openings as the original part. 17. same characteristics as they may result in damage and will often require extensive work by a qualified technician to...surges. This will need for further information. 4 technician has used , you follow the operating instructions. Safety Check - Contact your nearest Canon Service Center for service. even if you will prevent damage to the product due to rain or water. covers may result in fire,...
ZR70 ZR65 Instruction Manual
Page 11
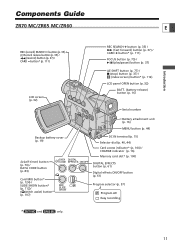
... 37) AE SHIFT button (p. 77) / (stop) button (p. 37) / (index screen) button* (p. 112) LCD panel OPEN button (p. 32) BATT. (battery release) button (p. 16) Serial number Battery attachment unit (p. 16) MENU button (p. 44) ...Backup battery cover (p. 19) (self-timer) button (p. 70) / DATA CODE button (p. 83) DATA DIGITAL CODE EFFECTS ON/OFF Card MIX button* (p. 124) / SLIDE SHOW button* MIX/ P (p. 112...indicator* (p. 104) / CHARGE indicator (p. 16) Memory card slot* (p. 100) DIGITAL EFFECTS button (p. 61) Digital effects ON/OFF button (p. 61) Program selector (p. 57) P Program AE Easy ...
... 37) AE SHIFT button (p. 77) / (stop) button (p. 37) / (index screen) button* (p. 112) LCD panel OPEN button (p. 32) BATT. (battery release) button (p. 16) Serial number Battery attachment unit (p. 16) MENU button (p. 44) ...Backup battery cover (p. 19) (self-timer) button (p. 70) / DATA CODE button (p. 83) DATA DIGITAL CODE EFFECTS ON/OFF Card MIX button* (p. 124) / SLIDE SHOW button* MIX/ P (p. 112...indicator* (p. 104) / CHARGE indicator (p. 16) Memory card slot* (p. 100) DIGITAL EFFECTS button (p. 61) Digital effects ON/OFF button (p. 61) Program selector (p. 57) P Program AE Easy ...

ZR70 ZR65 Instruction Manual
Page 13
E Introduction MIC MIC terminal (p. 71) AV AV IN/OUT terminal (p. 41) / (phones) terminal (p. 39) USB terminal * (p. 129) Bottom view Terminal cover ZR70 MC : Assist lamp (White LED) (p. 59) Remote sensor (p. 24) Stereo microphone (p. 71) Terminal cover S DV S-video IN/OUT terminal (p. 41) DV IN/OUT terminal (p. 87) OPEN/EJECT switch (p. 22) Tripod socket (p. 36) * ZR70 MC and ZR65 MC only. 13
E Introduction MIC MIC terminal (p. 71) AV AV IN/OUT terminal (p. 41) / (phones) terminal (p. 39) USB terminal * (p. 129) Bottom view Terminal cover ZR70 MC : Assist lamp (White LED) (p. 59) Remote sensor (p. 24) Stereo microphone (p. 71) Terminal cover S DV S-video IN/OUT terminal (p. 41) DV IN/OUT terminal (p. 87) OPEN/EJECT switch (p. 22) Tripod socket (p. 36) * ZR70 MC and ZR65 MC only. 13
ZR70 ZR65 Instruction Manual
Page 19
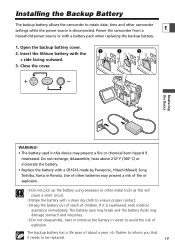
... intestines. ❍ Do not disassemble, heat or immerse the battery in water to be replaced. 19 Power the camcorder from a E household power source or with a CR1616 made by Panasonic, Hitachi Maxell, Sony, Toshiba, Varta or... batteries may present a risk of fire or explosion. ❍ Do not pick up the battery using tweezers or other camcorder settings while the power source is swallowed, seek medical assistance immediately. The backup battery has a life span of explosion. ...ensure proper contact. ❍ Keep the battery out of reach of children. Open the backup battery cover. 2.
... intestines. ❍ Do not disassemble, heat or immerse the battery in water to be replaced. 19 Power the camcorder from a E household power source or with a CR1616 made by Panasonic, Hitachi Maxell, Sony, Toshiba, Varta or... batteries may present a risk of fire or explosion. ❍ Do not pick up the battery using tweezers or other camcorder settings while the power source is swallowed, seek medical assistance immediately. The backup battery has a life span of explosion. ...ensure proper contact. ❍ Keep the battery out of reach of children. Open the backup battery cover. 2.
ZR70 ZR65 Instruction Manual
Page 22
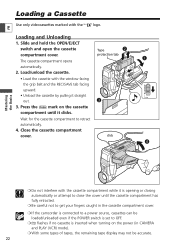
...tape display may not be loaded/unloaded even if the POWER switch is set to OFF. ❍ v flashes if no cassette is opening or closing automatically or attempt to close the cover until it straight out. Press the P mark on the power (in the cassette ...compartment cover. ❍ If the camcorder is connected to retract automatically. 4. E Loading and Unloading 1. OPEN/EJECT PUSH • Unload the cassette by pulling it clicks. Wait for the cassette compartment to a power source,...
...tape display may not be loaded/unloaded even if the POWER switch is set to OFF. ❍ v flashes if no cassette is opening or closing automatically or attempt to close the cover until it straight out. Press the P mark on the power (in the cassette ...compartment cover. ❍ If the camcorder is connected to retract automatically. 4. E Loading and Unloading 1. OPEN/EJECT PUSH • Unload the cassette by pulling it clicks. Wait for the cassette compartment to a power source,...

ZR70 ZR65 Instruction Manual
Page 24
...operable range of up to strong light. ❍ When the batteries run out, replace both at the camcorder's remote sensor when you press the buttons. ZR70 MC ZR65 MC q WL-D79 ZR60 q WL-D80 w w Mastering the Basics e e 1. Close the battery cover. 24 markings. 3. ...Using the Wireless Controller You can operate the camcorder with two AA batteries. Open the battery cover. 2. Following functions cannot be operated without the...
...operable range of up to strong light. ❍ When the batteries run out, replace both at the camcorder's remote sensor when you press the buttons. ZR70 MC ZR65 MC q WL-D79 ZR60 q WL-D80 w w Mastering the Basics e e 1. Close the battery cover. 24 markings. 3. ...Using the Wireless Controller You can operate the camcorder with two AA batteries. Open the battery cover. 2. Following functions cannot be operated without the...
ZR70 ZR65 Instruction Manual
Page 25
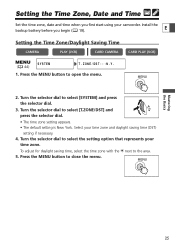
Press the MENU button to the area. 5. Install the backup battery before you first start using your camcorder. E Setting the Time Zone/Daylight Saving Time CAMERA PLAY (VCR) CARD CAMERA CARD PLAY (VCR) ( 44) SYSTEM T.ZONE/DST•••N.Y. 1. To ...begin ( 19). Press the MENU button to select [SYSTEM] and press the selector dial. 3. MENU Mastering the Basics 25 Turn the selector dial to open the menu. Turn the selector dial to select the setting option that represents your time zone and daylight saving time (DST) setting if necessary. 4. Turn...
Press the MENU button to the area. 5. Install the backup battery before you first start using your camcorder. E Setting the Time Zone/Daylight Saving Time CAMERA PLAY (VCR) CARD CAMERA CARD PLAY (VCR) ( 44) SYSTEM T.ZONE/DST•••N.Y. 1. To ...begin ( 19). Press the MENU button to select [SYSTEM] and press the selector dial. 3. MENU Mastering the Basics 25 Turn the selector dial to open the menu. Turn the selector dial to select the setting option that represents your time zone and daylight saving time (DST) setting if necessary. 4. Turn...

ZR70 ZR65 Instruction Manual
Page 26
... RIO (Rio de Janeiro) FERNAN. (Fernando de Noronha) AZORES ❍ Once you have set the time zone to the one of your destination, and the camcorder automatically adjusts the clock. ❍ Days per month and leap years will be automatically adjusted. Press the MENU button to another time zone. Setting the... Kong) TOKYO SYDNEY SOLOMON No. Just set time zone, date and time, you do not need to reset the clock each time you travel to open the menu. Mastering the Basics 16 E 19 18 20 17 15 21 1 4 2 24 3 6 7 9 10 5 8 23 14 22 12 11 13 14 15 16 17 18...
... RIO (Rio de Janeiro) FERNAN. (Fernando de Noronha) AZORES ❍ Once you have set the time zone to the one of your destination, and the camcorder automatically adjusts the clock. ❍ Days per month and leap years will be automatically adjusted. Press the MENU button to another time zone. Setting the... Kong) TOKYO SYDNEY SOLOMON No. Just set time zone, date and time, you do not need to reset the clock each time you travel to open the menu. Mastering the Basics 16 E 19 18 20 17 15 21 1 4 2 24 3 6 7 9 10 5 8 23 14 22 12 11 13 14 15 16 17 18...

