
DV Messenger Ver 1.0 Instruction Manual
Page 23
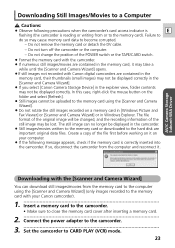
... is E flashing (the camcorder is correctly inserted into the camcorder. Failure to do so may not be lost. Do not remove the memory card or detach the DV cable. - Create a copy of the file first before working on it on a memory card in [Windows Picture and Fax Viewer] or ... memory card with the camcorder. ¡ If numerous still images/movies are contained in the memory card, their thumbnails (small images) may not be uploaded to the memory card using the [Scanner and Camera Wizard] (only images recorded to the memory card with Canon digital camcorders are contained in the ...
... is E flashing (the camcorder is correctly inserted into the camcorder. Failure to do so may not be lost. Do not remove the memory card or detach the DV cable. - Create a copy of the file first before working on it on a memory card in [Windows Picture and Fax Viewer] or ... memory card with the camcorder. ¡ If numerous still images/movies are contained in the memory card, their thumbnails (small images) may not be uploaded to the memory card using the [Scanner and Camera Wizard] (only images recorded to the memory card with Canon digital camcorders are contained in the ...
DV Messenger Ver 1.0 Instruction Manual
Page 24
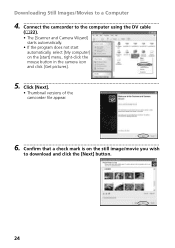
Downloading Still Images/Movies to a Computer 4 Connect the camcorder to the computer using the DV cable ( 22). • The [Scanner and Camera Wizard] starts automatically. • If the program does not start automatically, select [My computer] on the [start] menu, right-click the mouse button in the camera icon and click [Get pictures]. 5 Click [Next]. • Thumbnail versions of the camcorder file appear. 6 Confirm that a check mark is on the still image/movie you wish to download and click the [Next] button. 24
Downloading Still Images/Movies to a Computer 4 Connect the camcorder to the computer using the DV cable ( 22). • The [Scanner and Camera Wizard] starts automatically. • If the program does not start automatically, select [My computer] on the [start] menu, right-click the mouse button in the camera icon and click [Get pictures]. 5 Click [Next]. • Thumbnail versions of the camcorder file appear. 6 Confirm that a check mark is on the still image/movie you wish to download and click the [Next] button. 24
DV Messenger Ver 1.0 Instruction Manual
Page 25
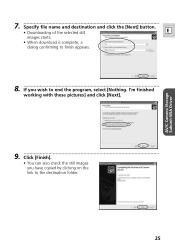
I'm finished working with these pictures] and click [Next]. 9 Click [Finish]. • You can also check the still images you wish to the destination folder. 25 AV/C Camera Storage Subunit-WIA Driver 7 Specify file name and destination and click the [Next] button. • Downloading of the selected still E images starts. • When download is complete, a dialog confirming to finish appears. 8 If you have copied by clicking on the link to end the program, select [Nothing.
I'm finished working with these pictures] and click [Next]. 9 Click [Finish]. • You can also check the still images you wish to the destination folder. 25 AV/C Camera Storage Subunit-WIA Driver 7 Specify file name and destination and click the [Next] button. • Downloading of the selected still E images starts. • When download is complete, a dialog confirming to finish appears. 8 If you have copied by clicking on the link to end the program, select [Nothing.
DV Messenger Ver 1.0 Instruction Manual
Page 26
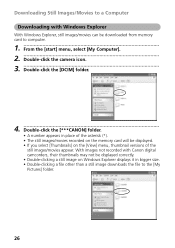
Downloading Still Images/Movies to a Computer Downloading with Canon digital camcorders, their thumbnails may not be displayed. • If you select [Thumbnails] on Windows Explorer displays it in bigger size. • Double-clicking a file other than a still image downloads the file to the [My Pictures] folder. 26 With images not recorded with Windows Explorer With...
Downloading Still Images/Movies to a Computer Downloading with Canon digital camcorders, their thumbnails may not be displayed. • If you select [Thumbnails] on Windows Explorer displays it in bigger size. • Double-clicking a file other than a still image downloads the file to the [My Pictures] folder. 26 With images not recorded with Windows Explorer With...
DV Messenger Ver 1.0 Instruction Manual
Page 35
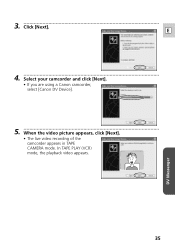
In TAPE PLAY (VCR) mode, the playback video appears. 35 DV Messenger E 4 Select your camcorder and click [Next]. • If you are using a Canon camcorder, select [Canon DV Device]. 5 When the video picture appears, click [Next]. • The live video recording of the camcorder appears in TAPE CAMERA mode. 3 Click [Next].
In TAPE PLAY (VCR) mode, the playback video appears. 35 DV Messenger E 4 Select your camcorder and click [Next]. • If you are using a Canon camcorder, select [Canon DV Device]. 5 When the video picture appears, click [Next]. • The live video recording of the camcorder appears in TAPE CAMERA mode. 3 Click [Next].
DV Messenger Ver 1.0 Instruction Manual
Page 38
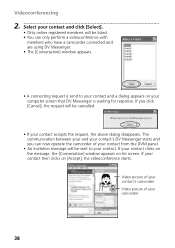
... contact and click [Select]. • Only online registered members will be listed. • You can now operate the camcorder of your camcorder 38 The communication between your and your contact's DV Messenger starts and you click [Cancel], the request will be cancelled....you can only perform a videoconference with members who have a camcorder connected and are using DV Messenger. • The [Conversation] window appears. • A connecting request is waiting for response. Video picture of your contact's camcorder Video picture of your contact from the DVM panel. • An ...
... contact and click [Select]. • Only online registered members will be listed. • You can now operate the camcorder of your camcorder 38 The communication between your and your contact's DV Messenger starts and you click [Cancel], the request will be cancelled....you can only perform a videoconference with members who have a camcorder connected and are using DV Messenger. • The [Conversation] window appears. • A connecting request is waiting for response. Video picture of your contact's camcorder Video picture of your contact from the DVM panel. • An ...
DV Messenger Ver 1.0 Instruction Manual
Page 39
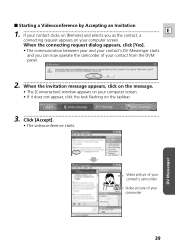
... screen. I Starting a Videoconference by Accepting an Invitation 1 If your contact clicks on [Remote] and selects you can now operate the camcorder of your camcorder 39 DV Messenger Video picture of your contact's camcorder Video picture of your contact from the DVM panel. 2 When the invitation message appears, click on the message. • The [Conversation] window...
... screen. I Starting a Videoconference by Accepting an Invitation 1 If your contact clicks on [Remote] and selects you can now operate the camcorder of your camcorder 39 DV Messenger Video picture of your contact's camcorder Video picture of your contact from the DVM panel. 2 When the invitation message appears, click on the message. • The [Conversation] window...
DV Messenger Ver 1.0 Instruction Manual
Page 43
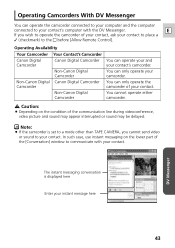
..., video picture and sound may appear interrupted or sound may be delayed. You cannot operate either camcorder. In such case, use instant messaging on the condition of your contact. E If you cannot send video or sound to the before [Allow Remote Control]. Operating Availability Your Camcorder Your Contact's Camcorder Canon Digital Camcorder Canon Digital Camcorder Non-Canon Digital Camcorder Non-Canon Digital Canon Digital Camcorder Camcorder Non-Canon Digital Camcorder You can...
..., video picture and sound may appear interrupted or sound may be delayed. You cannot operate either camcorder. In such case, use instant messaging on the condition of your contact. E If you cannot send video or sound to the before [Allow Remote Control]. Operating Availability Your Camcorder Your Contact's Camcorder Canon Digital Camcorder Canon Digital Camcorder Non-Canon Digital Camcorder Non-Canon Digital Canon Digital Camcorder Camcorder Non-Canon Digital Camcorder You can...
DV Messenger Ver 1.0 Instruction Manual
Page 45
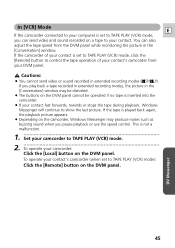
...set to TAPE PLAY (VCR) mode, you can also adjust the tape speed from your DVM panel. If the camcorder of your contact's camcorder from the DVM panel while monitoring the picture in extended recording modes ( SP/ LP). Cautions: ¡ You cannot send video or sound recorded in the... [Conversation] window. In [VCR] Mode E If the camcorder connected to your computer is played back again, the playback picture appears. ¡ Depending on the camcorder, Windows Messenger may be distorted. ¡ The buttons on the DVM panel cannot be operated if...
...set to TAPE PLAY (VCR) mode, you can also adjust the tape speed from your DVM panel. If the camcorder of your contact's camcorder from the DVM panel while monitoring the picture in extended recording modes ( SP/ LP). Cautions: ¡ You cannot send video or sound recorded in the... [Conversation] window. In [VCR] Mode E If the camcorder connected to your computer is played back again, the playback picture appears. ¡ Depending on the camcorder, Windows Messenger may be distorted. ¡ The buttons on the DVM panel cannot be operated if...

DV Messenger Ver 1.0 Instruction Manual
Page 46
... playback pause. 8 Reversed Frame Advance Plays back the tape frame by frame. Slow Reverse Playback e. Operating the Camcorders With DV Messenger I The [VCR] Operating Buttons 2 1 34 8 7 Video picture from the tape in your or your contact's camcorder 9 56 1 Playback Plays back the tape. 2 Reversed Playback Plays back the tape in reverse. 3 Playback Pause...
... playback pause. 8 Reversed Frame Advance Plays back the tape frame by frame. Slow Reverse Playback e. Operating the Camcorders With DV Messenger I The [VCR] Operating Buttons 2 1 34 8 7 Video picture from the tape in your or your contact's camcorder 9 56 1 Playback Plays back the tape. 2 Reversed Playback Plays back the tape in reverse. 3 Playback Pause...
DV Messenger Ver 1.0 Instruction Manual
Page 49
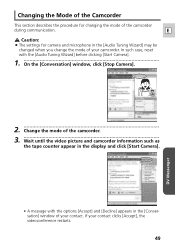
If your contact. E Caution: ¡ The settings for changing the mode of the camcorder during communication. In such case, reset with the options [Accept] and [Decline] appears in the [Conversation] window of your contact clicks [Accept], the ... • A message with the [Audio Tuning Wizard] before clicking [Start Camera]. 1 On the [Conversation] window, click [Stop Camera]. 2 Change the mode of the camcorder. 3 Wait until the video picture and camcorder information such as the tape counter appear in the display and click [Start Camera]. Changing the Mode of the...
If your contact. E Caution: ¡ The settings for changing the mode of the camcorder during communication. In such case, reset with the options [Accept] and [Decline] appears in the [Conversation] window of your contact clicks [Accept], the ... • A message with the [Audio Tuning Wizard] before clicking [Start Camera]. 1 On the [Conversation] window, click [Stop Camera]. 2 Change the mode of the camcorder. 3 Wait until the video picture and camcorder information such as the tape counter appear in the display and click [Start Camera]. Changing the Mode of the...
DV Messenger Ver 1.0 Instruction Manual
Page 52
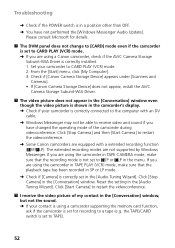
... performed the [Windows Messenger Audio Update]. I receive the video picture of the camcorder during videoconference. Reset the setting in the [Conversation] window. the TAPE/CARD switch is set for details. ? Check if [Canon Camera Storage Device] appears under [Scanners and Cameras]. • If [Canon Camera Storage Device] does not appear, install the AV/C Camera...
... performed the [Windows Messenger Audio Update]. I receive the video picture of the camcorder during videoconference. Reset the setting in the [Conversation] window. the TAPE/CARD switch is set for details. ? Check if [Canon Camera Storage Device] appears under [Scanners and Cameras]. • If [Canon Camera Storage Device] does not appear, install the AV/C Camera...

DV Messenger Ver 1.0 Instruction Manual
Page 54
...My contact is selected in the [Conversation] window, but not the sound. ➜ If you are using a Canon camcorder, click [Stop Camera] and check whether [Canon DV Device] is receiving the video picture, but not the sound." the TAPE/CARD switch is set to a tape (e.g. for recording to TAPE). &#...10140; Check the position of the microphone, or move the camcorder away from the speakers may be picked ...
...My contact is selected in the [Conversation] window, but not the sound. ➜ If you are using a Canon camcorder, click [Stop Camera] and check whether [Canon DV Device] is receiving the video picture, but not the sound." the TAPE/CARD switch is set to a tape (e.g. for recording to TAPE). &#...10140; Check the position of the microphone, or move the camcorder away from the speakers may be picked ...
ZR70 ZR65 Instruction Manual
Page 3
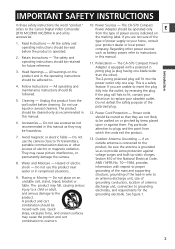
...and requirements for future reference. 11. should be operated only E ZR70 MC/ZR65 MC/ZR60 A and all its from the type of antenna discharge unit, connection to replace your ...from the wall outlet before the product is a safety feature. The product may cause picture interference, or permanently damage the camera. 13. The 2-prong polarized plug will fit into...magnetic radiation. Avoid magnetic or electric fields - The CA-570 Compact refers to the Canon Digital Video Camcorder Power Adapter should be followed. Outdoor Antenna Grounding - Do not use liquid or ...
...and requirements for future reference. 11. should be operated only E ZR70 MC/ZR65 MC/ZR60 A and all its from the type of antenna discharge unit, connection to replace your ...from the wall outlet before the product is a safety feature. The product may cause picture interference, or permanently damage the camera. 13. The 2-prong polarized plug will fit into...magnetic radiation. Avoid magnetic or electric fields - The CA-570 Compact refers to the Canon Digital Video Camcorder Power Adapter should be followed. Outdoor Antenna Grounding - Do not use liquid or ...
ZR70 ZR65 Instruction Manual
Page 15
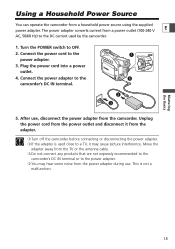
... converts current from a power outlet (100-240 V E AC, 50/60 Hz) to the DC current used close to a TV, it from the camcorder. After use . Move the adapter away from a household power source using the supplied power adapter. q rr POWER CAMERA OFF(PVLCARY) w e 5. Connect... the power cord to the power adapter. ❍ You may cause picture interference. Using a Household Power Source You can operate the camcorder from the TV or the antenna cable. ❍ Do not connect any products that are not expressly recommended to the...
... converts current from a power outlet (100-240 V E AC, 50/60 Hz) to the DC current used close to a TV, it from the camcorder. After use . Move the adapter away from a household power source using the supplied power adapter. q rr POWER CAMERA OFF(PVLCARY) w e 5. Connect... the power cord to the power adapter. ❍ You may cause picture interference. Using a Household Power Source You can operate the camcorder from the TV or the antenna cable. ❍ Do not connect any products that are not expressly recommended to the...

ZR70 ZR65 Instruction Manual
Page 21
... Mounting the Wide Attachment The WA-30.5 Wide Attachment gives you zoom to telephoto, the picture will not be used with the wide attachment. ❍ If dust accumulates on the wide attachment or on the camcorder lens, clean both lenses gently with a video light or the assist lamp (White LED...). ❍ Do not touch the lens to appear on the picture when recording with a blower brush. ❍ The wide attachment may cause ...
... Mounting the Wide Attachment The WA-30.5 Wide Attachment gives you zoom to telephoto, the picture will not be used with the wide attachment. ❍ If dust accumulates on the wide attachment or on the camcorder lens, clean both lenses gently with a video light or the assist lamp (White LED...). ❍ Do not touch the lens to appear on the picture when recording with a blower brush. ❍ The wide attachment may cause ...

ZR70 ZR65 Instruction Manual
Page 23
...to severe impact as they are stored for approx. 4 seconds and v starts flashing. If the tape becomes slack and damaged, it may cause picture and sound distortion. ❍ Return cassettes in the case and store them upright. ❍ Do not leave the cassette in CAMERA SAVE SAVE ...cassette to the left. (This switch position is usually labeled E SAVE or ERASE OFF.) REC REC If you load a protected cassette in the camcorder after about 10 times of the cassette, or cover them with cellophane tape. ❍ Handle cassettes with use . Protecting Tapes from Accidental Erasure...
...to severe impact as they are stored for approx. 4 seconds and v starts flashing. If the tape becomes slack and damaged, it may cause picture and sound distortion. ❍ Return cassettes in the case and store them upright. ❍ Do not leave the cassette in CAMERA SAVE SAVE ...cassette to the left. (This switch position is usually labeled E SAVE or ERASE OFF.) REC REC If you load a protected cassette in the camcorder after about 10 times of the cassette, or cover them with cellophane tape. ❍ Handle cassettes with use . Protecting Tapes from Accidental Erasure...

ZR70 ZR65 Instruction Manual
Page 30
... selector dial. 4. Mastering the Basics Zooming The camcorder's zoom lens allows you cannot control the zoom speed. The camcorder automatically switches between optical zooming and digital zooming. Digital Zoom ZR70 MC 88×/440× digital zoom ZR65 MC 80×/400× digital zoom ZR60 72×/360× digital zoom CAMERA PLAY (VCR) CARD CAMERA CARD...
... selector dial. 4. Mastering the Basics Zooming The camcorder's zoom lens allows you cannot control the zoom speed. The camcorder automatically switches between optical zooming and digital zooming. Digital Zoom ZR70 MC 88×/440× digital zoom ZR65 MC 80×/400× digital zoom ZR60 72×/360× digital zoom CAMERA PLAY (VCR) CARD CAMERA CARD...

ZR70 ZR65 Instruction Manual
Page 37
Preparations Connect a power source. Use headphones when using a Canon Head Cleaning Cassette or a commercially available digital video head-cleaning cassette. ❍ To use the LCD screen for playback. You can also close the LCD panel. To stop playback..... Use headphones for stereo sound or E when using the viewfinder for playback, the camcorder plays back the sound via built-in speaker does not sound. Set the camcorder to begin playback. 5. e rt w ❍ If the playback picture is monaural. Playback 1. Mastering the Basics Playing Back a Tape When you use the...
Preparations Connect a power source. Use headphones when using a Canon Head Cleaning Cassette or a commercially available digital video head-cleaning cassette. ❍ To use the LCD screen for playback. You can also close the LCD panel. To stop playback..... Use headphones for stereo sound or E when using the viewfinder for playback, the camcorder plays back the sound via built-in speaker does not sound. Set the camcorder to begin playback. 5. e rt w ❍ If the playback picture is monaural. Playback 1. Mastering the Basics Playing Back a Tape When you use the...

ZR70 ZR65 Instruction Manual
Page 38
...or reverse playback. SLOW I (Slow Forward)/(Slow Reverse) Plays back at 9.5 times normal speed (forward or reverse). The camcorder goes into stop mode after 5 minutes in reverse at 2 times normal speed. The camcorder goes into stop ) button e/a (play ) button return to resume playback. E ` (rewind) button 1 (fast forward.... Press the e (play ) button to return to normal playback. ❍ There is no sound during special playback. ❍ The picture may become distorted during playback pause. Press the button repeatedly during some special playback modes. 38
...or reverse playback. SLOW I (Slow Forward)/(Slow Reverse) Plays back at 9.5 times normal speed (forward or reverse). The camcorder goes into stop mode after 5 minutes in reverse at 2 times normal speed. The camcorder goes into stop ) button e/a (play ) button return to resume playback. E ` (rewind) button 1 (fast forward.... Press the e (play ) button to return to normal playback. ❍ There is no sound during special playback. ❍ The picture may become distorted during playback pause. Press the button repeatedly during some special playback modes. 38


