
XH G1S / XH A1S Instruction Manual
Page 5
... even more ! 5 Advanced Professional Features Pro level connectivity An industry-standard HD/SD SDI terminal for high-definition video. Added and improved functionality Push AE ( 59) • Gain fine-tuning in HDV standard. Whatever your video needs -TV programs, commercials, music videos or movies- Introduction The XH G1S / XH A1S - A Broad Range of the XH G1S that give you...
... even more ! 5 Advanced Professional Features Pro level connectivity An industry-standard HD/SD SDI terminal for high-definition video. Added and improved functionality Push AE ( 59) • Gain fine-tuning in HDV standard. Whatever your video needs -TV programs, commercials, music videos or movies- Introduction The XH G1S / XH A1S - A Broad Range of the XH G1S that give you...
XH G1S / XH A1S Instruction Manual
Page 6
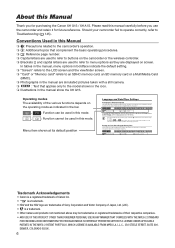
...ZONE/DST•••NEW YORK Trademark Acknowledgements • Canon is a registered trademark of Canon Inc. • is a trademark. • HDV and the HDV logo are used in the manual are displayed on the camcorder and will not change regardless of the language selected. Menu...and close the menu. ]. Please read this manual carefully before you for purchasing the Canon XH G1S / XH A1S. About this Manual Thank you use the camcorder and retain it for future reference. Should your camcorder, or if the built-in this mode. , : Function cannot be trademarks or ...
...ZONE/DST•••NEW YORK Trademark Acknowledgements • Canon is a registered trademark of Canon Inc. • is a trademark. • HDV and the HDV logo are used in the manual are displayed on the camcorder and will not change regardless of the language selected. Menu...and close the menu. ]. Please read this manual carefully before you for purchasing the Canon XH G1S / XH A1S. About this Manual Thank you use the camcorder and retain it for future reference. Should your camcorder, or if the built-in this mode. , : Function cannot be trademarks or ...

XH G1S / XH A1S Instruction Manual
Page 8
... the Supplied Accessories...10 Components Guide ...11 Preparations Preparing the Power Supply...16 Preparing the Camcorder ...19 Using the Wireless Controller ...24 Loading/Removing a Cassette ...25 Inserting/Removing a Memory...Filter ...41 Selecting the Frame Rate ...42 Setting the Time Code...44 Synchronizing the Camcorder's Time Code 46 Setting the User Bit ...48 Audio Recording...49 Image Stabilizer ...54...79 Audio Output ...83 Digital Video Control...85 Recording an External Video Signal (HDV/DV In, Analog Line-In 86 Converting Analog Signals into Digital Signals (Analog-Digital Converter ...
... the Supplied Accessories...10 Components Guide ...11 Preparations Preparing the Power Supply...16 Preparing the Camcorder ...19 Using the Wireless Controller ...24 Loading/Removing a Cassette ...25 Inserting/Removing a Memory...Filter ...41 Selecting the Frame Rate ...42 Setting the Time Code...44 Synchronizing the Camcorder's Time Code 46 Setting the User Bit ...48 Audio Recording...49 Image Stabilizer ...54...79 Audio Output ...83 Digital Video Control...85 Recording an External Video Signal (HDV/DV In, Analog Line-In 86 Converting Analog Signals into Digital Signals (Analog-Digital Converter ...

XH G1S / XH A1S Instruction Manual
Page 13
... devices with the mark to the terminal. Operation cannot be guaranteed for connections with mounting screws longer than the buttons on the camcorder. 13 Front view Back view Introduction External microphone holder ( 50) Tally lamp ( 102) External sensor for the Instant AF ( 37... access indicator ( 114) Battery/memory card compartment ( 16) Dioptric adjustment lever ( 19) VIEWFINDER COMPONENT OUT terminal ( 80) terminal A/V1 terminal ( 79) HDV indicator HDV/DV terminal ( 81, 86, 88) (headphones) terminal HD/SD COMPONENT OUT terminal ( 80) START/STOP button ( 30) Memory card slot ( 26)...
... devices with the mark to the terminal. Operation cannot be guaranteed for connections with mounting screws longer than the buttons on the camcorder. 13 Front view Back view Introduction External microphone holder ( 50) Tally lamp ( 102) External sensor for the Instant AF ( 37... access indicator ( 114) Battery/memory card compartment ( 16) Dioptric adjustment lever ( 19) VIEWFINDER COMPONENT OUT terminal ( 80) terminal A/V1 terminal ( 79) HDV indicator HDV/DV terminal ( 81, 86, 88) (headphones) terminal HD/SD COMPONENT OUT terminal ( 80) START/STOP button ( 30) Memory card slot ( 26)...
XH G1S / XH A1S Instruction Manual
Page 23
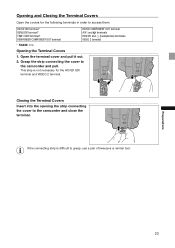
... access them. Open the terminal cover and pull it out. 2. Closing the Terminal Covers Insert into the opening the strip connecting the cover to the camcorder and pull. Opening and Closing the Terminal Covers Open the covers for the HD/SD SDI terminal and VIDEO 2 terminal. If the connecting strip is... similar tool. Preparations 23 HD/SD SDI terminal* GENLOCK terminal* TIME CODE terminal* VIEWFINDER COMPONENT OUT terminal HD/SD COMPONENT OUT terminal A/V1 and terminals HDV/DV and (headphones) terminals VIDEO 2 terminal * only.
... access them. Open the terminal cover and pull it out. 2. Closing the Terminal Covers Insert into the opening the strip connecting the cover to the camcorder and pull. Opening and Closing the Terminal Covers Open the covers for the HD/SD SDI terminal and VIDEO 2 terminal. If the connecting strip is... similar tool. Preparations 23 HD/SD SDI terminal* GENLOCK terminal* TIME CODE terminal* VIEWFINDER COMPONENT OUT terminal HD/SD COMPONENT OUT terminal A/V1 and terminals HDV/DV and (headphones) terminals VIDEO 2 terminal * only.

XH G1S / XH A1S Instruction Manual
Page 25
... cassette by pressing on the mark on the cover. Slide the OPEN/EJECT switch to get your fingers caught in HDV we recommend you use videocassettes designed for HDV recording. 1. Close the cassette compartment by pulling it is set to OFF. 25 Preparations Do not interfere... with the cassette compartment while it straight out. 3. If the camcorder is connected to a power source, cassettes can be loaded/removed ...
... cassette by pressing on the mark on the cover. Slide the OPEN/EJECT switch to get your fingers caught in HDV we recommend you use videocassettes designed for HDV recording. 1. Close the cassette compartment by pulling it is set to OFF. 25 Preparations Do not interfere... with the cassette compartment while it straight out. 3. If the camcorder is connected to a power source, cassettes can be loaded/removed ...

XH G1S / XH A1S Instruction Manual
Page 30
The default recording standard is HDV. Move the / (card/tape) switch to check if the camcorder operates correctly. Remove the cassette. 4. Recording Recording Before You Begin Recording Make...you start recording. Turn the dial to OFF if you do not intend to use the camcorder for a long time. If you do not remove the cassette, you can record the ...Set the dial to the relevant chapter ( 49). Disconnect the power source. We recommend not mixing recordings in HDV and DV standards on the same tape. Press the lock button and set the dial to pause recording. ...
The default recording standard is HDV. Move the / (card/tape) switch to check if the camcorder operates correctly. Remove the cassette. 4. Recording Recording Before You Begin Recording Make...you start recording. Turn the dial to OFF if you do not intend to use the camcorder for a long time. If you do not remove the cassette, you can record the ...Set the dial to the relevant chapter ( 49). Disconnect the power source. We recommend not mixing recordings in HDV and DV standards on the same tape. Press the lock button and set the dial to pause recording. ...
XH G1S / XH A1S Instruction Manual
Page 34
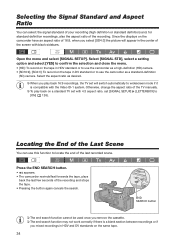
...Aspect Ratio You can use the camcorder as a standard-definition (SD) camera. Open the menu and select [SIGNAL SETUP]. Locating the End of the Last Scene You can select the signal standard of your recording (high definition or standard definition) and, for standard definition recordings, also the aspect ratio... a high-definition (HD) camera. • [SD16:9], [SD4:3]: To record on the same tape. 34 Select [SIGNAL STD], select a setting option and select [YES] to confirm the selection and close the menu. • [HD]: To record on the tape in HDV standard or to use the camcorder as ...
...Aspect Ratio You can use the camcorder as a standard-definition (SD) camera. Open the menu and select [SIGNAL SETUP]. Locating the End of the Last Scene You can select the signal standard of your recording (high definition or standard definition) and, for standard definition recordings, also the aspect ratio... a high-definition (HD) camera. • [SD16:9], [SD4:3]: To record on the same tape. 34 Select [SIGNAL STD], select a setting option and select [YES] to confirm the selection and close the menu. • [HD]: To record on the tape in HDV standard or to use the camcorder as ...

XH G1S / XH A1S Instruction Manual
Page 39
... to the PHOTO/MAGN. press once more to cancel the function. The Peaking function will show the exact same picture as displayed on the camcorder's viewfinder screen. button (normal or long press). With the custom function [PHOTO BUTTON] ( 97) you can also change the operation of the...on the screen. Recording 39 In mode, the Magnifying function will be output as it is to the HD/SD SDI terminal ( only) and the HDV/DV terminal. With the custom function [CUSTOM REC] ( 97) you can use two assist functions: Peaking emphasizes the outlines of the ...
... to the PHOTO/MAGN. press once more to cancel the function. The Peaking function will show the exact same picture as displayed on the camcorder's viewfinder screen. button (normal or long press). With the custom function [PHOTO BUTTON] ( 97) you can also change the operation of the...on the screen. Recording 39 In mode, the Magnifying function will be output as it is to the HD/SD SDI terminal ( only) and the HDV/DV terminal. With the custom function [CUSTOM REC] ( 97) you can use two assist functions: Peaking emphasizes the outlines of the ...

XH G1S / XH A1S Instruction Manual
Page 46
... the user bit of the time code signal will be 2:3 pulldown data (when recording in 24F mode or playing back movies that are HDV 1080/24p). An external device can receive the data used in the recording the user bit signal received from the TIME CODE terminal as the... Code/User bit IN Time Code OUT * - - - - - - - * In SD mode, Time Code IN is input through the TIME CODE terminal. Synchronizing the Camcorder's Time Code You can synchronize this conversion (2:3 pulldown data) to convert the signal to 1080/24p specifications. When [SIGNAL SETUP] [UB OUT] is converted to...
... the user bit of the time code signal will be 2:3 pulldown data (when recording in 24F mode or playing back movies that are HDV 1080/24p). An external device can receive the data used in the recording the user bit signal received from the TIME CODE terminal as the... Code/User bit IN Time Code OUT * - - - - - - - * In SD mode, Time Code IN is input through the TIME CODE terminal. Synchronizing the Camcorder's Time Code You can synchronize this conversion (2:3 pulldown data) to convert the signal to 1080/24p specifications. When [SIGNAL SETUP] [UB OUT] is converted to...

XH G1S / XH A1S Instruction Manual
Page 48
...select [CLEAR] in step 2. The user bit can be recorded when recording with an external time code, you can be selected from digital devices (HDV or DV). The first character of the user bit starts flashing. Select [UB DISPLAY], set /reset options appear; Setting the User Bit The user bit... display can also record the external user bit on the tape. Set the rest of 8 characters in the camcorder cannot be recorded when recording from the date or the time of recording, or an identification code consisting of the user bit in the same...
...select [CLEAR] in step 2. The user bit can be recorded when recording with an external time code, you can be selected from digital devices (HDV or DV). The first character of the user bit starts flashing. Select [UB DISPLAY], set /reset options appear; Setting the User Bit The user bit... display can also record the external user bit on the tape. Set the rest of 8 characters in the camcorder cannot be recorded when recording from the date or the time of recording, or an identification code consisting of the user bit in the same...

XH G1S / XH A1S Instruction Manual
Page 49
... Selecting the Microphone's Audio Recording Mode You can change the sensitivity of wind. Recording 49 HDV The audio transfer rate is 384 kbps and the sampling frequency is locked audio except for ...along with the sound of the built-in microphone to [NORMAL] or [HIGH] (+6 dB) to buildings). Select [LOW CUT], select a setting option and close the menu....on channels 1 and 2, leaving the other channels unused. • Audio cannot be dubbed using this camcorder. • Audio recorded with the built-in windy surroundings (for recording audio with this setting some...
... Selecting the Microphone's Audio Recording Mode You can change the sensitivity of wind. Recording 49 HDV The audio transfer rate is 384 kbps and the sampling frequency is locked audio except for ...along with the sound of the built-in microphone to [NORMAL] or [HIGH] (+6 dB) to buildings). Select [LOW CUT], select a setting option and close the menu....on channels 1 and 2, leaving the other channels unused. • Audio cannot be dubbed using this camcorder. • Audio recorded with the built-in windy surroundings (for recording audio with this setting some...

XH G1S / XH A1S Instruction Manual
Page 75
... ( 110) Press the CUSTOM KEY (1 or 2) button. The time code superimposed on the video signal output from the TIME CODE*, HD/SD SDI*, (LANC) and HDV/DV terminals will still be canceled when you turn the camcorder on hold. (* only.) • The time code hold .
... ( 110) Press the CUSTOM KEY (1 or 2) button. The time code superimposed on the video signal output from the TIME CODE*, HD/SD SDI*, (LANC) and HDV/DV terminals will still be canceled when you turn the camcorder on hold. (* only.) • The time code hold .

XH G1S / XH A1S Instruction Manual
Page 81
...with a 16:9 aspect ratio ( 34) will be distorted. 3 Using the HDV/DV Terminal Open the terminal cover CV-250F DV Cable (optional) or commercially available 6 pin-6 pin DV cable 4-pin 6-pin • When connecting the camcorder to a monitor or TV that supports DV input, you may be played ...automatically in widescreen mode whether you connect the camcorder to the TV using the A/V1 terminal or the VIDEO 2 terminal. During fast forward playback, rewind playback and reverse playback of a tape recorded in HDV standard, the picture may need to carry out a procedure on...
...with a 16:9 aspect ratio ( 34) will be distorted. 3 Using the HDV/DV Terminal Open the terminal cover CV-250F DV Cable (optional) or commercially available 6 pin-6 pin DV cable 4-pin 6-pin • When connecting the camcorder to a monitor or TV that supports DV input, you may be played ...automatically in widescreen mode whether you connect the camcorder to the TV using the A/V1 terminal or the VIDEO 2 terminal. During fast forward playback, rewind playback and reverse playback of a tape recorded in HDV standard, the picture may need to carry out a procedure on...

XH G1S / XH A1S Instruction Manual
Page 82
...playback, rewind playback and reverse playback of a tape recorded in HDV standard, the picture may be played automatically in widescreen mode whether you connect. Open the menu and select [SIGNAL SETUP]. Connection to a Standard Definition TV or Monitor 1 Using the HD/SD COMPONENT OUT or ... ( 80). • Select the appropriate component video signal depending on the TV or monitor you connect the camcorder to [ON] and close the menu. We recommend powering the camcorder from a household power outlet. TV sets equipped with the Video ID-1 System: Recordings made with ...
...playback, rewind playback and reverse playback of a tape recorded in HDV standard, the picture may be played automatically in widescreen mode whether you connect. Open the menu and select [SIGNAL SETUP]. Connection to a Standard Definition TV or Monitor 1 Using the HD/SD COMPONENT OUT or ... ( 80). • Select the appropriate component video signal depending on the TV or monitor you connect the camcorder to [ON] and close the menu. We recommend powering the camcorder from a household power outlet. TV sets equipped with the Video ID-1 System: Recordings made with ...

XH G1S / XH A1S Instruction Manual
Page 85
... external device: stop functions of an external digital device connected to the camcorder through the HDV/DV terminal. If the button was pressed while the camcorder was in a mode other devices can be overwritten. When connecting two DV Control-compatible Canon camcorders with the IEEE1394 AV/C protocol. Digital Video Control This feature enables the...
... external device: stop functions of an external digital device connected to the camcorder through the HDV/DV terminal. If the button was pressed while the camcorder was in a mode other devices can be overwritten. When connecting two DV Control-compatible Canon camcorders with the IEEE1394 AV/C protocol. Digital Video Control This feature enables the...
XH G1S / XH A1S Instruction Manual
Page 86
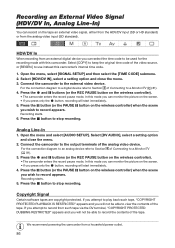
... the and buttons (or the REC PAUSE button on the wireless controller). • The camcorder enters the record pause mode. Select [HDV/DV IN], select a setting option and close the menu. 2. If you attempt to play back such tape, "COPYRIGHT PROTECTED PLAYBACK IS RESTRICTED" ... device refer to record appears. We recommend powering the camcorder from the analog video input (SD standard). Press the button (or the PAUSE you wish to the external video device. button on the tape an external video signal, either from the HDV/DV input (SD or HD standard) or from a...
... the and buttons (or the REC PAUSE button on the wireless controller). • The camcorder enters the record pause mode. Select [HDV/DV IN], select a setting option and close the menu. 2. If you attempt to play back such tape, "COPYRIGHT PROTECTED PLAYBACK IS RESTRICTED" ... device refer to record appears. We recommend powering the camcorder from the analog video input (SD standard). Press the button (or the PAUSE you wish to the external video device. button on the tape an external video signal, either from the HDV/DV input (SD or HD standard) or from a...

XH G1S / XH A1S Instruction Manual
Page 87
...to [OFF]. Converting Analog Signals into Digital Signals (Analog-Digital Converter) Using the camcorder you may not be able to transfer converted signals via the HDV/DV terminal. We recommend powering the camcorder from analog to digital signals might not work properly (e.g., signals that include copyright protection... or anomalous signals such as ghost signals). For normal use, set to [ON], digital signals cannot be input via the camcorder's HDV/DV terminal. Depending on the software and the specifications of your computer, you can also press the AV DV button on ...
...to [OFF]. Converting Analog Signals into Digital Signals (Analog-Digital Converter) Using the camcorder you may not be able to transfer converted signals via the HDV/DV terminal. We recommend powering the camcorder from analog to digital signals might not work properly (e.g., signals that include copyright protection... or anomalous signals such as ghost signals). For normal use, set to [ON], digital signals cannot be input via the camcorder's HDV/DV terminal. Depending on the software and the specifications of your computer, you can also press the AV DV button on ...

XH G1S / XH A1S Instruction Manual
Page 88
... [HD DOWN-CONV] to [OFF]. - HDV input: Set [PLAYBACK STD] to [HDV] and [HD DOWN-CONV] to [OFF]. - Connecting to a Computer To connect the camcorder to [DV]. - If the computer is not compatible with the camcorder's video output signal, the camcorder may not be correctly detected or may not .... Adjust the [SIGNAL SETUP] [PLAYBACK STD] and [HD DOWN-CONV] settings in HDV standard: Set [PLAYBACK STD] to [HDV] and [HD DOWN-CONV] to [ON]. For video input from the camcorder to the camcorder: - DV output: Set [PLAYBACK STD] to a computer you will need a computer equipped with...
... [HD DOWN-CONV] to [OFF]. - HDV input: Set [PLAYBACK STD] to [HDV] and [HD DOWN-CONV] to [OFF]. - Connecting to a Computer To connect the camcorder to [DV]. - If the computer is not compatible with the camcorder's video output signal, the camcorder may not be correctly detected or may not .... Adjust the [SIGNAL SETUP] [PLAYBACK STD] and [HD DOWN-CONV] settings in HDV standard: Set [PLAYBACK STD] to [HDV] and [HD DOWN-CONV] to [ON]. For video input from the camcorder to the camcorder: - DV output: Set [PLAYBACK STD] to a computer you will need a computer equipped with...

XH G1S / XH A1S Instruction Manual
Page 102
... will be on, except for the display of the distance to [TYPE 2] all LED indicators (including that of the HDV/DV terminal. When set to adjust the exposure compensation or the aperture value. Setting Options: [CHARACTER REC] Recording of ...], [ON] 13 [OBJ DST UNIT] Object Distance Units Display Selects the units (meters or feet) for that of the HDV/DV terminal) will be on. Setting Options: [ON], [BLINK], [OFF] 19 [LED] LED Indicators Selects the operation... Reference Audio Signal Selects the strength of the video recording and whether to record on the camcorder.
... will be on, except for the display of the distance to [TYPE 2] all LED indicators (including that of the HDV/DV terminal. When set to adjust the exposure compensation or the aperture value. Setting Options: [CHARACTER REC] Recording of ...], [ON] 13 [OBJ DST UNIT] Object Distance Units Display Selects the units (meters or feet) for that of the HDV/DV terminal) will be on. Setting Options: [ON], [BLINK], [OFF] 19 [LED] LED Indicators Selects the operation... Reference Audio Signal Selects the strength of the video recording and whether to record on the camcorder.


