CONSOLE_V1-1_ENG.pdf
Page 1
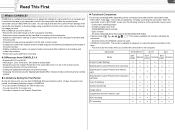
...Picture Control Recording onto the Hard Disk Playback the Recorded Files CONSOLE is for use with Windows® XP (Service Pack 2) only. You can adjust and save the Custom Preset settings of a camcorder from a computer and to compose the image you want. Uninstalling the Software ... is a software that enables you to adjust the settings of the camcorder and analyze a shooting image using a waveform monitor and a vector scope to record on the tape in the camcorder and onto the computer's hard disk by connecting the camcorder using an IEEE1394 (DV) cable. Shortcut Keys English
...Picture Control Recording onto the Hard Disk Playback the Recorded Files CONSOLE is for use with Windows® XP (Service Pack 2) only. You can adjust and save the Custom Preset settings of a camcorder from a computer and to compose the image you want. Uninstalling the Software ... is a software that enables you to adjust the settings of the camcorder and analyze a shooting image using a waveform monitor and a vector scope to record on the tape in the camcorder and onto the computer's hard disk by connecting the camcorder using an IEEE1394 (DV) cable. Shortcut Keys English
CONSOLE_V1-1_ENG.pdf
Page 2
..., Connection, Launch, Activation) Installing the Software and Drivers 1-6 Installing CONSOLE and the Canon Virtual VCR Driver 1-6 Installing the AV/C Camera Storage Subunit-WIA Driver 1-7 Connecting the Camcorder 1-8 Connecting the Camcorder to the Computer 1-8 Launching CONSOLE 1-9 Changing the Software Event Setting 1-9 Starting the...of the Custom Preset Files 4-40 Use of the Disconnected Camcorder After Adjusting the Custom Preset Files ....... 4-40 Passing Down the Custom Preset Setting to the Other Camcorders 4-41 Creating a New Custom Preset File Using an Existing File as a Base ...
..., Connection, Launch, Activation) Installing the Software and Drivers 1-6 Installing CONSOLE and the Canon Virtual VCR Driver 1-6 Installing the AV/C Camera Storage Subunit-WIA Driver 1-7 Connecting the Camcorder 1-8 Connecting the Camcorder to the Computer 1-8 Launching CONSOLE 1-9 Changing the Software Event Setting 1-9 Starting the...of the Custom Preset Files 4-40 Use of the Disconnected Camcorder After Adjusting the Custom Preset Files ....... 4-40 Passing Down the Custom Preset Setting to the Other Camcorders 4-41 Creating a New Custom Preset File Using an Existing File as a Base ...
CONSOLE_V1-1_ENG.pdf
Page 3
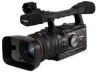
...129; IEEE1394 (DV) Cable Check the manual of the operations, the CPU usage may go up to mistaken operation or malfunction of the camcorder, the software, personal computer, or peripheral devices. „ Trademark Acknowledgements Microsoft® and Windows® are either registered ...of this guide is not guaranteed on the setting of the power scheme of Avid Technology Incorporated. © Canon Inc. 2006 All rights reserved. XH G1 XH A1 XL H1* *Unable to use : 4-pin: 6-pin: System Requirements OS CPU RAM Hard Disk Display Sound Interface Microsoft Windows XP Home ...
...129; IEEE1394 (DV) Cable Check the manual of the operations, the CPU usage may go up to mistaken operation or malfunction of the camcorder, the software, personal computer, or peripheral devices. „ Trademark Acknowledgements Microsoft® and Windows® are either registered ...of this guide is not guaranteed on the setting of the power scheme of Avid Technology Incorporated. © Canon Inc. 2006 All rights reserved. XH G1 XH A1 XL H1* *Unable to use : 4-pin: 6-pin: System Requirements OS CPU RAM Hard Disk Display Sound Interface Microsoft Windows XP Home ...
CONSOLE_V1-1_ENG.pdf
Page 4
.... CONSOLE is a software that enables you to adjust the settings of a camcorder from CONSOLE 1.0 • Supports XH G1 and XH A1 • New plug in the camcorder and onto the computer's hard disk by connecting the camcorder using a waveform monitor and a vector scope. • Compare the camcorder image and the recorded image by simultaneously displaying both images in...
.... CONSOLE is a software that enables you to adjust the settings of a camcorder from CONSOLE 1.0 • Supports XH G1 and XH A1 • New plug in the camcorder and onto the computer's hard disk by connecting the camcorder using a waveform monitor and a vector scope. • Compare the camcorder image and the recorded image by simultaneously displaying both images in...
CONSOLE_V1-1_ENG.pdf
Page 7
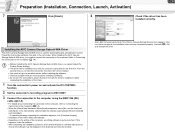
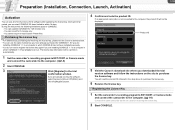
... this happens, close the window. Installing the AV/C Camera Storage Subunit-WIA Driver The AV/C Camera Storage Subunit-WIA driver is used for the first time. If a warning message regarding the installation appears, click [Continue Anyway]. • Installation of the driver ...completing the installation of the computer, an editing software may be installed. You need to connect the camcorder to the camcorder. Open [My Computer] and check if the [Canon Camera Storage Device] icon appears. 1-7 Preparation (Installation, Connection, Launch, Activation) 7 Click [Finish]. 4...
... this happens, close the window. Installing the AV/C Camera Storage Subunit-WIA Driver The AV/C Camera Storage Subunit-WIA driver is used for the first time. If a warning message regarding the installation appears, click [Continue Anyway]. • Installation of the driver ...completing the installation of the computer, an editing software may be installed. You need to connect the camcorder to the camcorder. Open [My Computer] and check if the [Canon Camera Storage Device] icon appears. 1-7 Preparation (Installation, Connection, Launch, Activation) 7 Click [Finish]. 4...
CONSOLE_V1-1_ENG.pdf
Page 8
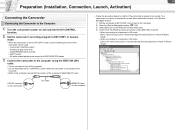
... see items described in step 4 in SD mode: [Canon DV camcorder], [Canon Camera Storage Device] and [Canon Virtual VCR] are shown. HDV/DV terminal on the camcorder DV cable IEEE1394 port on and activate the DV CONTROL function. 2 Set the camcorder's recording program to EXT.CONT. and connect to the ... computer • Follow the procedure below to confirm if the camcorder is properly connected. or Camera mode. • When the camcorder is set to the computer manual for AUDIO MONITOR button 3 Connect the camcorder to the computer using the IEEE1394 (DV) cable. • You do not need...
... see items described in step 4 in SD mode: [Canon DV camcorder], [Canon Camera Storage Device] and [Canon Virtual VCR] are shown. HDV/DV terminal on the camcorder DV cable IEEE1394 port on and activate the DV CONTROL function. 2 Set the camcorder's recording program to EXT.CONT. and connect to the ... computer • Follow the procedure below to confirm if the camcorder is properly connected. or Camera mode. • When the camcorder is set to the computer manual for AUDIO MONITOR button 3 Connect the camcorder to the computer using the IEEE1394 (DV) cable. • You do not need...
CONSOLE_V1-1_ENG.pdf
Page 9
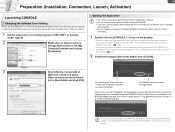
... Connection, Launch, Activation) Launching CONSOLE Changing the Software Event Setting When using CONSOLE, you need to change the settings in Windows [Display Properties] ...appear next time the target folder. you start CONSOLE, the target folder is not installed on [Canon Camera Storage Device] icon in the [Events] tab and click [OK]. Starting the Application ...program that displays the time at [Select an event] and select [Take no action"). 1 Set the camcorder's recording program to an external hard disk, an error message "Delayed Write Failed" may be lost. Click...
... Connection, Launch, Activation) Launching CONSOLE Changing the Software Event Setting When using CONSOLE, you need to change the settings in Windows [Display Properties] ...appear next time the target folder. you start CONSOLE, the target folder is not installed on [Canon Camera Storage Device] icon in the [Events] tab and click [OK]. Starting the Application ...program that displays the time at [Select an event] and select [Take no action"). 1 Set the camcorder's recording program to an external hard disk, an error message "Delayed Write Failed" may be lost. Click...
CONSOLE_V1-1_ENG.pdf
Page 10
...apply to EXT.CONT. Purchasing the License Key • For details about purchasing and receiving the license key, please visit the Canon's download site. • You can use all of the functions of this software after registering the license key. If you can start CONSOLE 50 times limited to EXT.CONT... been installed previously. • You do not need the product ID obtained in the step above to purchase the license key. If an appropriate camcorder is not connected to the computer, the product ID will not be carried on the site to purchase the license key. 6 Receive the license ...
...apply to EXT.CONT. Purchasing the License Key • For details about purchasing and receiving the license key, please visit the Canon's download site. • You can use all of the functions of this software after registering the license key. If you can start CONSOLE 50 times limited to EXT.CONT... been installed previously. • You do not need the product ID obtained in the step above to purchase the license key. If an appropriate camcorder is not connected to the computer, the product ID will not be carried on the site to purchase the license key. 6 Receive the license ...
CONSOLE_V1-1_ENG.pdf
Page 15
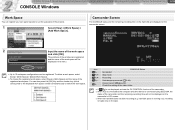
... in the menu. Up to 10 workspace configurations can be displayed on the camcorder's LCD screen. When the hard disk does not allow recording (e.g. hard disk space is running out), recording is connected using IEEE1394, the status of the projects. 1 Select [View] [Work Space] [Add ...to the computer and other device is made only on the hard disk are registered, and the name of the registered work space. Camcorder Screen The CONSOLE status and the remaining recording time on the tape. CONSOLE Windows Various Settings and [Performance Check] Camera and Picture ...
... in the menu. Up to 10 workspace configurations can be displayed on the camcorder's LCD screen. When the hard disk does not allow recording (e.g. hard disk space is running out), recording is connected using IEEE1394, the status of the projects. 1 Select [View] [Work Space] [Add ...to the computer and other device is made only on the hard disk are registered, and the name of the registered work space. Camcorder Screen The CONSOLE status and the remaining recording time on the tape. CONSOLE Windows Various Settings and [Performance Check] Camera and Picture ...
CONSOLE_V1-1_ENG.pdf
Page 17
...folder. 5 Sets the cache recording time ( 5-46). 6 Placing a check mark displays a dialog confirming the video folder each time you start the recording the camcorder pictures onto the hard disk. [General] Tab 1 Select [Option] from the [File] menu, or click . 1 2 2 Choose one of the... 3 and 4 sounds will be recorded separately from the recording file. A sequence number (up to 9999999) will be allocated after the date by selecting [Use recording date] or specify a new folder name under [Folder name]. The name of the Custom Preset file will be the recording file name, and the...
...folder. 5 Sets the cache recording time ( 5-46). 6 Placing a check mark displays a dialog confirming the video folder each time you start the recording the camcorder pictures onto the hard disk. [General] Tab 1 Select [Option] from the [File] menu, or click . 1 2 2 Choose one of the... 3 and 4 sounds will be recorded separately from the recording file. A sequence number (up to 9999999) will be allocated after the date by selecting [Use recording date] or specify a new folder name under [Folder name]. The name of the Custom Preset file will be the recording file name, and the...

CONSOLE_V1-1_ENG.pdf
Page 18
For details, refer to the camcorder. When [All pictures] or [I picture and P picture] is selected, data ... will be saved. The sounds on channel 3 and 4 will not be recorded in "File Name_sub.WAV". When using the editing software, load all the sound files. 1 Select the recording file type. The size of the recording... will be recorded in "File Name_sub.WAV". The types of the recording picture will be recorded in "File Name.WAV". When using the editing software, load all the sound files. The recorded [MPEG2ES] picture cannot be changed . 4 Select whether or...
For details, refer to the camcorder. When [All pictures] or [I picture and P picture] is selected, data ... will be saved. The sounds on channel 3 and 4 will not be recorded in "File Name_sub.WAV". When using the editing software, load all the sound files. 1 Select the recording file type. The size of the recording... will be recorded in "File Name_sub.WAV". The types of the recording picture will be recorded in "File Name.WAV". When using the editing software, load all the sound files. The recorded [MPEG2ES] picture cannot be changed . 4 Select whether or...
CONSOLE_V1-1_ENG.pdf
Page 19
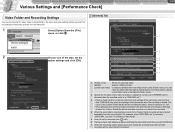
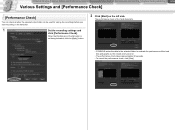
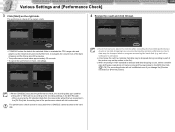
... the Hard Disk Playback the Recorded Files 3-19 Various Settings and [Performance Check] [Performance Check] You can check whether the selected video folder can be used for saving the recordings before you start recording on the left side.
... the Hard Disk Playback the Recorded Files 3-19 Various Settings and [Performance Check] [Performance Check] You can check whether the selected video folder can be used for saving the recordings before you start recording on the left side.
CONSOLE_V1-1_ENG.pdf
Page 20
... the Recorded Files 3-20 Various Settings and [Performance Check] 3 Click [Start] on the right side. When receiving the DV standard data from the camcorder while [Frame] is selected in the [DV Rec] tab. - furthermore, it evaluates the occurrences of the data dropping and the frame rate of ...not be affected even if you change the [Preview resolution] or [Preview picture]. When CONSOLE executes the performance check, the recording data type used for writing (DV or HDV) will be according to the recording settings in the [DV Rec] tab, the writing test of the system starts....
... the Recorded Files 3-20 Various Settings and [Performance Check] 3 Click [Start] on the right side. When receiving the DV standard data from the camcorder while [Frame] is selected in the [DV Rec] tab. - furthermore, it evaluates the occurrences of the data dropping and the frame rate of ...not be affected even if you change the [Preview resolution] or [Preview picture]. When CONSOLE executes the performance check, the recording data type used for writing (DV or HDV) will be according to the recording settings in the [DV Rec] tab, the writing test of the system starts....
CONSOLE_V1-1_ENG.pdf
Page 22
... Exporting the Custom Preset ...4-39 Practical Usages of the Custom Preset Files 4-40 Use of the Disconnected Camcorder After Adjusting the Custom Preset Files 4-40 Passing Down the Custom Preset Setting to the Other Camcorders 4-41 Creating a New Custom Preset File Using an Existing File as a Base 4-41 Preset Variation ...4-42 Resetting the Custom...
... Exporting the Custom Preset ...4-39 Practical Usages of the Custom Preset Files 4-40 Use of the Disconnected Camcorder After Adjusting the Custom Preset Files 4-40 Passing Down the Custom Preset Setting to the Other Camcorders 4-41 Creating a New Custom Preset File Using an Existing File as a Base 4-41 Preset Variation ...4-42 Resetting the Custom...
CONSOLE_V1-1_ENG.pdf
Page 23
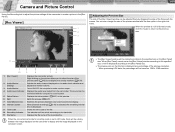
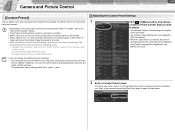
... Check] Camera and Picture Control Recording onto the Hard Disk Playback the Recorded Files Camera and Picture Control 4-23 Using the Recording tool to adjust the picture settings of the camcorder to create a picture in the [Rec Panel]. [Rec Viewer] 1 2 3 Adjusting the Preview Size The ...4 Audio Level Indicator 5 Zebra Pattern 6 Split 7 Color/Monochrome 8 Interval Counter 9 Time Code 10 Recording Indicator 11 File Name Displays the camcorder picture. Shows the time code of the recording file. The indicator will be based on the audio level indicator and adjusts the monitor volume. When...
... Check] Camera and Picture Control Recording onto the Hard Disk Playback the Recorded Files Camera and Picture Control 4-23 Using the Recording tool to adjust the picture settings of the camcorder to create a picture in the [Rec Panel]. [Rec Viewer] 1 2 3 Adjusting the Preview Size The ...4 Audio Level Indicator 5 Zebra Pattern 6 Split 7 Color/Monochrome 8 Interval Counter 9 Time Code 10 Recording Indicator 11 File Name Displays the camcorder picture. Shows the time code of the recording file. The indicator will be based on the audio level indicator and adjusts the monitor volume. When...
CONSOLE_V1-1_ENG.pdf
Page 28
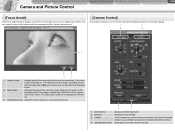
You can check the focus of the picture while the reduced size [Rec Viewer] is being used. [Camera Control] This window enables you to on the focus preview image. Changes the aspect ratio correction mode. Starts/Stops recording onto the hard disk. ... Control Recording onto the Hard Disk Playback the Recorded Files Camera and Picture Control 4-28 [Focus Assist] The [Focus Assist] window displays a part of the camcorder picture as in the [Option Settings] window, you can finalize and save the recording file while recording. The mouse cursor will be displayed on the...
You can check the focus of the picture while the reduced size [Rec Viewer] is being used. [Camera Control] This window enables you to on the focus preview image. Changes the aspect ratio correction mode. Starts/Stops recording onto the hard disk. ... Control Recording onto the Hard Disk Playback the Recorded Files Camera and Picture Control 4-28 [Focus Assist] The [Focus Assist] window displays a part of the camcorder picture as in the [Option Settings] window, you can finalize and save the recording file while recording. The mouse cursor will be displayed on the...

CONSOLE_V1-1_ENG.pdf
Page 30
.... When you are using a manual video lens and selecting [Manual], you cannot control the zoom function from CONSOLE. When the focus switch of the camcorder by clicking the scale. left clicking...gain level by moving the slider. When you cannot adjust the focus function from its center, the camcorder zoom and focus position will move the slider further from CONSOLE. 5 [Option Settings] Clicking displays ... or manual mode. When you are using XL2 and set the camcorder's frame rate to 24F or 30F (NTSC) or 25F (PAL) the camcorder's gain setting can only go up to +12dB...
.... When you are using a manual video lens and selecting [Manual], you cannot control the zoom function from CONSOLE. When the focus switch of the camcorder by clicking the scale. left clicking...gain level by moving the slider. When you cannot adjust the focus function from its center, the camcorder zoom and focus position will move the slider further from CONSOLE. 5 [Option Settings] Clicking displays ... or manual mode. When you are using XL2 and set the camcorder's frame rate to 24F or 30F (NTSC) or 25F (PAL) the camcorder's gain setting can only go up to +12dB...

CONSOLE_V1-1_ENG.pdf
Page 33
... the waveform monitor and the vector scope. 1 2 3 1 Switches over between the line and full scan mode. 2 Displays the selected line number. 3 Selects a number of lines used in the line mode. CONSOLE Windows Various Settings and [Performance Check] Camera and Picture Control Recording onto the Hard Disk Playback the Recorded Files Camera...
... the waveform monitor and the vector scope. 1 2 3 1 Switches over between the line and full scan mode. 2 Displays the selected line number. 3 Selects a number of lines used in the line mode. CONSOLE Windows Various Settings and [Performance Check] Camera and Picture Control Recording onto the Hard Disk Playback the Recorded Files Camera...

CONSOLE_V1-1_ENG.pdf
Page 34
...corrections will be activated. • To adjust the B area color, click of [B Area Review]. You can switch over each parameter, refer to the camcorder instruction manual. • The area that will be corrected will extend to include more you adjust to [+], the area detected will appear as a white area...to [+] results in stronger blue tones, and to [-] in stronger cyan tones. • [B Gain]: Adjust the blue gain of the detected area. Use the following values as they are managed on the [Color Control] window. When connecting the XL H1 or XL2, this function will not be activated...
...corrections will be activated. • To adjust the B area color, click of [B Area Review]. You can switch over each parameter, refer to the camcorder instruction manual. • The area that will be corrected will extend to include more you adjust to [+], the area detected will appear as a white area...to [+] results in stronger blue tones, and to [-] in stronger cyan tones. • [B Gain]: Adjust the blue gain of the detected area. Use the following values as they are managed on the [Color Control] window. When connecting the XL H1 or XL2, this function will not be activated...
CONSOLE_V1-1_ENG.pdf
Page 37
... name, click on the card. After altering the Custom Preset settings, you need to set the camcorder's recording program to EXT.CONT. When using XL H1, you need to set the camcorder's recording program to other modes - The new settings will be changed with the [ ] or [Shift] ...+ [Tab] keys. Disconnecting the IEEE1394 (DV) cable - You can change the setting using XL2, you need to the camcorder instruction manual. The [Custom Preset] window cannot be saved in the [Memory No.] box. 2 Enter a Custom Preset name. For ...
... name, click on the card. After altering the Custom Preset settings, you need to set the camcorder's recording program to EXT.CONT. When using XL H1, you need to set the camcorder's recording program to other modes - The new settings will be changed with the [ ] or [Shift] ...+ [Tab] keys. Disconnecting the IEEE1394 (DV) cable - You can change the setting using XL2, you need to the camcorder instruction manual. The [Custom Preset] window cannot be saved in the [Memory No.] box. 2 Enter a Custom Preset name. For ...


