Instruction Manual
Page 6
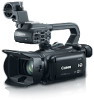
...The viewfinder can be tilted 45 degrees upward, which will feel even more immersed in microphone by selecting the audio scene that matches your shots are framed how you can optimize the audio settings of those important shots. Touch AE By simply touching the screen, you shoot. This ...remote control (A 124), using the Web browser on a smartphone or tablet to MP4 (A 118). 6 Other Features Versatile audio connectivity You can use microphones that require phantom power. Wi-Fi functions Because the camcorder is simple yet allows you to shoot with Wi-Fi, you have 100% frame coverage...
...The viewfinder can be tilted 45 degrees upward, which will feel even more immersed in microphone by selecting the audio scene that matches your shots are framed how you can optimize the audio settings of those important shots. Touch AE By simply touching the screen, you shoot. This ...remote control (A 124), using the Web browser on a smartphone or tablet to MP4 (A 118). 6 Other Features Versatile audio connectivity You can use microphones that require phantom power. Wi-Fi functions Because the camcorder is simple yet allows you to shoot with Wi-Fi, you have 100% frame coverage...
Instruction Manual
Page 8
... Non-Drop Frame 77 Setting the User Bit 78 User Bit Output 78 Table of contents 1 Introduction 11 About this Manual 11 Supplied Accessories 13 Names of Parts 14 8 2 Preparations 21 Attaching the Ferrite Core 21 Charging the Battery Pack 21 Preparing the Camcorder 24 Attaching the Microphone Holder Unit 24 Attaching...
... Non-Drop Frame 77 Setting the User Bit 78 User Bit Output 78 Table of contents 1 Introduction 11 About this Manual 11 Supplied Accessories 13 Names of Parts 14 8 2 Preparations 21 Attaching the Ferrite Core 21 Charging the Battery Pack 21 Preparing the Camcorder 24 Attaching the Microphone Holder Unit 24 Attaching...
Instruction Manual
Page 9
... to the MIC Terminal 80 Audio Scenes and Other Audio Settings 81 Audio Recording Level 82 Wind Screen (Built-in Microphone) 83 Microphone Attenuator (Built-in Microphone) 83 Audio Equalizer (Built-in Microphone) 84 Microphone Directionality (Built-in Microphone) 84 Switching the Input (MIC Terminal) 85 Microphone Attenuator (MIC Terminal) 85 Low Cut Filter (MIC Terminal) 86 Using...
... to the MIC Terminal 80 Audio Scenes and Other Audio Settings 81 Audio Recording Level 82 Wind Screen (Built-in Microphone) 83 Microphone Attenuator (Built-in Microphone) 83 Audio Equalizer (Built-in Microphone) 84 Microphone Directionality (Built-in Microphone) 84 Switching the Input (MIC Terminal) 85 Microphone Attenuator (MIC Terminal) 85 Low Cut Filter (MIC Terminal) 86 Using...

Instruction Manual
Page 61
... recording, the zoom speed is determined by the camcorder's internal machinery while zooming may be set to [Z Fast]. NOTES • When you are using an external microphone while recording, the sound made by the [Zoom Speed Level] setting. Refer to the following table for a summary of the zoom speed. 1 Open the [Zoom Speed...
... recording, the zoom speed is determined by the camcorder's internal machinery while zooming may be set to [Z Fast]. NOTES • When you are using an external microphone while recording, the sound made by the [Zoom Speed Level] setting. Refer to the following table for a summary of the zoom speed. 1 Open the [Zoom Speed...

Instruction Manual
Page 79
...can select the audio input independently for scenes recorded with a sampling frequency of the INPUT terminal ON/ OFF switch, and whether a microphone or analog audio source is connected to the MIC terminal. LPCM audio playback is also available for channel 1 (CH1) and channel...unit is attached to channel 1, which depends on whether the handle unit is set to channel 1 INPUT 1 terminal INPUT 1 terminal MIC terminal Built-in microphone MIC terminal Built-in stereo microphone, commercially available external microphone (INPUT 1/INPUT 2 terminals*, MIC terminal) or line input (INPUT 1/INPUT ...
...can select the audio input independently for scenes recorded with a sampling frequency of the INPUT terminal ON/ OFF switch, and whether a microphone or analog audio source is connected to the MIC terminal. LPCM audio playback is also available for channel 1 (CH1) and channel...unit is attached to channel 1, which depends on whether the handle unit is set to channel 1 INPUT 1 terminal INPUT 1 terminal MIC terminal Built-in microphone MIC terminal Built-in stereo microphone, commercially available external microphone (INPUT 1/INPUT 2 terminals*, MIC terminal) or line input (INPUT 1/INPUT ...
Instruction Manual
Page 80
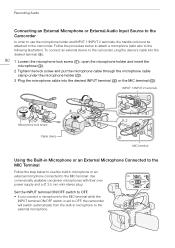
... terminal Using the Built-in Microphone or an External Microphone Connected to the MIC Terminal Follow the step below to attach a microphone (refer also to the following illustration). Set the INPUT terminal ON/OFF switch to OFF. • If you connect a microphone to the MIC terminal while ...the INPUT terminal ON/OFF switch is set to OFF, the camcorder will switch automatically from the built-in microphone or an external microphone connected to the MIC terminal. Use commercially available condenser microphones with their own power supply and a ∅ 3.5 mm mini-...
... terminal Using the Built-in Microphone or an External Microphone Connected to the MIC Terminal Follow the step below to attach a microphone (refer also to the following illustration). Set the INPUT terminal ON/OFF switch to OFF. • If you connect a microphone to the MIC terminal while ...the INPUT terminal ON/OFF switch is set to OFF, the camcorder will switch automatically from the built-in microphone or an external microphone connected to the MIC terminal. Use commercially available condenser microphones with their own power supply and a ∅ 3.5 mm mini-...
Instruction Manual
Page 81
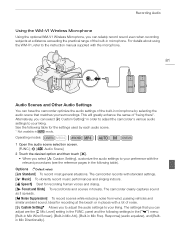
...details about using the WM-V1, refer to the instruction manual supplied with the microphone. 81 Audio Scenes and Other Audio Settings You can have the camcorder optimize the audio settings of the built-in microphone by each audio scene. * Not available in mode. Audio Scene] 2 Touch ... desired option and then touch [X]. • When you select [„ Custom Setting], customize the audio settings to your liking. Recording Audio Using the WM-V1 Wireless Microphone Using the optional WM-V1 Wireless Microphone, you can reliably record sound even when recording subjects at the beach or in...
...details about using the WM-V1, refer to the instruction manual supplied with the microphone. 81 Audio Scenes and Other Audio Settings You can have the camcorder optimize the audio settings of the built-in microphone by each audio scene. * Not available in mode. Audio Scene] 2 Touch ... desired option and then touch [X]. • When you select [„ Custom Setting], customize the audio settings to your liking. Recording Audio Using the WM-V1 Wireless Microphone Using the optional WM-V1 Wireless Microphone, you can reliably record sound even when recording subjects at the beach or in...
Instruction Manual
Page 82
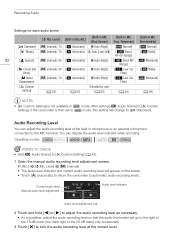
... recording level so that the audio level meter will change to lock the audio recording level at the current level. Audio Scene] to [„ Custom Setting] (A 81). 1 Open the manual audio recording level adjustment screen. [FUNC.] > [ä Mic Level] > [n] (manual) • The audio level ... recording level will appear on the screen. • Touch [m] (automatic) to return the camcorder to mode. Recording Audio Settings for each audio scene [ä Mic Level] [Built-in Mic Att.] [Built-in Mic Wind Screen] [Built-in microphone or an external microphone connected to the MIC terminal.
... recording level so that the audio level meter will change to lock the audio recording level at the current level. Audio Scene] to [„ Custom Setting] (A 81). 1 Open the manual audio recording level adjustment screen. [FUNC.] > [ä Mic Level] > [n] (manual) • The audio level ... recording level will appear on the screen. • Touch [m] (automatic) to return the camcorder to mode. Recording Audio Settings for each audio scene [ä Mic Level] [Built-in Mic Att.] [Built-in Mic Wind Screen] [Built-in microphone or an external microphone connected to the MIC terminal.
Instruction Manual
Page 83
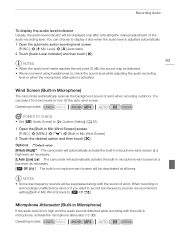
... you want to record low-frequency sounds, we recommend setting [Built-in Mic Wind Screen] to [„ Custom Setting] (A 81). 1 Open the [Built-in Mic Wind Screen] screen. [FUNC.] > [MENU] > p > [Built-in Microphone) If the audio level is activated. Operating modes: POINTS... TO CHECK • Set [- Wind Screen (Built-in microphone wind screen will be displayed only after activating the manual adjustment of wind. Options ( Default value...
... you want to record low-frequency sounds, we recommend setting [Built-in Mic Wind Screen] to [„ Custom Setting] (A 81). 1 Open the [Built-in Mic Wind Screen] screen. [FUNC.] > [MENU] > p > [Built-in Microphone) If the audio level is activated. Operating modes: POINTS... TO CHECK • Set [- Wind Screen (Built-in microphone wind screen will be displayed only after activating the manual adjustment of wind. Options ( Default value...
Instruction Manual
Page 84
...recording live music and clearly capture the special sound characteristics of a variety of instruments. or lowfrequency range and selecting one of the built-in microphone to [„ Custom Setting] (A 81). 1 Open the [Built-in Mic Att.] screen. [FUNC.] > [MENU] > p > [Built-in Mic Att.]...option and then touch [X]. Response] screen. [FUNC.] > [MENU] > p > [Built-in microphone attenuator will automatically activate the built-in Microphone) You can use the audio equalizer to [„ Custom Setting] (A 81). Audio Scene] to have more control over how sound is recorded. Audio Equalizer (...
...recording live music and clearly capture the special sound characteristics of a variety of instruments. or lowfrequency range and selecting one of the built-in microphone to [„ Custom Setting] (A 81). 1 Open the [Built-in Mic Att.] screen. [FUNC.] > [MENU] > p > [Built-in Mic Att.]...option and then touch [X]. Response] screen. [FUNC.] > [MENU] > p > [Built-in microphone attenuator will automatically activate the built-in Microphone) You can use the audio equalizer to [„ Custom Setting] (A 81). Audio Scene] to have more control over how sound is recorded. Audio Equalizer (...
Instruction Manual
Page 85
... adds to the sense of presence of movies. [ï Zoom] Stereo recording with the sound linked to prevent audio from the front of the camcorder/ microphone. 85 [h Normal] Standard stereo recording; Operating modes: 1 Open the [MIC Terminal Input] screen. [FUNC.] > [MENU] > p > [MIC ...will appear on whether you are using an external microphone or an external audio source, such as necessary for a microphone connected to the MIC terminal to the zoom position. a middle point between the [î Wide] and [í Monaural] settings in Mic Directionality] 2 Touch the desired option...
... adds to the sense of presence of movies. [ï Zoom] Stereo recording with the sound linked to prevent audio from the front of the camcorder/ microphone. 85 [h Normal] Standard stereo recording; Operating modes: 1 Open the [MIC Terminal Input] screen. [FUNC.] > [MENU] > p > [MIC ...will appear on whether you are using an external microphone or an external audio source, such as necessary for a microphone connected to the MIC terminal to the zoom position. a middle point between the [î Wide] and [í Monaural] settings in Mic Directionality] 2 Touch the desired option...
Instruction Manual
Page 86
...will be recorded to MIC+48V instead. Keep the microphone connected when turning off the phantom power. You can use this setting when recording audio for INPUT 1/INPUT 2 to LINE or MIC. • To supply a microphone with phantom power, set the switch to channel 1. Recording Audio to Channel ...You can activate the low cut filter to channel 1 and channel 2. You can use an external microphone connected to an INPUT terminal. 1 Set the INPUT terminal ON/OFF switch to ON. 2 Set the sensitivity switches for backup purposes. [ INPUT 2] The audio signal input through the INPUT 2 ...
...will be recorded to MIC+48V instead. Keep the microphone connected when turning off the phantom power. You can use this setting when recording audio for INPUT 1/INPUT 2 to LINE or MIC. • To supply a microphone with phantom power, set the switch to channel 1. Recording Audio to Channel ...You can activate the low cut filter to channel 1 and channel 2. You can use an external microphone connected to an INPUT terminal. 1 Set the INPUT terminal ON/OFF switch to ON. 2 Set the sensitivity switches for backup purposes. [ INPUT 2] The audio signal input through the INPUT 2 ...
Instruction Manual
Page 87
...the screen and the audio peak limiter will be set to [' Standard]. 87 Audio Recording Level (INPUT Terminals) You can set to the same audio input (external microphone or external line input), you can use the p > [INPUT 1/2 ALC Link] setting to perform the rest of audio input signals when...using headphones to check the sound level while adjusting the audio recording level or when the microphone attenuator is set the level (from -G to 18 dB) independently for each channel. Adjusting the Microphone's Sensitivity (INPUT terminals) You can adjust the sensitivity of the input of the 20 ...
...the screen and the audio peak limiter will be set to [' Standard]. 87 Audio Recording Level (INPUT Terminals) You can set to the same audio input (external microphone or external line input), you can use the p > [INPUT 1/2 ALC Link] setting to perform the rest of audio input signals when...using headphones to check the sound level while adjusting the audio recording level or when the microphone attenuator is set the level (from -G to 18 dB) independently for each channel. Adjusting the Microphone's Sensitivity (INPUT terminals) You can adjust the sensitivity of the input of the 20 ...
Instruction Manual
Page 88
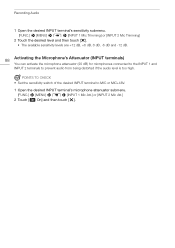
POINTS TO CHECK • Set the sensitivity switch of the desired INPUT terminal to prevent audio from being distorted if the audio level is too high. Recording Audio 1 Open the ... desired level and then touch [X]. • The available sensitivity levels are +12 dB, +6 dB, 0 dB, -6 dB and -12 dB. 88 Activating the Microphone's Attenuator (INPUT terminals) You can activate the microphone attenuator (20 dB) for microphones connected to the INPUT 1 and INPUT 2 terminals to MIC or MIC+48V. 1 Open the desired INPUT terminal...
POINTS TO CHECK • Set the sensitivity switch of the desired INPUT terminal to prevent audio from being distorted if the audio level is too high. Recording Audio 1 Open the ... desired level and then touch [X]. • The available sensitivity levels are +12 dB, +6 dB, 0 dB, -6 dB and -12 dB. 88 Activating the Microphone's Attenuator (INPUT terminals) You can activate the microphone attenuator (20 dB) for microphones connected to the INPUT 1 and INPUT 2 terminals to MIC or MIC+48V. 1 Open the desired INPUT terminal...
Instruction Manual
Page 144
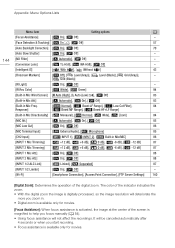
... 1/2 ALC Link] [ Linked], [ Separated] 87 [INPUT 1/2 Limiter] [i On], [j Off] - [Wi-Fi] [Smartphone Connection], [Access Point Connection], [FTP Server Settings] 140 [Digital Zoom]: Determines the operation of the screen is magnified to help you focus manually (A 54). • Using focus assistance will be cancelled automatically... Att.] [k Automatic], [i On], [j Off] 85 [MIC Low Cut] [i On], [j Off] 86 [MIC Terminal Input] [Þ External Audio], [ß Microphone] 85 [CH2 Input] [ INPUT 1], [ INPUT 2], [ Built-in . • Digital zoom is available only for movies.
... 1/2 ALC Link] [ Linked], [ Separated] 87 [INPUT 1/2 Limiter] [i On], [j Off] - [Wi-Fi] [Smartphone Connection], [Access Point Connection], [FTP Server Settings] 140 [Digital Zoom]: Determines the operation of the screen is magnified to help you focus manually (A 54). • Using focus assistance will be cancelled automatically... Att.] [k Automatic], [i On], [j Off] 85 [MIC Low Cut] [i On], [j Off] 86 [MIC Terminal Input] [Þ External Audio], [ß Microphone] 85 [CH2 Input] [ INPUT 1], [ INPUT 2], [ Built-in . • Digital zoom is available only for movies.
Instruction Manual
Page 159
...controller will not work. - Troubleshooting Horizontal bands appear on . The picture is displayed correctly but there is not set correctly (A 82). - Adjust the volume (A 101). - When using a microphone connected to [Programmed AE] or [Shutter-Pri. Initialize the memory card (A 38) when you use it ...This is recorded at the actual levels. Also, make sure the microphone is not exhausted. - The memory card was not facing the correct direction. Cannot record on the memory card is set the recording program to the MIC terminal, make sure its battery is...
...controller will not work. - Troubleshooting Horizontal bands appear on . The picture is displayed correctly but there is not set correctly (A 82). - Adjust the volume (A 101). - When using a microphone connected to [Programmed AE] or [Shutter-Pri. Initialize the memory card (A 38) when you use it ...This is recorded at the actual levels. Also, make sure the microphone is not exhausted. - The memory card was not facing the correct direction. Cannot record on the memory card is set the recording program to the MIC terminal, make sure its battery is...

Instruction Manual
Page 166
... the PIN code. Make sure the address range for that address are correctly configured. - Set the DNS server's IP address in the access point's configuration screen. Disconnect the microphone from the MIC terminal and turn them on the DNS server. If the problem persists, ...address in a location farther away from such appliances. - The camcorder's Wi-Fi functions cannot be used while the optional WM-V1 Wireless Microphone is using the same authentication/encryption method and encryption key. - Wi-Fi connection terminated - Make sure the camcorder and access point are correctly...
... the PIN code. Make sure the address range for that address are correctly configured. - Set the DNS server's IP address in the access point's configuration screen. Disconnect the microphone from the MIC terminal and turn them on the DNS server. If the problem persists, ...address in a location farther away from such appliances. - The camcorder's Wi-Fi functions cannot be used while the optional WM-V1 Wireless Microphone is using the same authentication/encryption method and encryption key. - Wi-Fi connection terminated - Make sure the camcorder and access point are correctly...
Instruction Manual
Page 180
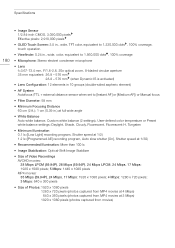
... • Viewfinder: 0.24 in., wide, color, equivalent to 1,560,000 dots, 100% coverage • Microphone: Stereo electret condenser microphone • Lens f=3.67-73.4 mm, F/1.8-2.8, 20x optical zoom, 8-bladed circular aperture 35 mm equivalent: 26.8 -... 576 mm 28.8 - 576 mm (when Dynamic IS is activated) • Lens Configuration: 12 elements in 10 groups (double-sided aspheric element) • AF System Autofocus (TTL + external distance sensor when set...
... • Viewfinder: 0.24 in., wide, color, equivalent to 1,560,000 dots, 100% coverage • Microphone: Stereo electret condenser microphone • Lens f=3.67-73.4 mm, F/1.8-2.8, 20x optical zoom, 8-bladed circular aperture 35 mm equivalent: 26.8 -... 576 mm 28.8 - 576 mm (when Dynamic IS is activated) • Lens Configuration: 12 elements in 10 groups (double-sided aspheric element) • AF System Autofocus (TTL + external distance sensor when set...
Instruction Manual
Page 181
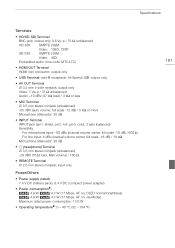
...(unbalanced) -65 dBV (auto volume, full scale -12 dB) / 5 kΩ or more Microphone attenuator: 20 dB • INPUT Terminal INPUT jack (pin1: shield, pin2: hot, pin3: cold), 2 sets (balanced) Sensitivity: For microphone input: -60 dBu (manual volume center, full scale -18 dB) / 600 Ω For ...line input: 4 dBu (manual volume center, full scale -18 dB) / 10 kΩ Microphone attenuator: 20 dB • × (headphone) Terminal...
...(unbalanced) -65 dBV (auto volume, full scale -12 dB) / 5 kΩ or more Microphone attenuator: 20 dB • INPUT Terminal INPUT jack (pin1: shield, pin2: hot, pin3: cold), 2 sets (balanced) Sensitivity: For microphone input: -60 dBu (manual volume center, full scale -18 dB) / 600 Ω For ...line input: 4 dBu (manual volume center, full scale -18 dB) / 10 kΩ Microphone attenuator: 20 dB • × (headphone) Terminal...
Instruction Manual
Page 183
...M M (Manual) mode 45 Maintenance 172 Manual exposure 68 Manual focus 54 Markers 145 Memory card 37, 170 Menu settings, saving and loading 99 MIC terminal 80, 81 Microphone attenuator 83, 88 Index A Abroad, using the camcorder 173 AGC (automatic gain control) limit 65 Aperture (f number 66... Battery pack Battery information 150 Charging 21 Remaining charge indicator 155 Beach (recording program 73 Built-in backup battery 170 Built-in microphone 79 C Capturing photos from a movie 102 CINEMA mode 52 Cinema-look filters 52 Color bars 90 Compact power adapter 21 Condensation...
...M M (Manual) mode 45 Maintenance 172 Manual exposure 68 Manual focus 54 Markers 145 Memory card 37, 170 Menu settings, saving and loading 99 MIC terminal 80, 81 Microphone attenuator 83, 88 Index A Abroad, using the camcorder 173 AGC (automatic gain control) limit 65 Aperture (f number 66... Battery pack Battery information 150 Charging 21 Remaining charge indicator 155 Beach (recording program 73 Built-in backup battery 170 Built-in microphone 79 C Capturing photos from a movie 102 CINEMA mode 52 Cinema-look filters 52 Color bars 90 Compact power adapter 21 Condensation...


