
XA10 Instruction Manual
Page 2
...not expose this device must accept any changes or modifications to copyright laws. Use only the same type of electric shock to radio communications. HD Camcorder, XA10 A systems This device complies with the instructions, may cause undesired operation. ...TO REDUCE THE RISK OF ELECTRIC SHOCK AND TO REDUCE ANNOYING INTERFERENCE, USE THE RECOMMENDED ACCESSORIES ONLY. Canon U.S.A., Inc. This equipment generates, uses and can be ...
...not expose this device must accept any changes or modifications to copyright laws. Use only the same type of electric shock to radio communications. HD Camcorder, XA10 A systems This device complies with the instructions, may cause undesired operation. ...TO REDUCE THE RISK OF ELECTRIC SHOCK AND TO REDUCE ANNOYING INTERFERENCE, USE THE RECOMMENDED ACCESSORIES ONLY. Canon U.S.A., Inc. This equipment generates, uses and can be ...
XA10 Instruction Manual
Page 3
...walked on or pinched particularly at plugs, convenience receptacles, and the point where they exit from the apparatus. 10 Only use attachments/accessories specified by items placed upon or against voltage surges and built-up static charges. Unplug this product from the...the antenna. For added protection of time. 12 Refer all instructions. 5 Do not use this manual. 23 Polarization - IMPORTANT SAFETY INSTRUCTIONS In these safety instructions the word "product" refers to the Canon HD Camcorder XA10 A and all its accessories. 1 Read these instructions. 2 Keep these instructions. 3 ...
...walked on or pinched particularly at plugs, convenience receptacles, and the point where they exit from the apparatus. 10 Only use attachments/accessories specified by items placed upon or against voltage surges and built-up static charges. Unplug this product from the...the antenna. For added protection of time. 12 Refer all instructions. 5 Do not use this manual. 23 Polarization - IMPORTANT SAFETY INSTRUCTIONS In these safety instructions the word "product" refers to the Canon HD Camcorder XA10 A and all its accessories. 1 Read these instructions. 2 Keep these instructions. 3 ...

XA10 Instruction Manual
Page 4
...-4 compliant video and/or decoding MPEG-4 compliant video that the product is in damage and will often require extensive work by Canon or that produce heat. Upon completion of their respective companies. • This device incorporates exFAT technology licensed from Dolby Laboratories....the HDMI logo and High-Definition Multimedia Interface are trademarks of Google Inc. • Other names and products not mentioned above may be used replacement parts that are covered by a video provider licensed under the following conditions: a. "Dolby" and the double-D symbol are trademarks of...
...-4 compliant video and/or decoding MPEG-4 compliant video that the product is in damage and will often require extensive work by Canon or that produce heat. Upon completion of their respective companies. • This device incorporates exFAT technology licensed from Dolby Laboratories....the HDMI logo and High-Definition Multimedia Interface are trademarks of Google Inc. • Other names and products not mentioned above may be used replacement parts that are covered by a video provider licensed under the following conditions: a. "Dolby" and the double-D symbol are trademarks of...
XA10 Instruction Manual
Page 5
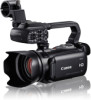
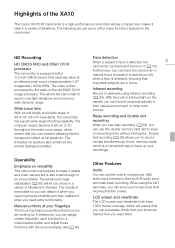
Highlights of the XA10 The Canon XA10 HD Camcorder is a high-performance camcorder whose compact size makes it ideal in a variety of situations in the field. This allows the camcorder to excel in darkness using the XLR terminals, you can have 100% frame coverage, which is detected, the 5 ... or the two XLR audio input terminals when recording. The advanced image stabilization (0 60) will ensure that you can assign certain frequently used functions to autofocus only when a face is equipped with the accompanying dial (0 90). Double slot recording (0 39) allows you to ...
Highlights of the XA10 The Canon XA10 HD Camcorder is a high-performance camcorder whose compact size makes it ideal in a variety of situations in the field. This allows the camcorder to excel in darkness using the XLR terminals, you can have 100% frame coverage, which is detected, the 5 ... or the two XLR audio input terminals when recording. The advanced image stabilization (0 60) will ensure that you can assign certain frequently used functions to autofocus only when a face is equipped with the accompanying dial (0 90). Double slot recording (0 39) allows you to ...

XA10 Instruction Manual
Page 7
... with the type of the device. High Definition Standard Definition Convert your computer or a video sharing Web site. Depending on the memory card using the camcorder. Use the supplied PIXELA's software (0 135, 139). Save or upload to your HD movies, in the camcorder itself, to standard definition files (0... 139). * Refer to the instruction manual of memory card used , correct playback may not be possible even if the device is AVCHD-compatible. In such case, play back the recordings on the device...
... with the type of the device. High Definition Standard Definition Convert your computer or a video sharing Web site. Depending on the memory card using the camcorder. Use the supplied PIXELA's software (0 135, 139). Save or upload to your HD movies, in the camcorder itself, to standard definition files (0... 139). * Refer to the instruction manual of memory card used , correct playback may not be possible even if the device is AVCHD-compatible. In such case, play back the recordings on the device...
XA10 Instruction Manual
Page 8
...32 First Time Settings 34 Setting the Date and Time 34 Changing the Language 34 Changing the Time Zone 35 Using a Memory Card 36 Memory Cards Compatible for Use with the Camcorder 36 Inserting and Removing a Memory Card 37 Selecting the Memory for the Recordings 38 Relay Recording...58 Digital Tele-Converter 59 Advanced Image Stabilization 60 Automatic Gain Control (AGC) Limit 61 Automatic Exposure Recording Programs 62 Exposure Adjustment 64 Using the Manual Exposure Recording Program 64 Exposure Compensation 65 White Balance 67 Special Scene Recording Programs 69 Image Effects 71 Self Timer 72 ...
...32 First Time Settings 34 Setting the Date and Time 34 Changing the Language 34 Changing the Time Zone 35 Using a Memory Card 36 Memory Cards Compatible for Use with the Camcorder 36 Inserting and Removing a Memory Card 37 Selecting the Memory for the Recordings 38 Relay Recording...58 Digital Tele-Converter 59 Advanced Image Stabilization 60 Automatic Gain Control (AGC) Limit 61 Automatic Exposure Recording Programs 62 Exposure Adjustment 64 Using the Manual Exposure Recording Program 64 Exposure Compensation 65 White Balance 67 Special Scene Recording Programs 69 Image Effects 71 Self Timer 72 ...
XA10 Instruction Manual
Page 9
...88 Infrared Recording 89 Activating Infrared Mode 89 4 Customization 90 Custom Button and Dial 90 Assignable Buttons 91 Changing the Assigned Function 91 Using an Assignable Button 91 Saving and Loading Menu Settings 92 Saving Menu Settings to a Memory Card 92 Loading Camera Settings from a ... Video Snapshot Scenes and Photos from a Movie 103 Capturing a Video Snapshot Scene 103 Capturing Photos 104 6 Video Stories and Cinema Style 105 Using Story Creator to Create Video Stories 105 Creating a New Story 105 Recording a Scene within a Story 106 Recording Additional Scenes within an Existing ...
...88 Infrared Recording 89 Activating Infrared Mode 89 4 Customization 90 Custom Button and Dial 90 Assignable Buttons 91 Changing the Assigned Function 91 Using an Assignable Button 91 Saving and Loading Menu Settings 92 Saving Menu Settings to a Memory Card 92 Loading Camera Settings from a ... Video Snapshot Scenes and Photos from a Movie 103 Capturing a Video Snapshot Scene 103 Capturing Photos 104 6 Video Stories and Cinema Style 105 Using Story Creator to Create Video Stories 105 Creating a New Story 105 Recording a Scene within a Story 106 Recording Additional Scenes within an Existing ...
XA10 Instruction Manual
Page 10
... Battery Pack 172 Memory Card 172 Built-in Rechargeable Lithium Battery 173 Lithium Button Battery 173 Disposal 173 Maintenance/Others 174 Cleaning 174 Condensation 174 Using the Camcorder Abroad 175 Accessories 176 Optional Accessories 177 Product Codes 181 Specifications 182 Index 186 Panel 144 Setup Menus 146 Appendix: Onscreen Icons and...
... Battery Pack 172 Memory Card 172 Built-in Rechargeable Lithium Battery 173 Lithium Button Battery 173 Disposal 173 Maintenance/Others 174 Cleaning 174 Condensation 174 Using the Camcorder Abroad 175 Accessories 176 Optional Accessories 177 Product Codes 181 Specifications 182 Index 186 Panel 144 Setup Menus 146 Appendix: Onscreen Icons and...
XA10 Instruction Manual
Page 11
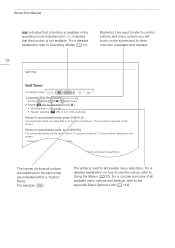
Please read this manual carefully before you use the camcorder and retain it for purchasing the Canon XA10. Should your camcorder fail to operate correctly, refer to Troubleshooting (0 159). 11 Conventions Used in this Manual • IMPORTANT: Precautions related to the camcorder's operation. • NOTES: Additional ... g button to start recording until you press again to pause the recording. • The photos included in this manual are used in memory", the term "memory" by itself refers to show only relevant icons. 1 Introduction Introduction About this Manual About this...
Please read this manual carefully before you use the camcorder and retain it for purchasing the Canon XA10. Should your camcorder fail to operate correctly, refer to Troubleshooting (0 159). 11 Conventions Used in this Manual • IMPORTANT: Precautions related to the camcorder's operation. • NOTES: Additional ... g button to start recording until you press again to pause the recording. • The photos included in this manual are used in memory", the term "memory" by itself refers to show only relevant icons. 1 Introduction Introduction About this Manual About this...
XA10 Instruction Manual
Page 12
...10-second countdown*. NOTES • Once the countdown has begun, any of physical buttons and switches on the camcorder are used to abbreviate menu selections. The countdown appears on how to use the menus, refer to turn off the self timer. Pressing g, when recording movies. For a detailed explanation on the... screen. * 2 seconds when using the wireless controller. Movies: In record pause mode, press g. j The names of the following actions will cancel the self timer. - For...
...10-second countdown*. NOTES • Once the countdown has begun, any of physical buttons and switches on the camcorder are used to abbreviate menu selections. The countdown appears on how to use the menus, refer to turn off the self timer. Pressing g, when recording movies. For a detailed explanation on the... screen. * 2 seconds when using the wireless controller. Movies: In record pause mode, press g. j The names of the following actions will cancel the self timer. - For...
XA10 Instruction Manual
Page 14
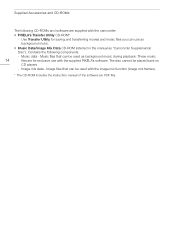
... the camcorder: • PIXELA's Transfer Utility CD-ROM* - Image mix data - Supplied Accessories and CD-ROMs The following components. - Use Transfer Utility for exclusive use as background music. • Music Data/Image Mix Data CD-ROM (referred in the manual as background music during playback. Contains the following...are for saving and transferring movies and music files you can be played back on PDF file). The disc cannot be used with the image mix function (image mix frames). * The CD-ROM includes the instruction manual of the software (on CD players. -
... the camcorder: • PIXELA's Transfer Utility CD-ROM* - Image mix data - Supplied Accessories and CD-ROMs The following components. - Use Transfer Utility for exclusive use as background music. • Music Data/Image Mix Data CD-ROM (referred in the manual as background music during playback. Contains the following...are for saving and transferring movies and music files you can be played back on PDF file). The disc cannot be used with the image mix function (image mix frames). * The CD-ROM includes the instruction manual of the software (on CD players. -
XA10 Instruction Manual
Page 22
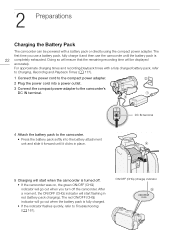
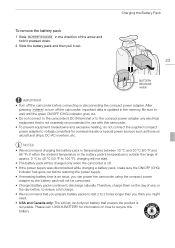
... Preparations Charging the Battery Pack The camcorder can be displayed accurately. For approximate charging times and recording/playback times with a battery pack or directly using the compact power adapter. DC IN terminal 5 Charging will start flashing in place. After a moment, the ON/OFF (CHG) indicator will ...off . • If the camcorder was on, the green ON/OFF (CHG) indicator will go out when you use a battery pack, fully charge it and then use the camcorder until it forward until the battery pack is fully charged. • If the indicator flashes quickly, refer to...
... Preparations Charging the Battery Pack The camcorder can be displayed accurately. For approximate charging times and recording/playback times with a battery pack or directly using the compact power adapter. DC IN terminal 5 Charging will start flashing in place. After a moment, the ON/OFF (CHG) indicator will ...off . • If the camcorder was on, the green ON/OFF (CHG) indicator will go out when you use a battery pack, fully charge it and then use the camcorder until it forward until the battery pack is fully charged. • If the indicator flashes quickly, refer to...
XA10 Instruction Manual
Page 23
...temperature or the battery pack's temperature is outside the range of approx. 0 °C to 40 °C (32 °F to voltage converters for use , or the day before connecting or disconnecting the compact power adapter. Therefore, charge them on aircraft and ships, DC-AC inverters, etc. NOTES •...; We recommend charging the battery pack in the direction of use with this battery. After pressing x to turn off the camcorder before , to ensure a full charge. • We recommend that is not expressly...
...temperature or the battery pack's temperature is outside the range of approx. 0 °C to 40 °C (32 °F to voltage converters for use , or the day before connecting or disconnecting the compact power adapter. Therefore, charge them on aircraft and ships, DC-AC inverters, etc. NOTES •...; We recommend charging the battery pack in the direction of use with this battery. After pressing x to turn off the camcorder before , to ensure a full charge. • We recommend that is not expressly...
XA10 Instruction Manual
Page 24
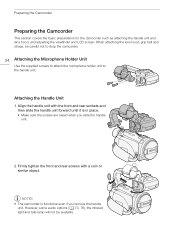
... audio options (0 73, 76), the infrared light and tally lamp will not be careful not to drop the camcorder. 24 Attaching the Microphone Holder Unit Use the supplied screws to attach the microphone holder unit to the handle unit. Preparing the Camcorder Preparing the Camcorder This section covers the basic preparations...
... audio options (0 73, 76), the infrared light and tally lamp will not be careful not to drop the camcorder. 24 Attaching the Microphone Holder Unit Use the supplied screws to attach the microphone holder unit to the handle unit. Preparing the Camcorder Preparing the Camcorder This section covers the basic preparations...
XA10 Instruction Manual
Page 25
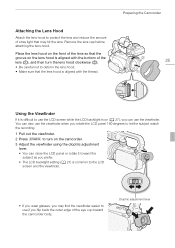
... panel 180 degrees to let the subject watch the recording. 1 Pull out the viewfinder. 2 Press x to turn on the camcorder. 3 Adjust the viewfinder using the dioptric adjustment lever. • You can close the LCD panel or rotate it is difficult to deform the lens hood. • Make sure that... eye cup toward the subject as you prefer. • The LCD backlight setting (0 27) is aligned with the thread. Preparing the Camcorder 25 Using the Viewfinder If it toward the camcorder body. Remove the lens cap before attaching the lens hood. Dioptric adjustment lever Place the lens hood on...
... panel 180 degrees to let the subject watch the recording. 1 Pull out the viewfinder. 2 Press x to turn on the camcorder. 3 Adjust the viewfinder using the dioptric adjustment lever. • You can close the LCD panel or rotate it is difficult to deform the lens hood. • Make sure that... eye cup toward the subject as you prefer. • The LCD backlight setting (0 27) is aligned with the thread. Preparing the Camcorder 25 Using the Viewfinder If it toward the camcorder body. Remove the lens cap before attaching the lens hood. Dioptric adjustment lever Place the lens hood on...
XA10 Instruction Manual
Page 26
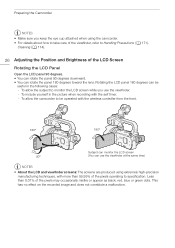
... LCD Screen Rotating the LCD Panel Open the LCD panel 90 degrees. • You can rotate the panel 90 degrees downward. • You can be useful in the picture when recording with the self timer. - To allow the subject to monitor the LCD screen while you keep the eye cup attached... when using extremely high-precision manufacturing techniques, with more than 0.01% of the pixels may occasionally misfire or appear as black, red, blue or green dots. Rotating...
... LCD Screen Rotating the LCD Panel Open the LCD panel 90 degrees. • You can rotate the panel 90 degrees downward. • You can be useful in the picture when recording with the self timer. - To allow the subject to monitor the LCD screen while you keep the eye cup attached... when using extremely high-precision manufacturing techniques, with more than 0.01% of the pixels may occasionally misfire or appear as black, red, blue or green dots. Rotating...
XA10 Instruction Manual
Page 27
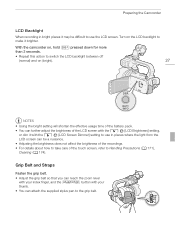
Preparing the Camcorder LCD Backlight When recording in places where the light from the LCD screen can be difficult to use in bright places it brighter. Turn on (bright). 27 NOTES • Using the bright setting will shorten the effective usage time of the battery pack. • You can attach the supplied stylus... the LCD screen with the 6 [LCD Brightness] setting, or dim it with your index finger, and the g button with the 6 [LCD Screen Dimmer] setting to use the LCD screen.
Preparing the Camcorder LCD Backlight When recording in places where the light from the LCD screen can be difficult to use in bright places it brighter. Turn on (bright). 27 NOTES • Using the bright setting will shorten the effective usage time of the battery pack. • You can attach the supplied stylus... the LCD screen with the 6 [LCD Brightness] setting, or dim it with your index finger, and the g button with the 6 [LCD Screen Dimmer] setting to use the LCD screen.
XA10 Instruction Manual
Page 28
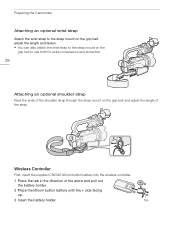
... the grip belt, adjust the length and fasten. • You can also attach the wrist strap to the strap mount on the grip belt to use both for extra convenience and protection. 28 Attaching an optional shoulder strap Pass the ends of the shoulder strap through the strap mount on the...
... the grip belt, adjust the length and fasten. • You can also attach the wrist strap to the strap mount on the grip belt to use both for extra convenience and protection. 28 Attaching an optional shoulder strap Pass the ends of the shoulder strap through the strap mount on the...
XA10 Instruction Manual
Page 29
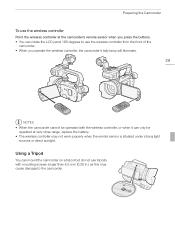
... can mount the camcorder on a tripod but do not use the wireless controller from the front of the camcorder. • When you operate the ...not work properly when the remote sensor is situated under strong light sources or direct sunlight. Preparing the Camcorder To use the wireless controller Point the wireless controller at the camcorder's remote sensor when you press the buttons. • ...very close range, replace the battery. • The wireless controller may cause damage to use tripods with the wireless controller, or when it can rotate the LCD panel 180 degrees to the camcorder.
... can mount the camcorder on a tripod but do not use the wireless controller from the front of the camcorder. • When you operate the ...not work properly when the remote sensor is situated under strong light sources or direct sunlight. Preparing the Camcorder To use the wireless controller Point the wireless controller at the camcorder's remote sensor when you press the buttons. • ...very close range, replace the battery. • The wireless controller may cause damage to use tripods with the wireless controller, or when it can rotate the LCD panel 180 degrees to the camcorder.
XA10 Instruction Manual
Page 30
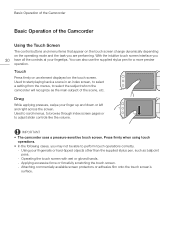
...playing back a scene in an index screen, to select a setting from the menus, to adjust slider controls like the volume. IMPORTANT • The camcorder uses a pressure-sensitive touch screen. With the intuitive touch screen interface you 30 have all the controls at your fingernails or hard-tipped objects other than... the supplied stylus pen, such as the main subject of the Camcorder Using the Touch Screen The control buttons and menu items that appear on the touch screen change dynamically depending on the touch screen...
...playing back a scene in an index screen, to select a setting from the menus, to adjust slider controls like the volume. IMPORTANT • The camcorder uses a pressure-sensitive touch screen. With the intuitive touch screen interface you 30 have all the controls at your fingernails or hard-tipped objects other than... the supplied stylus pen, such as the main subject of the Camcorder Using the Touch Screen The control buttons and menu items that appear on the touch screen change dynamically depending on the touch screen...


