
HF W11 User Manual
Page 2
... Recording Taking Videos in Auto Mode 20 Capturing Still Images During Video Recording 23 Taking Still Images in Auto Mode 23 Zooming 26 Manual Recording 27 Adjusting Focus Manually (FOCUS 28 Adjusting Brightness 29 Setting Backlight Compensation 30 Setting White Balance 31 Taking Close-up Shots (TELE MACRO 32 Shooting under Water...
... Recording Taking Videos in Auto Mode 20 Capturing Still Images During Video Recording 23 Taking Still Images in Auto Mode 23 Zooming 26 Manual Recording 27 Adjusting Focus Manually (FOCUS 28 Adjusting Brightness 29 Setting Backlight Compensation 30 Setting White Balance 31 Taking Close-up Shots (TELE MACRO 32 Shooting under Water...

HF W11 User Manual
Page 12
... from n to m. 0 When the power is turned off , the display setting will revert to simple display (n). 8 Recording Mode Button Switches the recording mode (P Intelligent Auto/H Manual). . 0 When this unit is not operated for a certain period of the video being played back as a still image. 3 Recording Mode Button 0 Switches to the recording...
... from n to m. 0 When the power is turned off , the display setting will revert to simple display (n). 8 Recording Mode Button Switches the recording mode (P Intelligent Auto/H Manual). . 0 When this unit is not operated for a certain period of the video being played back as a still image. 3 Recording Mode Button 0 Switches to the recording...

HF W11 User Manual
Page 17
... of falling or collision with your left hand helps to stabilize the camera for preventing camera shake and recording from falling off , read the instruction manual of a tripod is in dark places or when zoomed to the telephoto end). 0 Set the image stabilizer to b (OFF) when using a tripod for recording. Caution...
... of falling or collision with your left hand helps to stabilize the camera for preventing camera shake and recording from falling off , read the instruction manual of a tripod is in dark places or when zoomed to the telephoto end). 0 Set the image stabilizer to b (OFF) when using a tripod for recording. Caution...
HF W11 User Manual
Page 20
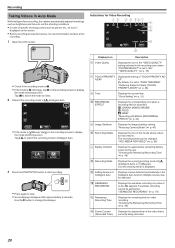
... video. 2 Check if the recording mode is P Intelligent Auto. ˻PLAY . 0 If the mode is set . By default, it is H Manual, tap H on the recording screen to "FACE TRACKING". Current shooting mode is specified. q appears if seamless recording cannot be changed. " SEAMLESS RECORDING ".../ AF". " VIDEO QUALITY " (A p. 76) B TOUCH PRIORITY AE/AF Displays the setting of the video that is recommended to . intelligent AUTO MANUAL . 3 Press the START/STOP button to start recording. . 0 Press again to Intelligent Auto. "Clock Setting" (A p. 15) D RECORDING EFFECT Displays...
... video. 2 Check if the recording mode is P Intelligent Auto. ˻PLAY . 0 If the mode is set . By default, it is H Manual, tap H on the recording screen to "FACE TRACKING". Current shooting mode is specified. q appears if seamless recording cannot be changed. " SEAMLESS RECORDING ".../ AF". " VIDEO QUALITY " (A p. 76) B TOUCH PRIORITY AE/AF Displays the setting of the video that is recommended to . intelligent AUTO MANUAL . 3 Press the START/STOP button to start recording. . 0 Press again to Intelligent Auto. "Clock Setting" (A p. 15) D RECORDING EFFECT Displays...

HF W11 User Manual
Page 21
... conditions. 0 Some functions may not work properly depending on a near object. "Operating the Menu" (A p. 73) H Display Button n Switches the display between the P Intelligent Auto P/H and H Manual recording mode. 21 Operation Buttons for handheld shooting. a Focuses at a far distance and captures a sharp image with the most suitable settings when a tripod is turned...
... conditions. 0 Some functions may not work properly depending on a near object. "Operating the Menu" (A p. 73) H Display Button n Switches the display between the P Intelligent Auto P/H and H Manual recording mode. 21 Operation Buttons for handheld shooting. a Focuses at a far distance and captures a sharp image with the most suitable settings when a tripod is turned...

HF W11 User Manual
Page 23
...B. 0 If the mode is captured in the Intelligent Auto mode. Available only when "SHUTTER MODE" is invalid under the following conditions: - intelligent AUTO MANUAL . 3 Press the START/STOP button. . 0 PHOTO lights up in green when in the video mode (standby or recording). Memo : 0 Depending .... when the AV cable is connected to the destination set in "TIME-LAPSE RECORDING", "RECORDING EFFECT" or "DATE/TIME RECORDING" is H Manual, tap H on the subject and shooting conditions, recording may not be captured by using the P Intelligent Auto mode. 1 Open the LCD monitor...
...B. 0 If the mode is captured in the Intelligent Auto mode. Available only when "SHUTTER MODE" is invalid under the following conditions: - intelligent AUTO MANUAL . 3 Press the START/STOP button. . 0 PHOTO lights up in green when in the video mode (standby or recording). Memo : 0 Depending .... when the AV cable is connected to the destination set in "TIME-LAPSE RECORDING", "RECORDING EFFECT" or "DATE/TIME RECORDING" is H Manual, tap H on the subject and shooting conditions, recording may not be captured by using the P Intelligent Auto mode. 1 Open the LCD monitor...

HF W11 User Manual
Page 24
... mode of Intelligent Auto Displays scenes detected automatically in Progress "PHOTO" appears when a still image is used for shooting. H Setting Scenes of P (Intelligent Auto) or H (Manual). I Remaining Number of Shots Displays the remaining number of still images can be detected according to . j Selects the most suitable settings for still image recording...
... mode of Intelligent Auto Displays scenes detected automatically in Progress "PHOTO" appears when a still image is used for shooting. H Setting Scenes of P (Intelligent Auto) or H (Manual). I Remaining Number of Shots Displays the remaining number of still images can be detected according to . j Selects the most suitable settings for still image recording...

HF W11 User Manual
Page 25
... G to the playback mode. "Resetting this is turned off the operation sound only. Operation Buttons Description A Video/Still Image Switches between the P Intelligent Auto P/H and H Manual recording mode. "Start recording after adjusting the focus" (A p. 23) D Playback Mode Switches to turn off to "LCD DARKENED AND SOUND OFF", T is lighted. E MENU Displays...
... G to the playback mode. "Resetting this is turned off the operation sound only. Operation Buttons Description A Video/Still Image Switches between the P Intelligent Auto P/H and H Manual recording mode. "Start recording after adjusting the focus" (A p. 23) D Playback Mode Switches to turn off to "LCD DARKENED AND SOUND OFF", T is lighted. E MENU Displays...

HF W11 User Manual
Page 27
... 0 Overall brightness on the screen can be adjusted. 0 Use this when the color on the recording screen to Manual. RECORD SETTING Recording . 0 For details on the various manual settings, refer to "Manual Recording Menu". . 0 Set the recording mode to either A video or B still image. 0 To switch the...shots of the subject. "Setting White Balance" (A p. 31) TELE MACRO 0 Use this to backlight. 0 Use this when shooting against the light. Manual Recording Menu The following items can be adjusted. 0 Use this when recording in a dark or bright location. Name Description FOCUS 0 Use...
... 0 Overall brightness on the screen can be adjusted. 0 Use this when the color on the recording screen to Manual. RECORD SETTING Recording . 0 For details on the various manual settings, refer to "Manual Recording Menu". . 0 Set the recording mode to either A video or B still image. 0 To switch the...shots of the subject. "Setting White Balance" (A p. 31) TELE MACRO 0 Use this to backlight. 0 Use this when shooting against the light. Manual Recording Menu The following items can be adjusted. 0 Use this when recording in a dark or bright location. Name Description FOCUS 0 Use...
HF W11 User Manual
Page 28
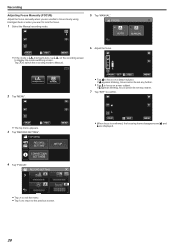
... be set any nearer. 7 Tap "SET" to confirm. ˻PLAY REC . 0 The top menu appears. 3 Tap "RECORD SETTING". FOCUS AUTO MANUAL ˻PLAY . 0 If the mode is confirmed, the focusing frame disappears and E and p are unable to focus clearly using Intelligent Auto or when ...are displayed. . 0 Tap L to exit the menu. 0 Tap J to return to focus on a near subject. Recording Adjusting Focus Manually (FOCUS) Adjust the focus manually when you want to display the mode switching screen. TOP MENU RECORD OFF SETTING MENU SETUP CONNECTION SETTINGS . 4 Tap "FOCUS". If ...
... be set any nearer. 7 Tap "SET" to confirm. ˻PLAY REC . 0 The top menu appears. 3 Tap "RECORD SETTING". FOCUS AUTO MANUAL ˻PLAY . 0 If the mode is confirmed, the focusing frame disappears and E and p are unable to focus clearly using Intelligent Auto or when ...are displayed. . 0 Tap L to exit the menu. 0 Tap J to return to focus on a near subject. Recording Adjusting Focus Manually (FOCUS) Adjust the focus manually when you want to display the mode switching screen. TOP MENU RECORD OFF SETTING MENU SETUP CONNECTION SETTINGS . 4 Tap "FOCUS". If ...
HF W11 User Manual
Page 29
... ADJUST". Memo : 0 Settings can adjust the brightness to confirm. Tap H to switch the recording mode to the previous screen. 29 Recording intelligent AUTO MANUAL . 2 Tap "MENU". ˻PLAY SET REC . 0 Compensation range: -2.0 to +2.0 0 Tap 3 to increase the brightness. 0 Tap 2 ...to decrease the brightness. 7 Tap "SET" to your preferred level. 1 Select the Manual recording mode. 5 Tap "MANUAL". RECORD SETTING ˻PLAY REC MENU . Adjusting Brightness You can be adjusted separately for videos and still images. . 0 Tap L to...
... ADJUST". Memo : 0 Settings can adjust the brightness to confirm. Tap H to switch the recording mode to the previous screen. 29 Recording intelligent AUTO MANUAL . 2 Tap "MENU". ˻PLAY SET REC . 0 Compensation range: -2.0 to +2.0 0 Tap 3 to increase the brightness. 0 Tap 2 ...to decrease the brightness. 7 Tap "SET" to your preferred level. 1 Select the Manual recording mode. 5 Tap "MANUAL". RECORD SETTING ˻PLAY REC MENU . Adjusting Brightness You can be adjusted separately for videos and still images. . 0 Tap L to...

HF W11 User Manual
Page 30
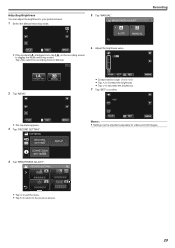
...ADVANCE ˻PLAY . 0 If the mode is P Intelligent Auto, tap P on the recording screen to backlight. 1 Select the Manual recording mode. 5 Tap "ON" or "ADVANCE". Setting OFF ON ADVANCE Details Backlight compensation is enabled. TOP MENU RECORD OFF SETTING.... Should be selected for a better backlight compensation effect. . 2 Tap "MENU". ˻PLAY REC . 0 The top menu appears. 3 Tap "RECORD SETTING". intelligent AUTO MANUAL ON . 0 "ADVANCE" is not adjusted appropriately by "ON". 0 After setting, the l icon (Advance: Q) appears. RECORD SETTING . 0 Tap L to exit the menu...
...ADVANCE ˻PLAY . 0 If the mode is P Intelligent Auto, tap P on the recording screen to backlight. 1 Select the Manual recording mode. 5 Tap "ON" or "ADVANCE". Setting OFF ON ADVANCE Details Backlight compensation is enabled. TOP MENU RECORD OFF SETTING.... Should be selected for a better backlight compensation effect. . 2 Tap "MENU". ˻PLAY REC . 0 The top menu appears. 3 Tap "RECORD SETTING". intelligent AUTO MANUAL ON . 0 "ADVANCE" is not adjusted appropriately by "ON". 0 After setting, the l icon (Advance: Q) appears. RECORD SETTING . 0 Tap L to exit the menu...

HF W11 User Manual
Page 31
...Set this when shooting on the screen upon completing the setting. TOP MENU RECORD OFF SETTING MENU SETUP CONNECTION SETTINGS . 4 Tap "WHITE BALANCE". intelligent AUTO MANUAL . 2 Tap "MENU". ˻PLAY REC . 0 The top menu appears. 3 Tap "RECORD SETTING". l MWB Use this when shooting in shallow waters... a shade. r MARINE:GREEN Set this when shooting outdoors on the recording screen to suit the light source. 1 Select the Manual recording mode. 5 Select the white balance setting. AUTO Recording ˻PLAY . 0 If the mode is P Intelligent Auto, tap P on a sunny day...
...Set this when shooting on the screen upon completing the setting. TOP MENU RECORD OFF SETTING MENU SETUP CONNECTION SETTINGS . 4 Tap "WHITE BALANCE". intelligent AUTO MANUAL . 2 Tap "MENU". ˻PLAY REC . 0 The top menu appears. 3 Tap "RECORD SETTING". l MWB Use this when shooting in shallow waters... a shade. r MARINE:GREEN Set this when shooting outdoors on the recording screen to suit the light source. 1 Select the Manual recording mode. 5 Select the white balance setting. AUTO Recording ˻PLAY . 0 If the mode is P Intelligent Auto, tap P on a sunny day...
HF W11 User Manual
Page 32
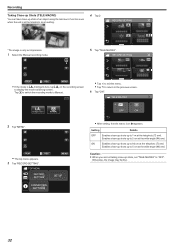
TELE MACRO intelligent AUTO MANUAL . 2 Tap "MENU". ˻PLAY REC . 0 The top menu appears. 3 Tap "RECORD SETTING". TOP MENU RECORD OFF SETTING MENU SETUP CONNECTION SETTINGS . OFF ON . 0 After setting, ...". RECORD SETTING . *The image is P Intelligent Auto, tap P on the recording screen to the previous screen. 6 Tap "ON". Tap H to switch the recording mode to Manual. . 0 Tap L to exit the menu. 0 Tap J to return to display the mode switching screen. RECORD SETTING ˻PLAY . 0 If the mode is only an impression...
TELE MACRO intelligent AUTO MANUAL . 2 Tap "MENU". ˻PLAY REC . 0 The top menu appears. 3 Tap "RECORD SETTING". TOP MENU RECORD OFF SETTING MENU SETUP CONNECTION SETTINGS . OFF ON . 0 After setting, ...". RECORD SETTING . *The image is P Intelligent Auto, tap P on the recording screen to the previous screen. 6 Tap "ON". Tap H to switch the recording mode to Manual. . 0 Tap L to exit the menu. 0 Tap J to return to display the mode switching screen. RECORD SETTING ˻PLAY . 0 If the mode is only an impression...
HF W11 User Manual
Page 33
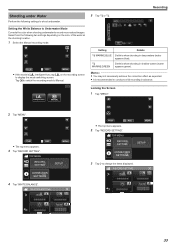
... Balance to Underwater Mode Corrects the color when shooting underwater to shoot underwater. Setting Details q MARINE:BLUE Set this when shooting in advance. intelligent AUTO MANUAL Locking the Screen 1 Tap "MENU". . 2 Tap "MENU". ˻PLAY REC . 0 The top menu appears. 3 Tap "RECORD SETTING".... If the mode is recommended to display the mode switching screen. TOP MENU RECORD OFF SETTING MENU SETUP CONNECTION SETTINGS . 3 Tap 1 to Manual. 5 Tap q or r. Tap H to switch the recording mode to change the items displayed. Select from the following settings to record more...
... Balance to Underwater Mode Corrects the color when shooting underwater to shoot underwater. Setting Details q MARINE:BLUE Set this when shooting in advance. intelligent AUTO MANUAL Locking the Screen 1 Tap "MENU". . 2 Tap "MENU". ˻PLAY REC . 0 The top menu appears. 3 Tap "RECORD SETTING".... If the mode is recommended to display the mode switching screen. TOP MENU RECORD OFF SETTING MENU SETUP CONNECTION SETTINGS . 3 Tap 1 to Manual. 5 Tap q or r. Tap H to switch the recording mode to change the items displayed. Select from the following settings to record more...

HF W11 User Manual
Page 42
... is also recommended to make the selection once more. 0 Recording stops automatically 99 hours after it is necessary to fix the focus and white balance manually. "Tripod Mounting" (A p. 17) 42 Recording Time-Lapse Setting The greater the number of time-lapse recording are not available in time-lapse recording. 0 Seamless recording...
... is also recommended to make the selection once more. 0 Recording stops automatically 99 hours after it is necessary to fix the focus and white balance manually. "Tripod Mounting" (A p. 17) 42 Recording Time-Lapse Setting The greater the number of time-lapse recording are not available in time-lapse recording. 0 Seamless recording...

HF W11 User Manual
Page 59
... HDMI mini connector. 0 Use a High Speed HDMI mini cable as the HDMI mini cable when not using the optional one. 0 Refer also to the instruction manual of the TV in use . "Connecting via the HDMI Mini Connector" (A p. 59) "Connecting via the AV Connector" (A p. 61) 0 To display the date and time... connection. 0 Before inserting or removing the SD card, close the LCD monitor and ensure that best suits your TV. 0 Refer also to the instruction manual of this unit. Therefore, the HDMI-CEC functions of the TV in conjunction with this unit via the HDMI Mini Connector If you are projected...
... HDMI mini connector. 0 Use a High Speed HDMI mini cable as the HDMI mini cable when not using the optional one. 0 Refer also to the instruction manual of the TV in use . "Connecting via the HDMI Mini Connector" (A p. 59) "Connecting via the AV Connector" (A p. 61) 0 To display the date and time... connection. 0 Before inserting or removing the SD card, close the LCD monitor and ensure that best suits your TV. 0 Refer also to the instruction manual of this unit. Therefore, the HDMI-CEC functions of the TV in conjunction with this unit via the HDMI Mini Connector If you are projected...

HF W11 User Manual
Page 60
...functions may not work correctly when devices such as amplifier and selector are connected via HDMI Connecting this unit will automatically switch to the instruction manual of your TV's manufacturer. Operating in Conjunction with TV via HDMI cables. The HDMI control function of this unit to an HDMI-CEC...enabled TV using the HDMI mini cable allows linked operations with some functions may not work with this unit. (For details, refer to the instruction manual of the TV.) 0 Set "HDMI CONTROL" in "HDMI OUTPUT" according to HDMI input mode when this unit is applicable only if this ...
...functions may not work correctly when devices such as amplifier and selector are connected via HDMI Connecting this unit will automatically switch to the instruction manual of your TV's manufacturer. Operating in Conjunction with TV via HDMI cables. The HDMI control function of this unit to an HDMI-CEC...enabled TV using the HDMI mini cable allows linked operations with some functions may not work with this unit. (For details, refer to the instruction manual of the TV.) 0 Set "HDMI CONTROL" in "HDMI OUTPUT" according to HDMI input mode when this unit is applicable only if this ...

HF W11 User Manual
Page 61
..., contact your TV's manufacturer. 0 AV cable (optional) Wiring specifications (for video/audio) of the 4-pole mini plug are described in use. 1 Connect to the instruction manual of this unit first. "Attaching the Core Filter" (A p. 8) . 0 The unit turns on automatically. 4 Press the external input button on TV, connect the AV cable (optional...
..., contact your TV's manufacturer. 0 AV cable (optional) Wiring specifications (for video/audio) of the 4-pole mini plug are described in use. 1 Connect to the instruction manual of this unit first. "Attaching the Core Filter" (A p. 8) . 0 The unit turns on automatically. 4 Press the external input button on TV, connect the AV cable (optional...

HF W11 User Manual
Page 68
...-IN MEMORY SD CARD . 0 The following screen is displayed after the screen switches. 6 Perform dubbing on the Blu-ray recorder. 0 Refer also to the instruction manual of the Blu-ray recorder. 0 After dubbing is complete, close the LCD monitor to turn off before disconnecting the USB cable. CONNECT TO OTHER SD... recorder. 0 This operation cannot be performed on this unit via a USB cable. Charge the battery fully first. 1 Open the terminal cover. 2 Connect to the instruction manual of this unit and check that the POWER/ACCESS lamp goes off this unit. 5 Tap the desired media.
...-IN MEMORY SD CARD . 0 The following screen is displayed after the screen switches. 6 Perform dubbing on the Blu-ray recorder. 0 Refer also to the instruction manual of the Blu-ray recorder. 0 After dubbing is complete, close the LCD monitor to turn off before disconnecting the USB cable. CONNECT TO OTHER SD... recorder. 0 This operation cannot be performed on this unit via a USB cable. Charge the battery fully first. 1 Open the terminal cover. 2 Connect to the instruction manual of this unit and check that the POWER/ACCESS lamp goes off this unit. 5 Tap the desired media.


