
Getting Started Guide
Page 1
... display the playback controls. Flashes while recording Photos: Touch [{] to step 9. 7. DIE-0485-000 HD Camcorder DIE0485000 Getting Started Package Contents HD Camcorder VIXIA HF R70 / VIXIA HF R72 / VIXIA HF R700 BP-727 Battery Pack [] CA-110 Compact Power Adapter [] (CA-110E, including power cord, in Asia) IFC-300PCU/S USB Cable [] HTC-100/S High Speed HDMI Cable [] Transfer Utility LE Startup Guide 1 Installing the Camcorder's Instruction Manual (PDF File) This guide only...
... display the playback controls. Flashes while recording Photos: Touch [{] to step 9. 7. DIE-0485-000 HD Camcorder DIE0485000 Getting Started Package Contents HD Camcorder VIXIA HF R70 / VIXIA HF R72 / VIXIA HF R700 BP-727 Battery Pack [] CA-110 Compact Power Adapter [] (CA-110E, including power cord, in Asia) IFC-300PCU/S USB Cable [] HTC-100/S High Speed HDMI Cable [] Transfer Utility LE Startup Guide 1 Installing the Camcorder's Instruction Manual (PDF File) This guide only...
Getting Started Guide
Page 2
..., IL 60143 USA CANON U.S.A., INC. Specifications and outer appearance are designed to change the camcorder's shooting mode. -- NO USER-SERVICEABLE PARTS INSIDE. These limits are subject to provide reasonable protection against harmful interference in the literature accompanying the product. Model ID0074 (including WLAN Module Model WM217, FCC ID: AZD217) This device complies with Part 15 of important operating and maintenance (servicing) instructions in a residential installation. Many studies of...
..., IL 60143 USA CANON U.S.A., INC. Specifications and outer appearance are designed to change the camcorder's shooting mode. -- NO USER-SERVICEABLE PARTS INSIDE. These limits are subject to provide reasonable protection against harmful interference in the literature accompanying the product. Model ID0074 (including WLAN Module Model WM217, FCC ID: AZD217) This device complies with Part 15 of important operating and maintenance (servicing) instructions in a residential installation. Many studies of...
User Manual
Page 2
...Corporation and Sony Corporation. • Google, Android, Google Play, YouTube are trademarks of the Wi-Fi Alliance. • WPS as used on the camcorder's settings, onscreen displays and in this manual signifies Wi-Fi Protected Setup. • The Wi-Fi Protected Setup Identifier Mark is a mark of the Wi-Fi Alliance. ... trademarks of HDMI Licensing LLC in the U.S. "Dolby" and the double-D symbol are trade- COPYRIGHT WARNING: Unauthorized recording of their respective companies. 2 Important Usage Instructions WARNING TO REDUCE THE RISK OF ELECTRIC SHOCK AND TO REDUCE ANNOYING INTERFERENCE...
...Corporation and Sony Corporation. • Google, Android, Google Play, YouTube are trademarks of the Wi-Fi Alliance. • WPS as used on the camcorder's settings, onscreen displays and in this manual signifies Wi-Fi Protected Setup. • The Wi-Fi Protected Setup Identifier Mark is a mark of the Wi-Fi Alliance. ... trademarks of HDMI Licensing LLC in the U.S. "Dolby" and the double-D symbol are trade- COPYRIGHT WARNING: Unauthorized recording of their respective companies. 2 Important Usage Instructions WARNING TO REDUCE THE RISK OF ELECTRIC SHOCK AND TO REDUCE ANNOYING INTERFERENCE...
User Manual
Page 4
... the Canon VIXIA HF R72 / VIXIA HF R70 / VIXIA HF R700. Please read this manual. Conventions Used in the icon. Should your camcorder fail to operate correctly, refer to abbreviate menu selections. Additional notes and topics that applies only to one movie unit recorded with a single recording operation. 4 This arrow is used in this manual: N When not specified as "memory card" or "built-in memory", the term "memory" by itself refers to the camcorder's operation...
... the Canon VIXIA HF R72 / VIXIA HF R70 / VIXIA HF R700. Please read this manual. Conventions Used in the icon. Should your camcorder fail to operate correctly, refer to abbreviate menu selections. Additional notes and topics that applies only to one movie unit recorded with a single recording operation. 4 This arrow is used in this manual: N When not specified as "memory card" or "built-in memory", the term "memory" by itself refers to the camcorder's operation...

User Manual
Page 8
... Operation of the Camcorder 40 Using the Touch Screen 40 Using the Menus 41 Operating Modes 47 Basic Recording and Playback 49 Basic Recording 50 Recording Video 50 Taking Photos 54 AUTO Mode 56 Zooming 59 Basic Playback 64 Playing Back Video 64 Viewing Photos 70 Deleting Scenes and Photos 73 Advanced Recording Functions 77 Recording Settings and Shooting Modes 78 Selecting the Movie Recording Format (AVCHD/MP4) ........78 Selecting the Video Quality 78 N Selecting the Memory (Built-in Memory/ Memory Card) for Recordings 80 N Dual Recording and Relay Recording...
... Operation of the Camcorder 40 Using the Touch Screen 40 Using the Menus 41 Operating Modes 47 Basic Recording and Playback 49 Basic Recording 50 Recording Video 50 Taking Photos 54 AUTO Mode 56 Zooming 59 Basic Playback 64 Playing Back Video 64 Viewing Photos 70 Deleting Scenes and Photos 73 Advanced Recording Functions 77 Recording Settings and Shooting Modes 78 Selecting the Movie Recording Format (AVCHD/MP4) ........78 Selecting the Video Quality 78 N Selecting the Memory (Built-in Memory/ Memory Card) for Recordings 80 N Dual Recording and Relay Recording...

User Manual
Page 23
... the pixels may occasionally misfire or appear as black, red, blue or green dots. This has no effect on the camcorder. The first time you through the basic settings (A 33). approx. 90° Adjust the position of the touch screen, refer to the recording conditions. • The screen is produced using extremely high-precision manufac- LCD touch screen Open the LCD panel 90 degrees.
... the pixels may occasionally misfire or appear as black, red, blue or green dots. This has no effect on the camcorder. The first time you through the basic settings (A 33). approx. 90° Adjust the position of the touch screen, refer to the recording conditions. • The screen is produced using extremely high-precision manufac- LCD touch screen Open the LCD panel 90 degrees.
User Manual
Page 79
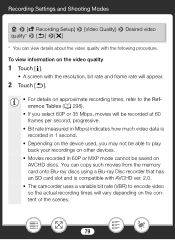
To view information on the video quality 1 Touch [I]. • A screen with the following procedure. Recording Settings and Shooting Modes 0 > [3 Recording Setup] > [Video Quality] > Desired video quality* > [K] >[X] * You can copy such movies from the memory card onto Blu-ray discs using a Blu-ray Disc recorder that has an SD card slot and is compatible with AVCHD ver. 2.0. • The camcorder uses a variable bit rate (VBR) to encode video so the actual recording times will be recorded at 60 frames...
To view information on the video quality 1 Touch [I]. • A screen with the following procedure. Recording Settings and Shooting Modes 0 > [3 Recording Setup] > [Video Quality] > Desired video quality* > [K] >[X] * You can copy such movies from the memory card onto Blu-ray discs using a Blu-ray Disc recorder that has an SD card slot and is compatible with AVCHD ver. 2.0. • The camcorder uses a variable bit rate (VBR) to encode video so the actual recording times will be recorded at 60 frames...
User Manual
Page 93
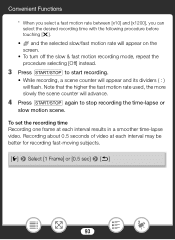
... To set the recording time Recording one frame at each interval results in a smoother time-lapse video. Note that the higher the fast motion rate used, the more slowly the scene counter will advance. 4 Press Y again to start recording. • While recording, a scene counter will appear and its dividers ( : ) will appear on the screen. • To turn off the slow & fast motion recording mode, repeat the...
... To set the recording time Recording one frame at each interval results in a smoother time-lapse video. Note that the higher the fast motion rate used, the more slowly the scene counter will advance. 4 Press Y again to start recording. • While recording, a scene counter will appear and its dividers ( : ) will appear on the screen. • To turn off the slow & fast motion recording mode, repeat the...

User Manual
Page 158
... to download the compressed installa- tion file. ies (A 64). 3 Connect the camcorder to a Computer Format Shooting Fmode 9N †ƒ ' Playback y} 1 Camcorder: Power the camcorder using the supplied USB cable. • Connection 3-ቢ. http://pixela.jp/cetule_dl 2 Uncompress the file. • The compressed file contains the installer (setup.exe) and the Software Guide (PDF file). 3 Install the software as explained in the PDF Software Guide. Connecting the Camcorder to the computer using the compact power adapter. 2 Camcorder: Open the desired index screen for...
... to download the compressed installa- tion file. ies (A 64). 3 Connect the camcorder to a Computer Format Shooting Fmode 9N †ƒ ' Playback y} 1 Camcorder: Power the camcorder using the supplied USB cable. • Connection 3-ቢ. http://pixela.jp/cetule_dl 2 Uncompress the file. • The compressed file contains the installer (setup.exe) and the Software Guide (PDF file). 3 Install the software as explained in the PDF Software Guide. Connecting the Camcorder to the computer using the compact power adapter. 2 Camcorder: Open the desired index screen for...
User Manual
Page 163
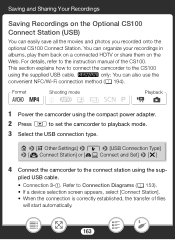
... playback mode. 3 Select the USB connection type. 0 > [1 Other Settings] > q > [USB Connection Type] > [ Connect Station] or [ Connect and Set] > [X] 4 Connect the camcorder to the CS100 using the sup- For details, refer to Connection Diagrams (A 153). • If a device selection screen appears, select [Connect Station]. • When the connection is correctly established, the transfer of the CS100. Refer to the instruction manual of files will start automatically. 163 N only: You can easily save all the movies and photos you recorded...
... playback mode. 3 Select the USB connection type. 0 > [1 Other Settings] > q > [USB Connection Type] > [ Connect Station] or [ Connect and Set] > [X] 4 Connect the camcorder to the CS100 using the sup- For details, refer to Connection Diagrams (A 153). • If a device selection screen appears, select [Connect Station]. • When the connection is correctly established, the transfer of the CS100. Refer to the instruction manual of files will start automatically. 163 N only: You can easily save all the movies and photos you recorded...

User Manual
Page 169
... analog audio/video inputs. Video output will be connected directly to an external Blu-ray Disc recorder using the optional STV-250N Stereo Video Cable. 169 Format Shooting Fmode 9N †ƒ ' Playback y} 1 Power the camcorder using the compact power adapter. 2 Connect the camcorder to the VCR using a USB cable in order to the memory card in high definition. N only: To copy the recordings in the built-in memory, copy them to copy recordings. ■ In Standard Definition You can copy your movies by connecting the camcorder to a VCR or a digital video recorder...
... analog audio/video inputs. Video output will be connected directly to an external Blu-ray Disc recorder using the optional STV-250N Stereo Video Cable. 169 Format Shooting Fmode 9N †ƒ ' Playback y} 1 Power the camcorder using the compact power adapter. 2 Connect the camcorder to the VCR using a USB cable in order to the memory card in high definition. N only: To copy the recordings in the built-in memory, copy them to copy recordings. ■ In Standard Definition You can copy your movies by connecting the camcorder to a VCR or a digital video recorder...
User Manual
Page 198
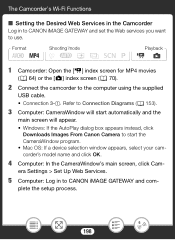
... Downloads Images From Canon Camera to the computer using the supplied USB cable. • Connection 3-ቢ. era Settings > Set Up Web Services. 5 Computer: Log in to CANON iMAGE GATEWAY and set the Web services you want to use. Refer to Connection Diagrams (A 153). 3 Computer: CameraWindow will start the CameraWindow program. • Mac OS: If a device selection window appears, select your camcorder's model name and click OK. 4 Computer: In the CameraWindow's main screen, click Cam...
... Downloads Images From Canon Camera to the computer using the supplied USB cable. • Connection 3-ቢ. era Settings > Set Up Web Services. 5 Computer: Log in to CANON iMAGE GATEWAY and set the Web services you want to use. Refer to Connection Diagrams (A 153). 3 Computer: CameraWindow will start the CameraWindow program. • Mac OS: If a device selection window appears, select your camcorder's model name and click OK. 4 Computer: In the CameraWindow's main screen, click Cam...

User Manual
Page 199
... your local CANON iMAGE GATEWAY Web site. • If the date set in the camcorder and the CameraWindow menu screen will appear. 6 Computer: Exit CameraWindow and then end the connection between the camcorder and computer. • Available Web services differ depending on the country/region of use and may be updated from time to time. The Camcorder's Wi-Fi Functions • Follow the onscreen instructions to register...
... your local CANON iMAGE GATEWAY Web site. • If the date set in the camcorder and the CameraWindow menu screen will appear. 6 Computer: Exit CameraWindow and then end the connection between the camcorder and computer. • Available Web services differ depending on the country/region of use and may be updated from time to time. The Camcorder's Wi-Fi Functions • Follow the onscreen instructions to register...

User Manual
Page 212
...[- Format Shooting Fmode 9N †ƒ ' Playback y} 1 Open the [- Check Current Configuration] screen. 0 > [ Remote Control+Streaming] (from any movie index screen in playback mode) > [w Check/Edit Settings] > [OK] To view the connection settings for the Monitor while Out function. Wi-Fi Connection and Settings • Otherwise, touch [K] > [X] to use. Viewing and Changing Wi-Fi Settings You can review and change, if necessary, the settings used for the various Wi-Fi connections and for iOS/Android devices 2 Touch [Smartphone Connection Settings]. • The camcorder...
...[- Format Shooting Fmode 9N †ƒ ' Playback y} 1 Open the [- Check Current Configuration] screen. 0 > [ Remote Control+Streaming] (from any movie index screen in playback mode) > [w Check/Edit Settings] > [OK] To view the connection settings for the Monitor while Out function. Wi-Fi Connection and Settings • Otherwise, touch [K] > [X] to use. Viewing and Changing Wi-Fi Settings You can review and change, if necessary, the settings used for the various Wi-Fi connections and for iOS/Android devices 2 Touch [Smartphone Connection Settings]. • The camcorder...
User Manual
Page 231
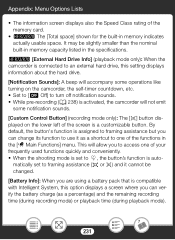
... change its function to 9, the button's function is set to framing assistance ( or ) and it as a percentage) and the remaining recording time (during recording mode) or playback time (during playback mode). 231 Appendix: Menu Options Lists • The information screen displays also the Speed Class rating of the memory card. • N The [Total space] shown for the built-in the specifications. N [External Hard Drive Info] (playback mode only): When the camcorder is connected to an external hard drive, this option displays a screen...
... change its function to 9, the button's function is set to framing assistance ( or ) and it as a percentage) and the remaining recording time (during recording mode) or playback time (during playback mode). 231 Appendix: Menu Options Lists • The information screen displays also the Speed Class rating of the memory card. • N The [Total space] shown for the built-in the specifications. N [External Hard Drive Info] (playback mode only): When the camcorder is connected to an external hard drive, this option displays a screen...

User Manual
Page 252
... between recording (Ü)/recording standby (Ñ)/playback (Ð) takes longer than usual. This is dirty. Delete some space. - The file numbers for MP4 movies and photos have reached their maximum value. The lens is a phenomenon typical of the recording. - You cannot record while the camcorder is writing previous recordings in the memory (while the ACCESS indicator is not a malfunction. Focus manually (A 113). - Changing the operating mode between pressing the button and...
... between recording (Ü)/recording standby (Ñ)/playback (Ð) takes longer than usual. This is dirty. Delete some space. - The file numbers for MP4 movies and photos have reached their maximum value. The lens is a phenomenon typical of the recording. - You cannot record while the camcorder is writing previous recordings in the memory (while the ACCESS indicator is not a malfunction. Focus manually (A 113). - Changing the operating mode between pressing the button and...

User Manual
Page 258
... and file numbers for the first time. - Insert a new memory card and set to [Reset]. The video input on a memory card (A 29). - When using the [Complete Initialization] option (A 38) when you connected the camcorder. N Video and audio will not be able to record movies on the TV is connected to which you use . 258 Disconnect the supplied High Speed HDMI cable. - Initialize the memory card using the camcorder in use it with External Devices Video noise appears on the memory card is...
... and file numbers for the first time. - Insert a new memory card and set to [Reset]. The video input on a memory card (A 29). - When using the [Complete Initialization] option (A 38) when you connected the camcorder. N Video and audio will not be able to record movies on the TV is connected to which you use . 258 Disconnect the supplied High Speed HDMI cable. - Initialize the memory card using the camcorder in use it with External Devices Video noise appears on the memory card is...
User Manual
Page 271
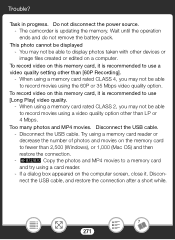
Trouble? The camcorder is recommended to use a video quality setting other than LP or 4 Mbps. This photo cannot be able to record movies using a video quality option other devices or image files created or edited on the computer screen, close it is recommended to fewer than 2,500 (Windows), or 1,000 (Mac OS) and then restore the connection. - Disconnect the USB cable, and restore the connection after a short while. 271 Task in...
Trouble? The camcorder is recommended to use a video quality setting other than LP or 4 Mbps. This photo cannot be able to record movies using a video quality option other devices or image files created or edited on the computer screen, close it is recommended to fewer than 2,500 (Windows), or 1,000 (Mac OS) and then restore the connection. - Disconnect the USB cable, and restore the connection after a short while. 271 Task in...
User Manual
Page 278
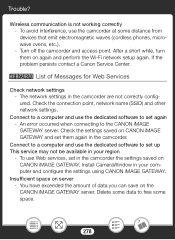
... the settings using CANON iMAGE GATEWAY. An error occurred when connecting to free some data to the CANON iMAGE GATEWAY server. Insufficient space on the CANON iMAGE GATEWAY server. If the problem persists contact a Canon Service Center. Install CameraWindow in the camcorder the settings saved on again and perform the Wi-Fi network setup again. Delete some space. 278 Check the connection point, network name (SSID) and other network settings. To avoid interference, use Web services, set...
... the settings using CANON iMAGE GATEWAY. An error occurred when connecting to free some data to the CANON iMAGE GATEWAY server. Insufficient space on the CANON iMAGE GATEWAY server. If the problem persists contact a Canon Service Center. Install CameraWindow in the camcorder the settings saved on again and perform the Wi-Fi network setup again. Delete some space. 278 Check the connection point, network name (SSID) and other network settings. To avoid interference, use Web services, set...
User Manual
Page 306
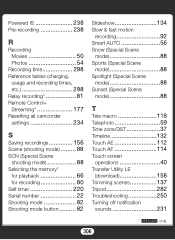
Powered IS 238 Pre-recording 238 R Recording Movies 50 Photos 54 Recording time 298 Reference tables (charging, usage and recording times, etc 298 Relay recording 81 Remote Control+ Streaming 177 Resetting all camcorder settings 234 S Saving recordings 156 Scene (shooting mode) ......... 88 SCN (Special Scene shooting mode 88 Selecting the memory* for playback 66 for recording 80 Self timer 220 Serial number 22 Shooting mode 82 Shooting mode button.......... 82 Slideshow 134 Slow & fast motion recording 92 Smart AUTO 56 Snow (Special Scene mode 88 Sports (Special Scene...
Powered IS 238 Pre-recording 238 R Recording Movies 50 Photos 54 Recording time 298 Reference tables (charging, usage and recording times, etc 298 Relay recording 81 Remote Control+ Streaming 177 Resetting all camcorder settings 234 S Saving recordings 156 Scene (shooting mode) ......... 88 SCN (Special Scene shooting mode 88 Selecting the memory* for playback 66 for recording 80 Self timer 220 Serial number 22 Shooting mode 82 Shooting mode button.......... 82 Slideshow 134 Slow & fast motion recording 92 Smart AUTO 56 Snow (Special Scene mode 88 Sports (Special Scene...


