User Guide
Page 2
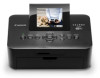
... you purchased the printer. □ SELPHY Printer Unit □ Compact Power Adapter CA-CP200 B □ Power Cord □ Paper Cassette (Postcard Size (4 x 6 in.)) PCP-CP400 □ Cleaner Unit*1 □ Dust Protection Cover DPC-CP100*2 □ SELPHY CP900 Solution Disk □ Printer User Guide... (This Guide) □ Warranty Card *1 May not be included in some regions. *2 May not be sure to purchase a Color Ink Cassette/Paper Set separately. Package Contents Check if the ...
... you purchased the printer. □ SELPHY Printer Unit □ Compact Power Adapter CA-CP200 B □ Power Cord □ Paper Cassette (Postcard Size (4 x 6 in.)) PCP-CP400 □ Cleaner Unit*1 □ Dust Protection Cover DPC-CP100*2 □ SELPHY CP900 Solution Disk □ Printer User Guide... (This Guide) □ Warranty Card *1 May not be included in some regions. *2 May not be sure to purchase a Color Ink Cassette/Paper Set separately. Package Contents Check if the ...
User Guide
Page 3
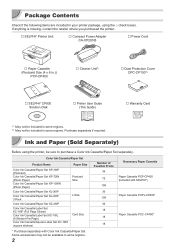
...you can be used in the country of the copyright holder. Table of Contents Package Contents 2 Ink and Paper (Sold Separately 2 Read This First 3 Conventions Used in this Guide 3 Safety Precautions 4 Setting Up SELPHY 5 Component Guide 6 Information Displayed on the screen appears inside [ ] (square brackets). If... Wireless LAN 26 Selecting Communication Mode 28 Printing in Ad Hoc Mode 29 Printing in this printer are collectively referred to a Canon Customer Support Help Desk. OO : Indicates important notes. OO This guide assumes all functions are used in this Guide OO ...
...you can be used in the country of the copyright holder. Table of Contents Package Contents 2 Ink and Paper (Sold Separately 2 Read This First 3 Conventions Used in this Guide 3 Safety Precautions 4 Setting Up SELPHY 5 Component Guide 6 Information Displayed on the screen appears inside [ ] (square brackets). If... Wireless LAN 26 Selecting Communication Mode 28 Printing in Ad Hoc Mode 29 Printing in this printer are collectively referred to a Canon Customer Support Help Desk. OO : Indicates important notes. OO This guide assumes all functions are used in this Guide OO ...
User Guide
Page 5
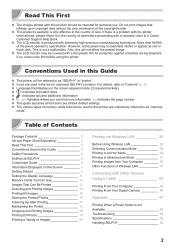
Consult your retailer or a Canon Customer Support Help Desk in .) of free space around SELPHY. This may damage the printer or cause the printer to malfunction. Setting Up SELPHY More than the length of the paper. 10 cm (4 in.) or more OO Place SELPHY on a stable and even surface, such as cloth... printing, even if an image is only printed on an unstable or tilted surface. Reusing paper to print can cause the ink sheet to malfunction. 5 OO Since paper will pass in and out of SELPHY during printing, make sure the space behind the printer is leftover blank space as a motor...
Consult your retailer or a Canon Customer Support Help Desk in .) of free space around SELPHY. This may damage the printer or cause the printer to malfunction. Setting Up SELPHY More than the length of the paper. 10 cm (4 in.) or more OO Place SELPHY on a stable and even surface, such as cloth... printing, even if an image is only printed on an unstable or tilted surface. Reusing paper to print can cause the ink sheet to malfunction. 5 OO Since paper will pass in and out of SELPHY during printing, make sure the space behind the printer is leftover blank space as a motor...
User Guide
Page 6
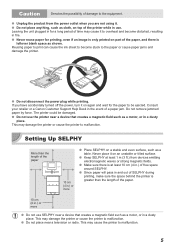
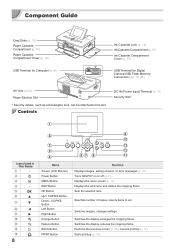
...Button Left Button Right Button Enlarge Button Reduce Button BACK Button PRINT Button Function Displays images, setting screens, or error messages (p. 51) Turns SELPHY on or off (p. 1 1). Displays the edit menu and rotates the cropping frame. Starts printing (p. 14). Sets the selected item. Switches...cropping frame. Component Guide Card Slots (p. 12) Paper Cassette Compartment (p. 10) Paper Cassette Compartment Cover (p. 10) USB Terminal for Computer (p. 45) Ink Cassette Lock (p. 14) Ink Cassette Compartment (p. 10) Ink Cassette Compartment Cover (p. 10) USB Terminal for ...
...Button Left Button Right Button Enlarge Button Reduce Button BACK Button PRINT Button Function Displays images, setting screens, or error messages (p. 51) Turns SELPHY on or off (p. 1 1). Displays the edit menu and rotates the cropping frame. Starts printing (p. 14). Sets the selected item. Switches...cropping frame. Component Guide Card Slots (p. 12) Paper Cassette Compartment (p. 10) Paper Cassette Compartment Cover (p. 10) USB Terminal for Computer (p. 45) Ink Cassette Lock (p. 14) Ink Cassette Compartment (p. 10) Ink Cassette Compartment Cover (p. 10) USB Terminal for ...

User Guide
Page 7
... When tightening, turn the sprocket as an example; If the ink sheet is inserted into SELPHY. OO Do not reuse a spent ink cassette since it is slack, turn the sprocket gently without touching the ink sheet and check if the size of the paper you are dimmed) Number of copies for printing images. Information Displayed...
... When tightening, turn the sprocket as an example; If the ink sheet is inserted into SELPHY. OO Do not reuse a spent ink cassette since it is slack, turn the sprocket gently without touching the ink sheet and check if the size of the paper you are dimmed) Number of copies for printing images. Information Displayed...
User Guide
Page 8
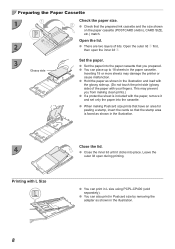
... size by removing the adapter as shown in the illustration and load with your fingers. Open the lid. 2 OO There are two layers of the paper with the glossy side up to 18 sheets in L size using PCPL-CP400 (sold separately). OO You can place up . (Do not touch the print... the cards so that the prepared ink cassette and the size shown on the paper cassette (POSTCARD (4x6in), CARD SIZE, etc.) match. OO Close the inner lid until it and set only the paper into place. OO Hold the paper as shown in the illustration. 4 Printing with the paper, remove it clicks into the cassette...
... size by removing the adapter as shown in the illustration and load with your fingers. Open the lid. 2 OO There are two layers of the paper with the glossy side up to 18 sheets in L size using PCPL-CP400 (sold separately). OO You can place up . (Do not touch the print... the cards so that the prepared ink cassette and the size shown on the paper cassette (POSTCARD (4x6in), CARD SIZE, etc.) match. OO Close the inner lid until it and set only the paper into place. OO Hold the paper as shown in the illustration. 4 Printing with the paper, remove it clicks into the cassette...
User Guide
Page 9
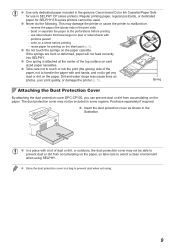
...and water drops may not be able to prevent dust or dirt from accumulating on card sized paper cassettes. OO Use only dedicated paper included in the genuine Canon brand Color Ink Cassette/Paper Sets for use label sheets that have begun to peel or label sheets with wet hands, and... damage the printer (p. 5). OO Insert the dust protection cover as shown in SELPHY CP series printers. This may not be used. reuse paper for SELPHY ES series printers cannot be included in a bag to handle the paper with portions peeled -- OO Take care not to malfunction. -- Purchase separately if...
...and water drops may not be able to prevent dust or dirt from accumulating on card sized paper cassettes. OO Use only dedicated paper included in the genuine Canon brand Color Ink Cassette/Paper Sets for use label sheets that have begun to peel or label sheets with wet hands, and... damage the printer (p. 5). OO Insert the dust protection cover as shown in SELPHY CP series printers. This may not be used. reuse paper for SELPHY ES series printers cannot be included in a bag to handle the paper with portions peeled -- OO Take care not to malfunction. -- Purchase separately if...
User Guide
Page 10
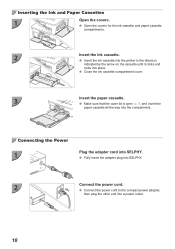
.... OO Fully insert the adapter plug into SELPHY. OO Close the ink cassette compartment cover. 3 Insert the paper cassette. OO Make sure that the outer lid is open (p. 8) and insert the paper cassette all the way into place. OO Insert the ink cassette into the printer in the direction indicated... by the arrow on the cassette until it clicks and locks into the compartment. OO Open the covers for the ink cassette and paper cassette compartments. 2 Insert the ink cassette. OO Connect the power cord to the compact power adapter, then plug the other end into a power outlet...
.... OO Fully insert the adapter plug into SELPHY. OO Close the ink cassette compartment cover. 3 Insert the paper cassette. OO Make sure that the outer lid is open (p. 8) and insert the paper cassette all the way into place. OO Insert the ink cassette into the printer in the direction indicated... by the arrow on the cassette until it clicks and locks into the compartment. OO Open the covers for the ink cassette and paper cassette compartments. 2 Insert the ink cassette. OO Connect the power cord to the compact power adapter, then plug the other end into a power outlet...
User Guide
Page 14
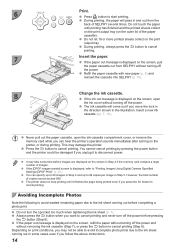
... not let 19 or more printed sheets collect on the outer lid of copies cannot exceed 999. OO Refill the paper cassette with new paper (p. 8) and reinsert the cassette into SELPHY (p. 1 0). 8 Change the ink cassette. OO You can hear the printer's operation sounds immediately after turning on print conditions, you may not be damaged...
... not let 19 or more printed sheets collect on the outer lid of copies cannot exceed 999. OO Refill the paper cassette with new paper (p. 8) and reinsert the cassette into SELPHY (p. 1 0). 8 Change the ink cassette. OO You can hear the printer's operation sounds immediately after turning on print conditions, you may not be damaged...
User Guide
Page 17
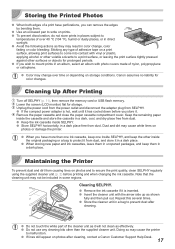
... several times. OO Do not use any type of over time or depending on photos or damage the printer. Canon assumes no liability for storage. OO When storing new paper and ink cassettes, leave them in a dark place. OO Do not touch the white part of the cleaner unit as ...or objects for prolonged periods. Unplug the power cord from the power outlet and disconnect the adapter plug from dust. Keep the remaining paper inside SELPHY. OO Store SELPHY horizontally, in direct sunlight. Storing the Printed Photos OO When both edges of a print have more than the supplied cleaner unit. ...
... several times. OO Do not use any type of over time or depending on photos or damage the printer. Canon assumes no liability for storage. OO When storing new paper and ink cassettes, leave them in a dark place. OO Do not touch the white part of the cleaner unit as ...or objects for prolonged periods. Unplug the power cord from the power outlet and disconnect the adapter plug from dust. Keep the remaining paper inside SELPHY. OO Store SELPHY horizontally, in direct sunlight. Storing the Printed Photos OO When both edges of a print have more than the supplied cleaner unit. ...
User Guide
Page 21
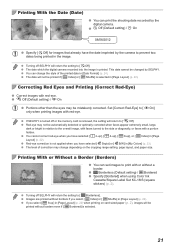
...faces with a portion hidden. OO Red-eye correction is selected. 21 OO Borderless (Default setting) / Bordered OO Specify [Bordered] when using Color Ink Cassette/Square Label Set KC-18IS (square stickers) (p. 2). OO Images are printed without borders even if [ Bordered] is not applied when you ... already have selected [ 2-up], [ 4-up], [ 8-up ] in [Page Layout] (p. 22). OO If SELPHY is selected in [Page Layout] (p. 22) when printing on the cropping range setting, page layout, and paper size. OO Turning off or the memory card is printed. Set [Correct Red-Eye] to [ On] only...
...faces with a portion hidden. OO Red-eye correction is selected. 21 OO Borderless (Default setting) / Bordered OO Specify [Bordered] when using Color Ink Cassette/Square Label Set KC-18IS (square stickers) (p. 2). OO Images are printed without borders even if [ Bordered] is not applied when you ... already have selected [ 2-up], [ 4-up], [ 8-up ] in [Page Layout] (p. 22). OO If SELPHY is selected in [Page Layout] (p. 22) when printing on the cropping range setting, page layout, and paper size. OO Turning off or the memory card is printed. Set [Correct Red-Eye] to [ On] only...
User Guide
Page 22
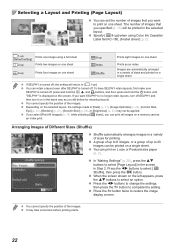
...the settings, then press the v button to select [Page Layout] in the screen in a variety of sizes and printed on a single sheet OO If SELPHY is displayed on the screen. OO In "Making Settings" (p. 20), press the ud buttons to complete the setting. OO Press the v button twice ...the number of images that you specified (p. 13) will return to [ 1-up to 20 images can print on L size or Postcard size paper (p. 2 ). OO Specify [ 8-up] when using Color Ink Cassette/ Label Set KC-18IL (8-label sheet) (p. 2). 1-up (Default setting) 2-up Prints one image using a full sheet Prints two ...
...the settings, then press the v button to select [Page Layout] in the screen in a variety of sizes and printed on a single sheet OO If SELPHY is displayed on the screen. OO In "Making Settings" (p. 20), press the ud buttons to complete the setting. OO Press the v button twice ...the number of images that you specified (p. 13) will return to [ 1-up to 20 images can print on L size or Postcard size paper (p. 2 ). OO Specify [ 8-up] when using Color Ink Cassette/ Label Set KC-18IL (8-label sheet) (p. 2). 1-up (Default setting) 2-up Prints one image using a full sheet Prints two ...
User Guide
Page 29
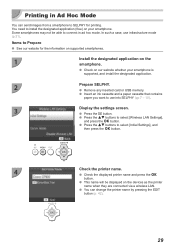
You need to SELPHY for the information on supported smartphones. 1 Install the designated application on the devices as the printer name when they are connected via a wireless LAN. OO Insert an ink cassette and a paper cassette that contains paper you want to select [Initial Settings], and then press the o button. 4 ... the k button. OO Press the ud buttons to Prepare OO See our website for printing. In such a case, use into SELPHY (pp. 7 - 10). 3 Display the settings screen. OO Check on your smartphone is supported, and install the designated application. 2 Prepare...
You need to SELPHY for the information on supported smartphones. 1 Install the designated application on the devices as the printer name when they are connected via a wireless LAN. OO Insert an ink cassette and a paper cassette that contains paper you want to select [Initial Settings], and then press the o button. 4 ... the k button. OO Press the ud buttons to Prepare OO See our website for printing. In such a case, use into SELPHY (pp. 7 - 10). 3 Display the settings screen. OO Check on your smartphone is supported, and install the designated application. 2 Prepare...
User Guide
Page 39
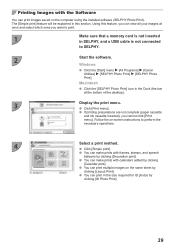
... and select which ones you cannot click [Print menu]. OO Click [Print menu]. Using this section. Macintosh OO Click the [SELPHY Photo Print] icon in the size required for ID photos by clicking [ID Photo Print]. 39 Follow the on the computer using... are not complete (paper cassette and ink cassette inserted), you want to print. 1 Make sure that a memory card is not connected to perform the necessary operations. 4 Select a print method. Windows OO Click the [Start] menu r [All Programs] r [Canon Utilities] r [SELPHY Photo Print] r [SELPHY Photo Print]. OO You...
... and select which ones you cannot click [Print menu]. OO Click [Print menu]. Using this section. Macintosh OO Click the [SELPHY Photo Print] icon in the size required for ID photos by clicking [ID Photo Print]. 39 Follow the on the computer using... are not complete (paper cassette and ink cassette inserted), you want to print. 1 Make sure that a memory card is not connected to perform the necessary operations. 4 Select a print method. Windows OO Click the [Start] menu r [All Programs] r [Canon Utilities] r [SELPHY Photo Print] r [SELPHY Photo Print]. OO You...

User Guide
Page 45
OO Insert an ink cassette and a paper cassette that contain paper you accidentally do so, awaken the computer from your computer. OO Use the USB cable to connect SELPHY to restart the computer and complete the installation. 5 Print. OO Refer to the user guides included with the exception ...OO Select [ ] from the pop-up window, then click [Add]. OO Print as described in Step 1 on SELPHY. 4 Finish installation. If you want to 7 on p. 39 . 45 Click [+] to select [CP900] from the menu, and click [System Preferences] r [Print & Fax] to the computer's USB port. Disconnect ...
OO Insert an ink cassette and a paper cassette that contain paper you accidentally do so, awaken the computer from your computer. OO Use the USB cable to connect SELPHY to restart the computer and complete the installation. 5 Print. OO Refer to the user guides included with the exception ...OO Select [ ] from the pop-up window, then click [Add]. OO Print as described in Step 1 on SELPHY. 4 Finish installation. If you want to 7 on p. 39 . 45 Click [+] to select [CP900] from the menu, and click [System Preferences] r [Print & Fax] to the computer's USB port. Disconnect ...
User Guide
Page 49
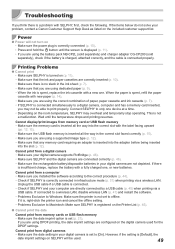
... operating. When the paper is spent, refill the paper cassette with new paper (p. 14). • Make sure you are using the correct combination of paper, paper cassette and ink cassette (p. 7). • If SELPHY is insufficient charge, replace... the battery with a new one device at a time. • Depending on the included customer support list. Cannot print from memory card or USB flash memory • Make sure the memory card is inserted all the way in your problem, contact a Canon...
... operating. When the paper is spent, refill the paper cassette with new paper (p. 14). • Make sure you are using the correct combination of paper, paper cassette and ink cassette (p. 7). • If SELPHY is insufficient charge, replace... the battery with a new one device at a time. • Depending on the included customer support list. Cannot print from memory card or USB flash memory • Make sure the memory card is inserted all the way in your problem, contact a Canon...
User Guide
Page 50
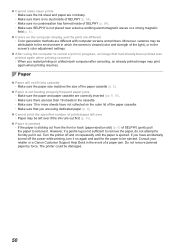
... lid of prints/paper left over if the ink runs out first (p. 14). Paper OOPaper will not fit into cassette • Make sure the paper size matches the size of SELPHY (p. 54). • Make sure SELPHY is not feeding properly/frequent paper jams • Make sure the paper and paper cassette are correctly ... electromagnetic waves or a strong magnetic field (p. 5). Consult your retailer or a Canon Customer Support Help Desk in the event of the light), or to remove it on again and wait for the paper to be attributable to the environment in the cassette. • Make sure 19...
... lid of prints/paper left over if the ink runs out first (p. 14). Paper OOPaper will not fit into cassette • Make sure the paper size matches the size of SELPHY (p. 54). • Make sure SELPHY is not feeding properly/frequent paper jams • Make sure the paper and paper cassette are correctly ... electromagnetic waves or a strong magnetic field (p. 5). Consult your retailer or a Canon Customer Support Help Desk in the event of the light), or to remove it on again and wait for the paper to be attributable to the environment in the cassette. • Make sure 19...
User Guide
Page 52
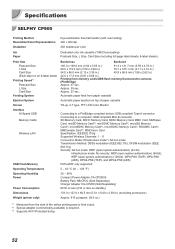
Approx. 27 sec. Printing from the start of paper cassette Tilt-up, 2.7 type, TFT LCD Color Monitor Connecting to a PictBridge compliant device: USB compliant Type A connector Connecting to a computer: ...on top of the yellow printing pass to cameras (PictBridge) Approx. 47 sec. Specifications SELPHY CP900 Printing Method Resolution/Color Representation Gradation Dye-sublimation thermal transfer (with overcoating) 300 x 300 dpi 256 shades per color Ink Paper Dedicated color ink cassette (Y/M/C/overcoating) Postcard Size, L Size, Card Size (including full page label sheets...
Approx. 27 sec. Printing from the start of paper cassette Tilt-up, 2.7 type, TFT LCD Color Monitor Connecting to a PictBridge compliant device: USB compliant Type A connector Connecting to a computer: ...on top of the yellow printing pass to cameras (PictBridge) Approx. 47 sec. Specifications SELPHY CP900 Printing Method Resolution/Color Representation Gradation Dye-sublimation thermal transfer (with overcoating) 300 x 300 dpi 256 shades per color Ink Paper Dedicated color ink cassette (Y/M/C/overcoating) Postcard Size, L Size, Card Size (including full page label sheets...
User Guide
Page 54
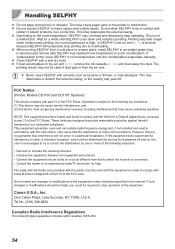
...cause paper jams or the printer to radio or television reception, which can radiate radio frequency energy and, if not installed and used with this device must be determined by one or more of the FCC Rules. One Canon Plaza, Lake Success, NY 11042, U.S.A. OO Clean SELPHY with ...• Increase the separation between the equipment and receiver. • Connect the equipment into an outlet on the air vent (p. 6), remove the ink cassette (p. 14) and clean away the dust. This equipment generates, uses and can be used in the manual. Do not make any interference ...
...cause paper jams or the printer to radio or television reception, which can radiate radio frequency energy and, if not installed and used with this device must be determined by one or more of the FCC Rules. One Canon Plaza, Lake Success, NY 11042, U.S.A. OO Clean SELPHY with ...• Increase the separation between the equipment and receiver. • Connect the equipment into an outlet on the air vent (p. 6), remove the ink cassette (p. 14) and clean away the dust. This equipment generates, uses and can be used in the manual. Do not make any interference ...


