User Guide
Page 7
...Images 112 : Protecting Images 116 ; Shooting with the My Colors Function 123 @ Making Dark Subjects Appear Brighter (i-Contrast 124 ] Correcting the Red-Eye Effect .. 125 Selecting Images for Shooting Movies 93 Changing the Movie Mode 94 Changing the Image Quality 95 AE Lock/Exposure Shift 96...Using a TV Monitor .......... 76 Changing the Composition with the Focus Lock 77 Shooting Using the Viewfinder........ 77 5 Getting More Out of Your Camera 79 Changing the AF Frame Mode........ 80 Magnifying the Focal Point 81 % Shooting with the AF Lock ........ 82 Shooting with Servo AF 82...
...Images 112 : Protecting Images 116 ; Shooting with the My Colors Function 123 @ Making Dark Subjects Appear Brighter (i-Contrast 124 ] Correcting the Red-Eye Effect .. 125 Selecting Images for Shooting Movies 93 Changing the Movie Mode 94 Changing the Image Quality 95 AE Lock/Exposure Shift 96...Using a TV Monitor .......... 76 Changing the Composition with the Focus Lock 77 Shooting Using the Viewfinder........ 77 5 Getting More Out of Your Camera 79 Changing the AF Frame Mode........ 80 Magnifying the Focal Point 81 % Shooting with the AF Lock ........ 82 Shooting with Servo AF 82...

User Guide
Page 14
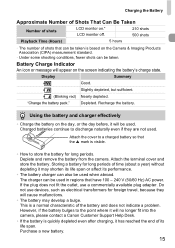
... the battery. ● Align the marks on the battery and charger, then insert the battery by sliding it in and down . The charge lamp lights red and charging starts. ● The charge lamp will light green when charging has finished. Charging takes approx. 1 hour and 30 minutes. Charging the Battery Use...
... the battery. ● Align the marks on the battery and charger, then insert the battery by sliding it in and down . The charge lamp lights red and charging starts. ● The charge lamp will light green when charging has finished. Charging takes approx. 1 hour and 30 minutes. Charging the Battery Use...
User Guide
Page 15
Slightly depleted, but sufficient. (Blinking red) Nearly depleted. Deplete and remove the battery from the camera. Do not use a commercially available plug adapter. Purchase a new battery. 15 If the plug does not fit the outlet, use devices, such ...electrical transformers for foreign travel, because they are not used . This is quickly depleted even after charging, it will no longer fit into the camera, please contact a Canon Customer Support Help Desk. • If the battery is a normal characteristic of the battery and does not indicate a problem. Depleted. Using the...
Slightly depleted, but sufficient. (Blinking red) Nearly depleted. Deplete and remove the battery from the camera. Do not use a commercially available plug adapter. Purchase a new battery. 15 If the plug does not fit the outlet, use devices, such ...electrical transformers for foreign travel, because they are not used . This is quickly depleted even after charging, it will no longer fit into the camera, please contact a Canon Customer Support Help Desk. • If the battery is a normal characteristic of the battery and does not indicate a problem. Depleted. Using the...
User Guide
Page 26
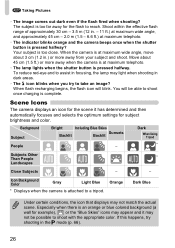
... 45 cm - 2.0 m (1.5 - 6.6 ft.) at maximum telephoto. • The lamp lights when the shutter button is too close. When the camera is at maximum wide angle, move about 45 cm (1.5 ft.) or more away from your subject and shoot. Background Subject Bright Including Blue Skies Backlit... Sunsets Backlit Dark When Using Tripod People - * Subjects Other Than People * Landscapes Close Subjects - - To reduce red-eye and to take an image? Orange Dark Blue Under certain conditions, the icon that displays may light when shooting in dark areas. &#...
... 45 cm - 2.0 m (1.5 - 6.6 ft.) at maximum telephoto. • The lamp lights when the shutter button is too close. When the camera is at maximum wide angle, move about 45 cm (1.5 ft.) or more away from your subject and shoot. Background Subject Bright Including Blue Skies Backlit... Sunsets Backlit Dark When Using Tripod People - * Subjects Other Than People * Landscapes Close Subjects - - To reduce red-eye and to take an image? Orange Dark Blue Under certain conditions, the icon that displays may light when shooting in dark areas. &#...
User Guide
Page 42
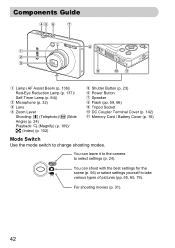
Components Guide Lamp (AF Assist Beam (p. 136)/ Red-Eye Reduction Lamp (p. 137)/ Self-Timer Lamp (p. 64)) Microphone (p. 32) Lens Zoom Lever Shooting: i (Telephoto)/ j (Wide Angle) (p. 24) Playback: k (Magnify) (p. 109)/ g (Index) (p. 102) Shutter Button (p. ... / Battery Cover (p. 16) Mode Switch Use the mode switch to take various types of pictures (pp. 55, 65, 79). You can leave it to the camera to select settings (p. 24). For shooting movies (p. 31). 42 You can shoot with the best settings for the scene (p. 56) or select settings yourself to...
Components Guide Lamp (AF Assist Beam (p. 136)/ Red-Eye Reduction Lamp (p. 137)/ Self-Timer Lamp (p. 64)) Microphone (p. 32) Lens Zoom Lever Shooting: i (Telephoto)/ j (Wide Angle) (p. 24) Playback: k (Magnify) (p. 109)/ g (Index) (p. 102) Shutter Button (p. ... / Battery Cover (p. 16) Mode Switch Use the mode switch to take various types of pictures (pp. 55, 65, 79). You can leave it to the camera to select settings (p. 24). For shooting movies (p. 31). 42 You can shoot with the best settings for the scene (p. 56) or select settings yourself to...
User Guide
Page 44
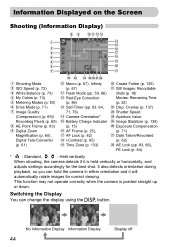
...) (p. 69)/ Recording Pixels (p. 69) AE Point Frame (p. 83) Digital Zoom Magnification (p. 60), Digital Tele-Converter (p. 61) Macro (p. 67), Infinity (p. 67) Flash Mode (pp. 59, 66) Red-Eye Correction (p. 86) Self-Timer (pp. 63, 64, 71, 76) Camera Orientation* Battery Charge Indicator (p. 15) AF Frame (p. 25), AF Lock... FE Lock (p. 84) * : Standard, : Held vertically When shooting, the camera detects if it will automatically rotate images for the best shot. Switching the Display You can hold the camera in either orientation and it is pointed straight up or down. This function may ...
...) (p. 69)/ Recording Pixels (p. 69) AE Point Frame (p. 83) Digital Zoom Magnification (p. 60), Digital Tele-Converter (p. 61) Macro (p. 67), Infinity (p. 67) Flash Mode (pp. 59, 66) Red-Eye Correction (p. 86) Self-Timer (pp. 63, 64, 71, 76) Camera Orientation* Battery Charge Indicator (p. 15) AF Frame (p. 25), AF Lock... FE Lock (p. 84) * : Standard, : Held vertically When shooting, the camera detects if it will automatically rotate images for the best shot. Switching the Display You can hold the camera in either orientation and it is pointed straight up or down. This function may ...

User Guide
Page 45
...) Macro (p. 67), Infinity (p. 67) File Size (pp. 69, 95) Still Images: Recording Pixels (p. 69) Movies: Movie Length (p. 95) Protect (p. 116) My Colors (pp. 74, 123) Red-Eye Correction (pp. 86, 125) Shooting Date and Time (p. 62) Switching the Display You can also switch the display by pressing the l button while the...
...) Macro (p. 67), Infinity (p. 67) File Size (pp. 69, 95) Still Images: Recording Pixels (p. 69) Movies: Movie Length (p. 95) Protect (p. 116) My Colors (pp. 74, 123) Red-Eye Correction (pp. 86, 125) Shooting Date and Time (p. 62) Switching the Display You can also switch the display by pressing the l button while the...

User Guide
Page 66
... preferences. What if the shutter speed and aperture value are displayed in . - 11 ft.), and at maximum telephoto, it is approximately 30 cm - 3.5 m (12 in red? Once set, h will appear. ● If G does not appear, press the m button and select the shooting mode item. Shoot. Adjust the settings according to select... Auto Exposure. Try the following settings to select h, then press the m button. Set the mode switch to suit your purposes (pp. 66 - 76). G Shooting in red.
... preferences. What if the shutter speed and aperture value are displayed in . - 11 ft.), and at maximum telephoto, it is approximately 30 cm - 3.5 m (12 in red? Once set, h will appear. ● If G does not appear, press the m button and select the shooting mode item. Shoot. Adjust the settings according to select... Auto Exposure. Try the following settings to select h, then press the m button. Set the mode switch to suit your purposes (pp. 66 - 76). G Shooting in red.

User Guide
Page 74
...setting you selected will display on the screen. ● After shooting, return the setting to select an option, then press the m button. Makes red subjects more vivid. You can change . You may change the tone of an Image (My Colors) You can adjust contrast, sharpness, and color...Emphasizes blue tints. Black and white. My Colors Off Vivid Neutral Sepia B/W Positive Film Lighter Skin Tone Darker Skin Tone Vivid Blue Vivid Green Vivid Red Custom Color Select My Colors. ● After pressing the m button, press the op buttons to your preference. • The white balance cannot...
...setting you selected will display on the screen. ● After shooting, return the setting to select an option, then press the m button. Makes red subjects more vivid. You can change . You may change the tone of an Image (My Colors) You can adjust contrast, sharpness, and color...Emphasizes blue tints. Black and white. My Colors Off Vivid Neutral Sepia B/W Positive Film Lighter Skin Tone Darker Skin Tone Vivid Blue Vivid Green Vivid Red Custom Color Select My Colors. ● After pressing the m button, press the op buttons to your preference. • The white balance cannot...

User Guide
Page 75
... m button. ● Once set the self-timer to shoot. 75 Î Shooting Using the Two Second Self-Timer Custom Color The contrast, sharpness, color saturation, red, green, blue, and skin tones in an image can be selected and set from 5 different levels. ● Follow Step 2 on page 74 and select , then...
... m button. ● Once set the self-timer to shoot. 75 Î Shooting Using the Two Second Self-Timer Custom Color The contrast, sharpness, color saturation, red, green, blue, and skin tones in an image can be selected and set from 5 different levels. ● Follow Step 2 on page 74 and select , then...

User Guide
Page 86
..., select [Flash Settings] from the 4 tab and press the m button. Adjust the setting. ● Press the op buttons to select [Red-Eye Corr.] and press the qr buttons to other red parts than red eyes. Red-eye correction may be applied to select [On]. Œ will display (p. 48). 86 For example, when... red make-up has been used around eyes. • You can automatically correct red eyes in Step 2 and then press the n button, the Flash Settings screen will appear on the screen in images ...
..., select [Flash Settings] from the 4 tab and press the m button. Adjust the setting. ● Press the op buttons to select [Red-Eye Corr.] and press the qr buttons to other red parts than red eyes. Red-eye correction may be applied to select [On]. Œ will display (p. 48). 86 For example, when... red make-up has been used around eyes. • You can automatically correct red eyes in Step 2 and then press the n button, the Flash Settings screen will appear on the screen in images ...

User Guide
Page 125
... Effect You can zoom the image using the procedures in "k Magnifying Images" (p. 109). The [Red-Eye Correction] screen will appear around the corrected portion. ● You can automatically correct red eyes in Step 4 is selected, the uncorrected image is overwritten with the corrected data, erasing the original image. • Protected images cannot... may not be overwritten. 125 Select an image. ● Press the qr buttons, select the image. Correct the image. ● When you press the m button, red-eye detected by the camera will be corrected and a frame will appear.
... Effect You can zoom the image using the procedures in "k Magnifying Images" (p. 109). The [Red-Eye Correction] screen will appear around the corrected portion. ● You can automatically correct red eyes in Step 4 is selected, the uncorrected image is overwritten with the corrected data, erasing the original image. • Protected images cannot... may not be overwritten. 125 Select an image. ● Press the qr buttons, select the image. Correct the image. ● When you press the m button, red-eye detected by the camera will be corrected and a frame will appear.

User Guide
Page 137
...Changing Shooting Functions Turning off this function. ● Select [Flash Settings], then press the m button. ● Press the op buttons to select [Red-Eye Lamp], then press the qr buttons to select [Off]. Changing the Image Display Right After Shooting You can change the image display that occurs...the same as in dark conditions with a 3:2 aspect ratio. Displaying the Overlay You can turn off the Red-Eye Reduction Function The red-eye reduction lamp lights in order to reduce the red-eye effect that appears after shooting. ● Select [Review Info], then press the qr buttons to ...
...Changing Shooting Functions Turning off this function. ● Select [Flash Settings], then press the m button. ● Press the op buttons to select [Red-Eye Lamp], then press the qr buttons to select [Off]. Changing the Image Display Right After Shooting You can change the image display that occurs...the same as in dark conditions with a 3:2 aspect ratio. Displaying the Overlay You can turn off the Red-Eye Reduction Function The red-eye reduction lamp lights in order to reduce the red-eye effect that appears after shooting. ● Select [Review Info], then press the qr buttons to ...
User Guide
Page 143
...on then back off (p. 17). Screen does not display properly in movies. • When the camera is subjected to powerful light sources, the display may darken. • Under fluorescent lighting, the ...screen may flicker. • When shooting bright light sources, a bar of light (purplish red) may not display correctly when set as listed on . Please note, the following . Warm the ... the shutter button halfway (p. 23). Shooting Cannot shoot. • When in your problem, contact a Canon Customer Support Help Desk as a start-up . • Images that have been edited on a computer...
...on then back off (p. 17). Screen does not display properly in movies. • When the camera is subjected to powerful light sources, the display may darken. • Under fluorescent lighting, the ...screen may flicker. • When shooting bright light sources, a bar of light (purplish red) may not display correctly when set as listed on . Please note, the following . Warm the ... the shutter button halfway (p. 23). Shooting Cannot shoot. • When in your problem, contact a Canon Customer Support Help Desk as a start-up . • Images that have been edited on a computer...
User Guide
Page 145
... may not be able to the lens. Try one of the following. • Perform a low-level format of the memory card in the camera, or use the digital zoom while recording, but not the optical zoom (p. 96). Playback stops, or audio cuts out. • Use a card that has been ...formatted on this camera (p. 22). • If you can be made differ depending on the shooting mode. Troubleshooting Eyes appear red (p. 86). • Set the [Red-Eye Lamp]...
... may not be able to the lens. Try one of the following. • Perform a low-level format of the memory card in the camera, or use the digital zoom while recording, but not the optical zoom (p. 96). Playback stops, or audio cuts out. • Use a card that has been ...formatted on this camera (p. 22). • If you can be made differ depending on the shooting mode. Troubleshooting Eyes appear red (p. 86). • Set the [Red-Eye Lamp]...

User Guide
Page 150
...On/Off - {{{{ Standard/Off { {{{{ 1.5x / 2.0x { {{{{ AF-Point Zoom (p. 81) On/Off { {{{{ AF-assist Beam (p. 136) On/Off { {{{{ Flash Settings (pp. 86, 137) Red-Eye Corr. Overlay (p. 137) Off/Grid Lines 3:2 Guide/Both IS Mode (p. 138) Date Stamp (p. 62) Continuous/Off Shoot Only/Panning Off/Date/Date & Time *2 *1 AiAF... *2 Always [On]. *3 Available when h is selected. 150 Menus 4 Shooting Menu Function AF Frame (p. 80) AF Frame Size (p. 80) Servo AF (p. 82) Digital Zoom (p. 60) Shooting modes A G I F V Face AiAF { {{{{ Center - {{{{ Normal/Small - {---
...On/Off - {{{{ Standard/Off { {{{{ 1.5x / 2.0x { {{{{ AF-Point Zoom (p. 81) On/Off { {{{{ AF-assist Beam (p. 136) On/Off { {{{{ Flash Settings (pp. 86, 137) Red-Eye Corr. Overlay (p. 137) Off/Grid Lines 3:2 Guide/Both IS Mode (p. 138) Date Stamp (p. 62) Continuous/Off Shoot Only/Panning Off/Date/Date & Time *2 *1 AiAF... *2 Always [On]. *3 Available when h is selected. 150 Menus 4 Shooting Menu Function AF Frame (p. 80) AF Frame Size (p. 80) Servo AF (p. 82) Digital Zoom (p. 60) Shooting modes A G I F V Face AiAF { {{{{ Center - {{{{ Normal/Small - {---

User Guide
Page 153
Menus 1 Playback Menu Item Slideshow My Category Erase Protect i-Contrast Red-Eye Correction Trimming Resize My Colors Rotate Resume Transition * Default setting Options/Summary Plays back images and movies automatically. Corrects ...shot Fade*/Slide 1/Slide 2/Off Ref. Selects images for printing. Cancels all images for printing. Adjusts colors in images. Sets the printing style. Ref. Corrects red eyes in images. Selects images for printing. Selects individual images for printing by category. Trims portions of images. Page p. 105 p. 118 p. 112 p. ...
Menus 1 Playback Menu Item Slideshow My Category Erase Protect i-Contrast Red-Eye Correction Trimming Resize My Colors Rotate Resume Transition * Default setting Options/Summary Plays back images and movies automatically. Corrects ...shot Fade*/Slide 1/Slide 2/Off Ref. Selects images for printing. Cancels all images for printing. Adjusts colors in images. Sets the printing style. Ref. Corrects red eyes in images. Selects images for printing. Selects individual images for printing by category. Trims portions of images. Page p. 105 p. 118 p. 112 p. ...
User Guide
Page 155
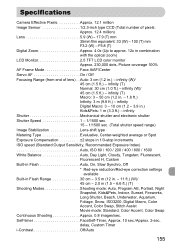
Specifications Camera Effective Pixels Approx. 12.1 million Image Sensor 1/2.3-inch type CCD (Total number of lens) . . infinity (T) Macro: 3 - 50 cm (1.2 in .) Kids&Pets: 1 m (3.3 ft.) - infinity Digital Macro: 3 - 10 cm (1.2 - 3.9 in . - 1.6 ft.) Infinity: 3 m (9.8 ft.) - F5.8 (T) Digital Zoom Approx. 4.... 1600 White Balance Auto, Day Light, Cloudy, Tungsten, Fluorescent, Fluorescent H, Custom Built-in Flash Auto, On, Slow Synchro, Off * Red-eye reduction/Red-eye correction settings available Built-in Flash Range 30 cm - 3.5 m (12 in .) - delay, Custom Timer i-Contrast Off/Auto 155...
Specifications Camera Effective Pixels Approx. 12.1 million Image Sensor 1/2.3-inch type CCD (Total number of lens) . . infinity (T) Macro: 3 - 50 cm (1.2 in .) Kids&Pets: 1 m (3.3 ft.) - infinity Digital Macro: 3 - 10 cm (1.2 - 3.9 in . - 1.6 ft.) Infinity: 3 m (9.8 ft.) - F5.8 (T) Digital Zoom Approx. 4.... 1600 White Balance Auto, Day Light, Cloudy, Tungsten, Fluorescent, Fluorescent H, Custom Built-in Flash Auto, On, Slow Synchro, Off * Red-eye reduction/Red-eye correction settings available Built-in Flash Range 30 cm - 3.5 m (12 in .) - delay, Custom Timer i-Contrast Off/Auto 155...

User Guide
Page 156
... Recording Media SD memory card, SDHC memory card, MultiMediaCard, MMCplus memory card, HC MMCplus memory card File Format Design rule for camera file system and DPOF compliant Data Type Still images: Exif 2.2 (JPEG) Movies: MOV (Image data: H.264, Audio data:... Function Erase, Protect, My Category, Resize, My Colors, iContrast, Trimming, Rotate, Red-Eye Correction Direct Print Type PictBridge capable Interface Hi-Speed USB (Dedicated connector (female) with unified type of digital, audio and video*) * mini-B compatible HDMI Mini Connector Communication Settings MTP, PTP Power...
... Recording Media SD memory card, SDHC memory card, MultiMediaCard, MMCplus memory card, HC MMCplus memory card File Format Design rule for camera file system and DPOF compliant Data Type Still images: Exif 2.2 (JPEG) Movies: MOV (Image data: H.264, Audio data:... Function Erase, Protect, My Category, Resize, My Colors, iContrast, Trimming, Rotate, Red-Eye Correction Direct Print Type PictBridge capable Interface Hi-Speed USB (Dedicated connector (female) with unified type of digital, audio and video*) * mini-B compatible HDMI Mini Connector Communication Settings MTP, PTP Power...
User Guide
Page 158
... Changing 20 Date/Time Battery 20 158 Setting 19 Date/Time Date and Time Default Settings 51 DIGITAL CAMERA Solution Disk 2, 35 Digital Macro (Scene Mode 68 Digital Tele-Converter 61 Digital Zoom 60 Direct Print 30 Disp. Overlay 137 Display Language 21 DPOF 126 E Editing i-Contrast... 124 My Colors 123 Red-Eye Correction 125 Resizing (Making Images Smaller) ..... 121 Rotating Images 120 Trimming 122 Enlarged...
... Changing 20 Date/Time Battery 20 158 Setting 19 Date/Time Date and Time Default Settings 51 DIGITAL CAMERA Solution Disk 2, 35 Digital Macro (Scene Mode 68 Digital Tele-Converter 61 Digital Zoom 60 Direct Print 30 Disp. Overlay 137 Display Language 21 DPOF 126 E Editing i-Contrast... 124 My Colors 123 Red-Eye Correction 125 Resizing (Making Images Smaller) ..... 121 Rotating Images 120 Trimming 122 Enlarged...


