Software Starter Guide
Page 4
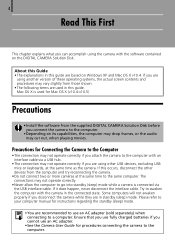
...) mode. • You are recommended to use an AC adapter. • See the Camera User Guide for Mac OS X (v10.4-v10.5) Precautions • Install the software from the supplied DIGITAL CAMERA Solution Disk before you cannot use an AC adapter (sold separately) when connecting to the Computer... • The connection may cut out, when playing movies. If it does happen, never disconnect the interface cable. Ensure that you use fully ...
...) mode. • You are recommended to use an AC adapter. • See the Camera User Guide for Mac OS X (v10.4-v10.5) Precautions • Install the software from the supplied DIGITAL CAMERA Solution Disk before you cannot use an AC adapter (sold separately) when connecting to the Computer... • The connection may cut out, when playing movies. If it does happen, never disconnect the interface cable. Ensure that you use fully ...
Software Starter Guide
Page 10
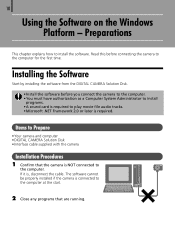
...tracks. • Microsoft .NET Framework 2.0 or later is connected to Prepare • Your camera and computer • DIGITAL CAMERA Solution Disk • Interface cable supplied with the camera Installation Procedures 1 Confirm that are running. 10 Using the Software on the Windows Platform - Items...at the start. 2 Close any programs that the camera is , disconnect the cable. Installing the Software Start by installing the software from the DIGITAL CAMERA Solution Disk. • Install the software before connecting the camera to install the software. The software cannot be ...
...tracks. • Microsoft .NET Framework 2.0 or later is connected to Prepare • Your camera and computer • DIGITAL CAMERA Solution Disk • Interface cable supplied with the camera Installation Procedures 1 Confirm that are running. 10 Using the Software on the Windows Platform - Items...at the start. 2 Close any programs that the camera is , disconnect the cable. Installing the Software Start by installing the software from the DIGITAL CAMERA Solution Disk. • Install the software before connecting the camera to install the software. The software cannot be ...
Software Starter Guide
Page 14
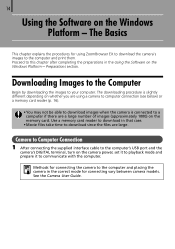
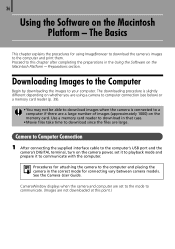
... - The Basics This chapter explains the procedures for connecting vary between camera models. Preparations section. The downloading procedure is connected to a computer if there are large. Camera to Computer Connection 1 After connecting the supplied interface cable to the computer's USB port and the camera's DIGITAL terminal, turn on the Windows Platform - Use a memory card reader...
... - The Basics This chapter explains the procedures for connecting vary between camera models. Preparations section. The downloading procedure is connected to a computer if there are large. Camera to Computer Connection 1 After connecting the supplied interface cable to the computer's USB port and the camera's DIGITAL terminal, turn on the Windows Platform - Use a memory card reader...
Software Starter Guide
Page 32
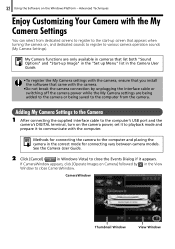
Adding My Camera Settings to the Camera 1 After connecting the supplied interface cable to the computer's USB port and the camera's DIGITAL terminal, turn on Camera] followed by unplugging the interface cable or switching off the camera power while the My Camera settings are only available in cameras that list both "Sound Options" and "Start-up Image" in the "Set up...
Adding My Camera Settings to the Camera 1 After connecting the supplied interface cable to the computer's USB port and the camera's DIGITAL terminal, turn on Camera] followed by unplugging the interface cable or switching off the camera power while the My Camera settings are only available in cameras that list both "Sound Options" and "Start-up Image" in the "Set up...

Software Starter Guide
Page 34
... in the computer's CD-ROM drive. 3 Double-click the [Canon Digital Camera Installer] icon in the OS Extended (journaled) format. Read this before connecting the camera to install the software. Items to Prepare • Your camera and computer • DIGITAL CAMERA Solution Disk • Interface cable supplied with the camera Macintosh software can only be used on the Macintosh...
... in the computer's CD-ROM drive. 3 Double-click the [Canon Digital Camera Installer] icon in the OS Extended (journaled) format. Read this before connecting the camera to install the software. Items to Prepare • Your camera and computer • DIGITAL CAMERA Solution Disk • Interface cable supplied with the camera Macintosh software can only be used on the Macintosh...
Software Starter Guide
Page 36
... files are a large number of images (approximately 1000) on the memory card. Camera to Computer Connection 1 After connecting the supplied interface cable to the computer's USB port and the camera's DIGITAL terminal, turn on the Macintosh Platform - CameraWindow displays when the camera and computer are not downloaded at this chapter after completing the preparations in...
... files are a large number of images (approximately 1000) on the memory card. Camera to Computer Connection 1 After connecting the supplied interface cable to the computer's USB port and the camera's DIGITAL terminal, turn on the Macintosh Platform - CameraWindow displays when the camera and computer are not downloaded at this chapter after completing the preparations in...
Software Starter Guide
Page 54
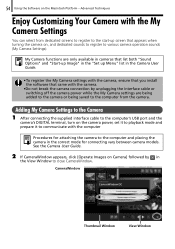
Adding My Camera Settings to the Camera 1 After connecting the supplied interface cable to the computer's USB port and the camera's DIGITAL terminal, turn on Camera] followed by unplugging the interface cable or switching off the camera power while the My Camera settings are only available in cameras that list both "Sound Options" and "Start-up Image" in the "Set up...
Adding My Camera Settings to the Camera 1 After connecting the supplied interface cable to the computer's USB port and the camera's DIGITAL terminal, turn on Camera] followed by unplugging the interface cable or switching off the camera power while the My Camera settings are only available in cameras that list both "Sound Options" and "Start-up Image" in the "Set up...
Software Starter Guide
Page 58
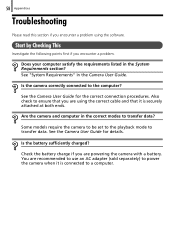
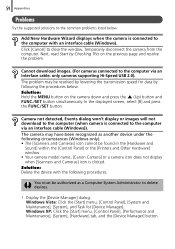
...the correct connection procedures. Is the battery sufficiently charged? See the Camera User Guide for details. See "System Requirements" in the System Requirements... first if you encounter a problem. Does your computer satisfy the requirements listed in the Camera User Guide. Are the camera and computer in the correct modes to the computer? Check the battery charge if you...an AC adapter (sold separately) to power the camera when it is connected to transfer data. You are powering the camera with a battery. Some models require the camera to be set to the playback mode to a...
...the correct connection procedures. Is the battery sufficiently charged? See the Camera User Guide for details. See "System Requirements" in the System Requirements... first if you encounter a problem. Does your computer satisfy the requirements listed in the Camera User Guide. Are the camera and computer in the correct modes to the computer? Check the battery charge if you...an AC adapter (sold separately) to power the camera when it is connected to transfer data. You are powering the camera with a battery. Some models require the camera to be set to the playback mode to a...
Software Starter Guide
Page 59
...] to the computer via an interface cable (Windows)). The camera may be found in the [Hardware and Sound] within the [Control Panel] or the [Printers and Other Hardware] window. • Your camera model name, [Canon Camera] or a camera icon does not display when [Scanners and Cameras] icon is clicked. Temporarily disconnect the camera from the computer. Solution: Hold...
...] to the computer via an interface cable (Windows)). The camera may be found in the [Hardware and Sound] within the [Control Panel] or the [Printers and Other Hardware] window. • Your camera model name, [Canon Camera] or a camera icon does not display when [Scanners and Cameras] icon is clicked. Temporarily disconnect the camera from the computer. Solution: Hold...
User Guide
Page 2
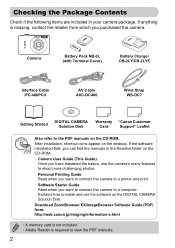
... Guide) Once you want to connect the camera to the PDF manuals on the DIGITAL CAMERA Solution Disk. Camera Battery Pack NB-6L (with Terminal Cover) Battery Charger CB-2LY/CB-2LYE Interface Cable IFC-400PCU AV Cable AVC-DC400 Wrist Strap WS-DC7 Getting Started DIGITAL CAMERA Solution Disk Warranty "Canon Customer Card Support" Leaflet Also refer to...
... Guide) Once you want to connect the camera to the PDF manuals on the DIGITAL CAMERA Solution Disk. Camera Battery Pack NB-6L (with Terminal Cover) Battery Charger CB-2LY/CB-2LYE Interface Cable IFC-400PCU AV Cable AVC-DC400 Wrist Strap WS-DC7 Getting Started DIGITAL CAMERA Solution Disk Warranty "Canon Customer Card Support" Leaflet Also refer to...
User Guide
Page 27
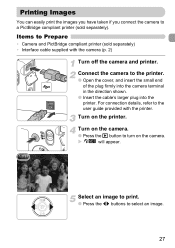
... guide provided with the camera (p. 2) Turn off the camera and printer. Items to the printer. ● Open the cover, and insert the small end of the plug firmly into the camera terminal in the direction shown. ● Insert the cable's larger plug into the printer. Connect the camera to Prepare • Camera and PictBridge compliant printer...
... guide provided with the camera (p. 2) Turn off the camera and printer. Items to the printer. ● Open the cover, and insert the small end of the plug firmly into the camera terminal in the direction shown. ● Insert the cable's larger plug into the printer. Connect the camera to Prepare • Camera and PictBridge compliant printer...
User Guide
Page 28
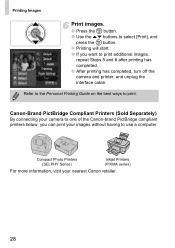
..., repeat Steps 5 and 6 after printing has completed. ● After printing has completed, turn off the camera and printer, and unplug the interface cable. Canon-Brand PictBridge Compliant Printers (Sold Separately) By connecting your camera to one of the Canon-brand PictBridge compliant printers below, you want to use a computer. Printing Images Print images. ● Press...
..., repeat Steps 5 and 6 after printing has completed. ● After printing has completed, turn off the camera and printer, and unplug the interface cable. Canon-Brand PictBridge Compliant Printers (Sold Separately) By connecting your camera to one of the Canon-brand PictBridge compliant printers below, you want to use a computer. Printing Images Print images. ● Press...
User Guide
Page 33
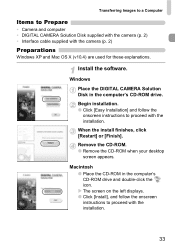
Transferring Images to a Computer Items to Prepare • Camera and computer • DIGITAL CAMERA Solution Disk supplied with the camera (p. 2) • Interface cable supplied with the installation. When the install finishes, click [Restart] or [Finish]. Remove the CD-ROM. ● Remove the CD-ROM when your desktop screen ... screen on the left displays. ● Click [Install], and follow the onscreen instructions to proceed with the installation. 33 Install the software. Windows Place the DIGITAL CAMERA Solution Disk in the computer's CD-ROM drive and double-click the icon.
Transferring Images to a Computer Items to Prepare • Camera and computer • DIGITAL CAMERA Solution Disk supplied with the camera (p. 2) • Interface cable supplied with the installation. When the install finishes, click [Restart] or [Finish]. Remove the CD-ROM. ● Remove the CD-ROM when your desktop screen ... screen on the left displays. ● Click [Install], and follow the onscreen instructions to proceed with the installation. 33 Install the software. Windows Place the DIGITAL CAMERA Solution Disk in the computer's CD-ROM drive and double-click the icon.
User Guide
Page 34
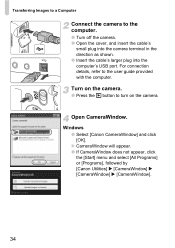
... CameraWindow does not appear, click the [Start] menu and select [All Programs] or [Programs], followed by [Canon Utilities] X [CameraWindow] X [CameraWindow] X [CameraWindow]. 34 Turn on the camera. ● Press the 1 button to the user guide provided with the computer. Open CameraWindow. For connection details...to turn on the camera. Transferring Images to a Computer Connect the camera to the computer. ● Turn off the camera. ● Open the cover, and insert the cable's small plug into the camera terminal in the direction as shown. ● Insert the cable's larger plug into ...
... CameraWindow does not appear, click the [Start] menu and select [All Programs] or [Programs], followed by [Canon Utilities] X [CameraWindow] X [CameraWindow] X [CameraWindow]. 34 Turn on the camera. ● Press the 1 button to the user guide provided with the computer. Open CameraWindow. For connection details...to turn on the camera. Transferring Images to a Computer Connect the camera to the computer. ● Turn off the camera. ● Open the cover, and insert the cable's small plug into the camera terminal in the direction as shown. ● Insert the cable's larger plug into ...
User Guide
Page 35
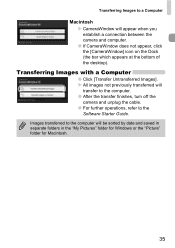
...Images transferred to a Computer Macintosh X CameraWindow will transfer to the computer. ● After the transfer finishes, turn off the camera and unplug the cable. ● For further operations, refer to the Software Starter Guide. X All images not previously transferred will appear when you establish... a connection between the camera and computer. ● If CameraWindow does not appear, click the [CameraWindow] icon on ...
...Images transferred to a Computer Macintosh X CameraWindow will transfer to the computer. ● After the transfer finishes, turn off the camera and unplug the cable. ● For further operations, refer to the Software Starter Guide. X All images not previously transferred will appear when you establish... a connection between the camera and computer. ● If CameraWindow does not appear, click the [CameraWindow] icon on ...
User Guide
Page 36
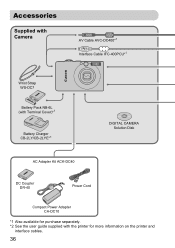
Accessories Supplied with Camera AV Cable AVC-DC400*1 Interface Cable IFC-400PCU*1 Wrist Strap WS-DC7 Battery Pack NB-6L (with Terminal Cover)*1 Battery Charger CB-2LY/CB-2LYE*1 DIGITAL CAMERA Solution Disk AC Adapter Kit ACK-DC40 DC Coupler DR-40 Power Cord Compact Power Adapter CA-DC10 *1 Also available for purchase separately. *2 See the user guide supplied with the printer for more information on the printer and interface cables. 36
Accessories Supplied with Camera AV Cable AVC-DC400*1 Interface Cable IFC-400PCU*1 Wrist Strap WS-DC7 Battery Pack NB-6L (with Terminal Cover)*1 Battery Charger CB-2LY/CB-2LYE*1 DIGITAL CAMERA Solution Disk AC Adapter Kit ACK-DC40 DC Coupler DR-40 Power Cord Compact Power Adapter CA-DC10 *1 Also available for purchase separately. *2 See the user guide supplied with the printer for more information on the printer and interface cables. 36

User Guide
Page 95
... terminals as shown in the illustration. Items to Prepare • Camera and TV • AV cable supplied with the camera (p. 2) Turn off the camera and TV, and unplug the AV cable. Press the n button, select the 3 tab and [Video System] to switch to which the cable is connected. Turn on the TV (nothing will not display...
... terminals as shown in the illustration. Items to Prepare • Camera and TV • AV cable supplied with the camera (p. 2) Turn off the camera and TV, and unplug the AV cable. Press the n button, select the 3 tab and [Video System] to switch to which the cable is connected. Turn on the TV (nothing will not display...
User Guide
Page 132
... Adapter Kit 38, 116 Accessories 36 AE Lock 79 AF Frame 23 AF J Auto Focus AF Lock 77 Aquarium (Scene Mode 54 AV Cable 2 AV cable 95 B Battery Battery Charger 2, 12, 38 Charge Indicator 13 Date/Time Battery 18 Recharge 12 Beach (Scene Mode 53 Black and White...Changing 18 Date and Time J Date/Time Date/Time Date/Time Battery 18 Default Settings 48 Deleting J Erasing DIGITAL CAMERA Solution Disk ......... 2, 33 Digital Macro (Scene Mode 64 Digital Tele-Converter 57 Digital Zoom 56 Direct Print 28 132 Disp. Overlay 112 Display Language 19 DPOF 102 E Editing i-Contrast 100 ...
... Adapter Kit 38, 116 Accessories 36 AE Lock 79 AF Frame 23 AF J Auto Focus AF Lock 77 Aquarium (Scene Mode 54 AV Cable 2 AV cable 95 B Battery Battery Charger 2, 12, 38 Charge Indicator 13 Date/Time Battery 18 Recharge 12 Beach (Scene Mode 53 Black and White...Changing 18 Date and Time J Date/Time Date/Time Date/Time Battery 18 Default Settings 48 Deleting J Erasing DIGITAL CAMERA Solution Disk ......... 2, 33 Digital Macro (Scene Mode 64 Digital Tele-Converter 57 Digital Zoom 56 Direct Print 28 132 Disp. Overlay 112 Display Language 19 DPOF 102 E Editing i-Contrast 100 ...

User Guide
Page 133
... 81, 100 Image Erasing Images 26 Playback J View Protect 96 Image Quality (Compression Ratio) ......... 65 Images Editing J Editing Indoor (Scene Mode 53 Infinity 63 Interface Cable 2, 27, 33 ISO Speed 68 ISO3200 (Scene Mode 54 K Kids&Pets (Scene Mode 53 L Lamp 40, 41, 111, 112 LCD Monitor J Screen Long Exposures 83...
... 81, 100 Image Erasing Images 26 Playback J View Protect 96 Image Quality (Compression Ratio) ......... 65 Images Editing J Editing Indoor (Scene Mode 53 Infinity 63 Interface Cable 2, 27, 33 ISO Speed 68 ISO3200 (Scene Mode 54 K Kids&Pets (Scene Mode 53 L Lamp 40, 41, 111, 112 LCD Monitor J Screen Long Exposures 83...


