
User Manual
Page 2
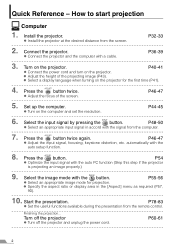
... start projection Computer 1. P36-39 3. z Adjust the focus of the projecting image (P43). P44-45 6. P78-83 z Set the useful functions available during the presentation from the screen. P40-41 z Connect the power cord and turn on the projector for projection. z Install the projector at the desired distance from the remote control. z Select a display language when turning on the projector. P60-61 2 Turn off the projector z Turn off the projector and unplug the power cord. Install the projector. P46-47 z Adjust the input signal, focusing, keystone...
... start projection Computer 1. P36-39 3. z Adjust the focus of the projecting image (P43). P44-45 6. P78-83 z Set the useful functions available during the presentation from the screen. P40-41 z Connect the power cord and turn on the projector for projection. z Install the projector at the desired distance from the remote control. z Select a display language when turning on the projector. P60-61 2 Turn off the projector z Turn off the projector and unplug the power cord. Install the projector. P46-47 z Adjust the input signal, focusing, keystone...
User Manual
Page 3
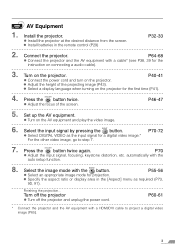
... instruction on connecting a audio cable). 3. P60-61 * Connect the projector and the AV equipment with the auto setup function. 8. z Select a display language when turning on the projector. Press the button twice. z Select DIGITAL VIDEO as required (P73, 90, 91). Select the image mode with a cable* (see P38, 39 for projection. z Turn on the projector. z Install the projector at the desired distance from the screen. Select the input signal by pressing the button. Finishing the projection... Install the projector. Turn off the projector z Turn...
... instruction on connecting a audio cable). 3. P60-61 * Connect the projector and the AV equipment with the auto setup function. 8. z Select a display language when turning on the projector. Press the button twice. z Select DIGITAL VIDEO as required (P73, 90, 91). Select the image mode with a cable* (see P38, 39 for projection. z Turn on the projector. z Install the projector at the desired distance from the screen. Select the input signal by pressing the button. Finishing the projection... Install the projector. Turn off the projector z Turn...
User Manual
Page 4
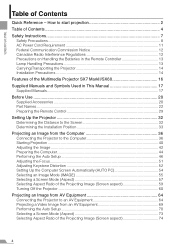
... Multimedia Projector SX7 MarkII/SX60 16 Supplied Manuals and Symbols Used in This Manual 17 Supplied Manuals...17 Before Use ...20 Supplied Accessories ...20 Part Names...22 Preparing the Remote Control 29 Setting Up the Projector 32 Determining the Distance to the Screen 32 Determining the Installation Position 33 Projecting an Image from the Computer 36 Connecting the Projector to the Computer 36 Starting Projection ...40 Adjusting the Image ...42 Preparing the Computer 44 Performing the Auto Setup 46 Adjusting...
... Multimedia Projector SX7 MarkII/SX60 16 Supplied Manuals and Symbols Used in This Manual 17 Supplied Manuals...17 Before Use ...20 Supplied Accessories ...20 Part Names...22 Preparing the Remote Control 29 Setting Up the Projector 32 Determining the Distance to the Screen 32 Determining the Installation Position 33 Projecting an Image from the Computer 36 Connecting the Projector to the Computer 36 Starting Projection ...40 Adjusting the Image ...42 Preparing the Computer 44 Performing the Auto Setup 46 Adjusting...
User Manual
Page 6
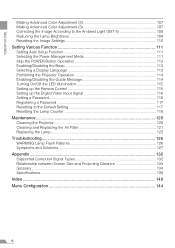
... the LED Illumination 115 Setting up the Remote Control 115 Setting up the Digital Video Input Signal 116 Setting a Password...116 Registering a Password 117 Resetting to the Default Setting 117 Resetting the Lamp Counter 118 Maintenance...120 Cleaning the Projector 120 Cleaning and Replacing the Air Filter 121 Replacing the Lamp ...122 Troubleshooting 126 WARNING Lamp Flash Patterns 126 Symptoms and Solutions 127 Appendix ...132 Supported Computer Signal Types 132 Relationship between Screen Size and Projecting Distance 133 Glossary ...134 Specifications ...138 Index ...140 Menu...
... the LED Illumination 115 Setting up the Remote Control 115 Setting up the Digital Video Input Signal 116 Setting a Password...116 Registering a Password 117 Resetting to the Default Setting 117 Resetting the Lamp Counter 118 Maintenance...120 Cleaning the Projector 120 Cleaning and Replacing the Air Filter 121 Replacing the Lamp ...122 Troubleshooting 126 WARNING Lamp Flash Patterns 126 Symptoms and Solutions 127 Appendix ...132 Supported Computer Signal Types 132 Relationship between Screen Size and Projecting Distance 133 Glossary ...134 Specifications ...138 Index ...140 Menu...
User Manual
Page 9
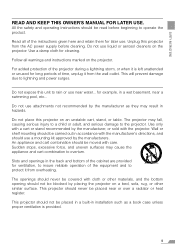
... all warnings and instructions marked on an unstable cart, stand, or table. For added protection of time, unplug it from the AC power supply before beginning to the projector. Use a damp cloth for ventilation, to insure reliable operation of the cabinet are provided for cleaning. Do not expose this unit to protect it is provided. 9 for example, in installation such as...
... all warnings and instructions marked on an unstable cart, stand, or table. For added protection of time, unplug it from the AC power supply before beginning to the projector. Use a damp cloth for ventilation, to insure reliable operation of the cabinet are provided for cleaning. Do not expose this unit to protect it is provided. 9 for example, in installation such as...

User Manual
Page 13
Failure to clean and check the inside the projector. z Do not attempt to replace both batteries at the same time. Some lamps may fail in the Remote Controller SAFETY INSTRUCTIONS Caution Observe the following precautions when handling the batteries. z A lamp gradually becomes darker over time. Warning If a Lamp Explodes z If a lamp explodes, gas or dust may cause explosion, heat generation, fire, or leakage of the battery...
Failure to clean and check the inside the projector. z Do not attempt to replace both batteries at the same time. Some lamps may fail in the Remote Controller SAFETY INSTRUCTIONS Caution Observe the following precautions when handling the batteries. z A lamp gradually becomes darker over time. Warning If a Lamp Explodes z If a lamp explodes, gas or dust may cause explosion, heat generation, fire, or leakage of the battery...
User Manual
Page 16
... the use because the cooling fan keeps rotating even if the power cord is removed from the DVD player to the big screen. Major Features Smooth and Beautiful Imaging Capability Incorporation of Your Projector (SX7 II) When projecting a digital still photo image or an image that has been processed on an sRGB-compatible monitor, you to 4.9 m (16.0') away. Various Image Modes for purchasing a Canon projector. The MULTIMEDIA PROJECTOR SX7 MarkII/SX60 are high-performance projectors...
... the use because the cooling fan keeps rotating even if the power cord is removed from the DVD player to the big screen. Major Features Smooth and Beautiful Imaging Capability Incorporation of Your Projector (SX7 II) When projecting a digital still photo image or an image that has been processed on an sRGB-compatible monitor, you to 4.9 m (16.0') away. Various Image Modes for purchasing a Canon projector. The MULTIMEDIA PROJECTOR SX7 MarkII/SX60 are high-performance projectors...

User Manual
Page 24
... menu. tons on the remote control or the top con- (5) trol on automati- The remote control allows you to the infrared remote receiver on the main unit. (2) POWER button (P40, 60) (11) (12) Turns the projector on or off. (14) (3) AUTO SET button (P46, 70) (15) Performs auto adjustment on focusing, keystone distortion, screen color (13) correction, and so on (Auto Setup (16) Function). (4) IMAGE button (P55) (17) (19) Switches among image modes (image qualities). (20) (22) (5) INPUT button...
... menu. tons on the remote control or the top con- (5) trol on automati- The remote control allows you to the infrared remote receiver on the main unit. (2) POWER button (P40, 60) (11) (12) Turns the projector on or off. (14) (3) AUTO SET button (P46, 70) (15) Performs auto adjustment on focusing, keystone distortion, screen color (13) correction, and so on (Auto Setup (16) Function). (4) IMAGE button (P55) (17) (19) Switches among image modes (image qualities). (20) (22) (5) INPUT button...

User Manual
Page 40
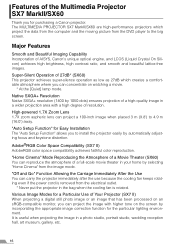
... IMAGE FROM THE COMPUTER 2 Remove the lens cap and press the [POWER] button. The [POWER] indicator flashes green, and then lights in red. Otherwise, the operating computer may suffer electromagnetic radiation problems and poor reception by TV and radio. Unplug the Power Cord When the Projector is Not in Use The projector constantly consumes approximately 7W power even when it cannot be turned on for an extended period of time. 1 Connect the power cord...
... IMAGE FROM THE COMPUTER 2 Remove the lens cap and press the [POWER] button. The [POWER] indicator flashes green, and then lights in red. Otherwise, the operating computer may suffer electromagnetic radiation problems and poor reception by TV and radio. Unplug the Power Cord When the Projector is Not in Use The projector constantly consumes approximately 7W power even when it cannot be turned on for an extended period of time. 1 Connect the power cord...

User Manual
Page 60
A confirmation message appears on during the process. 1 Press the [POWER] button. The lamp goes off, the [POWER] indicator starts flashing in an unstable state shortly after turning on the projector. PROJECTING AN IMAGE FROM THE COMPUTER Turning Off the Projector z You may shorten the lamp life if turning off the projector while its lamp is still in red, and it starts cooling the lamp. 3 Remove the power cord from the AC outlet. Wait at least 5 minutes...
A confirmation message appears on during the process. 1 Press the [POWER] button. The lamp goes off, the [POWER] indicator starts flashing in an unstable state shortly after turning on the projector. PROJECTING AN IMAGE FROM THE COMPUTER Turning Off the Projector z You may shorten the lamp life if turning off the projector while its lamp is still in red, and it starts cooling the lamp. 3 Remove the power cord from the AC outlet. Wait at least 5 minutes...
User Manual
Page 61
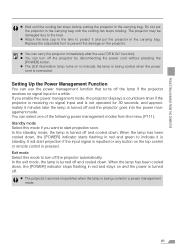
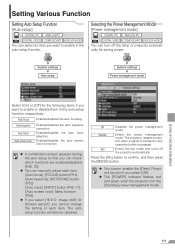
... a power management mode. 61 z The projector becomes inoperative when the lamp is connected. If you want to start projection if the input signal is inputted or any button on to protect it is not operated for a while. When the lamp has been cooled down , the [POWER] indicator stops flashing in the carrying bag. In the standby mode, the lamp is turned off the lamp if the projector receives no signal input and is standby. PROJECTING AN IMAGE...
... a power management mode. 61 z The projector becomes inoperative when the lamp is connected. If you want to start projection if the input signal is inputted or any button on to protect it is not operated for a while. When the lamp has been cooled down , the [POWER] indicator stops flashing in the carrying bag. In the standby mode, the lamp is turned off the lamp if the projector receives no signal input and is standby. PROJECTING AN IMAGE...

User Manual
Page 86
... the menu screen. You can make various adjustments to the projected image. The projector stores the settings for each input signal (8) and image mode (up to 5). Menu item used when projecting an image from the computer. COMPONENT input SCART SCART input COMP./SCART COMPONENT input/SCART input VIDEO/S-VIDEO VIDEO input/S-VIDEO input SETTING UP FUNCTIONS FROM MENUS 86 Image adjustment menu (P102) This menu is used to select an input signal and make various settings related to display. You can set various functions of the projector. Display settings menu...
... the menu screen. You can make various adjustments to the projected image. The projector stores the settings for each input signal (8) and image mode (up to 5). Menu item used when projecting an image from the computer. COMPONENT input SCART SCART input COMP./SCART COMPONENT input/SCART input VIDEO/S-VIDEO VIDEO input/S-VIDEO input SETTING UP FUNCTIONS FROM MENUS 86 Image adjustment menu (P102) This menu is used to select an input signal and make various settings related to display. You can set various functions of the projector. Display settings menu...

User Manual
Page 91
... adjust the aspect ratio of 16:9. z Each item may become unavailable depending on the screen. Select an input signal type suitable for the signal types supported by this projector. Press the [MENU] button when you finish. Press the [MENU] button when you finish. Wide Projects a video image with aspect ratio of the image projected on the setting of 16:9. SETTING UP FUNCTIONS FROM MENUS 91 T Display settings T Aspect T Display settings T Input signal select Full screen Projects...
... adjust the aspect ratio of 16:9. z Each item may become unavailable depending on the screen. Select an input signal type suitable for the signal types supported by this projector. Press the [MENU] button when you finish. Press the [MENU] button when you finish. Wide Projects a video image with aspect ratio of the image projected on the setting of 16:9. SETTING UP FUNCTIONS FROM MENUS 91 T Display settings T Aspect T Display settings T Input signal select Full screen Projects...

User Manual
Page 107
... color adjustment with the 6axis color adjustment box (RGB (red/green/blue) and CMY (cyan/ magenta/yellow)). Adjust Enables the 6-axis color adjustment. z This setting is saved for the currently selected input signal and image mode. Making Advanced Color Adjustment (3) [6-axis color adjust] DIGITAL PC ANALOG PC DIGITAL VIDEO COMP./SCART VIDEO/S-VIDEO You can be projected more vividly. L Specifies the intensity of the memo- Press the [MENU] button when you finish. Setting the Image Quality Making Advanced Color Adjustment (2) [Mem. color correct] DIGITAL...
... color adjustment with the 6axis color adjustment box (RGB (red/green/blue) and CMY (cyan/ magenta/yellow)). Adjust Enables the 6-axis color adjustment. z This setting is saved for the currently selected input signal and image mode. Making Advanced Color Adjustment (3) [6-axis color adjust] DIGITAL PC ANALOG PC DIGITAL VIDEO COMP./SCART VIDEO/S-VIDEO You can be projected more vividly. L Specifies the intensity of the memo- Press the [MENU] button when you finish. Setting the Image Quality Making Advanced Color Adjustment (2) [Mem. color correct] DIGITAL...
User Manual
Page 111
... change the setting of each item. [Auto focus]: [FOCUS] button (P51) [Auto keystone]: [KEYSTONE] button (P52) [Auto input]: [INPUT] button (P48, 71) [Auto screen color]: Menu function (P98) z If you can manually adjust each item. The auto setup function will also be disabled. The projector restarts projection when a signal is inputted or any operation button is in the auto setup function. Exit Enters the exit mode and turns off the lamp or projector automatically for the following items if you select [Off]. z The [POWER] indicator flashes red and green...
... change the setting of each item. [Auto focus]: [FOCUS] button (P51) [Auto keystone]: [KEYSTONE] button (P52) [Auto input]: [INPUT] button (P48, 71) [Auto screen color]: Menu function (P98) z If you can manually adjust each item. The auto setup function will also be disabled. The projector restarts projection when a signal is inputted or any operation button is in the auto setup function. Exit Enters the exit mode and turns off the lamp or projector automatically for the following items if you select [Off]. z The [POWER] indicator flashes red and green...

User Manual
Page 117
... [Lamp counter], [Language] and [Remote control] will not be reset even after resetting to confirm, and then press the [MENU] button. Press the [OK] button to the factory defaults. z For the factory defaults, see P144, 145. SETTING UP FUNCTIONS FROM MENUS < 117 You can reset the menu item settings and restore the system settings to the factory defaults. z The language selection screen appears when you turn on the projector. Setting Various Function Registering a Password [Register password] DIGITAL...
... [Lamp counter], [Language] and [Remote control] will not be reset even after resetting to confirm, and then press the [MENU] button. Press the [OK] button to the factory defaults. z For the factory defaults, see P144, 145. SETTING UP FUNCTIONS FROM MENUS < 117 You can reset the menu item settings and restore the system settings to the factory defaults. z The language selection screen appears when you turn on the projector. Setting Various Function Registering a Password [Register password] DIGITAL...
User Manual
Page 121
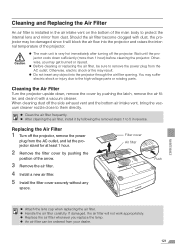
... insert any space. Cleaning the Air Filter Turn the projector upside down sufficiently (more than 1 hour) before cleaning the projector. z After cleaning the air filter, install it by pushing the position of the arrow. 3 Remove the air filter. 4 Install a new air filter. 5 Install the filter cover securely without any object into the projector and raises the internal temperature of the main body to protect the internal lens and mirror from dust. z Before cleaning or replacing the air filter, be sure...
... insert any space. Cleaning the Air Filter Turn the projector upside down sufficiently (more than 1 hour) before cleaning the projector. z After cleaning the air filter, install it by pushing the position of the arrow. 3 Remove the air filter. 4 Install a new air filter. 5 Install the filter cover securely without any object into the projector and raises the internal temperature of the main body to protect the internal lens and mirror from dust. z Before cleaning or replacing the air filter, be sure...

User Manual
Page 129
..., clean or replace the air filter (P121). If the air filter is dirty. Check whether the lamp has exploded. video terminal of keys used to the User's Manual that displayed on the notebook computer. The lamp may be defective if it has not exploded. For more detailed information, refer to the User's Manual that came with your computer. The operating temperature is not con- The projector is automatically turned off...
..., clean or replace the air filter (P121). If the air filter is dirty. Check whether the lamp has exploded. video terminal of keys used to the User's Manual that displayed on the notebook computer. The lamp may be defective if it has not exploded. For more detailed information, refer to the User's Manual that came with your computer. The operating temperature is not con- The projector is automatically turned off...
User Manual
Page 130
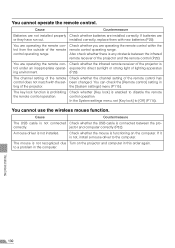
... lock] is not, install a mouse driver to disable the remote the remote control operation. correctly. If it is enabled to the computer. The mouse is connected between the infrared remote receiver of the projector. installed correctly, replace them with the set [Key lock] to [Off] (P114). been changed. Cause Countermeasure The USB cable is not connected Check whether the USB cable is not recognized due Turn on the computer. You cannot operate the remote control. control operation...
... lock] is not, install a mouse driver to disable the remote the remote control operation. correctly. If it is enabled to the computer. The mouse is connected between the infrared remote receiver of the projector. installed correctly, replace them with the set [Key lock] to [Off] (P114). been changed. Cause Countermeasure The USB cable is not connected Check whether the USB cable is not recognized due Turn on the computer. You cannot operate the remote control. control operation...
User Manual
Page 144
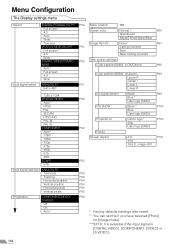
... reset) ** You can set this if you have selected [Photo] for [Image mode]. ***SX7 II: It is available if the input signal is [DIGITAL VIDEO], [COMPONENT], [VIDEO] or [S-VIDEO]. 144 Menu Configuration The Display settings menu Aspect Input signal select DIGITAL PC/ANALOG PC P90 Full screen * 4:3 Auto Wide True size VIDEO/S-VIDEO/SCART P91 Full screen * 4:3 Wide DIGITAL VIDEO/COMPO- P90 NENT Auto * Full screen 4:3 Wide ANALOG PC P91 640 x 480 Menu position P96 Screen color Normal * P98 Greenboard Adjust Red/Green/Blue Image flip H/V None * P97 Ceiling mounted...
... reset) ** You can set this if you have selected [Photo] for [Image mode]. ***SX7 II: It is available if the input signal is [DIGITAL VIDEO], [COMPONENT], [VIDEO] or [S-VIDEO]. 144 Menu Configuration The Display settings menu Aspect Input signal select DIGITAL PC/ANALOG PC P90 Full screen * 4:3 Auto Wide True size VIDEO/S-VIDEO/SCART P91 Full screen * 4:3 Wide DIGITAL VIDEO/COMPO- P90 NENT Auto * Full screen 4:3 Wide ANALOG PC P91 640 x 480 Menu position P96 Screen color Normal * P98 Greenboard Adjust Red/Green/Blue Image flip H/V None * P97 Ceiling mounted...


