User Manual
Page 4
... 15 Viewing Still Images 18 Erasing 19 Printing 20 Embedding the Date in the Image Data 22 Shooting Movies ( Standard Mode 24 Viewing Movies 26 Downloading Images to a Computer 27 System Map 34 Learning More 39 Components Guide 40 Using the Control Dial 43 Using the Button 44 Indicator 45 Basic...
... 15 Viewing Still Images 18 Erasing 19 Printing 20 Embedding the Date in the Image Data 22 Shooting Movies ( Standard Mode 24 Viewing Movies 26 Downloading Images to a Computer 27 System Map 34 Learning More 39 Components Guide 40 Using the Control Dial 43 Using the Button 44 Indicator 45 Basic...
User Manual
Page 29
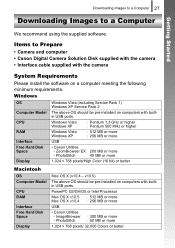
PhotoStitch : 40 MB or more USB Free Hard Disk Space Display • Canon Utilities - Windows OS Computer Model CPU RAM Interface Windows Vista (including Service Pack 1) Windows XP Service Pack 2 The above OS should ... Started We recommend using the supplied software. PhotoStitch : 300 MB or more : 50 MB or more - Downloading Images to a Computer 27 Downloading Images to Prepare • Camera and computer • Canon Digital Camera Solution Disk supplied with the camera • Interface cable supplied with the camera System Requirements Please install...
PhotoStitch : 40 MB or more USB Free Hard Disk Space Display • Canon Utilities - Windows OS Computer Model CPU RAM Interface Windows Vista (including Service Pack 1) Windows XP Service Pack 2 The above OS should ... Started We recommend using the supplied software. PhotoStitch : 300 MB or more : 50 MB or more - Downloading Images to a Computer 27 Downloading Images to Prepare • Camera and computer • Canon Digital Camera Solution Disk supplied with the camera • Interface cable supplied with the camera System Requirements Please install...
User Manual
Page 30
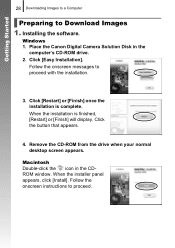
Installing the software. Follow the onscreen messages to Download Images 1. Click the button that appears. 4. Place the Canon Digital Camera Solution Disk in the CDROM window. Click [Easy Installation]. Getting Started 28 Downloading Images to a Computer Preparing to proceed with the installation. 3. When the installation is complete. When the installer panel appears, click [Install...
Installing the software. Follow the onscreen messages to Download Images 1. Click the button that appears. 4. Place the Canon Digital Camera Solution Disk in the CDROM window. Click [Easy Installation]. Getting Started 28 Downloading Images to a Computer Preparing to proceed with the installation. 3. When the installation is complete. When the installer panel appears, click [Install...
User Manual
Page 31
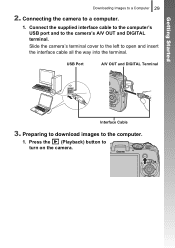
Connect the supplied interface cable to the computer's USB port and to turn on the camera. USB Port A/V OUT and DIGITAL Terminal Interface Cable 3. Press the (Playback) button to the camera's A/V OUT and DIGITAL terminal. Connecting the camera to the computer. 1. Preparing to download images to a computer. 1. Slide the camera's terminal cover to the left to a Computer 29 2. Getting Started Downloading Images to open and insert the interface cable all the way into the terminal.
Connect the supplied interface cable to the computer's USB port and to turn on the camera. USB Port A/V OUT and DIGITAL Terminal Interface Cable 3. Press the (Playback) button to the camera's A/V OUT and DIGITAL terminal. Connecting the camera to the computer. 1. Preparing to download images to a computer. 1. Slide the camera's terminal cover to the left to a Computer 29 2. Getting Started Downloading Images to open and insert the interface cable all the way into the terminal.
User Manual
Page 32
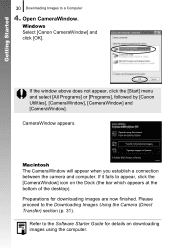
...click the [Start] menu and select [All Programs] or [Programs], followed by [Canon Utilities], [CameraWindow], [CameraWindow] and [CameraWindow]. Please proceed to a Computer 4. Getting Started 30 Downloading Images to the Downloading Images Using the Camera (Direct Transfer) section (p. 31). CameraWindow appears. Macintosh The... between the camera and computer. Open CameraWindow. Refer to appear, click the [CameraWindow] icon on downloading images using the computer. Preparations for details on the Dock (the bar which appears at the bottom of the desktop). Windows ...
...click the [Start] menu and select [All Programs] or [Programs], followed by [Canon Utilities], [CameraWindow], [CameraWindow] and [CameraWindow]. Please proceed to a Computer 4. Getting Started 30 Downloading Images to the Downloading Images Using the Camera (Direct Transfer) section (p. 31). CameraWindow appears. Macintosh The... between the camera and computer. Open CameraWindow. Refer to appear, click the [CameraWindow] icon on downloading images using the computer. Preparations for details on the Dock (the bar which appears at the bottom of the desktop). Windows ...

User Manual
Page 33
...method for the first time (p. 28). Button Buttons Button MENU Button 1. Press the button. Direct Transfer Menu • Images not previously downloaded will light blue. • Press the MENU button if the Direct Transfer menu fails to appear. 2. Confirm that the Direct Transfer ...menu is displayed on the camera's LCD monitor. • The button will download to download images using camera operations. Getting Started Downloading Images to a Computer 31 Downloading Images Using the Camera (Direct Transfer) Use this method to the computer.
...method for the first time (p. 28). Button Buttons Button MENU Button 1. Press the button. Direct Transfer Menu • Images not previously downloaded will light blue. • Press the MENU button if the Direct Transfer menu fails to appear. 2. Confirm that the Direct Transfer ...menu is displayed on the camera's LCD monitor. • The button will download to download images using camera operations. Getting Started Downloading Images to a Computer 31 Downloading Images Using the Camera (Direct Transfer) Use this method to the computer.

User Manual
Page 34
... as the background on the computer desktop. All Images/New Images/DPOF Trans. Select & Transfer/Wallpaper 1. The button will blink blue while downloading is complete. • Pressing the FUNC./SET button will return to the computer. Images Transfers and saves all images to the Direct Transfer...menu to the computer only the images that have not been previously transferred. Transfers and saves to set the method for downloading images. Getting Started 32 Downloading Images to a Computer You can also use the following options in progress. Use the or button to select or and...
... as the background on the computer desktop. All Images/New Images/DPOF Trans. Select & Transfer/Wallpaper 1. The button will blink blue while downloading is complete. • Pressing the FUNC./SET button will return to the computer. Images Transfers and saves all images to the Direct Transfer...menu to the computer only the images that have not been previously transferred. Transfers and saves to set the method for downloading images. Getting Started 32 Downloading Images to a Computer You can also use the following options in progress. Use the or button to select or and...

User Manual
Page 35
... to the Direct Transfer menu. Click [×] at the bottom right of the window to a Computer 33 2. Getting Started Downloading Images to close CameraWindow. Use the or button to select images to their shooting dates. The option selected with the button is...power is in effect the next time the Direct Transfer menu is displayed. Windows Macintosh ZoomBrowser EX ImageBrowser By default, the downloaded images are saved into folders according to download and press the button. • The images will appear directly when the [Select & Transfer] or the [Wallpaper] option...
... to the Direct Transfer menu. Click [×] at the bottom right of the window to a Computer 33 2. Getting Started Downloading Images to close CameraWindow. Use the or button to select images to their shooting dates. The option selected with the button is...power is in effect the next time the Direct Transfer menu is displayed. Windows Macintosh ZoomBrowser EX ImageBrowser By default, the downloaded images are saved into folders according to download and press the button. • The images will appear directly when the [Select & Transfer] or the [Wallpaper] option...

User Manual
Page 136
Press the button. 2 Rotate the image. 1. In the menu, use the or button to download the images. Press the button. • Cycle through the 90°/270°/original orientations with each press of images rotated by the camera will ...depend upon the software used to select . 3. The orientation is recorded in the image. Press the MENU button. 2. When images are downloaded to a computer, the orientation of the FUNC./SET button. • This also can be set in the index playback mode. Original 90° 270°...
Press the button. 2 Rotate the image. 1. In the menu, use the or button to download the images. Press the button. • Cycle through the 90°/270°/original orientations with each press of images rotated by the camera will ...depend upon the software used to select . 3. The orientation is recorded in the image. Press the MENU button. 2. When images are downloaded to a computer, the orientation of the FUNC./SET button. • This also can be set in the index playback mode. Original 90° 270°...

User Manual
Page 154
... MENU button. 3. 152 Setting the DPOF Transfer Settings You can use the or button to select . 4. Refer to the Software Starter Guide for images before downloading to select an order method. The settings used on a memory card. 2. Order : Select single images. Press the button. 2 Select an order method...
... MENU button. 3. 152 Setting the DPOF Transfer Settings You can use the or button to select . 4. Refer to the Software Starter Guide for images before downloading to select an order method. The settings used on a memory card. 2. Order : Select single images. Press the button. 2 Select an order method...

User Manual
Page 163
Use the or button to select the menu. 3. Check that detects the orientation of images downloaded to a computer will appear in the shooting mode, (normal), (right end is down) or (left end is down . Configuring the Camera 161 Setting the Auto ... Rotate function to [Off]. Press the MENU button. • When the Auto Rotate function is set to [On] and the LCD monitor is set to download the images. Use the or button to select [Auto Rotate]. 2 Make settings. 1. z Even if the Auto Rotate function is pointed straight up or down ) will...
Use the or button to select the menu. 3. Check that detects the orientation of images downloaded to a computer will appear in the shooting mode, (normal), (right end is down) or (left end is down . Configuring the Camera 161 Setting the Auto ... Rotate function to [Off]. Press the MENU button. • When the Auto Rotate function is set to [On] and the LCD monitor is set to download the images. Use the or button to select [Auto Rotate]. 2 Make settings. 1. z Even if the Auto Rotate function is pointed straight up or down ) will...

User Manual
Page 169
... charging. displayed on the recorded lightened the image image. Shooting Camera will not record. z Switch to make it easier to a computer/printer mode. z If required, download the images to a computer and erase them from the memory card to Shooting mode (p. 44). Consult the nearest...
... charging. displayed on the recorded lightened the image image. Shooting Camera will not record. z Switch to make it easier to a computer/printer mode. z If required, download the images to a computer and erase them from the memory card to Shooting mode (p. 44). Consult the nearest...
User Manual
Page 178
... type of RAW image. Change the batteries Battery charge is attempting to a computer and altered. Cannot magnify! Please note that has been downloaded to create, or the highest possible file number has already been reached. No images recorded on memory card. You attempted to Battery (p. ... JPEG You attempted to play back an image with corrupted data, an image with unused AA-size alkaline batteries or fully charged Canon AA-size NiMH batteries. Replace both batteries immediately with a recording type specific to another manufacturer's camera, or an image that formatting...
... type of RAW image. Change the batteries Battery charge is attempting to a computer and altered. Cannot magnify! Please note that has been downloaded to create, or the highest possible file number has already been reached. No images recorded on memory card. You attempted to Battery (p. ... JPEG You attempted to play back an image with corrupted data, an image with unused AA-size alkaline batteries or fully charged Canon AA-size NiMH batteries. Replace both batteries immediately with a recording type specific to another manufacturer's camera, or an image that formatting...

User Manual
Page 180
... detected an error. A problem exists if the error code reappears. Try turning the power back on the memory card. Note the number and contact your Canon Customer Support Help Desk as there may not have been recorded. If this message continues to display, contact your...
... detected an error. A problem exists if the error code reappears. Try turning the power back on the memory card. Note the number and contact your Canon Customer Support Help Desk as there may not have been recorded. If this message continues to display, contact your...
User Manual
Page 209
... Installing 10 Battery Capacity 202 Battery Charge Indicator ...........49 Beach 81 C Camera Shake Warning 48 Components Guide 40 Compression 71 Computer Connecting the Camera ........29 Downloading 27 System Requirements .......... 27 Continuous Shooting 93 Control Dial 43 Create Folder 159 D Date Battery 194 Date Stamp 22 Date/Time 13 Default Value 162...
... Installing 10 Battery Capacity 202 Battery Charge Indicator ...........49 Beach 81 C Camera Shake Warning 48 Components Guide 40 Compression 71 Computer Connecting the Camera ........29 Downloading 27 System Requirements .......... 27 Continuous Shooting 93 Control Dial 43 Create Folder 159 D Date Battery 194 Date Stamp 22 Date/Time 13 Default Value 162...


