
ImageBrowser 6.5 for Macintosh Instruction Manual
Page 3
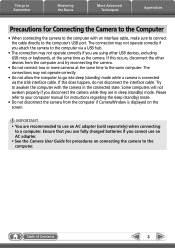
...) mode while a camera is displayed on connecting the camera to the same computer. Ensure that you use an AC adapter. • See the Camera User Guide for instructions regarding the sleep (standby) mode. • Do not disconnect the camera from the computer and try reconnecting the camera. • Do not connect two...
...) mode while a camera is displayed on connecting the camera to the same computer. Ensure that you use an AC adapter. • See the Camera User Guide for instructions regarding the sleep (standby) mode. • Do not disconnect the camera from the computer and try reconnecting the camera. • Do not connect two...
ImageBrowser 6.5 for Macintosh Instruction Manual
Page 9
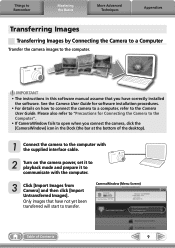
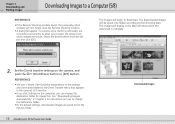
...CameraWindow fails to communicate with the computer. 3 Click [Import Images from Camera] and then click [Import Untransferred Images]. IMPORTANT • The instructions in the Dock (the bar at the bottom of Contents 9 CameraWindow (Menu Screen) Table of the desktop). 1 Connect the camera to...the computer with the supplied interface cable. 2 Turn on how to connect the camera to a computer, refer to the Camera User Guide. Things to Remember Mastering the Basics More Advanced Techniques Appendices Transferring Images Transferring Images by Connecting the Camera to a Computer ...
...CameraWindow fails to communicate with the computer. 3 Click [Import Images from Camera] and then click [Import Untransferred Images]. IMPORTANT • The instructions in the Dock (the bar at the bottom of Contents 9 CameraWindow (Menu Screen) Table of the desktop). 1 Connect the camera to...the computer with the supplied interface cable. 2 Turn on how to connect the camera to a computer, refer to the Camera User Guide. Things to Remember Mastering the Basics More Advanced Techniques Appendices Transferring Images Transferring Images by Connecting the Camera to a Computer ...
ZoomBrowser EX 6.5 for Windows Instruction Manual
Page 3
... computer if CameraWindow is connected via the USB interface cable. IMPORTANT • You are recommended to use an AC adapter. • See the Camera User Guide for instructions regarding the sleep (standby) mode. • Do not disconnect the camera from the computer and try reconnecting the camera. • Do not connect two...
... computer if CameraWindow is connected via the USB interface cable. IMPORTANT • You are recommended to use an AC adapter. • See the Camera User Guide for instructions regarding the sleep (standby) mode. • Do not disconnect the camera from the computer and try reconnecting the camera. • Do not connect two...

ZoomBrowser EX 6.5 for Windows Instruction Manual
Page 9
...button, followed by Connecting the Camera to a Computer Transfer the camera images to the computer. Double click . With Windows XP, click [Canon CameraWindow] then [OK] in this case, double-click the ZoomBrowser EX icon on the desktop to start ZoomBrowser EX and open when ...the camera is connected. IMPORTANT • The instructions in the AutoPlay window. Click on how to connect the camera to a computer, refer to the Camera User Guide. Click [Downloads Images From Canon Camera using Canon CameraWindow]. For Windows 7, use the following steps to modify the...
...button, followed by Connecting the Camera to a Computer Transfer the camera images to the computer. Double click . With Windows XP, click [Canon CameraWindow] then [OK] in this case, double-click the ZoomBrowser EX icon on the desktop to start ZoomBrowser EX and open when ...the camera is connected. IMPORTANT • The instructions in the AutoPlay window. Click on how to connect the camera to a computer, refer to the Camera User Guide. Click [Downloads Images From Canon Camera using Canon CameraWindow]. For Windows 7, use the following steps to modify the...
ZoomBrowser EX 5.0 Software User Guide
Page 8
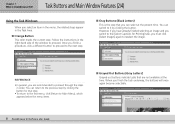
Follow the instructions in the Task Area. ■ Orange Button This color marks the current step. However, if you have already finished selecting an image and you can ... the window to reselect the image. REFERENCE • In general, you finish the task underway, the buttons will once again become selectable. 8 ZoomBrowser EX Software User Guide When you are not available at the present time. Chapter 1 What is the step that you switch to the [Select Captions for that step...
Follow the instructions in the Task Area. ■ Orange Button This color marks the current step. However, if you have already finished selecting an image and you can ... the window to reselect the image. REFERENCE • In general, you finish the task underway, the buttons will once again become selectable. 8 ZoomBrowser EX Software User Guide When you are not available at the present time. Chapter 1 What is the step that you switch to the [Select Captions for that step...
ZoomBrowser EX 5.0 Software User Guide
Page 15
...8226; By the default settings, downloaded images are saved to the My Pictures folder. 15 ZoomBrowser EX Software User Guide Downloaded Images REFERENCE • See your Camera User Guide for explanations of the settings and commands related to the Direct Transfer menu that appears in Chapter 3 for...list box and click [OK]. Select the desired device from which images are connected concurrently to allow you can change the destination folder for instructions on the camera, and push the (Print/Share) button or [SET] button. The images will begin to download. Chapter 2 Downloading...
...8226; By the default settings, downloaded images are saved to the My Pictures folder. 15 ZoomBrowser EX Software User Guide Downloaded Images REFERENCE • See your Camera User Guide for explanations of the settings and commands related to the Direct Transfer menu that appears in Chapter 3 for...list box and click [OK]. Select the desired device from which images are connected concurrently to allow you can change the destination folder for instructions on the camera, and push the (Print/Share) button or [SET] button. The images will begin to download. Chapter 2 Downloading...
ZoomBrowser EX 5.0 Software User Guide
Page 37
... the list. To restore the original settings file, you want to replace. 4. B Click this. Click here to the camera. See your Camera User Guide for adding settings to close the dialog. IMPORTANT • Never detach the interface cable, turn off the camera power or do anything to stop... Select the setting you must add it appears in the camera is selected. Click [OK] if a confirmation dialog appears. This concludes the procedure for instructions on changing the start-up image, start-up sound and other settings. Chapter 3 What You Can Do with the one you wish to save to...
... the list. To restore the original settings file, you want to replace. 4. B Click this. Click here to the camera. See your Camera User Guide for adding settings to close the dialog. IMPORTANT • Never detach the interface cable, turn off the camera power or do anything to stop... Select the setting you must add it appears in the camera is selected. Click [OK] if a confirmation dialog appears. This concludes the procedure for instructions on changing the start-up image, start-up sound and other settings. Chapter 3 What You Can Do with the one you wish to save to...
ZoomBrowser EX 5.0 Software User Guide
Page 41
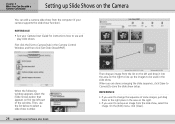
... the Camera Control Window by clicking [Acquire & Camera Settings], followed by [Set to Camera]. • See your Camera User Guide for instructions how to use and play slide shows. 41 ZoomBrowser EX Software User Guide Then drag an image from the list on the left of the next window and select the number...
... the Camera Control Window by clicking [Acquire & Camera Settings], followed by [Set to Camera]. • See your Camera User Guide for instructions how to use and play slide shows. 41 ZoomBrowser EX Software User Guide Then drag an image from the list on the left of the next window and select the number...
ZoomBrowser EX 5.0 Software User Guide
Page 66
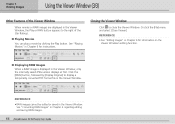
... cannot be edited or saved in Chapter 6 regarding editing and saving RAW images. 66 ZoomBrowser EX Software User Guide See "Converting RAW Images" in the Viewer Window. REFERENCE • See "Editing Images" in Chapter 6 for instructions. Click the [RAW] button, followed by clicking the Play button. Chapter 4 Viewing Images Using the Viewer...
... cannot be edited or saved in Chapter 6 regarding editing and saving RAW images. 66 ZoomBrowser EX Software User Guide See "Converting RAW Images" in the Viewer Window. REFERENCE • See "Editing Images" in Chapter 6 for instructions. Click the [RAW] button, followed by clicking the Play button. Chapter 4 Viewing Images Using the Viewer...
ZoomBrowser EX 5.0 Software User Guide
Page 67
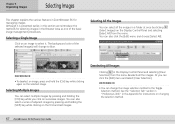
... can also select a series of the basic image management procedures. Chapter 5 Organizing Images Selecting Images This chapter explains the various features in the Appendix for instructions on changing the selection method. 67 ZoomBrowser EX Software...
... can also select a series of the basic image management procedures. Chapter 5 Organizing Images Selecting Images This chapter explains the various features in the Appendix for instructions on changing the selection method. 67 ZoomBrowser EX Software...

ZoomBrowser EX 5.0 Software User Guide
Page 116
...window, and stitch your images together. This section explains how to use PhotoStitch to connect the images together to stitch images. Click [1. Then, follow the instructions on how to use PhotoStitch, refer to PhotoStitch Help (accessible from the [Help] menu). • You can use this program to make it easier ... 6 Using Supplementary Features Stitching Panoramic Images - Decide the order in which the images should be stitched. Click [2. Save the image. 116 ZoomBrowser EX Software User Guide REFERENCE • You can also start PhotoStitch by [Stitch Photos]. 2.
...window, and stitch your images together. This section explains how to use PhotoStitch to connect the images together to stitch images. Click [1. Then, follow the instructions on how to use PhotoStitch, refer to PhotoStitch Help (accessible from the [Help] menu). • You can use this program to make it easier ... 6 Using Supplementary Features Stitching Panoramic Images - Decide the order in which the images should be stitched. Click [2. Save the image. 116 ZoomBrowser EX Software User Guide REFERENCE • You can also start PhotoStitch by [Stitch Photos]. 2.
ZoomBrowser EX 5.0 Software User Guide
Page 123
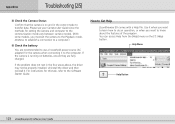
... they are recommended to use a household power source (AC adapter) for the camera when connecting it to the computer. Use it . Please see your Camera User Guide since the methods for setting the camera and computer to the communication mode vary between camera models. (With some models, you want to learn...; Check the Camera Status Confirm that the camera is running on and in the four areas above, the driver may not be properly installed. For instructions for this task, refer to Get Help ZoomBrowser EX comes with a Help file.
... they are recommended to use a household power source (AC adapter) for the camera when connecting it to the computer. Use it . Please see your Camera User Guide since the methods for setting the camera and computer to the communication mode vary between camera models. (With some models, you want to learn...; Check the Camera Status Confirm that the camera is running on and in the four areas above, the driver may not be properly installed. For instructions for this task, refer to Get Help ZoomBrowser EX comes with a Help file.
ImageBrowser Software User Guide
Page 24
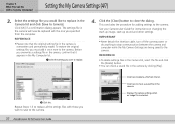
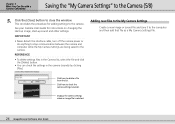
... from the list. Click here to the computer and then add that file as a My Camera Settings file. This concludes the procedure for instructions on changing the start-up image, start-up sound and other settings. IMPORTANT • Never detach the interface cable, turn off the camera... by clicking [Play]. Chapter 3 What You Can Do with a Camera Connected Saving the "My Camera Settings" to close the window. See your Camera User Guide for adding settings to the camera. Click the [Close] button to the Camera (5/8) 5. Click here to check the camera settings (sounds). Displays...
... from the list. Click here to the computer and then add that file as a My Camera Settings file. This concludes the procedure for instructions on changing the start-up image, start-up sound and other settings. IMPORTANT • Never detach the interface cable, turn off the camera... by clicking [Play]. Chapter 3 What You Can Do with a Camera Connected Saving the "My Camera Settings" to close the window. See your Camera User Guide for adding settings to the camera. Click the [Close] button to the Camera (5/8) 5. Click here to check the camera settings (sounds). Displays...
ImageBrowser Software User Guide
Page 28
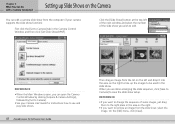
... right to line up the images to use the list below to select a slide show number. 28 ImageBrowser Software User Guide Then drag an image from the computer (if your Camera User Guide for instructions how to be used in the slide show. REFERENCE • If you want to change the sequence of...
... right to line up the images to use the list below to select a slide show number. 28 ImageBrowser Software User Guide Then drag an image from the computer (if your Camera User Guide for instructions how to be used in the slide show. REFERENCE • If you want to change the sequence of...

ImageBrowser Software User Guide
Page 41
... Uses the entire Browser Area to move the display. REFERENCE • You can change the thumbnail size by Date and Time-TimeTunnel in Chapter 6 for instructions for operating TimeTunnel and adjusting its settings. 41 ImageBrowser Software...
... Uses the entire Browser Area to move the display. REFERENCE • You can change the thumbnail size by Date and Time-TimeTunnel in Chapter 6 for instructions for operating TimeTunnel and adjusting its settings. 41 ImageBrowser Software...

ImageBrowser Software User Guide
Page 99
... the same scene with only a slight difference, you want to stitch together. Decide the order in which the images should be stitched. Then, follow the instructions on how to use this program to shoot them. This section describes how to use PhotoStitch, refer to the PhotoStitch Help (accessible from the [Help...]. Chapter 6 Using Supplementary Features Stitching Panoramic Images - PhotoStitch If you have several images of the PhotoStitch window, and stitch your images together. 99 ImageBrowser Software User Guide Save the image.
... the same scene with only a slight difference, you want to stitch together. Decide the order in which the images should be stitched. Then, follow the instructions on how to use this program to shoot them. This section describes how to use PhotoStitch, refer to the PhotoStitch Help (accessible from the [Help...]. Chapter 6 Using Supplementary Features Stitching Panoramic Images - PhotoStitch If you have several images of the PhotoStitch window, and stitch your images together. 99 ImageBrowser Software User Guide Save the image.
Direct Print User Guide
Page 5
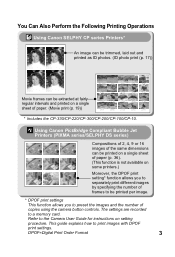
Using Canon PictBridge Compliant Bubble Jet Printers (PIXMA series/SELPHY DS series) Compositions of 2, 4, 9 or 16 images of the ...of copies using the camera button controls. This guide explains how to a memory card. You Can Also Perform the Following Printing Operations Using Canon SELPHY CP series Printers* An image can be trimmed, laid out and printed as ID photos. (ID photo print (p. 17)) 107...-10. The settings are recorded to print images with DPOF print settings. Refer to the Camera User Guide for instructions on setting procedure. DPOF=Digital Print Order Format 3
Using Canon PictBridge Compliant Bubble Jet Printers (PIXMA series/SELPHY DS series) Compositions of 2, 4, 9 or 16 images of the ...of copies using the camera button controls. This guide explains how to a memory card. You Can Also Perform the Following Printing Operations Using Canon SELPHY CP series Printers* An image can be trimmed, laid out and printed as ID photos. (ID photo print (p. 17)) 107...-10. The settings are recorded to print images with DPOF print settings. Refer to the Camera User Guide for instructions on setting procedure. DPOF=Digital Print Order Format 3

Direct Print User Guide
Page 8
For instructions on page 4. into the camera. • Compact power adapter (sold separately) • Fully charged battery • New batteries Set paper, ink cassette/cartridge, etc. DIGITAL terminal Camera: Connect the cable to the printer's user guide. Printer: Refer to the DIGITAL terminal. Depending on.... • Movie playback. • Language settings that use the SET button and the MENU button. 6 This illustration shows the PowerShot SD20 DIGITAL ELPH/DIGITAL IXUS i5 as an example. Connect the camera to the printer. The following into the printer. Connecting the ...
For instructions on page 4. into the camera. • Compact power adapter (sold separately) • Fully charged battery • New batteries Set paper, ink cassette/cartridge, etc. DIGITAL terminal Camera: Connect the cable to the printer's user guide. Printer: Refer to the DIGITAL terminal. Depending on.... • Movie playback. • Language settings that use the SET button and the MENU button. 6 This illustration shows the PowerShot SD20 DIGITAL ELPH/DIGITAL IXUS i5 as an example. Connect the camera to the printer. The following into the printer. Connecting the ...

Direct Print User Guide
Page 23
In the [ (Play)] menu, select [Print Order] and press the SET button. 1 Select [Print] and press the SET button. 2 Set the print style settings as required. • See Setting the Print Style 3 (p. 11). • A print style cannot be set if [Set up] on how to set to the DPOF print settings section of the Camera User Guide. Printing with DPOF print settings. In this section, we will explain how to print several images already specified with DPOF Print Settings For instructions on the screen in Step 2 is set DPOF print settings, please refer to [Index]. 21
In the [ (Play)] menu, select [Print Order] and press the SET button. 1 Select [Print] and press the SET button. 2 Set the print style settings as required. • See Setting the Print Style 3 (p. 11). • A print style cannot be set if [Set up] on how to set to the DPOF print settings section of the Camera User Guide. Printing with DPOF print settings. In this section, we will explain how to print several images already specified with DPOF Print Settings For instructions on the screen in Step 2 is set DPOF print settings, please refer to [Index]. 21

Direct Print User Guide
Page 38
... example 2] Printing 3 copies of image A and 2 copies of image B in 9-up DPOF print settings* (p. 37) Layout Image A: [3] copies Image B: [2] copies 9-up * Refer to the Camera User Guide for instructions on DPOF print setting method. 36
... example 2] Printing 3 copies of image A and 2 copies of image B in 9-up DPOF print settings* (p. 37) Layout Image A: [3] copies Image B: [2] copies 9-up * Refer to the Camera User Guide for instructions on DPOF print setting method. 36


