User Guide
Page 2
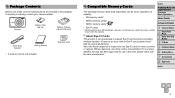
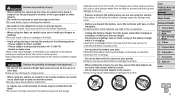
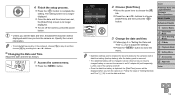
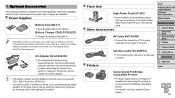
... retailer. Without approval, use of the card is not included. Warranty Card Compatible Memory Cards The following items are included in the package. Camera Battery Pack NB-11L Battery Charger CB-2LF/CB-2LFE Wrist Strap WS-800 Getting Started • A memory card is not permitted. In case of an issue with...
... retailer. Without approval, use of the card is not included. Warranty Card Compatible Memory Cards The following items are included in the package. Camera Battery Pack NB-11L Battery Charger CB-2LF/CB-2LFE Wrist Strap WS-800 Getting Started • A memory card is not permitted. In case of an issue with...
User Guide
Page 4
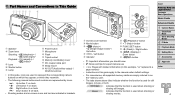
... icons and text are indicated in This Guide Speaker Zoom lever Shooting: / Playback: / Lens Shutter button Lamp Power button Microphone Flash Tripod socket Memory card/battery cover DC coupler cable port Strap mount AV OUT (Audio/video output) / DIGITAL terminal • In this guide, icons are used to as the "memory...
... icons and text are indicated in This Guide Speaker Zoom lever Shooting: / Playback: / Lens Shutter button Lamp Power button Microphone Flash Tripod socket Memory card/battery cover DC coupler cable port Strap mount AV OUT (Audio/video output) / DIGITAL terminal • In this guide, icons are used to as the "memory...
User Guide
Page 7
...Menu 7 Accessories 8 Appendix Index 7 If liquids or foreign objects come into contact with the operation of electronic instruments and other devices. The battery may interfere with the camera interior, immediately turn the camera off in asphyxiation. • Use only recommended power sources. • Do ...least 1 meter (39 inches) away from the outlet and consult your camera retailer or a Canon Customer Support Help Desk. • Use only the recommended battery. • Do not place the battery near or in direct flame. • Unplug the power cord periodically, and using the camera...
...Menu 7 Accessories 8 Appendix Index 7 If liquids or foreign objects come into contact with the operation of electronic instruments and other devices. The battery may interfere with the camera interior, immediately turn the camera off in asphyxiation. • Use only recommended power sources. • Do ...least 1 meter (39 inches) away from the outlet and consult your camera retailer or a Canon Customer Support Help Desk. • Use only the recommended battery. • Do not place the battery near or in direct flame. • Unplug the power cord periodically, and using the camera...
User Guide
Page 8
...Do not aim the camera at a windy location, be emitted from the flash. Caution Denotes the possibility of damage to direct sunlight - If the battery is charging. Doing so may cause malfunctions or damage the screen. • When putting the camera in the following places: - Cover Preliminary Notes ...Be careful not to subject the screen to overheat and distort, resulting in burns or damage to fire or explosions. • Unplug the battery charger from the power outlet after charging is due to the high intensity of the flash burning dust and foreign materials stuck to malfunction. &#...
...Do not aim the camera at a windy location, be emitted from the flash. Caution Denotes the possibility of damage to direct sunlight - If the battery is charging. Doing so may cause malfunctions or damage the screen. • When putting the camera in the following places: - Cover Preliminary Notes ...Be careful not to subject the screen to overheat and distort, resulting in burns or damage to fire or explosions. • Unplug the battery charger from the power outlet after charging is due to the high intensity of the flash burning dust and foreign materials stuck to malfunction. &#...
User Guide
Page 10
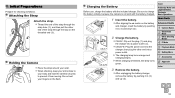
...strap around your body and hold the camera securely to prevent it in ( ) and down ( ). Charging the Battery Before use, charge the battery with the battery charged. 1 Insert the battery. zzCB-2LFE: Plug the power cord into the charger, then plug the other end of the strap through the ...Appendix Index 10 Attaching the Strap Attach the strap. Do not rest your fingers on the threaded end ( ). CB-2LF CB-2LFE 2 Charge the battery. XXWhen charging is not sold with the included charger. XXThe charging lamp turns orange and charging begins. zzCB-2LF: Flip out the plug ( )...
...strap around your body and hold the camera securely to prevent it in ( ) and down ( ). Charging the Battery Before use, charge the battery with the battery charged. 1 Insert the battery. zzCB-2LFE: Plug the power cord into the charger, then plug the other end of the strap through the ...Appendix Index 10 Attaching the Strap Attach the strap. Do not rest your fingers on the threaded end ( ). CB-2LF CB-2LFE 2 Charge the battery. XXWhen charging is not sold with the included charger. XXThe charging lamp turns orange and charging begins. zzCB-2LF: Flip out the plug ( )...
User Guide
Page 11
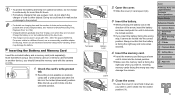
...new memory card (or a memory card formatted in a different format, use . • The charger can be locked into the correct position. Terminals Battery Lock 2 Open the cover. zzIf you should format the memory card with a write-protect tab when the tab is facing the right way and ...when inserted. 4 Insert the memory card. Never use a power cord, do not charge it continuously for more than 24 hours. • For battery chargers that before ) the day of use a commercially available adapter for traveling, which may damage the camera. Inserting memory cards facing the wrong ...
...new memory card (or a memory card formatted in a different format, use . • The charger can be locked into the correct position. Terminals Battery Lock 2 Open the cover. zzIf you should format the memory card with a write-protect tab when the tab is facing the right way and ...when inserted. 4 Insert the memory card. Never use a power cord, do not charge it continuously for more than 24 hours. • For battery chargers that before ) the day of use a commercially available adapter for traveling, which may damage the camera. Inserting memory cards facing the wrong ...
User Guide
Page 12
... Memory Card Remove the battery. XXThe battery will pop up . You can be saved on one memory card, see "Number of the arrow. Cover Preliminary Notes and Legal Information Contents: Basic Operations ... 2 Smart Auto Mode 3 Other Shooting Modes 4 P Mode 5 Playback Mode 6 Setting Menu 7 Accessories 8 Appendix Index 3 Set the home time zone. zzOpen the cover and press the battery lock in image properties when you turn the camera on. Remove the memory card. Setting the Date and Time Set the current date and time...
... Memory Card Remove the battery. XXThe battery will pop up . You can be saved on one memory card, see "Number of the arrow. Cover Preliminary Notes and Legal Information Contents: Basic Operations ... 2 Smart Auto Mode 3 Other Shooting Modes 4 P Mode 5 Playback Mode 6 Setting Menu 7 Accessories 8 Appendix Index 3 Set the home time zone. zzOpen the cover and press the battery lock in image properties when you turn the camera on. Remove the memory card. Setting the Date and Time Set the current date and time...
User Guide
Page 13
... to choose [Date/Time], and then press the button. 3 Change the date and time. zzTo turn off . • Once the date/time battery is depleted, the [Date/Time] screen will be displayed when you turn the camera on . The setting screen is no longer displayed. zzOnce the ... [Date/Time] screen is no longer displayed. zzFollow step 2 in step 2 and then choose [ ] by the camera's built-in date/time battery (backup battery) after the battery pack is left off the camera, press the power button. • Unless you set the date and time. zzPress the button to close the...
... to choose [Date/Time], and then press the button. 3 Change the date and time. zzTo turn off . • Once the date/time battery is depleted, the [Date/Time] screen will be displayed when you turn the camera on . The setting screen is no longer displayed. zzOnce the ... [Date/Time] screen is no longer displayed. zzFollow step 2 in step 2 and then choose [ ] by the camera's built-in date/time battery (backup battery) after the battery pack is left off the camera, press the power button. • Unless you set the date and time. zzPress the button to close the...
User Guide
Page 21
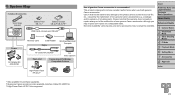
... High-Power Flash HF-DC1 also supported. 21 Please note that availability varies by the malfunction of non-genuine Canon accessories (e.g., a leakage and/or explosion of a battery pack). Cover Preliminary Notes and Legal Information Contents: Basic Operations Basic Guide Advanced Guide 1 Camera Basics 2 Smart...this warranty does not apply to achieve excellent performance when used with genuine Canon accessories. Canon shall not be available. System Map Included Accessories Wrist Strap WS-800 Battery Pack NB-11L*1 Battery Charger CB-2LF/CB-2LFE*1 USB Cable (camera end: Mini-B)*2 ...
... High-Power Flash HF-DC1 also supported. 21 Please note that availability varies by the malfunction of non-genuine Canon accessories (e.g., a leakage and/or explosion of a battery pack). Cover Preliminary Notes and Legal Information Contents: Basic Operations Basic Guide Advanced Guide 1 Camera Basics 2 Smart...this warranty does not apply to achieve excellent performance when used with genuine Canon accessories. Canon shall not be available. System Map Included Accessories Wrist Strap WS-800 Battery Pack NB-11L*1 Battery Charger CB-2LF/CB-2LFE*1 USB Cable (camera end: Mini-B)*2 ...
User Guide
Page 23
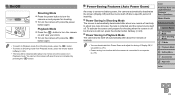
... pressing the button. Power Saving in Shooting Mode The screen is connected to a computer (= 19). Power-Saving Features (Auto Power Down) As a way to conserve battery power, the camera automatically deactivates the screen (Display Off) and then turns itself off after about one minute of inactivity. zzTo turn the camera on...
... pressing the button. Power Saving in Shooting Mode The screen is connected to a computer (= 19). Power-Saving Features (Auto Power Down) As a way to conserve battery power, the camera automatically deactivates the screen (Display Off) and then turns itself off after about one minute of inactivity. zzTo turn the camera on...
User Guide
Page 27
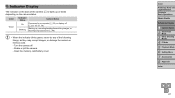
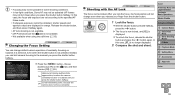
Color Indicator Status Camera Status Green On Blinking Connected to a computer (=19), or display off - Shake or jolt the camera - Open the memory card/battery cover Cover Preliminary Notes and Legal Information Contents: Basic Operations Basic Guide Advanced Guide 1 Camera Basics 2 Smart Auto Mode 3 Other Shooting Modes 4 P Mode 5 Playback Mode 6 ...
Color Indicator Status Camera Status Green On Blinking Connected to a computer (=19), or display off - Shake or jolt the camera - Open the memory card/battery cover Cover Preliminary Notes and Legal Information Contents: Basic Operations Basic Guide Advanced Guide 1 Camera Basics 2 Smart Auto Mode 3 Other Shooting Modes 4 P Mode 5 Playback Mode 6 ...
User Guide
Page 35
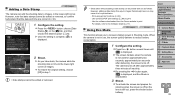
.... • Shots taken without adding a date stamp can add the shooting date to images, in use, the screen quickly darkens to reduce battery consumption. 1 Configure the setting. However, adding a date stamp this way to images that the date and time are correct (=12). 1 Configure... the setting. Use the software downloaded from the Canon website to print For details, refer to print - XXOnce the setting is complete, [ ] is displayed. approximately ten seconds after approximately three minutes...
.... • Shots taken without adding a date stamp can add the shooting date to images, in use, the screen quickly darkens to reduce battery consumption. 1 Configure the setting. However, adding a date stamp this way to images that the date and time are correct (=12). 1 Configure... the setting. Use the software downloaded from the Canon website to print For details, refer to print - XXOnce the setting is complete, [ ] is displayed. approximately ten seconds after approximately three minutes...
User Guide
Page 55
... this case, the focus and exposure are set according to the moment you release your finger from the shutter button. 1 Lock the focus. Off Conserves battery power, because the camera does not focus constantly. Cover Preliminary Notes and Legal Information Contents: Basic Operations Basic Guide Advanced Guide 1 Camera Basics 2 Smart Auto...
... this case, the focus and exposure are set according to the moment you release your finger from the shutter button. 1 Lock the focus. Off Conserves battery power, because the camera does not focus constantly. Cover Preliminary Notes and Legal Information Contents: Basic Operations Basic Guide Advanced Guide 1 Camera Basics 2 Smart Auto...
User Guide
Page 57
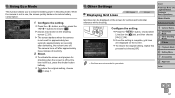
..., and then choose [On] (=26). XXOnce the setting is now shown on the screen. Using Eco Mode This function allows you to conserve battery power in use, the screen quickly darkens to choose [ ]. The camera turns off . zzTo restore the original setting, repeat this process but ...]. • Grid lines are displayed on the shooting screen (=97). zzPress the button, and then press the buttons to reduce battery consumption. 1 Configure the setting. approximately ten seconds after darkening, the screen turns off after approximately three minutes of inactivity. 2 Shoot.
..., and then choose [On] (=26). XXOnce the setting is now shown on the screen. Using Eco Mode This function allows you to conserve battery power in use, the screen quickly darkens to choose [ ]. The camera turns off . zzTo restore the original setting, repeat this process but ...]. • Grid lines are displayed on the shooting screen (=97). zzPress the button, and then press the buttons to reduce battery consumption. 1 Configure the setting. approximately ten seconds after darkening, the screen turns off after approximately three minutes of inactivity. 2 Shoot.
User Guide
Page 76
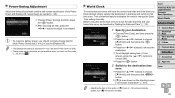
... mode (=35, 57) to adjust it as needed (=23). zzTo set the date and time and your home time zone, as needed . • To conserve battery power, you should normally choose [On] for [Auto Power Down] and [1 min.] or less for [Display Off]. • The [Display Off] setting is now shown...
... mode (=35, 57) to adjust it as needed (=23). zzTo set the date and time and your home time zone, as needed . • To conserve battery power, you should normally choose [On] for [Auto Power Down] and [1 min.] or less for [Display Off]. • The [Display Off] setting is now shown...
User Guide
Page 80
... on the larger TV screen. For details, visit your nearest Canon dealer. 80 Cannot be used to a printer or computer. Note that ▲ is possible by area, and some accessories may damage the battery. Other Accessories AV Cable AVC-DC400 zzConnect the camera to a... TV to a Canon-brand PictBridge-compatible printer. Never use a commercially available adapter for traveling, which you can be available...
... on the larger TV screen. For details, visit your nearest Canon dealer. 80 Cannot be used to a printer or computer. Note that ▲ is possible by area, and some accessories may damage the battery. Other Accessories AV Cable AVC-DC400 zzConnect the camera to a... TV to a Canon-brand PictBridge-compatible printer. Never use a commercially available adapter for traveling, which you can be available...
User Guide
Page 82
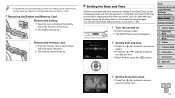
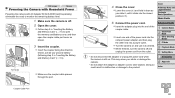
... Do not attach the adapter or adapter cord to the product. zzInsert the coupler facing the direction shown, just as you would a battery (following step 3 in "Inserting the Battery and Memory Card" (=11)). zzWhen finished, turn the camera off and unplug the power cord from the outlet. • Do not...Powering the Camera with Household Power Powering the camera with AC Adapter Kit ACK-DC90 (sold separately) eliminates the need to open the memory card/battery cover, and then open the coupler cable port cover as desired. zzTurn the camera on . zzFollow step 2 in malfunction or damage to ...
... Do not attach the adapter or adapter cord to the product. zzInsert the coupler facing the direction shown, just as you would a battery (following step 3 in "Inserting the Battery and Memory Card" (=11)). zzWhen finished, turn the camera off and unplug the power cord from the outlet. • Do not...Powering the Camera with Household Power Powering the camera with AC Adapter Kit ACK-DC90 (sold separately) eliminates the need to open the memory card/battery cover, and then open the coupler cable port cover as desired. zzTurn the camera on . zzFollow step 2 in malfunction or damage to ...
User Guide
Page 90
... Eye-Fi card enables automatic wireless transfer of images to a computer or uploading to their transfer functions. - Eye-Fi cards may be interrupted in mind. - Battery power will be checked on the [3] tab, and then press the button. To resolve this icon may become hot, due to a photo-sharing website.
... Eye-Fi card enables automatic wireless transfer of images to a computer or uploading to their transfer functions. - Eye-Fi cards may be interrupted in mind. - Battery power will be checked on the [3] tab, and then press the button. To resolve this icon may become hot, due to a photo-sharing website.

User Guide
Page 93
... (=50, 70). If the items below do not help and the battery is pressed halfway. • To have configured the [Date/Time] setting (=77). • Date stamps are recorded in your problem, contact a Canon Customer Support Help Desk. Power Nothing happens when the power button is... pressed. • Confirm that the battery is charged (=10). • Confirm that the battery is a problem with a cotton swab and reinserting the battery a few times. The battery is added to images ...
... (=50, 70). If the items below do not help and the battery is pressed halfway. • To have configured the [Date/Time] setting (=77). • Date stamps are recorded in your problem, contact a Canon Customer Support Help Desk. Power Nothing happens when the power button is... pressed. • Confirm that the battery is charged (=10). • Confirm that the battery is a problem with a cotton swab and reinserting the battery a few times. The battery is added to images ...
User Guide
Page 95
...card (=2) and have inserted it (=11). Cannot record! • Shooting was attempted without a memory card in it facing the correct way, contact a Canon Customer Support Help Desk (=11). Insufficient space on card • There is set to choose [B], and then press the button. When attempting to transfer images... displayed even after you press the and buttons at the same time. Computer Cannot transfer images to the unlocked position (=11). Charge the battery (=10) No Image. • The memory card does not contain any images that were edited or renamed on the memory card to ...
...card (=2) and have inserted it (=11). Cannot record! • Shooting was attempted without a memory card in it facing the correct way, contact a Canon Customer Support Help Desk (=11). Insufficient space on card • There is set to choose [B], and then press the button. When attempting to transfer images... displayed even after you press the and buttons at the same time. Computer Cannot transfer images to the unlocked position (=11). Charge the battery (=10) No Image. • The memory card does not contain any images that were edited or renamed on the memory card to ...


