
iP8500 Quick Start Guide
Page 14
Push the Cassette all the way into the printer. If the Cassette has been extended to accommodate paper sizes larger than 5" x 7", the front edge of the cassette will extend beyond the front of the printer. 10 Basic Printing 4 Insert the Cassette into the printer. (1) Set the Cover on the Cassette. (2) Insert the Cassette into the printer.
Push the Cassette all the way into the printer. If the Cassette has been extended to accommodate paper sizes larger than 5" x 7", the front edge of the cassette will extend beyond the front of the printer. 10 Basic Printing 4 Insert the Cassette into the printer. (1) Set the Cover on the Cassette. (2) Insert the Cassette into the printer.

iP8500 Quick Start Guide
Page 18
...Paper High Resolution Paper T-Shirt Transfer Transparency * If paper does not feed properly, fan the paper to prevent sticking together. Basic Printing „ Canon Specialty Media Media Type Paper Support Load Limit Sheet Feeder Cassette Super White Paper Up to 13 mm or 0.52 inches Up ...Letter: up to 10 sheets 5" x 7": up to 10 sheets 4" x 6": up to 20 sheets Letter: up to 10 sheets 5" x 7": up to 10 sheets 4" x 6": up to 20 sheets Photo Paper Plus Double Sided Letter: up to 10 sheets 5" x 7": up to 10 sheets Letter: up to 10 sheets 5" x 7": up to 10 sheets Photo Paper Plus...
...Paper High Resolution Paper T-Shirt Transfer Transparency * If paper does not feed properly, fan the paper to prevent sticking together. Basic Printing „ Canon Specialty Media Media Type Paper Support Load Limit Sheet Feeder Cassette Super White Paper Up to 13 mm or 0.52 inches Up ...Letter: up to 10 sheets 5" x 7": up to 10 sheets 4" x 6": up to 20 sheets Letter: up to 10 sheets 5" x 7": up to 10 sheets 4" x 6": up to 20 sheets Photo Paper Plus Double Sided Letter: up to 10 sheets 5" x 7": up to 10 sheets Letter: up to 10 sheets 5" x 7": up to 10 sheets Photo Paper Plus...
iP8500 Quick Start Guide
Page 22
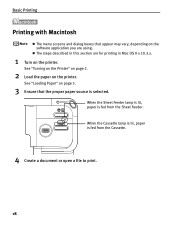
See "Loading Paper" on page 3. 3 Ensure that appear may vary, depending on the software application you are for printing in Mac OS X v.10.3.x. 1 Turn on the printer. When the Cassette lamp is lit, paper is fed from the Sheet Feeder. See "Turning on the Printer" on page 2. 2 Load ... described in this section are using. When the Sheet Feeder lamp is lit, paper is fed from the Cassette. 4 Create a document or open a file to print. 18 Basic Printing Printing with Macintosh z The menu screens and dialog boxes that the proper paper source is selected.
See "Loading Paper" on page 3. 3 Ensure that appear may vary, depending on the software application you are for printing in Mac OS X v.10.3.x. 1 Turn on the printer. When the Cassette lamp is lit, paper is fed from the Sheet Feeder. See "Turning on the Printer" on page 2. 2 Load ... described in this section are using. When the Sheet Feeder lamp is lit, paper is fed from the Cassette. 4 Create a document or open a file to print. 18 Basic Printing Printing with Macintosh z The menu screens and dialog boxes that the proper paper source is selected.

iP8500 Quick Start Guide
Page 29
... Paper Pro, select Fast Photo from Paper size. If any setting cannot be made on Canon PictBridge-compatible cameras are used . The following sizes and types of settings that are displayed... your camera depending on your camera's instruction manual. For details, refer to select the PictBridge print setup mode and confirm or check the settings. By default, 4" x 6" is selected from... Paper size and Photo (Photo Paper Plus Glossy) is used in Layout. 25 "Paper size" setting 10 x 15 cm/4" x 6" (Default) 13 x 18 cm/5" x 7" A4/8.5" x 11" (Letter) 5.4 x 8.6 cm/Credit...
... Paper Pro, select Fast Photo from Paper size. If any setting cannot be made on Canon PictBridge-compatible cameras are used . The following sizes and types of settings that are displayed... your camera depending on your camera's instruction manual. For details, refer to select the PictBridge print setup mode and confirm or check the settings. By default, 4" x 6" is selected from... Paper size and Photo (Photo Paper Plus Glossy) is used in Layout. 25 "Paper size" setting 10 x 15 cm/4" x 6" (Default) 13 x 18 cm/5" x 7" A4/8.5" x 11" (Letter) 5.4 x 8.6 cm/Credit...

iP8500 Quick Start Guide
Page 48
... was installed, the Applications folder, and then the Utilities folder. (2) Double-click the Printer Setup Utility icon. When using Mac OS X v.10.2, double-click the Print Center icon. (3) Select the name of your printer from the Name list and click Utility. BJ Printer Utility appears. (5) Select Ink level .... Tank with an empty ink tank, it may cause problems. z If you continue printing with low ink level 44 If you click: Delete Job, the printer cancels the current printing job. When using Mac OS X v.10.2, select the name of your printer from the pop-up menu. [!] indicates a low...
... was installed, the Applications folder, and then the Utilities folder. (2) Double-click the Printer Setup Utility icon. When using Mac OS X v.10.2, double-click the Print Center icon. (3) Select the name of your printer from the Name list and click Utility. BJ Printer Utility appears. (5) Select Ink level .... Tank with an empty ink tank, it may cause problems. z If you continue printing with low ink level 44 If you click: Delete Job, the printer cancels the current printing job. When using Mac OS X v.10.2, select the name of your printer from the pop-up menu. [!] indicates a low...
iP8500 Quick Start Guide
Page 55
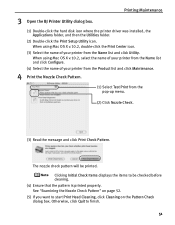
...(4) Select the name of your printer from the Product list and click Maintenance. 4 Print the Nozzle Check Pattern. (1) Select Test Print from the Name list and click Utility. When using Mac OS X v.10.2, double-click the Print Center icon. (3) Select the name of your printer from the pop-up menu.... (2) Click Nozzle Check. (3) Read the message and click Print Check Pattern. See "Examining the Nozzle Check Pattern" on page 52....
...(4) Select the name of your printer from the Product list and click Maintenance. 4 Print the Nozzle Check Pattern. (1) Select Test Print from the Name list and click Utility. When using Mac OS X v.10.2, double-click the Print Center icon. (3) Select the name of your printer from the pop-up menu.... (2) Click Nozzle Check. (3) Read the message and click Print Check Pattern. See "Examining the Nozzle Check Pattern" on page 52....
iP8500 Quick Start Guide
Page 59
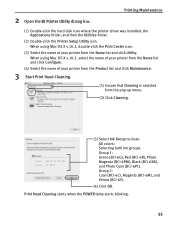
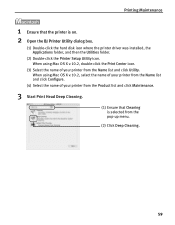
... starts when the POWER lamp starts blinking. 55 When using Mac OS X v.10.2, double-click the Print Center icon. (3) Select the name of your printer from the pop-up menu. (2) Click Cleaning. (3) Select Ink Group to clean. All colors: Selecting both ink ...-6M), and Yellow (BCI-6Y). (4) Click OK. When using Mac OS X v.10.2, select the name of your printer from the Name list and click Configure. (4) Select the name of your printer from the Product list and click Maintenance. 3 Start Print Head Cleaning. (1) Ensure that Cleaning is selected from the Name list and...
... starts when the POWER lamp starts blinking. 55 When using Mac OS X v.10.2, double-click the Print Center icon. (3) Select the name of your printer from the pop-up menu. (2) Click Cleaning. (3) Select Ink Group to clean. All colors: Selecting both ink ...-6M), and Yellow (BCI-6Y). (4) Click OK. When using Mac OS X v.10.2, select the name of your printer from the Name list and click Configure. (4) Select the name of your printer from the Product list and click Maintenance. 3 Start Print Head Cleaning. (1) Ensure that Cleaning is selected from the Name list and...
iP8500 Quick Start Guide
Page 63
...Setup Utility icon. When using Mac OS X v.10.2, select the name of your printer from the Name list and click Configure. (4) Select the name of your printer from the Name list and click Utility. When using Mac OS X v.10.2, double-click the Print Center icon. (3) Select the name of your... printer from the Product list and click Maintenance. 3 Start Print Head Deep Cleaning. (1) Ensure that the printer is selected from the pop-up menu. ...
...Setup Utility icon. When using Mac OS X v.10.2, select the name of your printer from the Name list and click Configure. (4) Select the name of your printer from the Name list and click Utility. When using Mac OS X v.10.2, double-click the Print Center icon. (3) Select the name of your... printer from the Product list and click Maintenance. 3 Start Print Head Deep Cleaning. (1) Ensure that the printer is selected from the pop-up menu. ...

iP8500 Quick Start Guide
Page 67
Do not open the Top Cover while printing. 4 Check the printed pattern. If the pattern is printed as shown below, the Print Head is now ready to start printing. It takes about 90 seconds to use. 63 When using Mac OS X v.10.2, double-click the Print Center icon. (3) Select the name of your printer... 1 With the printer on, load a sheet of your printer from the pop-up menu. (2) Click Print Head Alignment. (3) Read the message and click Print Head Alignment. When using Mac OS X v.10.2, select the name of your printer from the Name list and click Configure. (4) Select the name of ...
Do not open the Top Cover while printing. 4 Check the printed pattern. If the pattern is printed as shown below, the Print Head is now ready to start printing. It takes about 90 seconds to use. 63 When using Mac OS X v.10.2, double-click the Print Center icon. (3) Select the name of your printer... 1 With the printer on, load a sheet of your printer from the pop-up menu. (2) Click Print Head Alignment. (3) Read the message and click Print Head Alignment. When using Mac OS X v.10.2, select the name of your printer from the Name list and click Configure. (4) Select the name of ...
iP8500 Quick Start Guide
Page 74
...to cool down . In Windows 2000, the print jobs may not be Restart your printer displayed under Name in the User's Guide. 70 Select Applications from the Start Menu" on the printer. When using Mac OS X v.10.2, double-click the Print Center icon. 3. Ensure that paper is ...designed to automatically pause at least 15 minutes to allow the Print Head to select an undesired document and select Purge Print Documents in Macintosh for at line breaks before resuming...
...to cool down . In Windows 2000, the print jobs may not be Restart your printer displayed under Name in the User's Guide. 70 Select Applications from the Start Menu" on the printer. When using Mac OS X v.10.2, double-click the Print Center icon. 3. Ensure that paper is ...designed to automatically pause at least 15 minutes to allow the Print Head to select an undesired document and select Purge Print Documents in Macintosh for at line breaks before resuming...

iP8500 Quick Start Guide
Page 90
...Speed (Custom Setting 5): 17 ppm Standard: 5.3 ppm Color printing Max Speed (Custom Setting 5): 15 ppm Standard: 4.6 ppm Photo printing (PR-101 A4) Standard: 1.39 ppm 203.2 mm max. (8.0 inches) (for Borderless Printing: 215.9 mm / 8.5 inches) Canon extended mode 80 KB USB interface / USB 2.0 Hi-Speed ...interface Approx. 36 dB (A) (in the highest print quality mode) Temperature: 5 to 35°C (41 to 95°F) Humidity: 10 to 90%RH (no condensation) Temperature: 0...
...Speed (Custom Setting 5): 17 ppm Standard: 5.3 ppm Color printing Max Speed (Custom Setting 5): 15 ppm Standard: 4.6 ppm Photo printing (PR-101 A4) Standard: 1.39 ppm 203.2 mm max. (8.0 inches) (for Borderless Printing: 215.9 mm / 8.5 inches) Canon extended mode 80 KB USB interface / USB 2.0 Hi-Speed ...interface Approx. 36 dB (A) (in the highest print quality mode) Temperature: 5 to 35°C (41 to 95°F) Humidity: 10 to 90%RH (no condensation) Temperature: 0...

iP8500 Quick Start Guide
Page 92
...Windows Me or Windows 98 can select it . Poster Printing - Booklet Printing - Appendix Camera Direct Print (PictBridge) Paper size Paper type Layout Trimming Image optimize Date print Default (Photo Paper Plus Glossy 10 x 15 cm/4" x 6") 10 x 15 cm/4" x 6" (Photo Paper Plus ...10.2.x or later: 100 MB *4 USB 2.0 Hi-Speed operation can only be available in Layout. Off (No trimming), follow camera's setting Default (On: ExifPrint), "VIVID"*, "NR" (Noise Reduction)*, "VIVID+NR"* *If using a Canon PictBridge-compatible camera, you can operate. Manual Duplex Printing - Default (Off: No printing...
...Windows Me or Windows 98 can select it . Poster Printing - Booklet Printing - Appendix Camera Direct Print (PictBridge) Paper size Paper type Layout Trimming Image optimize Date print Default (Photo Paper Plus Glossy 10 x 15 cm/4" x 6") 10 x 15 cm/4" x 6" (Photo Paper Plus ...10.2.x or later: 100 MB *4 USB 2.0 Hi-Speed operation can only be available in Layout. Off (No trimming), follow camera's setting Default (On: ExifPrint), "VIVID"*, "NR" (Noise Reduction)*, "VIVID+NR"* *If using a Canon PictBridge-compatible camera, you can operate. Manual Duplex Printing - Default (Off: No printing...

iP8500 Quick Start Guide
Page 95
... range of 5°C to 35°C (41°F to 95°F) and humidity of the printer. Never remove the plug by pulling on top of 10% to a heating source. Do not place metal objects (paper clips, staples, etc.) or containers of fire or electric shocks, install the printer in a ...location that the area around the printer Never put your hands or fingers in the printer while it is printing. If any ink, consult a doctor immediately. If a child ingests any foreign object (metal or liquid) fall into the printer, unplug the power cord and...
... range of 5°C to 35°C (41°F to 95°F) and humidity of the printer. Never remove the plug by pulling on top of 10% to a heating source. Do not place metal objects (paper clips, staples, etc.) or containers of fire or electric shocks, install the printer in a ...location that the area around the printer Never put your hands or fingers in the printer while it is printing. If any ink, consult a doctor immediately. If a child ingests any foreign object (metal or liquid) fall into the printer, unplug the power cord and...

iP8500 Easy Setup Instructions
Page 2
...CD-ROM icon, then the Mac OS X folder, then the Printer Driver folder. 3 Double-click the PIXMA iP8500 300.pkg icon, then follow the on-screen instructions. 7 When the "Print Head Alignment" screen appears, ensure that letter size paper is loaded in the auto sheet feeder (top paper... the cover of paper. 7 Insert cassette completely into place. If the printer is completed" screen appears, click OK. 10 Double-click on to select Test Print. Canon is selected, then click Restart. Click the down-arrow to Windows as an Administrator before continuing. NOTE: For Windows®...
...CD-ROM icon, then the Mac OS X folder, then the Printer Driver folder. 3 Double-click the PIXMA iP8500 300.pkg icon, then follow the on-screen instructions. 7 When the "Print Head Alignment" screen appears, ensure that letter size paper is loaded in the auto sheet feeder (top paper... the cover of paper. 7 Insert cassette completely into place. If the printer is completed" screen appears, click OK. 10 Double-click on to select Test Print. Canon is selected, then click Restart. Click the down-arrow to Windows as an Administrator before continuing. NOTE: For Windows®...


