iP6210D Quick Start Guide
Page 14
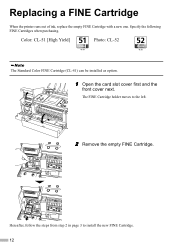
Specify the following FINE Cartridges when purchasing. The FINE Cartridge holder moves to install the new FINE Cartridge. 12 Color: CL-51 [High Yield] Photo: CL-52 The Standard Color FINE Cartridge (CL-41) can be installed as option. 1 Open the card slot cover first and the front cover next. Hereafter, follow the steps from step 2 in page 3 to the left. 2 Remove the empty FINE Cartridge. Replacing a FINE Cartridge When the printer runs out of ink, replace the empty FINE Cartridge with a new one.
Specify the following FINE Cartridges when purchasing. The FINE Cartridge holder moves to install the new FINE Cartridge. 12 Color: CL-51 [High Yield] Photo: CL-52 The Standard Color FINE Cartridge (CL-41) can be installed as option. 1 Open the card slot cover first and the front cover next. Hereafter, follow the steps from step 2 in page 3 to the left. 2 Remove the empty FINE Cartridge. Replacing a FINE Cartridge When the printer runs out of ink, replace the empty FINE Cartridge with a new one.

iP6210D Direct Printing Guide
Page 44
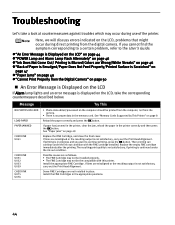
... of ink, replace them using the following such maintenance as option. When replacing a FINE Cartridge, check the model number very carefully. The printer will not print properly if a wrong FINE Cartridge is used, or installed wrong. Handle the FINE Cartridge carefully to the local laws and ... When a FINE Cartridge runs out of printing following steps. 1 Ensure that the printer is on. 2 Open the card slot cover first and then open the front cover. Color: CL-51 [High Yield] Photo: CL-52 The standard Color FINE Cartridge (CL-41) can be installed as print head cleaning, a FINE ...
... of ink, replace them using the following such maintenance as option. When replacing a FINE Cartridge, check the model number very carefully. The printer will not print properly if a wrong FINE Cartridge is used, or installed wrong. Handle the FINE Cartridge carefully to the local laws and ... When a FINE Cartridge runs out of printing following steps. 1 Ensure that the printer is on. 2 Open the card slot cover first and then open the front cover. Color: CL-51 [High Yield] Photo: CL-52 The standard Color FINE Cartridge (CL-41) can be installed as print head cleaning, a FINE ...

iP6210D Direct Printing Guide
Page 45
...∗To the FINE Cartridge holder Unpack a new FINE Cartridge and remove the orange protective tape gently. The Color FINE Cartridge should be installed into the left slot (C) and the Photo FINE Cartridge should be into place. 41 Once the protective tape is removed, do not touch the electrical contacts... or print head nozzles on a FINE Cartridge. The printer may not print out properly if you have removed it. ...
...∗To the FINE Cartridge holder Unpack a new FINE Cartridge and remove the orange protective tape gently. The Color FINE Cartridge should be installed into the left slot (C) and the Photo FINE Cartridge should be into place. 41 Once the protective tape is removed, do not touch the electrical contacts... or print head nozzles on a FINE Cartridge. The printer may not print out properly if you have removed it. ...
iP6210D Direct Printing Guide
Page 48
...INK U041 CHECK INK U051 U052 U053 U059 CHECK INK U075 U076 Try This • Photo data edited/processed on the computer should be printed from the computer, not from the... Install the appropriate FINE Cartridge. Some FINE Cartridges are misaligned or the resulting output is Blurred/Colors are Wrong/White Streaks" on page 49 "Cannot Print Properly from the camera. • There is ... satisfactory, if printing is no proper data in the memory card. Install the FINE Cartridges in the printer correctly and then press the OK button. If lines are as follows: • The FINE Cartridge ...
...INK U041 CHECK INK U051 U052 U053 U059 CHECK INK U075 U076 Try This • Photo data edited/processed on the computer should be printed from the computer, not from the... Install the appropriate FINE Cartridge. Some FINE Cartridges are misaligned or the resulting output is Blurred/Colors are Wrong/White Streaks" on page 49 "Cannot Print Properly from the camera. • There is ... satisfactory, if printing is no proper data in the memory card. Install the FINE Cartridges in the printer correctly and then press the OK button. If lines are as follows: • The FINE Cartridge ...
iP6210D Direct Printing Guide
Page 56
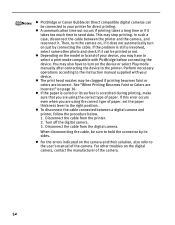
...their solution, also refer to the instruction manual supplied with PictBridge before connecting the device. To disconnect the cable connected between the printer and the camera, and reconnect it takes too much time to hold the connector by connecting the cable. Disconnect the cable ...connected to the right position. PictBridge or Canon Bubble Jet Direct compatible digital cameras can be clogged if printing becomes faint or colors are incorrect. For other troubles on just by its surface is still unresolved, select some other photo and check if it does not automatically...
...their solution, also refer to the instruction manual supplied with PictBridge before connecting the device. To disconnect the cable connected between the printer and the camera, and reconnect it takes too much time to hold the connector by connecting the cable. Disconnect the cable ...connected to the right position. PictBridge or Canon Bubble Jet Direct compatible digital cameras can be clogged if printing becomes faint or colors are incorrect. For other troubles on just by its surface is still unresolved, select some other photo and check if it does not automatically...
iP6210D Easy Setup Instructions
Page 1
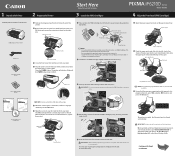
... one to the left position. 3 Ensure that the message requesting head alignment is aligned automatically. PIXMA iP6210D Photo Printer Power Cord Color FINE Cartridge (CL-51) Photo FINE Cartridge (CL-52) 1 Remove the shipping tape from the front and back of the printer. 2 Open (a) the card slot cover first and (b) the front cover next, Pull down the...
... one to the left position. 3 Ensure that the message requesting head alignment is aligned automatically. PIXMA iP6210D Photo Printer Power Cord Color FINE Cartridge (CL-51) Photo FINE Cartridge (CL-52) 1 Remove the shipping tape from the front and back of the printer. 2 Open (a) the card slot cover first and (b) the front cover next, Pull down the...


