iP6000D Diect Print Guide
Page 2
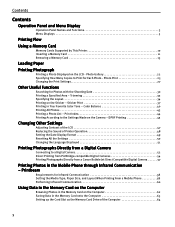
... the Settings 50 Changing the Language Displayed 51 Printing Photographs Directly from a Digital Camera Connecting to a Digital Camera 52 Direct Printing from PictBridge-compatible Digital Cameras 54 Printing Photographs Directly from a Canon Bubble Jet Direct Compatible Digital Camera 57 Printing Photos in Your Favorite Color Tone - Sticker Print 37 Printing in the Mobile Phone through Infrared Communication -
... the Settings 50 Changing the Language Displayed 51 Printing Photographs Directly from a Digital Camera Connecting to a Digital Camera 52 Direct Printing from PictBridge-compatible Digital Cameras 54 Printing Photographs Directly from a Canon Bubble Jet Direct Compatible Digital Camera 57 Printing Photos in Your Favorite Color Tone - Sticker Print 37 Printing in the Mobile Phone through Infrared Communication -

iP6000D Diect Print Guide
Page 3
Contents Replacing an Ink Tank Knowing When to Replace Ink Tank 66 Replacing Ink Tanks 67 Printing Maintenance When Printing Becomes Faint or Colors are Incorrect 70 Printing the Nozzle Check Pattern 71 Examining the Nozzle Check Pattern 72 Print Head Cleaning 73 Print Head Deep Cleaning 74 Aligning Print Head - Auto head align 75 Troubleshooting A Message is Displayed on the LCD 77 Index 86 2
Contents Replacing an Ink Tank Knowing When to Replace Ink Tank 66 Replacing Ink Tanks 67 Printing Maintenance When Printing Becomes Faint or Colors are Incorrect 70 Printing the Nozzle Check Pattern 71 Examining the Nozzle Check Pattern 72 Print Head Cleaning 73 Print Head Deep Cleaning 74 Aligning Print Head - Auto head align 75 Troubleshooting A Message is Displayed on the LCD 77 Index 86 2
iP6000D Diect Print Guide
Page 4
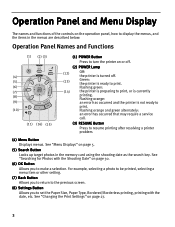
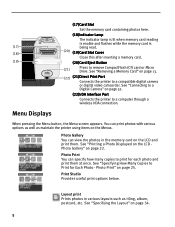
...on or off. (2) POWER Lamp (12) Off: the printer is turned off. (13) Green: the printer is not ready to print. For example, selecting a photo to be printed, selecting a menu item or other setting. (7) Back Button Allows you to return to the previous screen. (8) Settings Button Allows you to...date as the search key. Flashing orange: an error has occurred and the printer is ready to print. See "Changing the Print Settings" on page 30. (6) OK Button Allows you to print, or is currently printing. Flashing green: (14) the printer is preparing to set the Paper Size, Paper Type, ...
...on or off. (2) POWER Lamp (12) Off: the printer is turned off. (13) Green: the printer is not ready to print. For example, selecting a photo to be printed, selecting a menu item or other setting. (7) Back Button Allows you to return to the previous screen. (8) Settings Button Allows you to...date as the search key. Flashing orange: an error has occurred and the printer is ready to print. See "Changing the Print Settings" on page 30. (6) OK Button Allows you to print, or is currently printing. Flashing green: (14) the printer is preparing to set the Paper Size, Paper Type, ...
iP6000D Diect Print Guide
Page 5
.... Trimming" on page 32. (14) Buttons Press to trim the photo being displayed. on the LCD. 4 See "Printing a Specified Area - Pressing this button is pressed during printing, the printer aborts printing. (16)Print Button Press to start printing according to the settings displayed on page 32. (15)Cancel Button Press to cancel the settings you... "Browsing Photos in the Memory Card on the Computer" on the LCD, to select a menu item or photo, to specify the number of copies to print, to make print settings, or to...
.... Trimming" on page 32. (14) Buttons Press to trim the photo being displayed. on the LCD. 4 See "Printing a Specified Area - Pressing this button is pressed during printing, the printer aborts printing. (16)Print Button Press to start printing according to the settings displayed on page 32. (15)Cancel Button Press to cancel the settings you... "Browsing Photos in the Memory Card on the Computer" on the LCD, to select a menu item or photo, to specify the number of copies to print, to make print settings, or to...
iP6000D Diect Print Guide
Page 6
... Copies to a compatible digital camera or digital video camcorder. Photo Print" on page 13. (22) (21)Direct Print Port Connects the printer to Print for each photo and print them . See "Specifying the Layout" on page 22. See "Printing a Photo Displayed on the LCD Photo Gallery" on page 34....20)Card Eject Button (21) Press to a computer through a wireless IrDA connection. See "Connecting to print for Each Photo - Layout print Prints photos in the memory card on the LCD and print them at once. You can view the photos in various layouts such as maintain the printer using items...
... Copies to a compatible digital camera or digital video camcorder. Photo Print" on page 13. (22) (21)Direct Print Port Connects the printer to Print for each photo and print them . See "Specifying the Layout" on page 22. See "Printing a Photo Displayed on the LCD Photo Gallery" on page 34....20)Card Eject Button (21) Press to a computer through a wireless IrDA connection. See "Connecting to print for Each Photo - Layout print Prints photos in the memory card on the LCD and print them at once. You can view the photos in various layouts such as maintain the printer using items...
iP6000D Diect Print Guide
Page 7
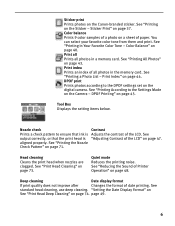
... LCD" on the Canon-branded sticker. See "Printing All Photos" on page 44. See "Printing According to the Settings Made on page 71. See "Printing the Nozzle Check Pattern" on the Camera - See "Printing a Photo List - Color Balance" on page 45. DPOF Printing" on page 40. Quiet mode Reduces the printing noise. See "Printing on page 73. See...
... LCD" on the Canon-branded sticker. See "Printing All Photos" on page 44. See "Printing According to the Settings Made on page 71. See "Printing the Nozzle Check Pattern" on the Camera - See "Printing a Photo List - Color Balance" on page 45. DPOF Printing" on page 40. Quiet mode Reduces the printing noise. See "Printing on page 73. See...
iP6000D Diect Print Guide
Page 8
...through Infrared Communication - position. Auto See "Changing the Language Displayed" on head align" on page 58. Infrared print Sets the paper size and layout of the print head Sets the Language displayed on the LCD. Printbeam" on page 75. Reset Resets all settings other than the... display language and the print head position to the initial state. Head alignment print Languages Prints the current settings of the print via infrared communication from the mobile phone. Thick paper Use the Thick Paper setting if ...
...through Infrared Communication - position. Auto See "Changing the Language Displayed" on head align" on page 58. Infrared print Sets the paper size and layout of the print head Sets the Language displayed on the LCD. Printbeam" on page 75. Reset Resets all settings other than the... display language and the print head position to the initial state. Head alignment print Languages Prints the current settings of the print via infrared communication from the mobile phone. Thick paper Use the Thick Paper setting if ...
iP6000D Diect Print Guide
Page 9
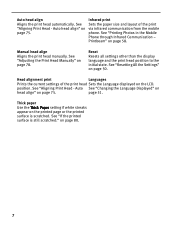
Step 1 Turn on page 10. 8 Step 4 Insert the memory card. See "Using a Memory Card" on the Printer. See "Loading Paper" on page 15. Step 3 Ensure the paper source. Step 2 Load the paper. Printing Flow This is the procedure for printing photos from the memory card inserted in the card slot of the printer. See page 22.
Step 1 Turn on page 10. 8 Step 4 Insert the memory card. See "Using a Memory Card" on the Printer. See "Loading Paper" on page 15. Step 3 Ensure the paper source. Step 2 Load the paper. Printing Flow This is the procedure for printing photos from the memory card inserted in the card slot of the printer. See page 22.

iP6000D Diect Print Guide
Page 10
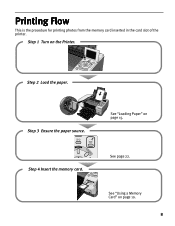
Press the Print button to print using the buttons. See "Changing the Print Settings" on page 27. Select photos to start printing. 9 Press the buttons to change the print settings. Press the Settings button to select a printing menu. Step 8 Start printing. Step 5 Select a Menu. Step 7 Check print setting. Step 6 Select photos to print. The setting confirmation screen appears when pressing the OK button.
Press the Print button to print using the buttons. See "Changing the Print Settings" on page 27. Select photos to start printing. 9 Press the buttons to change the print settings. Press the Settings button to select a printing menu. Step 8 Start printing. Step 5 Select a Menu. Step 7 Check print setting. Step 6 Select photos to print. The setting confirmation screen appears when pressing the OK button.
iP6000D Diect Print Guide
Page 11
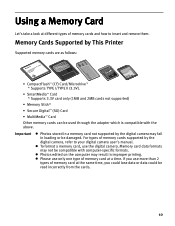
.... Using a Memory Card Let's take a look at a time. Memory card data formats may not be damaged. Photos edited on the computer may fail in improper printing. Memory Cards Supported by the digital camera, refer to insert and remove them. Important Photos stored in a memory card not supported by the digital camera...
.... Using a Memory Card Let's take a look at a time. Memory card data formats may not be damaged. Photos edited on the computer may fail in improper printing. Memory Cards Supported by the digital camera, refer to insert and remove them. Important Photos stored in a memory card not supported by the digital camera...
iP6000D Diect Print Guide
Page 12
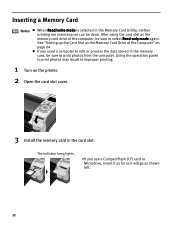
... the memory card drive of the Computer" on the printer. 2 Open the card slot cover. 3 Install the memory card in the Memory Card Utility, neither printing nor maintenance can be done. Inserting a Memory Card Notes When Read/write mode is selected in the card slot. The Indicator lamp lights. •If... you used a computer to edit or process the data stored in the memory card, be sure to print photos from the computer. After using the card slot as the Memory Card Drive of the computer, be sure to select Read-only mode again...
... the memory card drive of the Computer" on the printer. 2 Open the card slot cover. 3 Install the memory card in the Memory Card Utility, neither printing nor maintenance can be done. Inserting a Memory Card Notes When Read/write mode is selected in the card slot. The Indicator lamp lights. •If... you used a computer to edit or process the data stored in the memory card, be sure to print photos from the computer. After using the card slot as the Memory Card Drive of the computer, be sure to select Read-only mode again...
iP6000D Diect Print Guide
Page 16
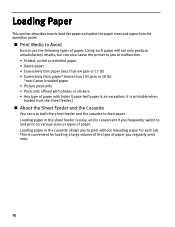
... paper • Excessively thin paper (less than 64 gsm or 17 lb) • Excessively thick paper* (more than 105 gsm or 28 lb) *non-Canon branded paper • Picture postcards • Postcards affixed with photos or stickers • Any type of paper with holes (Loose-leaf paper is convenient for.... Loading paper in the sheet feeder is easy, and is printable when loaded from the operation panel. it is convenient if you to print without reloading paper for loading a large volume of the type of paper. Loading paper in the cassette allows you frequently switch to feed paper...
... paper • Excessively thin paper (less than 64 gsm or 17 lb) • Excessively thick paper* (more than 105 gsm or 28 lb) *non-Canon branded paper • Picture postcards • Postcards affixed with photos or stickers • Any type of paper with holes (Loose-leaf paper is convenient for.... Loading paper in the sheet feeder is easy, and is printable when loaded from the operation panel. it is convenient if you to print without reloading paper for loading a large volume of the type of paper. Loading paper in the cassette allows you frequently switch to feed paper...
iP6000D Diect Print Guide
Page 17
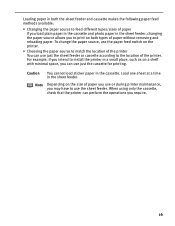
... match the location of the printer You can perform the operations you can use just the cassette for printing. Note Depending on the size of paper you use or during printer maintenance, you to print on a shelf with minimal space, you require. 16 Loading paper in both the sheet feeder and cassette...
... match the location of the printer You can perform the operations you can use just the cassette for printing. Note Depending on the size of paper you use or during printer maintenance, you to print on a shelf with minimal space, you require. 16 Loading paper in both the sheet feeder and cassette...

iP6000D Diect Print Guide
Page 18
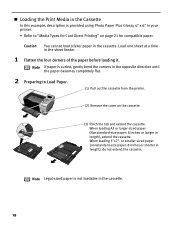
... paper feed switch so that the sheet feeder lamp is lit. (2) Open the paper output tray and pull out the extension completely. 17 Loading the Print Media in the Sheet Feeder In this example, description is provided using Photo Paper Plus Glossy 4" x 6" in the opposite direction until the paper becomes completely... flat. Refer to "Uncurling the Media" on the User's Guide. 2 Preparing to "Media Types for Card Direct Printing" on page 21 for compatible paper. 1 Flatten the four corners of the paper before loading it.
... paper feed switch so that the sheet feeder lamp is lit. (2) Open the paper output tray and pull out the extension completely. 17 Loading the Print Media in the Sheet Feeder In this example, description is provided using Photo Paper Plus Glossy 4" x 6" in the opposite direction until the paper becomes completely... flat. Refer to "Uncurling the Media" on the User's Guide. 2 Preparing to "Media Types for Card Direct Printing" on page 21 for compatible paper. 1 Flatten the four corners of the paper before loading it.

iP6000D Diect Print Guide
Page 19
Load the paper lengthways regardless of the direction of the photo. (2) Align the paper stack snug against the right side of the sheet feeder. (3) Press the paper guide and slide it against the left side of the stack of paper. Note Do not touch the printed surface until the ink dries. For specific drying times, refer to the instructions packaged with print side facing up. 3 Loading the Paper Load Limit Mark Do not load beyond this load limit mark. (1) Insert the paper in the sheet feeder with your media. 18
Load the paper lengthways regardless of the direction of the photo. (2) Align the paper stack snug against the right side of the sheet feeder. (3) Press the paper guide and slide it against the left side of the stack of paper. Note Do not touch the printed surface until the ink dries. For specific drying times, refer to the instructions packaged with print side facing up. 3 Loading the Paper Load Limit Mark Do not load beyond this load limit mark. (1) Insert the paper in the sheet feeder with your media. 18
iP6000D Diect Print Guide
Page 20
...(Nonstandard-size paper: 8 inches or longer in the cassette. 19 Note Legal-sized paper is not loadable in length), extend the cassette. Loading the Print Media in the Cassette In this example, description is provided using Photo Paper Plus Glossy 4" x 6" in your printer. • Refer to Load... Paper. (1) Pull out the cassette from the printer. (2) Remove the cover on page 21 for Card Direct Printing" on the cassette. (3) Pinch the tab and extend the cassette. or smaller sized paper (nonstandard-size paper: 8 inches or shorter in length), do ...
...(Nonstandard-size paper: 8 inches or longer in the cassette. 19 Note Legal-sized paper is not loadable in length), extend the cassette. Loading the Print Media in the Cassette In this example, description is provided using Photo Paper Plus Glossy 4" x 6" in your printer. • Refer to Load... Paper. (1) Pull out the cassette from the printer. (2) Remove the cover on page 21 for Card Direct Printing" on the cassette. (3) Pinch the tab and extend the cassette. or smaller sized paper (nonstandard-size paper: 8 inches or shorter in length), do ...

iP6000D Diect Print Guide
Page 21
... cassette. 5 Prepare the paper output tray. (2) Insert the cassette into the printer. Note Do not touch the printed surface until the ink dries. For specific drying times, refer to the instructions packaged with the print side facing down. (2) Align the paper stack against the right side of the cassette. (3) Slide the paper...
... cassette. 5 Prepare the paper output tray. (2) Insert the cassette into the printer. Note Do not touch the printed surface until the ink dries. For specific drying times, refer to the instructions packaged with the print side facing down. (2) Align the paper stack against the right side of the cassette. (3) Slide the paper...

iP6000D Diect Print Guide
Page 22
Do not load in the cassette. *3: When printing on sticker paper, select Stickers x16 in the Infrared print screen. 21 Place the necessary number of sheets (up to 150 sheets can be set. *1: When loading Letter size paper in the sheet feeder, do ...not load the paper all at a time, to 10 sheets) one at once. Media Types for Card Direct Printing You can use the following Canon media: Media Type Plain Paper Photo Paper Pro Photo Paper Plus Glossy Photo Paper Plus Semigloss Matte Photo Paper Glossy Photo Paper Photo...
Do not load in the cassette. *3: When printing on sticker paper, select Stickers x16 in the Infrared print screen. 21 Place the necessary number of sheets (up to 150 sheets can be set. *1: When loading Letter size paper in the sheet feeder, do ...not load the paper all at a time, to 10 sheets) one at once. Media Types for Card Direct Printing You can use the following Canon media: Media Type Plain Paper Photo Paper Pro Photo Paper Plus Glossy Photo Paper Plus Semigloss Matte Photo Paper Glossy Photo Paper Photo...
iP6000D Diect Print Guide
Page 23
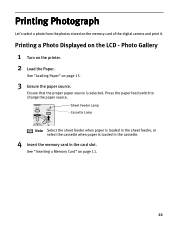
... memory card in the card slot. Photo Gallery 1 Turn on page 15. 3 Ensure the paper source. See "Loading Paper" on the printer. 2 Load the Paper. Printing a Photo Displayed on page 11. 22 See "Inserting a Memory Card" on the LCD - Sheet Feeder Lamp Cassette Lamp Note Select the sheet feeder when paper... is loaded in the sheet feeder, or select the cassette when paper is selected. Press the paper feed switch to change the paper source. Printing Photograph Let's select a photo from the photos stored on the memory card of the digital camera and...
... memory card in the card slot. Photo Gallery 1 Turn on page 15. 3 Ensure the paper source. See "Loading Paper" on the printer. 2 Load the Paper. Printing a Photo Displayed on page 11. 22 See "Inserting a Memory Card" on the LCD - Sheet Feeder Lamp Cassette Lamp Note Select the sheet feeder when paper... is loaded in the sheet feeder, or select the cassette when paper is selected. Press the paper feed switch to change the paper source. Printing Photograph Let's select a photo from the photos stored on the memory card of the digital camera and...
iP6000D Diect Print Guide
Page 24
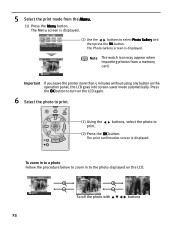
... from a memory card. The Photo Gallery screen is displayed. Press the OK button to print. (1) Using the print. To zoom in to a photo Follow the procedure below to zoom in to the photo displayed on the LCD again. 6 Select the photo to turn ... photo to select Photo Gallery and then press the OK button. The Menu screen is displayed. (2) Use the buttons to (2) Press the OK button. The print confirmation screen is displayed. Important If you leave the printer more than 5 minutes without using any button on the operation panel, the LCD goes into...
... from a memory card. The Photo Gallery screen is displayed. Press the OK button to print. (1) Using the print. To zoom in to a photo Follow the procedure below to zoom in to the photo displayed on the LCD again. 6 Select the photo to turn ... photo to select Photo Gallery and then press the OK button. The Menu screen is displayed. (2) Use the buttons to (2) Press the OK button. The print confirmation screen is displayed. Important If you leave the printer more than 5 minutes without using any button on the operation panel, the LCD goes into...


