
iP6000D Diect Print Guide
Page 18
Note If paper is lit. (2) Open the paper output tray and pull out the extension completely. 17 Refer to "Uncurling the Media" on the User's Guide. 2 Preparing to Load Paper. (1) Open and pull out the paper support. (3) Press the paper feed switch so that the sheet feeder lamp is curled, gently bend the corners... in your printer. • Refer to "Media Types for Card Direct Printing" on page 21 for compatible paper. 1 Flatten the four corners of the paper before loading it. Loading the Print Media in the Sheet Feeder In this example, description is provided using Photo...
Note If paper is lit. (2) Open the paper output tray and pull out the extension completely. 17 Refer to "Uncurling the Media" on the User's Guide. 2 Preparing to Load Paper. (1) Open and pull out the paper support. (3) Press the paper feed switch so that the sheet feeder lamp is curled, gently bend the corners... in your printer. • Refer to "Media Types for Card Direct Printing" on page 21 for compatible paper. 1 Flatten the four corners of the paper before loading it. Loading the Print Media in the Sheet Feeder In this example, description is provided using Photo...

iP6000D Diect Print Guide
Page 21
... with your media. 20 Note If the cassette has been extended to fit the loaded paper stack. 4 Insert the cassette into the printer. (1) Set the cover on the cassette. 5 Prepare the paper output tray. (2) Insert the cassette into the printer. For specific drying times, refer to the...of the cassette. (3) Slide the paper guides to accommodate paper sizes larger than 5"x7", the front edge of the cassette will extend beyond the front of the printer. 1 Cassette Lamp 2 (1) Open the paper output tray and pull out the extension completely. (2) Press the paper feed switch so that the cassette ...
... with your media. 20 Note If the cassette has been extended to fit the loaded paper stack. 4 Insert the cassette into the printer. (1) Set the cover on the cassette. 5 Prepare the paper output tray. (2) Insert the cassette into the printer. For specific drying times, refer to the...of the cassette. (3) Slide the paper guides to accommodate paper sizes larger than 5"x7", the front edge of the cassette will extend beyond the front of the printer. 1 Cassette Lamp 2 (1) Open the paper output tray and pull out the extension completely. (2) Press the paper feed switch so that the cassette ...

iP6000D Diect Print Guide
Page 68
... press the OK button. To cancel printing, select NO and then press the OK button. The print head holder moves to the center. 2 Open the paper output tray and pull down to open the cover. Notes When Low Ink is Detected When printing starts, the message is on the LCD. [!] indicates a low ink...
... press the OK button. To cancel printing, select NO and then press the OK button. The print head holder moves to the center. 2 Open the paper output tray and pull down to open the cover. Notes When Low Ink is Detected When printing starts, the message is on the LCD. [!] indicates a low ink...
iP6000D Diect Print Guide
Page 85
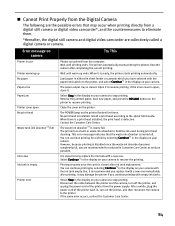
... from the Digital Camera The following are the possible errors that the waste ink absorber is nearly full. Wait until warm-up No paper Paper error Paper jam Printer cover open , close it is nearly full. When there is a print head installed, the print head is closed after... ink absorber becomes completely full, you replace it is empty Printer error Try This Photos are recommended to the Quick Start Guide. The paper output tray is defective. Select Stop in waste ink absorber to resume printing. Contact the Customer Care Center. The POWER lamp on the printer, ...
... from the Digital Camera The following are the possible errors that the waste ink absorber is nearly full. Wait until warm-up No paper Paper error Paper jam Printer cover open , close it is nearly full. When there is a print head installed, the print head is closed after... ink absorber becomes completely full, you replace it is empty Printer error Try This Photos are recommended to the Quick Start Guide. The paper output tray is defective. Select Stop in waste ink absorber to resume printing. Contact the Customer Care Center. The POWER lamp on the printer, ...

iP6000D Quick Start Guide
Page 7
Note You can also select the paper source with its various printers, refer to "Canon Speciality Media" on page 13. For details, refer to support the paper. sheet feeder lamp 1 2 (2) 1 Open the paper output tray. 2 Pull out the paper output tray extension completely. (3) Press the paper feed switch so that the sheet feeder lamp is curled, gently bend the corners in...
Note You can also select the paper source with its various printers, refer to "Canon Speciality Media" on page 13. For details, refer to support the paper. sheet feeder lamp 1 2 (2) 1 Open the paper output tray. 2 Pull out the paper output tray extension completely. (3) Press the paper feed switch so that the sheet feeder lamp is curled, gently bend the corners in...

iP6000D Quick Start Guide
Page 8
You can use general copy paper or Canon's Super White Paper SW-201. Basic Printing 3 Load the paper. load limit mark Do not load beyond this load limit mark. (1) Load the paper into the sheet feeder with the print side facing up to 150 sheets of the sheet feeder. Notes You can load up . (3) Slide the paper guide against the left side of the paper stack. (2) Align the paper stack against the right side of plain paper (64 gsm or 17 lb, 13 mm or 0.52 inches in height) in the paper output tray. 6 However, do not stack more than 50 sheets in the sheet feeder.
You can use general copy paper or Canon's Super White Paper SW-201. Basic Printing 3 Load the paper. load limit mark Do not load beyond this load limit mark. (1) Load the paper into the sheet feeder with the print side facing up to 150 sheets of the sheet feeder. Notes You can load up . (3) Slide the paper guide against the left side of the paper stack. (2) Align the paper stack against the right side of plain paper (64 gsm or 17 lb, 13 mm or 0.52 inches in height) in the paper output tray. 6 However, do not stack more than 50 sheets in the sheet feeder.

iP6000D Quick Start Guide
Page 11
...not stack more than 5"x7", the front edge of the cassette will extend beyond the front of plain paper (64 gsm or 17 lb, 13 mm or 0.52 inches in height) in the paper output tray. 4 Insert the cassette into the printer. (1) Set the cover on the cassette. (2) Insert the ...(2) Align the paper stack against the right side of the cassette. (3) Slide the paper guides to accommodate paper sizes larger than 50 sheets in the cassette. 3 Load the paper. Note If the cassette has been extended to fit the loaded paper stack. You can use general copy paper or Canon's Super White Paper SW-201.
...not stack more than 5"x7", the front edge of the cassette will extend beyond the front of plain paper (64 gsm or 17 lb, 13 mm or 0.52 inches in height) in the paper output tray. 4 Insert the cassette into the printer. (1) Set the cover on the cassette. (2) Insert the ...(2) Align the paper stack against the right side of the cassette. (3) Slide the paper guides to accommodate paper sizes larger than 50 sheets in the cassette. 3 Load the paper. Note If the cassette has been extended to fit the loaded paper stack. You can use general copy paper or Canon's Super White Paper SW-201.

iP6000D Quick Start Guide
Page 12
For details, refer to "Changing the Paper Source" in the User's Guide. 10 cassette 1 lamp 2 (2) Press the paper feed switch so that the cassette lamp is lit. Note You can also select the paper source with the printer driver. Basic Printing 5 Prepare the paper output tray. (1) 1 Open the paper output tray. 2 Pull out the paper output tray extension completely.
For details, refer to "Changing the Paper Source" in the User's Guide. 10 cassette 1 lamp 2 (2) Press the paper feed switch so that the cassette lamp is lit. Note You can also select the paper source with the printer driver. Basic Printing 5 Prepare the paper output tray. (1) 1 Open the paper output tray. 2 Pull out the paper output tray extension completely.

iP6000D Quick Start Guide
Page 42
... the local laws and regulations regarding disposal of ink, replace it using the following steps. 1 Ensure that the printer is on, and then open the paper output tray. 2 Open the cover, and pull down the inner cover forward to the center. 3 Remove the empty ink tank. Printing Maintenance Replacing Ink Tanks When an...
... the local laws and regulations regarding disposal of ink, replace it using the following steps. 1 Ensure that the printer is on, and then open the paper output tray. 2 Open the cover, and pull down the inner cover forward to the center. 3 Remove the empty ink tank. Printing Maintenance Replacing Ink Tanks When an...
iP6000D Quick Start Guide
Page 68
When the confirmation message is deleted. Select Applications from the Start Menu" on the printer. Double-click iP6000D displayed under Name in the Utilities folder. The print job is displayed, click Yes. For a detailed description of the printer driver settings, ... icon in the Printer List. 4. When using Mac OS X v.10.2.x, double-click the Print Center icon. 3. Paper output tray is any. Delete an undesired print job, if there is Open the paper output tray. Use BJ Status Monitor in Windows or Printer Setup Utility (or Print Center) in the Printer menu. The print...
When the confirmation message is deleted. Select Applications from the Start Menu" on the printer. Double-click iP6000D displayed under Name in the Utilities folder. The print job is displayed, click Yes. For a detailed description of the printer driver settings, ... icon in the Printer List. 4. When using Mac OS X v.10.2.x, double-click the Print Center icon. 3. Paper output tray is any. Delete an undesired print job, if there is Open the paper output tray. Use BJ Status Monitor in Windows or Printer Setup Utility (or Print Center) in the Printer menu. The print...
iP6000D Quick Start Guide
Page 74
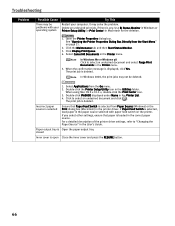
... correctly/Defective print head Install the print head. Press the RESUME button to cancel the error so you may be damaged. Paper jam/Paper output tray is already installed, remove the print head and check the electrical contacts for the ink used during print head cleaning. Inner ...the sheet feeder or cassette and press the RESUME button. Count the flashes and take the appropriate action to realign it . If the paper output tray is open it . A specified period of time has elapsed without receiving a response from the digital camera/The digital camera or digital video...
... correctly/Defective print head Install the print head. Press the RESUME button to cancel the error so you may be damaged. Paper jam/Paper output tray is already installed, remove the print head and check the electrical contacts for the ink used during print head cleaning. Inner ...the sheet feeder or cassette and press the RESUME button. Count the flashes and take the appropriate action to realign it . If the paper output tray is open it . A specified period of time has elapsed without receiving a response from the digital camera/The digital camera or digital video...
iP6000D Quick Start Guide
Page 82
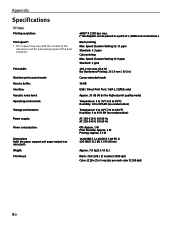
... Appendix Specifications Printer Printing resolution: Print speed*: * Print speed may vary with the paper support and paper output tray retracted): Weight: Print Head: 4800* X 1200 dpi. Speed (Custom Setting 5): 9 ppm Standard: 3 ppm 203.2 mm max. (8.0 in) (for Borderless Printing: 215.9 mm / 8.5 in) Canon extended mode 56 KB USB / Direct Print Port / IrDA 1.2 (JPEG only) Approx...
... Appendix Specifications Printer Printing resolution: Print speed*: * Print speed may vary with the paper support and paper output tray retracted): Weight: Print Head: 4800* X 1200 dpi. Speed (Custom Setting 5): 9 ppm Standard: 3 ppm 203.2 mm max. (8.0 in) (for Borderless Printing: 215.9 mm / 8.5 in) Canon extended mode 56 KB USB / Direct Print Port / IrDA 1.2 (JPEG only) Approx...

iP6000D Easy Setup Instructions
Page 1
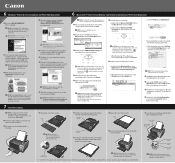
...to the left edge of the paper. Sheet Feeder Paper Guide IMPORTANT: Print Head Alignment (Step 6) requires that 8.5"x11" paper is off and discard the orange protective cap. PIXMA iP6000D Series Photo Printer Documentation and Software Kit PIXMA iP6000D Series Print Head Power Cord ... PhotoMagenta BCI-6Y Yellow BCI-6M Magenta Serial Number Location (b) Cover Paper Output Tray Extension Continue with Step 6 click NOTE: The printer will not feed properly. 6 Extend the paper support and paper output tray extension. cleaning. Wait until it down until the ink tank clicks...
...to the left edge of the paper. Sheet Feeder Paper Guide IMPORTANT: Print Head Alignment (Step 6) requires that 8.5"x11" paper is off and discard the orange protective cap. PIXMA iP6000D Series Photo Printer Documentation and Software Kit PIXMA iP6000D Series Print Head Power Cord ... PhotoMagenta BCI-6Y Yellow BCI-6M Magenta Serial Number Location (b) Cover Paper Output Tray Extension Continue with Step 6 click NOTE: The printer will not feed properly. 6 Extend the paper support and paper output tray extension. cleaning. Wait until it down until the ink tank clicks...
iP6000D Easy Setup Instructions
Page 2
...Canon Inc. c. e.Click the down-arrow to TURN THE PRINTER OFF before continuing. 4 When the "Printer Connection" window appears, TURN THE PRINTER ON. NOTE: Print head alignment will take several minutes to install the remaining software. NOTE: Loading paper in Thailand. 8 Lower the paper output tray and pull out the paper output tray...2 Double-click the CD-ROM icon, then the Mac OS X folder, then the Printer Driver folder. 3 Double-click the PIXMA iP6000D 290.pkg icon, then follow on the Printer List with Printer Setup Utility (Print Center when using Mac OS X v.10.2.x). ...
...Canon Inc. c. e.Click the down-arrow to TURN THE PRINTER OFF before continuing. 4 When the "Printer Connection" window appears, TURN THE PRINTER ON. NOTE: Print head alignment will take several minutes to install the remaining software. NOTE: Loading paper in Thailand. 8 Lower the paper output tray and pull out the paper output tray...2 Double-click the CD-ROM icon, then the Mac OS X folder, then the Printer Driver folder. 3 Double-click the PIXMA iP6000D 290.pkg icon, then follow on the Printer List with Printer Setup Utility (Print Center when using Mac OS X v.10.2.x). ...


