PIXMA MX892 Setup - Canon
PIXMA MX892 Setup
Related Manual Pages


Similar Questions

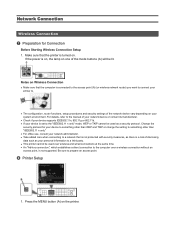
Wireless Canon Mx512 Setup
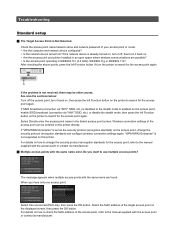
Setup for wireless printing says to hold down the WPS button on the printer. Where is that button? O...
Setup for wireless printing says to hold down the WPS button on the printer. Where is that button? O...
(Posted by sanford11 7 years ago)


Where Is Wps Access Button I'm Supposed To Push For My Laptop Setup W/mx892?
(Posted by zwahlenr 10 years ago)

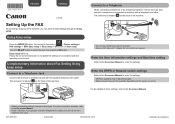
How Do I Setup The Fax For Mx340?
Been trying to setup fax capabilities and need help.
Been trying to setup fax capabilities and need help.
(Posted by douglassmith2275 11 years ago)

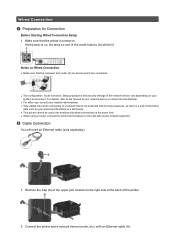
Network Setup
Can the printer be setup for wired and wireless at the same time
Can the printer be setup for wired and wireless at the same time
(Posted by eagleguy48 11 years ago)
Related Terms
The following terms were also used when searching for PIXMA MX892 Setup - Canon:- cannon pixma mx892
- canon - pixma mx892 network-ready wireless all-in-one printer
- canon pixma mx882
- canon pixma mx882 driver
- canon pixma mx882 drivers
- canon pixma mx882 ink
- canon pixma mx882 ink cartridges
- canon pixma mx882 instruction manual
- canon pixma mx882 manual
- canon pixma mx882 printer
- canon pixma mx882 printer driver
- canon pixma mx882 troubleshooting
- canon pixma mx882 user manual
- canon pixma mx882 wireless
- canon pixma mx892
- canon pixma mx892 airprint
- canon pixma mx892 all in one printer
- canon pixma mx892 all-in-one inkjet printer
- canon pixma mx892 amazon
- canon pixma mx892 b200
- canon pixma mx892 b200 error
- canon pixma mx892 best buy
- canon pixma mx892 best price
- canon pixma mx892 cartridges
- canon pixma mx892 change ink
- canon pixma mx892 costco
- canon pixma mx892 download
- canon pixma mx892 driver
- canon pixma mx892 driver download
- canon pixma mx892 driver for mac
- canon pixma mx892 driver windows 8
- canon pixma mx892 drivers
- canon pixma mx892 error 5100
- canon pixma mx892 error 6000
- canon pixma mx892 error b200
- canon pixma mx892 error c000
- canon pixma mx892 error code b200
- canon pixma mx892 error u052
- canon pixma mx892 error u052 resetting
- canon pixma mx892 factory reset
- canon pixma mx892 fax setup
- canon pixma mx892 for sale
- canon pixma mx892 how to change ink
- canon pixma mx892 how to fax
- canon pixma mx892 ink
- canon pixma mx892 ink cartridge
- canon pixma mx892 ink cartridges
- canon pixma mx892 ink cartridges chipped
- canon pixma mx892 ink refill
- canon pixma mx892 instruction manual
- canon pixma mx892 load paper
- canon pixma mx892 lowest price
- canon pixma mx892 mac
- canon pixma mx892 manual
- canon pixma mx892 manual pdf
- canon pixma mx892 network ready wireless all in one printer
- canon pixma mx892 no power
- canon pixma mx892 not printing
- canon pixma mx892 oem 4-color ink combo pack
- canon pixma mx892 office depot
- canon pixma mx892 owner's manual
- canon pixma mx892 owners manual
- canon pixma mx892 parts
- canon pixma mx892 power supply
- canon pixma mx892 price
- canon pixma mx892 print head
- canon pixma mx892 print head replacement
- canon pixma mx892 printer
- canon pixma mx892 printer driver
- canon pixma mx892 printer driver download
- canon pixma mx892 printer drivers
- canon pixma mx892 printer error b200
- canon pixma mx892 printer head
- canon pixma mx892 printer manual
- canon pixma mx892 printer refurbished
- canon pixma mx892 printer reviews
- canon pixma mx892 printer software
- canon pixma mx892 printers
- canon pixma mx892 printhead
- canon pixma mx892 printhead replacement
- canon pixma mx892 printing blank pages
- canon pixma mx892 prints blank
- canon pixma mx892 problems
- canon pixma mx892 refurbished
- canon pixma mx892 review
- canon pixma mx892 review cnet
- canon pixma mx892 reviews
- canon pixma mx892 scan to email
- canon pixma mx892 scan to pdf
- canon pixma mx892 scanner
- canon pixma mx892 scanner driver
- canon pixma mx892 scanner setup
- canon pixma mx892 setup
- canon pixma mx892 software
- canon pixma mx892 software download
- canon pixma mx892 specifications
- canon pixma mx892 staples
- canon pixma mx892 troubleshooting
- canon pixma mx892 u052 error
- canon pixma mx892 user guide
- canon pixma mx892 user manual
- canon pixma mx892 user's manual
- canon pixma mx892 will not turn on
- canon pixma mx892 windows 8 driver
- canon pixma mx892 wireless
- canon pixma mx892 wireless error message b200
- canon pixma mx892 wireless printer
- canon pixma mx892 wireless reviews
- canon pixma mx892 wireless setup
- canon pixma mx892 won't print any colors
- canon pixma mx892 won't turn on
- canon pixmamx892
- canon pixmamx892 manual
- canon printer pixma mx892
- ink for canon pixma mx892
- ink for pixma mx892
- manual pixma mx892
- pixma mx 892 driver
- pixma mx882
- pixma mx882 airprint
- pixma mx882 driver
- pixma mx882 drivers
- pixma mx882 ink
- pixma mx882 ink cartridges
- pixma mx882 instruction manual
- pixma mx882 manual
- pixma mx882 printer
- pixma mx882 printer driver
- pixma mx882 troubleshooting
- pixma mx882 user manual
- pixma mx882 wireless
- pixma mx892
- pixma mx892 airprint
- pixma mx892 airprint setup
- pixma mx892 all in one printer
- pixma mx892 all-in-one inkjet printer
- pixma mx892 amazon
- pixma mx892 availability
- pixma mx892 b200
- pixma mx892 b200 error
- pixma mx892 best buy
- pixma mx892 best price
- pixma mx892 bluetooth
- pixma mx892 canada
- pixma mx892 cartridge
- pixma mx892 cartridges
- pixma mx892 change ink
- pixma mx892 continuous ink
- pixma mx892 costco
- pixma mx892 download
- pixma mx892 driver
- pixma mx892 driver download
- pixma mx892 driver for mac
- pixma mx892 driver windows 8
- pixma mx892 drivers
- pixma mx892 error
- pixma mx892 error 5100
- pixma mx892 error 6000
- pixma mx892 error 6901
- pixma mx892 error b200
- pixma mx892 error c000
- pixma mx892 error code b200
- pixma mx892 error u052
- pixma mx892 error u052 resetting
- pixma mx892 factory reset
- pixma mx892 fax setup
- pixma mx892 for sale
- pixma mx892 how to change ink
- pixma mx892 how to fax
- pixma mx892 ink
- pixma mx892 ink cartridge
- pixma mx892 ink cartridges
- pixma mx892 ink cartridges chipped
- pixma mx892 ink refill
- pixma mx892 instruction manual
- pixma mx892 load paper
- pixma mx892 lowest price
- pixma mx892 mac
- pixma mx892 mac address
- pixma mx892 manual
- pixma mx892 manual pdf
- pixma mx892 network ready wireless all in one printer
- pixma mx892 no power
- pixma mx892 not printing
- pixma mx892 oem 4-color ink combo pack
- pixma mx892 office all-in-one inkjet printers
- pixma mx892 office depot
- pixma mx892 offline
- pixma mx892 operators manual
- pixma mx892 owner's manual
- pixma mx892 owners manual
- pixma mx892 parts
- pixma mx892 photo printing
- pixma mx892 power supply
- pixma mx892 price
- pixma mx892 print head
- pixma mx892 print head replacement
- pixma mx892 printer
- pixma mx892 printer driver
- pixma mx892 printer driver download
- pixma mx892 printer drivers
- pixma mx892 printer error b200
- pixma mx892 printer head
- pixma mx892 printer manual
- pixma mx892 printer refurbished
- pixma mx892 printer reviews
- pixma mx892 printer software
- pixma mx892 printers
- pixma mx892 printhead
- pixma mx892 printhead replacement
- pixma mx892 printing blank pages
- pixma mx892 prints blank
- pixma mx892 prints blank pages
- pixma mx892 problem
- pixma mx892 problems
- pixma mx892 product review
- pixma mx892 refurbished
- pixma mx892 release
- pixma mx892 reset
- pixma mx892 review
- pixma mx892 review cnet
- pixma mx892 reviews
- pixma mx892 scan resolution
- pixma mx892 scan to email
- pixma mx892 scan to pdf
- pixma mx892 scanner
- pixma mx892 scanner driver
- pixma mx892 scanner setup
- pixma mx892 scanning
- pixma mx892 serial number location
- pixma mx892 service manual
- pixma mx892 setup
- pixma mx892 software
- pixma mx892 software download
- pixma mx892 software windows 8
- pixma mx892 specifications
- pixma mx892 specs
- pixma mx892 staples
- pixma mx892 toner
- pixma mx892 troubleshooting
- pixma mx892 u052
- pixma mx892 u052 error
- pixma mx892 uk
- pixma mx892 user guide
- pixma mx892 user guides
- pixma mx892 user manual
- pixma mx892 user's manual
- pixma mx892 will not turn on
- pixma mx892 windows 8
- pixma mx892 windows 8 driver
- pixma mx892 wireless
- pixma mx892 wireless all-in-one
- pixma mx892 wireless error message b200
- pixma mx892 wireless inkjet office all-in-one
- pixma mx892 wireless office all-in-one
- pixma mx892 wireless printer
- pixma mx892 wireless review
- pixma mx892 wireless reviews
- pixma mx892 wireless setup
- pixma mx892 won't print any colors
- pixma mx892 won't turn on